Saturday, 31 August 2019

Databases in DevOps - Introduction

Case
I want my Data Warehouse databases in Azure DevOps just like my ETL projects and use Contunious Integration (CI) and Continuous Deliver (CD) for multiple environments. How do you do that?
SQL Database in DevOps


Solution
If you read a couple of forums and blogs about this subject then you will probably notice that 'all roads lead to Rome'. In this blog series we will explain our approach, but feel free to deviate.

Just for the record. With Continuous Integration (CI) we mean merging the code of all developers and building the project to check whether everything still works. Continuous Deliver will orchestrate the  deployment of the package created by CI through out the DTAP environment in an automated manner to reduce costs, but speed up the release proces.

For this example we work with four environments each with its own Azure SQL database: Development, Test, Acceptance and Production. The Development database is a shared database where all developers do there coding.

The database changes since the last compare will be pushed to a Visual Studio Database project. Which on its turn will be committed to Git. After that the project will be build in DevOps and then deployed through all environments.
DTAP environments


Note: This approach with a single shared development database only works for smaller teams or when the database work can be separated to avoid conflicts. The alternative is to give each developer their own local development database. This will take a little more syncing and merging effort though.

1) Visual Studio Database project
First, you either need Visual Studio 2017 or 2019. You have three options:
  1. SSDT standalone installer. This is Visual Studio 2017 with only the BI and DB project templates.
  2. Visual Studio 2017 (Community Edition is free). During installation locate Data storage and processing and select SQL Server Data Tools. Finding a download without an MSDN license is a bit tricky since 2019 is the current version
  3. Visual Studio 2019 (Community Edition is free). During installation locate Data storage and processing and select SQL Server Data Tools.

Data Storage and processing - SQL Server Data Tools


After installing you will find the SQL Server Database Project under SQL Server when you create a new project.
Create new Database Project


2) Import or Schema compare
Now that we have an empty database project we need to add the database items from our development database to this new project. You can either do an import of the database or do a Schema Compare between the database and the project.

When importing a new database you only have couple of options like not importing referenced logins or the folder structure. I would suggest not to import any logins because the are probably different on all environments. As folder structure I recommend Schema\Object Type because I think this is the clearest structure. Note that you can do an import only once.
Import Database


The second option is to do a schema compare which gives you much more options for tuning the synchronization. The best feature is that you can repeat this any time you like to update the Visual Studio Project.

Right click the project and choose Schema Compare... Then make sure the source database is on the left side and the Visual Studio project on the right side. Click on the options/settings icon to tune the comparison. In this case we will ignore users and role memberships.

Now press the compare button and review all changes especially when you work in a team. Then you probably only want your changes. Uncheck changes that are not yours or not ready to go to the next environment. By clicking on a change you can see the actual differences. Last step is to press the Update button and move all selected changes to the Visual Studio project. Before committing any changes to Git you should built your project to check if everything works.
Sql Schema Compare


Note: When working with multiple developers in a single development database you will probably encounter a couple of database changes which where not made by you. This is the point where you have to be selective on which changes you want to push to the database project.

Tip: When you have a lot of 'garbage' in your development database you could do a clean up by switching the source and target in the Sql Schema Compare and then push the update button. This will throw everything away that is not in your database project. It is probably a good idea to first create a backup.

3) Add Schema Compare to project
A great feature of the Sql Schema Compare file is that you can save it to your PC and then add it to your database project. The next time you only have to open it and click on the compare button.
Add Compare file to db project


4) Dacpac to create or update
If you built the database project in Visual Studio or DevOps it will generate a .dacpac file which can be used to create or update the next database in our DTAP environment. By default it can only update tables when they get bigger (extra columns or larger datatypes). This is to prevent loss of data. In a next post we will explain how to overcome this with Publish profiles or Pre-Deployment script.

Conclusion
In this introduction post you learned how to create a database project in Visual Studio and how to synchronize a database and a database project. In the next posts we will create a Build pipeline in DevOps to validate your committed database changes and after that we will create a Release pipeline to release your committed database changes through the DTAP environment.

A downside of database projects in Visual Studio is that it can become very slow if you have like thousands and thousands of database objects. For those very large databases (not in size, but in structure) you could also take a look at commercial database tools like those of redgate or SentryOne. However the majority of Data Warehouse databases will probably easily fit in Visual Studio Database projects.


Wednesday, 5 June 2019

Staging with the Azure Data Factory Foreach Loop

Case
When we where using SSIS we could use BIML to generate a whole bunch of staging packages for all tables in a certain database. Is there a similar solution for Data Factory where I don't have to create pipelines for all tables?
ForEach loop in Azure Data Factory


Solution
Azure Data Factory (ADF) has a For Each loop construction that you can use to loop through a set of tables. This is similar to BIML where you often create a For Each loop in C# to loop through a set of tables or files.

To keep things very simple for this example, we have two databases called Source and Stage. We already generated three tables in the Stage database that have the same structure and datatypes as in the Source database. We will empty the stage tables before filling them.

1) Create view in Stage
First we need a list of tables that we can use to loop through. For this example we used a view in the Stage database that retrieves all tables from the information schema. You can finetune this view with for example a where clause or use a filled table instead.
CREATE VIEW [dbo].[StageTables]
AS
  SELECT TABLE_SCHEMA
  ,      TABLE_NAME
  FROM   INFORMATION_SCHEMA.TABLES
  WHERE  TABLE_TYPE = 'BASE TABLE'
GO

Note: Use QUOTENAME to make deviating tablenames monkeyproof. It will add brackets around schema and table names.

2) Create Dataset for view
Now go to ADF (Author & Monitor dashboard) and create a new Dataset for the view above.
ADF - Add Dataset


Select the right Data Store (Azure SQL Server in our example) and give your dataset a suitable name like 'StageTables'. Next add a new (or select an existing) Linked service. Then select the newly created view.
ADF - New Dataset


3) Create Dataset for Source tables
Next we will create a Dataset for the tables in the Source database, but instead of pointing to a particular table we will use a Parameter called 'SourceTable'. First go to the Parameters tab and create the variable. Then return to the Connection tab where the tablename can now be filled with Dynamic Content: @dataset().SourceTable
ADF - Create Dataset with parameter


4) Create Dataset for Stage tables
Now repeat the exact same steps to create a Dataset for the Stage tables and call the Dataset 'Stage' and the Parameter 'StageTable'. The tablename can then be filled with Dynamic Content: @dataset().StageTable

5) Create Pipeline
At this point we have three Datasets (StageTables, Source and Stage) and two Linked Services (to the Source and Stage database). Now it's time to create the pipeline that exists of a Lookup (under General) and a ForEach (under Iteration & Conditionals).
ADF - Pipeline with Lookup and Foreach


6) Add Lookup
In the newly created pipeline we first need to add a Lookup activity that points to the Dataset called StageTables which points to the view. You can hit the Preview data button to check the tables.
ADF - Add Lookup


7) Add Foreach
Next step is adding a Foreach activity that loops through the result of the lookup. On the Settings tab you can provide the items you want to loop though. In our case the output of the preceding Lookup activity from the previous step: @activity('my tables').output.value
On the Activities tab we can add a new activity that we want to execute for all our staging tables. For this example only a Copy Data activity which we will configure in the next step.
ADF - Configure ForEach


Note: on the Settings tab you will also see the setting 'Batch count', this is the maximum number of parallel executions of the Copy Data Activity. If you have a lot of tables then you should probably max it with this setting!


8) Copy Data Activity
The last step is to configure the Copy Data Activity to copy the data from the Source to the Stage database. First give it a suitable name like: stage my table. Then go to the Source tab and select  'Source' (from step 3) as the Source dataset.
Because we added a parameter to this dataset, a new field called 'sourcetable' will appear. With an expression we will add the schema name and a table name from the ForEach loop construction: @concat(item().TABLE_SCHEMA,'.',item().TABLE_NAME)
Next we will repeat this for the Sink tab where we will use the Sink dataset called 'Stage'. The expression for the table name is the same as above: @concat(item().TABLE_SCHEMA,'.',item().TABLE_NAME)
ADF - Copy Data in ForEach


9) Truncate Stage
To empty the Stage tables, you could of course add a Stored Procedure Activity before the Copy Data Activity to execute a Truncate or Delete statement. However the Copy Data Activity has a Pre-copy script option on the Sink tab that you can use to execute this same statement (thx colleague David van der Velden for the idea). Add the following expression:
@concat('TRUNCATE TABLE ', item().TABLE_SCHEMA,'.',item().TABLE_NAME)
ADF - Copy Data Pre-copy script


Summary
In this post you have seen a BIML-SSIS alternative in Azure Data Factory to stage tables with the ForEach construction. If you want to stage an other table you can just add the empty table to the stage database and the ForEach will fill it automatically.


Friday, 31 May 2019

Azure - Incremental load using ADF Data Flows

Case
Recently Microsoft introduced a new feature for Azure Data Factory (ADF) called Mapping Data Flows. This allows you to do data transformations without writing and maintaining code. Similar to SSIS, but then in the Cloud. How can we use Mapping Data Flows to build an incremental load?


Solution
First, it is good to know that Mapping Data Flows is not the only feature that is part of "Data Flows". Microsoft announced also Wrangling Data Flows. The main difference between these two features is that Mapping Data Flows is more traditional "ETL" with a known source and destination, while Wrangling Data Flows is suited for preparing data and store this dataset in Azure Data Lake for example. From here, it can be used as input for Machine Learning or doing transformations later on. Currently it is in Limited Private Preview. In a future post we will explain more about Wrangling Data Flows and show you how it actually works.

In this post we are going to set up an incremental load for a Data Warehouse (DWH) scenario using Mapping Data Flows. We want to load our Staging layer incremental. We use a so-called Watermark for this. An example of a watermark is a column that contains the last modified time or id. We already configured an Azure Data Factory and we are using an Azure SQL Database with sample data from WideWorldImporters. We use the "Orders" table.

Note:
Here you will find an tutorial of an incremental load using an ADF pipeline with several activities.

1) Create table for watermark(s)
First we create a table that stores the watermark values of all the tables that are suited for an incremental load. The table contains the following columns:

--Create Watermark table
CREATE TABLE [dbo].[WatermarkTable](
 [WatermarkTableName] [nvarchar](255) NULL
, [WatermarkColumn] [nvarchar](255) NULL
, [WatermarkValue] [nvarchar](255) NULL
) ON [PRIMARY]
GO

2) Fill watermark table
Add the appropriate table, column and value to the watermark table. The value must be the last loaded date or id. This is a one-time insert, because after this the watermark value will be updated after each load. In our case the table contains the following record:

Azure SQL Database - Watermark value for Orders

3) Create Linked Service
Before we can start building the Data Flow, we first have to make a connection with our database. Go to Connections and click on 'New'. Select Azure SQL Database and give it a suitable name. Select your Azure subscription and then select the correct server, database and fill in the credentials.

Azure Data Factory - Create Linked Service


4) Create Data Flow
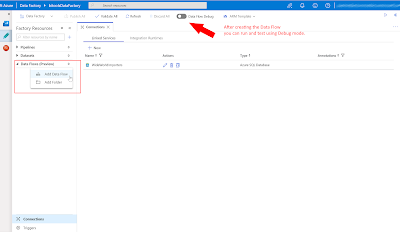
Now lets build the Data Flow itself. Click on Add Data Flow and give it a suitable name. Important to know is that you can test your Data Flow components by turning on the Data Flow Debug mode. Be aware of the costs, because it will spin up a Databricks cluster and that is hourly billed. More information about the debug mode here.

Azure Data Factory - Create Data Flow


Note:
After creating the Data Flow, we can only save it by adding at least one source and one sink.

The goal of this Data Flow is to include only data from the source table / query that is greater then the watermark value that is stored from the previous load. Below we will explain each component of this flow individually.

Source 1: source table / query
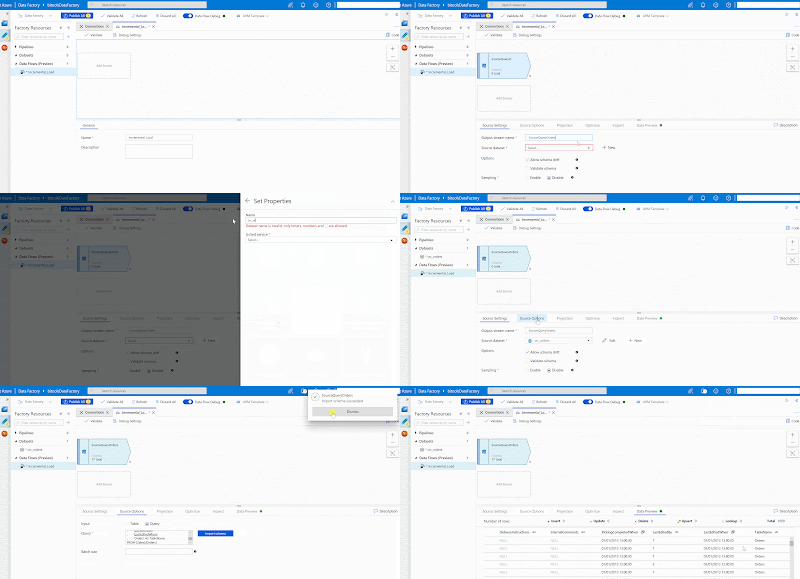
In this Data Flow the first source is the source table / query. Click on "Add Source", give it a suitable name and click on new "Source dataset". Select "Azure SQL Database" and select the Linked Service we created earlier. Now go back to the source and click on "Source Options". Select "Query" and write the query. Click on "Import Schema" and at last we can preview our data. We have turned on the Debug mode to import the schema and preview the data.

Azure Data Factory - Add Source in Data Flows


We used the following query. As you can see, we added a column that contains the table name from which we want to retrieve the watermark value.

--Create source query
SELECT
 [OrderID]
, [CustomerID]
, [SalespersonPersonID]
, [PickedByPersonID]
, [ContactPersonID]
, [BackorderOrderID]
, [OrderDate]
, [ExpectedDeliveryDate]
, [CustomerPurchaseOrderNumber]
, [IsUndersupplyBackordered]
, [Comments]
, [DeliveryInstructions]
, [InternalComments]
, [PickingCompletedWhen]
, [LastEditedBy]
, [LastEditedWhen]
, 'Orders' AS TableName
FROM [Sales].[Orders]

Source 2: watermark table
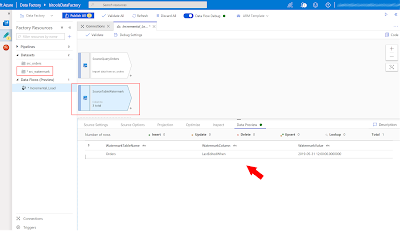
This source contains a simple query of the watermark table. The setup is the same as source 1, only with a different query. Later on we will make sure we only select the watermark value from the correct table in the watermark table (with a Join).

--Create watermark table query
SELECT 
 [WatermarkTableName]
, [WatermarkColumn]
, [WatermarkValue]
FROM [dbo].[WatermarkTable]

Azure Data Factory - Source WatermarkTable


Derived Column
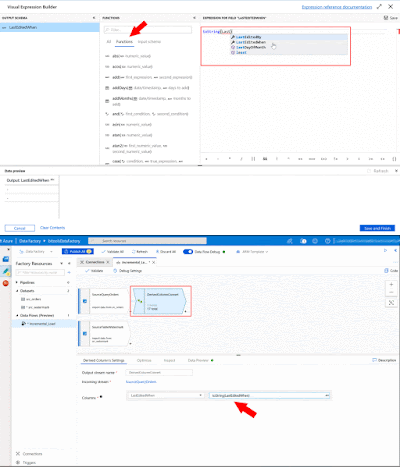
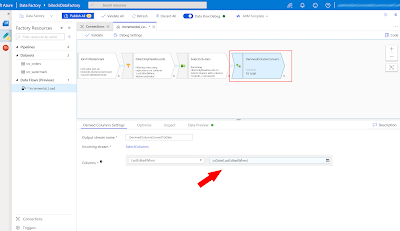
It can occur that the watermark values has different datatypes. That is why we use the 'nvarchar' datatype to store the values. In this case the watermark is a 'datetime' and we have to convert this to make a successful join to the watermark table. We use the expression language of Mapping Data Flow for this, more information here.

Azure Data Factory - Use Mapping Data Flow expression language


Join
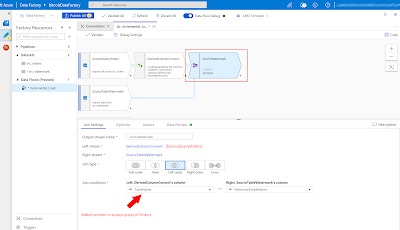
We use a join to combine data from different sources. We can choose between 'Full outer', 'Inner', 'Left outer', 'Right outer' or a 'Cross' join. Here we want to make sure that the watermark value of the specific table is used for the incremental load. We use a 'Left outer', but you can also use a 'Inner' here because all the records contain the same table. A join on watermark table is more future proof, because a join on the watermark column is not going to work when you have multiple watermark tables with the same watermark column name.

Azure Data Factory - Use Join component


Filter
Because you can only use the "Join" component with two columns that are equal to each other, we use "Filter" to include only the records where the watermark value from the source table / query is greater then the latest watermark value.

Azure Data Factory - Filter out old records


Select
In SSIS you can map the columns from source to destination in the destination. If you do not want to load a column, you do not map it. Here we have to use the "Select" component to select the relevant columns. Thank you Ronny Albouts for mention this.

Azure Data Factory - Map or unmap columns


Derived Column 2
Before we choose the destination, we will convert the column"LastEditedWhen" back to a date using a new "Derived Column" component. Otherwise we cannot map this column with the 'Orders_Incremental' table, because we use the original table definition of 'Orders' and here the datatype is a date (time).

Azure Data Factory - Convert back to date before Sink


Sink
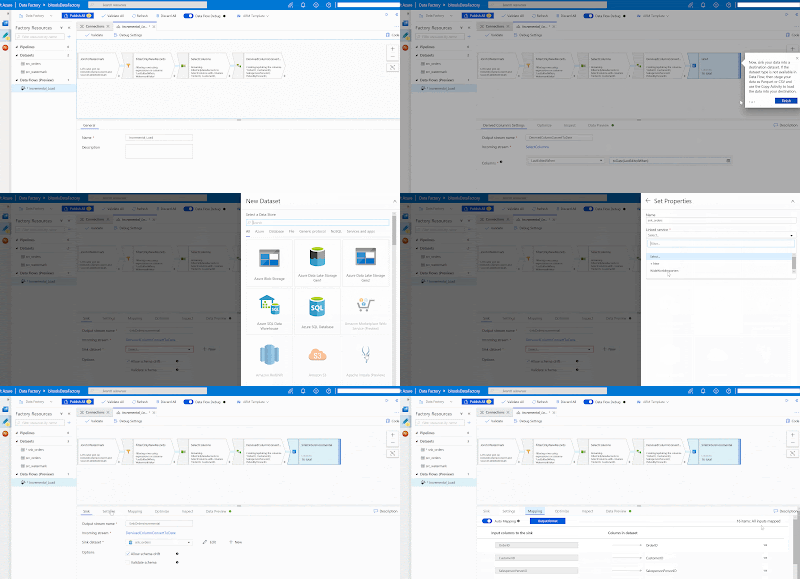
In ADF a destination is called "Sink". Here we will select our destination table called "Orders_Incremental". The table definition is the same as "Orders". Create the Sink dataset and automatically the columns will map. You can turn off 'Auto Mapping' to make manual changes.

Azure Data Factory - Add Sink in Data Flows


Note:
If the destination type is not available, you can store the data into CSV format or Blob Storage and use a Copy Activity to load the data in your preferred destination.

Result
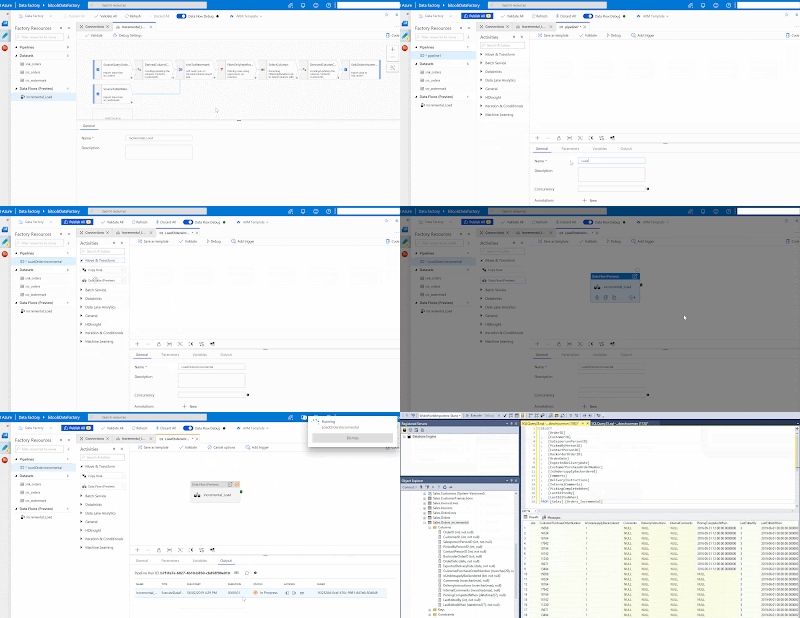
After the Data Flow is ready, go back to "Pipelines" and create a new one. In here we will select the Data Flow activity and select the Data Flow we have created earlier. Now run the pipeline and let's take a look at the result, it is working!

SQL Server Management Studio - Result of Incremental Load

Note:
To make it as generic as possible, it is prefered to use the "Derived Column" component to add a new column (similar to SSIS). In this way you will keep the source query 'clean'. Unfortunately this is not working at the moment and Microsoft is investigating this issue.

Update Watermark
At last we have to update the watermark value to the last known value, in this case the date of "LastEditedWhen". Therefore we will use the following simple Stored Procedure.

/* Create Stored Procedure */
CREATE PROCEDURE [dbo].[usp_UpdateWatermark] 
 @tableName nvarchar(255)

AS

BEGIN

 DECLARE 
 /* ============= Variables ============= */
  @watermarkValue  nvarchar(255) 

 /* Determine latest Watermark value from input table */
 SELECT 
  @watermarkValue = MAX([LastEditedWhen]) 
 FROM [Sales].[Orders_Incremental] AS T

 /* Update Watermark table */
 UPDATE [dbo].[WatermarkTable]
 SET  [WatermarkValue]  = @watermarkValue 
 WHERE [WatermarkTableName] = @tableName

END
GO

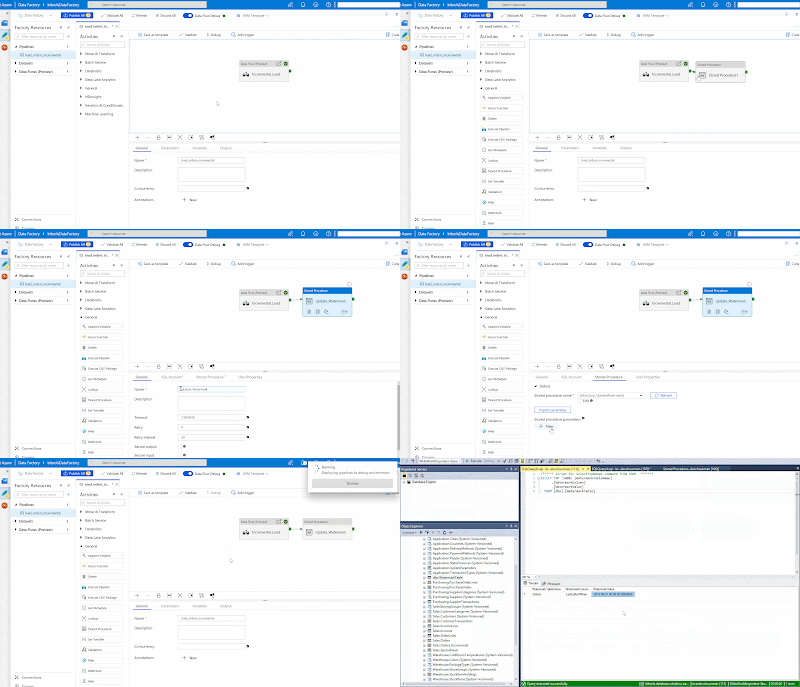
Add the Stored Procedure activity at the end of the pipeline. The result should look like this.

Azure Data Factory - Update Watermark using SP


As you can see the T-SQL is hard coded. In a next post we will show you how to setup a dynamic pipeline so that you can reuse the Stored Procedure activity for every table in an Incremental Load batch.

Conclusion
In this post we showed you how to create an incremental load scenario for your Data Warehouse using Mapping Data Flows inside Azure Data Factory. With Mapping Data Flows, you can transform and clean up your data like a traditional ETL tool (SSIS).

This is just the beginning of Mapping Data Flows, we will expect more and more functions to make this grow into the new "SSIS in the cloud".

Friday, 29 March 2019

Azure - Reuse Power BI dataflows

Case
Microsoft recently introduced Power BI dataflows for self-service ETL or data preparation. It uses an Azure Data Lake Storage (ADLS), which is only visible to Power BI, to store the metadata and result of the dataflows. However, you can also bring your own storage account. How does that work and why would you want that?

Bring Your Own Storage in preview

Solution
As we mentioned earlier in our previous post, Power BI dataflows can be seen as a self-service data preparation tool. It is easy accessible, so that other people in your organization (besides IT) can get started with transforming and maintaining the data. Nowadays there are often several people / business analysts in a department who are maintaining Excel files. With Power BI dataflows you can centralize this process and contribute to the ideology of "one version of the truth".

When you bring your own ADLS Gen2 storage account (StorageV2) for Power BI dataflows, other services like Azure Data Factory or Azure Databricks could use that same data. This makes it possible to do light weight data preparations with an user-friendly tool for corporate data warehousing or data science. However Power BI dataflows does not (yet?) replace SSIS, Azure Data Factory or any other ETL tool. They could even write back data to the data lake to create 'external' dataflows that are not maintained in Power BI.

Configure and connect to your own storage account
First you have to create an ADLS Gen2 storage account. Make sure the storage account is on the same region as the Power BI tenant. Click here for the documentation of Microsoft that explains step by step how to create such account.

Next, execute the following steps to make a connection with your own storage account. Note that the last step is a one-time action that cannot be changed afterwards.

It requires the following permissions to make a connection:
  • Role "Owner" in the Azure Subscription (service administrator / classic administrator) to add an ADLS Gen2 storage account. This is also required to give the Power BI Service access to the storage account and Blob Container. 
  • Global Administrator in O365 or Azure Active Directory to connect your ADLS Gen2 storage account with dataflows. This has to be done in the Power BI admin portal. The role Power BI Service Administrator is not sufficient to perform those actions.

Power BI Service - Successfully connected to your own ADLS Gen2 storage account


Result
To actual store the dataflow definition and the related data files in your ADLS Gen2 storage account, you must create a new Power BI app workspace or update an existing one. In case of an update, make sure you do not already have dataflows stored in the workspace. Otherwise you cannot change this.

In this case we created a new workspace. Turn on Dataflow storage (preview) under "Advanced" settings. In this case we built the same (simple) dataflow as our previous post. Save your dataflow and click "Refresh".

Azure Storage Explorer
When the dataflow is refreshed, go to the Blob container you created earlier for your ADLS Gen2 storage account. Here you will find the definition (source code) of the dataflow and the output. Note that the content of the ADLS Gen2 storage account is only visible in Azure Storage Explorer. Click here to download.

Azure Data Explorer - Result in own ADLS Gen2 storage account


And now you can choose per workspace whether you want to use this new Data Lake. This only works for the new workspaces, that are at the moment also still in preview.
Power BI Workspace settings


Common errors
When you try to connect to your own storage account in the admin portal of the Power BI Service, you can get several errors.

You must have global administrator permissions
Only Global Administrators in Office 365 or Azure Active Directory are administrators in Power BI and therefore able to connect to the storage account. Click here for more information about administrator roles in Power BI.


There was a problem accessing your dataflow storage account
After creating your storage account , it can take up to 30 minutes to make a connection. Also make sure you avoid spelling mistakes.

Your storage account must be in the same Azure Active Directory tenant
This occurs for example when you are trying to make a connection with the ADLS storage account in the Power BI Service with an account outside the organization. In this case, the organization (subscription) is where the storage account is created.


Conclusion
In this post we showed you how to use your own Azure Data Lake Storage account instead of the default provided by Power BI using dataflows. This new feature has several possible use cases. For example:
  1. Data preparation for 'corporate' data warehousing by a business user with a user-friendly tool
  2. Data preparation for 'corporate' data science by a business user with a user-friendly tool
  3. Creating 'external' dataflows for Power BI with Azure Services like Data Factory or Databricks
  4. Using data from other CDM-compliant applications like Dynamics 365 and Office 365

We hope Microsoft will make it a bit easier to bring your own storage, because at the moment there are a lot of steps to take and you need a lot of rights to do it. This discourages to arrange this powerful option.

We also expect some more admin capabilities in Power BI, because at this moment you cannot change your dataflow storage once Power BI is connected to your own ADLS account (so be very careful). And for larger corporations one ADLS account is probably not enough. It is also expected that the integration and collaboration with other Azure services will be improved so that you are even more flexible in choosing the services in your BI landscape.

Saturday, 23 March 2019

Power Apps Snack: Refresh Power BI (automatically)

Case
A while ago we blogged about the integration of PowerApps and Power BI. This allows you to change data from within your Power BI report! One downside was that you still had to refresh the Power BI data manually (or by using the API and Flow). How can you automate the refresh?
The new PowerApps Visualization in Power BI


Solution
Microsoft recently updated PowerApps with the ability to refresh Power BI. Now you can add the refresh command PowerBIIntegration.Refresh() right after your SubmitForm or Patch command. That is all!
PowerBIIntegration.Refresh()


Note: For me it didn't work for existing PowerApps. I had to create a new PowerApp to get the refresh option available. We will follow up on that.
Update 25-03-2019: The Refresh() function gets added to PowerApps from the visual on creation. Therefore it will not be available for existing PowerApps. The workaround for now is creating a new app and then copy and paste the items from the existing app. Please upvote this uservoice request.

Refresh without clicking on the Refresh button in Power BI


Summary
Finally we have an even better integration of PowerApps and Power BI. No more clicking on refresh buttons. Also note the new PowerApps Visualization in Power BI. It got a total makeover with some handy explanations about the integration of both tools. See the top picture. Also see this link for more PowerApps updates