Showing posts with label ADF. Show all posts

Wednesday 28 June 2023

Synapse and ADF Pipeline snack - Disable Activity

Case
Something that we already had in SSIS, but was never implemented in Data Factory or Synapse... until now! You can disable Pipeline activities with Activity State (in preview at the moment of writing)
Disabling Pipeline Activities!


Solution
In each activity (ADF and Synapse) you now have the option to change the state of an Activity from Active to Inactive and after that you can provice the end status that should be used when running this activity in the pipeline: Skipped, Succeeded or Failed.
Mark activity as Skipped, Succeeded or Failed


This is extremly useful for debugging and testing parts of your pipeline. You can set it in the properties, but even more simpel is just right clicking the activity (just like in SSIS ♥).
Right click to change activity state


An other great scenario is that you can now disable an activity that is not yet ready and validate the pipeline without getting any errors that required fields are not yet provided. Validating just ignores the disabled activities.

Validating ignores disabled activities


Conclusion
It only took almost 6 years, but this seemingly simple feature could be very useful. It is still in preview but available in Data Factory and Synapse pipelines.

Disable multiple activities at the same time


Wednesday 5 April 2023

Synapse snack - Increment counter variable

Case
I want to increment a variable to count some actions. For example to break a until loop after 4 times. What is the Synapse (or ADF) equivalent of counter++ or counter = counter + 1 because you can not self reference in a variable expression.
The expression contains self referencing variable.
A variable cannot reference itself in the expression.


Solution
Unfortunately you can not self reference a variable in an expression of a Set variable activity. If you want to increment a variable called Counter then you can't use an expresion like this:
@add(int(variables('Counter')), 1)
1) Add extra variable
The trick is to use two variables (and two Set Variable activities). In this example we have besides the Counter variable also a second 'helper' variable called NewCounterValue. The type is String for both since there isn't an integer type available.
Two variables to increment a variable value


2) Add first Set variable
Now add two Set variable activities to the canvas of your pipeline. In this case inside an UNTIL loop. The first activity will set the value of the helper variable called NewCounterValue. It retrieves the value of the original Counter variable, converts it to an Integer and then adds 1. After that it is converted back to a String:
@string(
    add(
        int(variables('Counter')),
        1
    )
)
Increment variable part 1


3) Add second Set variable
The second activity just retrieves the value of the new helper variable and uses it to set the value of the Counter variable. No need to cast the variable to an other type.
Increment variable part 2


4) Until loop
Now lets test it in an until loop where it stops the until loop after 4 times.
The Until loop


The Until loop in action


Conclusions
In this post we showed you how to overcome a little shortcoming in Synapse and ADF. It's a handy contruction to do something max X times. For example checking the status max 4 times. The Until stops whenever the status changes or when the retry counter is 4 or higher.
@or(
    greaterOrEquals(int(variables('Counter')),4)
,   not(equals(activity('WEB_Check_Status').output.status,'PENDING'))
)
Case Example for retry


Sunday 5 March 2023

Synapse snack - Get child pipeline value to parent

Case
We can pass values from the parent pipeline to the child pipeline via parameters, but how do we get return values from the child pipeline to the parent pipeline?
Pipeline return value


Solution
In the past we used a Webhook activity to call a child pipeline via the Rest API and then we can use a Web activity in the child pipeline to return a value via the callbackuri. This workaround was way to complex and you end up with to different executions that are not related to each other.

Last month Microsoft introduced for both Synapse Worksapce and Azure Data Factory, the new Pipeline return value option in the Set variable activity. This allows you to return one or more HARDCODED values to the child pipeline.

1) Child pipeline - Set Variable
First we need to create a child pipe that we will be calling from a parant pipeline in the next step. The only required activity is the Set Variable activity
  • So first create a new pipeline. We called it PL_Child
  • Add a Set Variable activity to the canvas of your child pipeline. Ours is called Return Value
  • In the Settings tab of the activity set the Variable type to Pipeline return value (preview)
  • Now you can create a new string variable with a hardcoded return value. For expressions you need to change the type to for example Expression. Note that compared to pipeline variables you have way more types to choose from.
Return value


Note that this is not an existing pipeline variable so other activities cannot change its value. Also note that the Value field cannot be overruled with an expression. So only hardcode values.

2) Parent pipeline - Execute Pipeline
Now we need the parent pipeline that will be calling the child pipeline to get the return value.
  • Create a new pipeline. Ours is called PL_Parent
  • Add a Execute Pipeline activity to the canvas of your new pipeline
  • Set it to execute the Child pipeline of step 1
  • Make sure the Wait on completion is checked!
Execute Pipeline to retrieve return value


Note that if you execute this parent pipeline that you won't see the return value in the Output window. This means we need an other activity to see that return value.
Output with no visible return value


3) Get return value
To get the return value you can use an expression with a pipelineReturnValue after the output of your Execute Pipeline activity followed by the name of your return value: @activity('EPL_GetAnswer').output.pipelineReturnValue.MyAnswer

In this example we will store the return value in a pipeline variable. Note that if you used anything else than String, Boolean or Array that you need to add a type conversion in the expression:
@string(activity('EPL_GetAnswer').output.pipelineReturnValue.MyAnswer)
Read return value from output


Output showing return value


Note that you cannot have multiple Set Variable activities running and all returning values (even if they use different names). Then it will only return one of those causing an error in your expression. You can have mulitple Set Variable activities returning values if you put them in for example an if construction so that only one will run.


Conclusions
In this little snack you learn about the new preview(!) feature in ADF and Synapase to return values from the child to the parent pipeline. A very nice new feature that we were waiting for al long time, it could use some small improvements like the expressions (why do we need an expression type?) and an option to see the output of the Execute pipeline activity.


Monday 13 February 2023

Show dataset parameters in Azure Synapse Dataflow

Case
I have a parameterized dataset. The parameter is showing in the pipeline's Copy Data Activity, but it's not showing in the Synappse (or ADF) dataflow under source or sink. When going the the Data preview it shows me an error message: No value provided for Parameter 'MyFileName'.
No value provided for Parameter 'abc'


Solution
You added a parameter to your dataset so you can for example use it in a foreach construction in your pipeline.
Dataset with parameter


In your pipeline's Copy Data Activity you can see the dataset parameter as soon as you select your dataset with the parameter.
Parameter showing in Copy Data Activity


However when you select that same dataset as a source (or sink) you won't see the parameter appearing in the editor. On this screen there is no way to provide the parameter and when you debug the source you will get an error stating that you need to provide a value for that parameter: No value provided for Parameter 'MyFileName'.
Dataset selected, but no parameter


The first option is to provide a default value for your dataset parameter in the dataset itself. Now you won't get that error. This is perhaps in some cases suitable, but for most cases it isn't.
Default value for parameter in dataset


Now go to your pipeline and add a Dataflow Activity for your Dataflow. You will see the Parameter appear in the settings tab (not in the Parameters tab which is for Dataflow parameters only). This is handy for when you when want to debug the Pipeline and Dataflow at the same time, but not for when you just want to debug your Dataflow to see the data preview.

Parameter is back again


Now go to your Dataflow and click on Debug Settings. Whitin the Debug Settings go to the Parameters tab. Find your source under Dataset parameters and provide a value for debugging.
Provide Value for parameter in Dataflow Debug Settings


Go to your source (or sink) in the Dataflow and then go to Data preview to see the actual data.
There is data in our preview


Conclusion
In this post you learned how to debug your Dataflow when using a parameterized Dataset. Compared to other parts of Synapse (or ADF) it would probably make more sense to first create a Dataflow Parameter (with a default value for debugging). Then show the Dataset Parameter it in the Source (or Sink) settings page where you override it with the Dataflow Parameter.

Sunday 18 December 2022

ADF Snack - Global parameters deployment resets Networking settings

Case
After deployment of Azure Data Factory (ADF) via Azure DevOps pipelines, I noticed that the Network Access settings has been changed from "Private endpoint" to "Public endpoint". How can we prevent this overwrite during deployment?

Azure portal - Networking settings of ADF


Solution
For this we need to make use of the new mechanism to include global parameters in your ARM template, instead of the old mechanism via de GUI ('Manage' - 'Author' - 'Global Parameters'). 

ADF portal - Old mechanism to include global parameters


Another solution that is part of the old mechanism, this PowerShell script, has already been updated and includes now the following code that is necessary to fix this.
Set-AzDataFactoryV2 -InputObject $dataFactory -Force -PublicNetworkAccess $dataFactory.PublicNetworkAccess
1) Include global parameters in ARM template
The first step is to include the global parameters on a different place then in the past. Go to "Manage", then "Source control" and click on "ARM template". Check the box to include the parameters.


ADF portal - New mechanism to include global parameters


2) Edit parameter configuration
Next we need to add some additional code to the ARM template parameter definition file. The location where to include the global parameters has changed. 
"Microsoft.DataFactory/factories/globalparameters": {
     "properties": {
             "*": { 
                 "value": "=" 
             }
     }
},
The file will now look like something like this. You can remove the old global parameter configuration "Microsoft.DataFactory/factories" if you want, but for now I keep this to show the difference.

ADF portal - Result of edit parameter configuration


Click here for more information and the current default parameterization template.

3) Change release pipeline
If you are using YAML to publish the changes, the only thing you have to edit is the overrideParameters property for the following task:
AzureResourceManagerTemplateDeployment@3.

Search the following part of your global parameters code.
dataFactory_properties_globalParameters_
Replace this with the following code.
default_properties_
This part of your code will now look like something like this.
overrideParameters: > 
  -default_properties_GP_AzureSynapseServerName_value $(AzureSqlDedicatedPoolServerName) 
  -default_properties_GP_AzureSynapseDatabaseName_value $(AzureSqlDedicatedPoolName) 
  -default_properties_GP_AzureResourceGroupName_value $(AzureResourceGroupName) 
  -default_properties_GP_AzureSubscriptionId_value $(AzureSubscriptionId) 
  -default_properties_GP_AzureKeyvaultSecretsURL_value $(AzureKeyVaultUrl) 

Conclusion
In this post you learned how to use the new mechanism to include global parameters in your ARM template for Azure Data Factory. Besides resolving the issue where the endpoint settings has been changed after a deployment, it will also be a future proof solution. For now Microsoft continue the support of the old mechanism, but the question (as always) is for how long.

Sunday 31 July 2022

Skipped dependency between pipeline activities

Case
Where is the Skipped dependency between ADF or Synapse pipeline activities useful for?
Skipped dependency


Solution
The Skipped dependency will execute the next activity if the previous activity is not executed. For example because the activity before that previous activity failed.

You could for example use this to create a general event handler for the entire pipeline by connecting the end of each 'line' to a dummy activity and then to an event handler or notification activity. The dummy activity is required because it will be skipped if anything fails. The (1 sec) Wait activity is probably the easiest to use.
If something fails the Web activity will execute


If any of these activities above fails then the 'Dummy' Wait activity will not be executed and as a result the Web activity with the Skipped dependency will be executed. If all activities are succesful then the 'Dummy' Wait activity will be executed, but the Web activity won't .

Conclusion
In this post you learned one of the usages of the Skipped dependency, but please post your usage of the Skipped dependency in the comments below.

Note that it will wait for all 'lines' to be finished before the Dummy activity is skipped. So if Stored Procedure 1 fails then the Dummy activity still needs to wait for Stored Procedure 2, 3 and 4 to be ready (failed or succeeded). This is because the dependencies is ADF are a logial AND (in SSIS you could also change it to be a logical OR).


Wednesday 8 June 2022

Break or stop ForEach loop in ADF and Synapse

Case
I have a pipeline with a parallel Foreach loop to execute for example multiple Stored Procedures, but if one of those fails I want to stop the Foreach executing more Stored Procedures. Can I break the Foreach loop in case of an error without turning it from parallel into sequential? 
Can you stop a ForEach Loop? Nope!


Solution
You can't stop the foreach loop itself on error, but if an iteration fails then you can cancel the entire pipeline that is running the foreach loop. When the pipeline is running it gets a RUN ID and you can use that to call a Rest API to cancel the current pipeline run if one of the Stored Procedures inside the ForEach fails.
Cancel the entire pipeline


1) Give ADF/Synapse access to its own Rest APIs
To use the Rest APIs of ADF or Synapse within a pipeline you first need to give ADF or Synapse access to its own Rest APIs. This can be done in the Azure Portal on the overview page of the service.
  • Open the Azure Portal in your browser and go to the overview page of your Data Factory or Synapse Workspace.
  • In the left menu click on Access control (IAM)
  • Click on +Add and then choose Add role assignment
  • Select the role Contributor or for ADF Data Factory Contributor and click on Next
  • Under Assign access to select Manged identity
  • Under Members click on +Select members
  • Now you need to select Synapse workspace or Data Factory (V2) and search for your ADF or Synapse
  • Click on your Synapse or ADF and click on the Select button
  • Optionally enter a description: "Give ADF/Synapse access to its own Rest APIs"
  • Click on the Review + assign button (twice) 
The animated GIF is from a Synapse workspace, but it is identical to Data Factory. Just select Data Factory as Managed identity type.
Giving Synapse access to its own Rest APIs


2) Add Web Activity in Foreach on fail
In the ForEach loop construction we need to add a Web Activity to call the Rest API that cancels the Pipeline run. Data Factory and Synapse have a different URL to cancel the pipeline. Within the example URL you need to replace the red parts with the curly brackets by either a hard code value, a parameter or a System Variable. For Data Factory and Synapse you can use the same System Variabes to retrieve the factoryName/workspaceName and the runId: pipeline().DataFactory / pipeline().RunId

Azure Data Factory:
https://management.azure.com/subscriptions/{subscriptionId}/resourceGroups/{resourceGroupName}/providers/Microsoft.DataFactory/factories/{factoryName}/pipelineruns/{runId}/cancel?api-version=2018-06-01

@concat('https://management.azure.com/subscriptions/',
pipeline().parameters.subscriptionId
'/resourceGroups/',
pipeline().parameters.resourceGroup,
'/providers/Microsoft.DataFactory/factories/',
pipeline().DataFactory,
'/pipelineruns/',
pipeline().RunId,
'/cancel?api-version=2018-06-01')

Azure Synapse Workspace
{endpoint}/pipelineruns/{runId}/cancel?api-version=2020-12-01

or a little easier:
https://{workspaceName}.dev.azuresynapse.net/pipelineruns/{runId}/cancel?api-version=2020-12-01

@concat('https://',
pipeline().DataFactory,
'.dev.azuresynapse.net/pipelineruns/',
pipeline().RunId,
'/cancel?api-version=2020-12-01')

  • In the ForEach add a Web Activity and connect it to your existing activity
  • Make sure to change the type of the line from Success to Failure
  • Give the Web Activty a useful name and go to the Settings tab
  • For URL use and expression like above (don't forget to add parameters if you use them)
  • Set the Method to POST
  • Enter a fake/dummy JSON message in the body. We don't need it, but it is required
  • Set the Authentication to System Assigned Managed Identity
  • And last set the Resource to https://management.azure.com/
Web Activity to Cancel the pipeline run


3) Testing
For this example we used 10 Stored Procedures of which one of them fails on purpose. First make sure to publish the pipeline and then trigger the pipeline (don't use Debug). Then check the monitor to see the result.
One Stored Procedure Failed, rest is cancelled


Conclusion
In this post you learned how to stop a running pipeline when one of the activities within a foreach loop fails so that is doesn't unnecessary executes new activities. One of the downsides is that in the logs the status of your pipeline will be 'Cancelled' instead of 'Failed', but it saves you running (and paying for) unnecessary activities.

Another downside is that it does not work in debug mode because then you don't get a RUN ID and there is no pipeline run to cancel. The workaround for that is to put the Web Activity that cancels your pipeline in an IF construction that only cancels if the RUN ID is not 0.

The usefulness of this construction get better if you have a lot of iterations and hopefully it's not the last iteration that failed. Let us know in the comments what you think of a construction like this and if you have an alternative solutions.

Thursday 2 June 2022

ADF Snack: Trigger every hour during office hours

Case
I want to trigger my ADF or Synapse pipeline every hour (or every 30 minutes) during office hours. How do I run my pipeline each hour without creating a separate trigger for each hour?
Don't want separate triggers for each hour


Solution
It is easier then you think. Create a new trigger and set Recurrence to Days and 1. Then just add one by one the number 8 to 17 under hours and 0 under minutes

Run pipeline each hour during business hours


If you want it run each half an hour then just add 0 and 30 under minutes.
Run pipeline each 30 minutes during business hours


Thursday 19 May 2022

Refresh single table in PBI Dataset from within ETL

Case
I have one big Power BI dataset with multiple source tables and one of those source tables is refreshed once every hour and all the other tables are only refreshed once a day. How can refresh only specific tables within my Power BI dataset via an ADF or Synapse pipeline?
Using XMLA enpoints in Power BI


Solution
To accomplish this you need the XMLA enpoints in Power BI. Those XMLA enpoints provide access to the Analysis Services engine in Power BI giving you extra options for your dataset like only refreshing a single table (or a couple of tables).

However, XMLA enpoints are only availble for premium workspaces. So you either need Power BI premium (capacity) or Power BI premium per user. This doesn't work for Power BI PRO.

1) Enable XMLA endpoints
First make sure the XMLA endpoints are enabled in the Tenant settings. For this you need a Power BI administrator role.
  • Log in to PowerBI.com
  • Click on the gear icon in the top right corner
  • Choose Admin Portal
  • Click on Tenant settings in the Admin portal menu. If you don't see that option then you don't have the PBI admin role
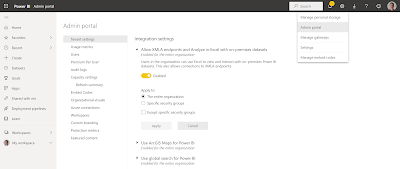
  • Scrole down to Integration settings
  • Expand 'Allow XMLA endpoints and Analyze in Excel with on-premises datasets'
  • Check whether it is enabled for either The entire organization or Specific security groups. If it is set to Specific security groups make sure that your user and the Service Principal or the Managed Identity of ADF/Synapse is in that group.
Allow XMLA endpoints and
Analyze in Excel with on-premises datasets


2) Set to Read-Write
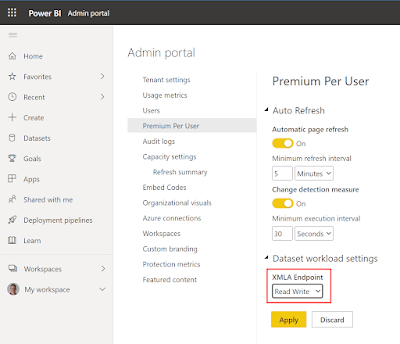
Depending or the premium license type you go to Premium Per User or to Capacity settings in the same Admin portal menu. And if you have multiple Capacities then first go to the specific Capacity.
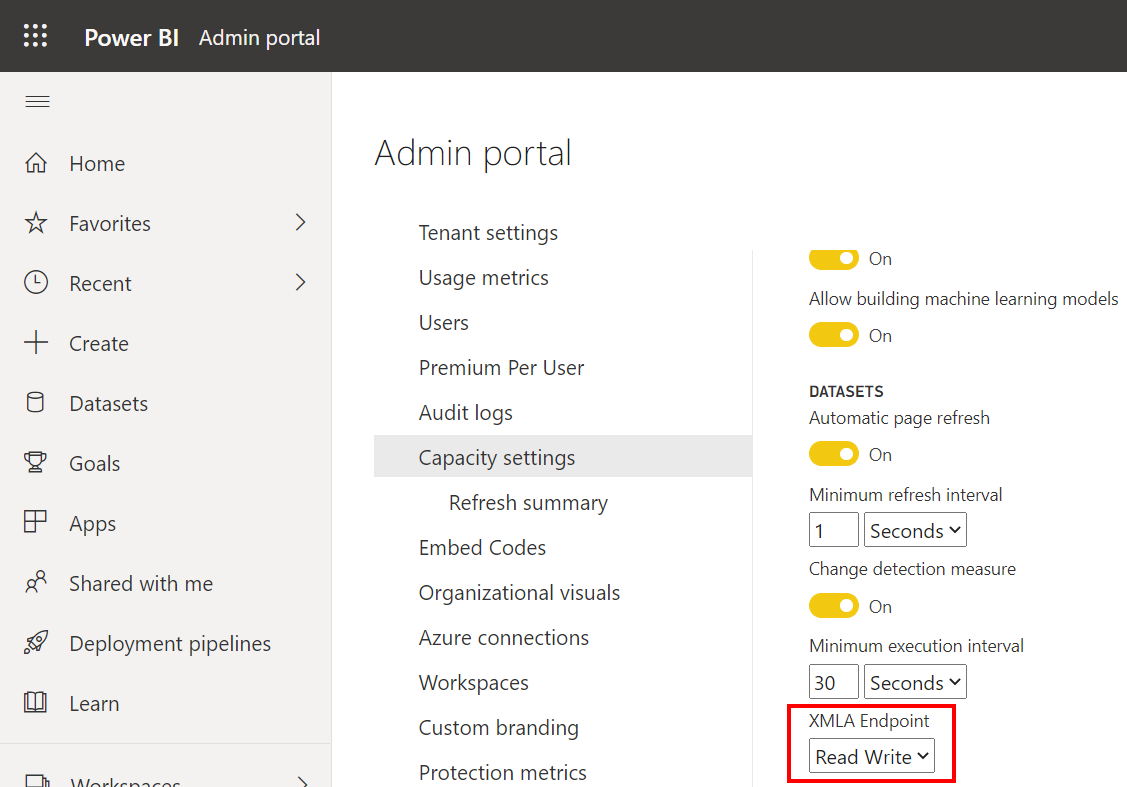
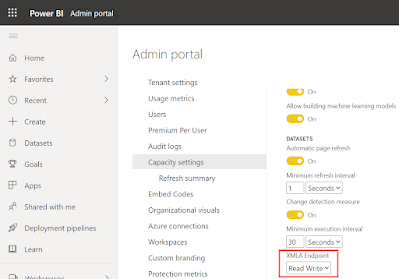
  • In the Admin portal go to Premium Per User or to Capacity settings (depending on your license)
  • Locate the XMLA Endpoint setting and set it to Read Write
XMLA endpoints for Premium Capacity


XMLA endpoints for Permium per user


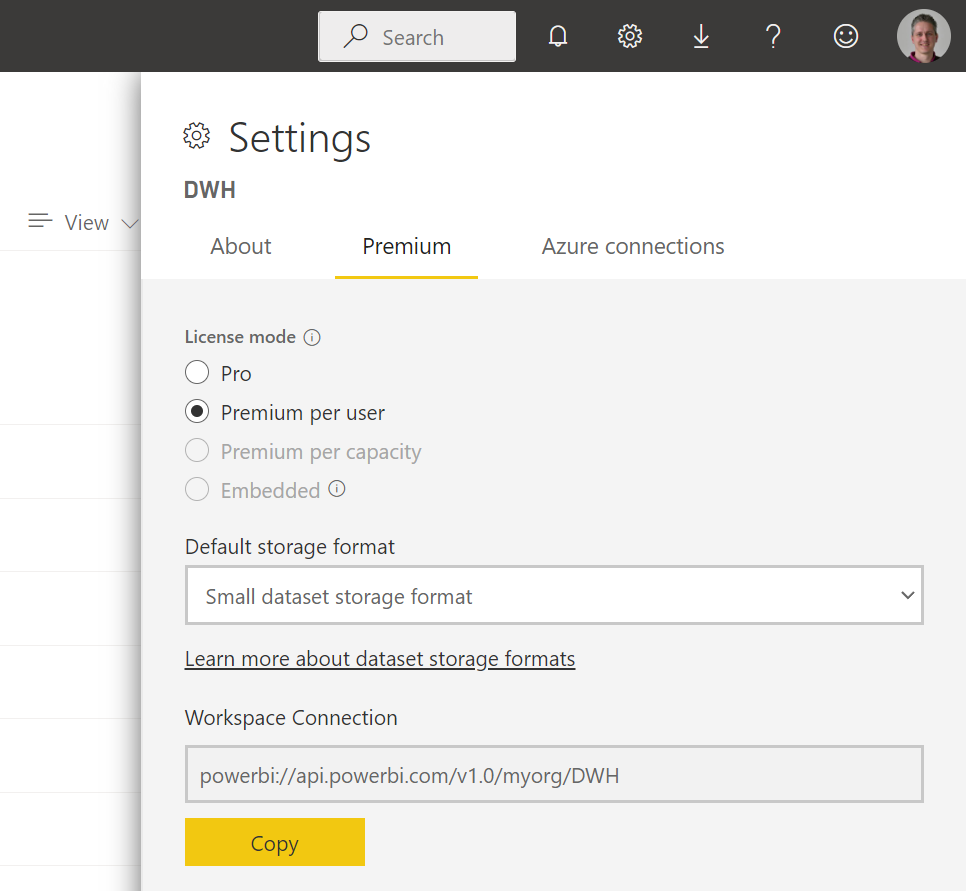
3) Premium workspace
Now go to the Power BI Workspace where your dataset is located and make sure the workspace is a Premium workspace. You can change it in the Settings in the upper right corner.


4) Create JSON message 
Now go to your ADF or Synapse pipeline that refreshes the Power BI dataset where you either use a Service Principal or a Managed Identity to access Power BI. All those steps are described in details in those two posts.
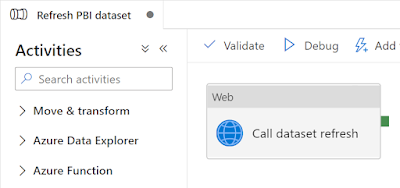
Web Activity to refresh a Power BI dataset


The body of this Web Activity contains options for refreshing the dataset. Our basic example only contained an option to skip notifications: {"notifyOption":"NoNotification"}. This message can also contain settings to refresh only certain tables. Check DatasetRefreshObjects and DatasetRefreshType in the documentation and create a JSON messages like this where we refresh only the data of two tables: myFact and myDim.

{"notifyOption":"NoNotification"
,"objects":"[{"table":"myFact"},{"table":"myDim"}]"
,"type":"DataOnly"}

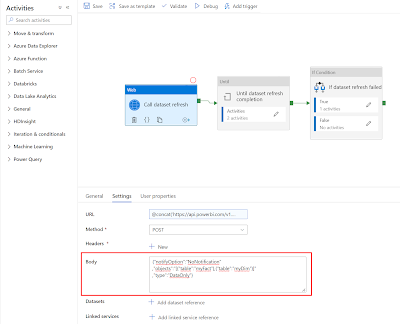
Refresh specific tables in a PBI dataset


5) Create JSON message via SQL
If you want to make that a little more flexible then you can put a Lookup activity in front of it that gets the tables from query like this:
SELECT CONVERT(VARCHAR(MAX),
    (SELECT [table]
    FROM [META].[DatasetContinuousRefresh]
	WHERE Active = 1
    FOR JSON PATH)
) as body

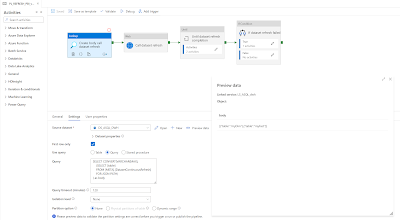
Lookup activity to get table names in a JSON output


Instead of the hardcoded body in the Web activity you can create something more dynamic with an expression like:
@concat('{"notifyOption":"NoNotification"'
,if(pipeline().parameters.ContinuousLoad,concat(',"objects":"',activity('Create body call dataset refresh').output.firstRow.body,'"'),'')
,',"type":"DataOnly"}')

The entire pipeline to refresh a Power BI dataset via its name (instead of the ID) looks something like this:
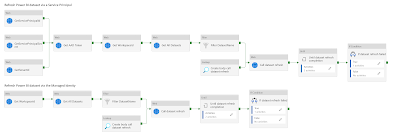
The complete refresh PBI dataset pipeline


Please check the previous blog posts for all the details

Conclusions
In this post we showed you how to refresh only a single table or just a couple of tables within a Power BI dataset. This could save you a lot of refresh time if you don't want to refresh all tables each and every time. The only downside is that Power BI PRO is not enough and you need access to the Power BI admin portal to set the XMLA settings.

thx to colleague Hans Timmerman for helping.