Showing posts with label DEVOPS. Show all posts

Tuesday, 29 October 2024

Synapse - Execute pipeline after deployment

Case
I want to execute a Synapse pipeline right after the deployment via Azure DevOps. How do you accomplish that?
Execute pipeline after deployment


Solution
We can use a PowerShell task and then use that to execute a Create Pipeline Run Rest API. This will be an asynchronous execution (shoot and forget). If you also want to know the result of the pipeline then you have to create an additional WHILE or UNTIL loop and use the Get Pipeline Run Rest API. Note that you will then keep your DevOps agent busy while waiting.

1) Create Synapse pipeline
First create a pipeline in Synapse and name it for example pl_Master_Deployment. In this pipeline you can add all the activities for tasks that you want to do right after the deployment. For testing purposes you can add a simple wait activity.

2) Add PowerShell script
To execute the Synapse pipeline we will use a PowerShell script and a Rest API call to Pipeline - Create Pipeline Run. This Rest API will only start the pipeline but it doesn't wait for it to finish. So it's an asynchronously call. The PowerShell script is stored in the repository as a PowerShell file called SynapseExecutePipeline.ps1 and we will call it via the YAML file using an AzurePowerShell@5 task.

The script has only two parameters. First the Synapse WorkspaceName so you can use it to execute piplines in all environments of your DTAP. The second is the name of the pipeline.

If your pipeline name contains a space or an other 'forbidden' character then the EscapeDataString method will make sure it fits in a URL.

<#
    .SYNOPSIS
    This script executes a Synapse pipeline during the CICD process asynchronously. This means it doesn't wait for it to succeed (or fail).
    .PARAMETER WorkspaceName
    Name of the Synapse Workspace where you want to execute a pipeline.
    .PARAMETER PipelineName
    The name of the synapse pipeline that you want to execute.
    .EXAMPLE
    SynapseExecutePipeline.ps1 -SynapseExecutePipeline MySynapse `
                               -PipelineName MyPipeline
#>
Param(
   [Parameter(Mandatory=$true,
   HelpMessage="Name of your Synapse workspace.")]
   [ValidateNotNullOrEmpty()]
   [Alias("SynapseWorkspaceName")]
   [string]
   $WorkspaceName,

   [Parameter(Mandatory=$true,
   HelpMessage="Name of the pipeline that you want to execute")]
   [ValidateNotNullOrEmpty()]
   [Alias("SynapsePipelineName")]
   [string]
   $PipelineName
)

# Make sure that characters like spaces are encode for the URL
$EncodePipelineName = [System.Uri]::EscapeDataString("$($PipelineName)")

# Determine the URI of the REST API
$RestApiURL = "https://$($WorkspaceName).dev.azuresynapse.net/pipelines/$($EncodePipelineName)/createRun?api-version=2020-12-01"

Write-Host "Executing $($PipelineName) asynchronously in the Synapse workspace $($WorkspaceName)."
Write-Host "Rest API uri $($RestApiURL)"

# Create a dummy json because POST needs one. However not needed at the moment because there are no parameters
# Adjust script en json if you need paramters: https://learn.microsoft.com/en-us/rest/api/synapse/data-plane/pipeline/create-pipeline-run?view=rest-synapse-data-plane-2020-12-01&tabs=HTTP
$payload = @{dummy="dummy"} | ConvertTo-Json -Depth 3
$Result = Invoke-AzRestMethod -Method POST -Uri $RestApiURL -Payload $payload
if ($Result.StatusCode -lt 300)
{
   Write-Host "Asynchronous call of $($PipelineName) is done"
}
else
{
   Write-Error "##vso[task.logissue type=error]Something went very wrong. Pipeline not found or no access?"
   exit 1
}
3) Add YAML task
In your deployment YAML we need to add an additional task. Put it somewhere after the Synapse workspace deployment@2 task or after the toggle-triggers-dev@2 task that will enable your triggers.

For the Azure Subscription parameter you can reuse the same Azure DevOps Service Connection as in your Synapse deployment task. If your Service Principal only got the role Synapse Artifact Publisher, then you need to give it an addtional role that also allows you to execute pipelines. For example Synapse Credential User or Synapse Administrator.

The WorkspaceName parameter can also reuse the value of the Synapse deployment task, but the PipelineName is hardcoded in this example. However you could ofcourse create a variable and/or parameter for this to make it easier to adjust.
            ###################################
            # Validate and Deploy Synapse
            ###################################
            - task: Synapse workspace deployment@2
              displayName: 'Validate and Deploy Synapse'
              inputs:
                operation: validateDeploy
                ArtifactsFolder: '$(Pipeline.Workspace)/SynapseArtifact'
                azureSubscription: ${{ parameters.ServiceConnection }}
                ResourceGroupName: ${{ parameters.Synapse_ResourceGroupName }}
                TargetWorkspaceName: ${{ parameters.Synapse_WorkspaceName }}
                DeleteArtifactsNotInTemplate: true
                DeployManagedPrivateEndpoints: true
                OverrideArmParameters: '
				  -LS_AKV_Secrets_properties_typeProperties_baseUrl				https://${{ parameters.KeyVault_Name }}.vault.azure.net/
				  -LS_ADLS_Datalake_properties_typeProperties_url				https://${{ parameters.Datalake_Name }}.dfs.core.windows.net/
				  -LS_ASQL_Metadata_connectionString							${{ parameters.Metadata_Connectionstring }}
                  '
###################################
# Execute Synapse pipeline
###################################
- task: AzurePowerShell@5
  displayName:  'Execute Synapse pipeline'
  inputs:
	azureSubscription: ${{ parameters.ServiceConnection }}
	scriptType: filePath
	scriptPath: $(Pipeline.Workspace)\s\CICD\PowerShell\SynapseExecutePipeline.ps1
	scriptArguments:
	  -WorkspaceName ${{ parameters.Synapse_WorkspaceName }} `
	  -PipelineName "pl_Master_Deployment"
	azurePowerShellVersion: latestVersion
	pwsh: true
Conclusion
In this short example we showed how to execute a Synapse pipeline right after deployment. You can use it for example to do some cleanup or setup in your datalake or lake database. Or use it to run your ETL for testing purposes.

And instead of running the pipeline immediately you could also create a (onetime) trigger and schedule it for the next evening which could be useful if you have multiple deployments during the day to the same environment.

Tuesday, 1 October 2024

Synapse - Invalid notebook reference

Case
During the deployment of Synapse I'm getting an invalid referene error for my notebooks. They are referencing Spark pools that only exists in the Development workspace.


The document creation or update failed because of invalid reference 'SparkPoolJoost' 
An error occurred during execution: Error: Failed to fetch the deployment status 
{"code":"400","message":"CreateOrUpdateNotebook failed: [statusCode from ADF:BadRequest, 
ErrorMessage: {\"code\":\"BadRequest\",\"message\":\"The document creation or update failed because of invalid reference 'bitools'.\",
\"target\":\"/subscriptions/aaaaaaaa-bbbb-cccc-dddd-eeeeeeeeeeee/resourceGroups/rg-bitools/providers/Microsoft.Synapse/workspaces/bitools-tst/notebooks/myNotebook\",
\"details\":null,\"error\":null}, workspace: yp-tst, notebook: myNotebook, ArtifactId: a4581d64-96d3-4041-9ac4-ccc0d7235cc4]"}

Solution
This deployment error often happens when you don't have the same set of Spark pools in each environment of your DTAP. If one of your notebooks is still referencing a Spark Pool that doesn't exists in the target workspace then the deploymenty proces will throw an invalid reference error.

We often have one general Spark Pool doing all the work and that is available in each Synapse workspace, but also have a whole bunch of Spark Pools in development letting multiple developers do some work without getting in each other's way. Nothing is more enoying then waiting for a colleague to release the spark nodes. 

This deployment error can easily be solved by changing the attached Spark Pool in the notebook before you start deploying. This is ofcourse taking a lot of extra time (and patience) each time you forget to select the right Spark Pool that exists in all workspaces.
Attached Spark Pool


You can make it a little less enoying by adding an override to the YAML task Synapse workspace deployment@2 for the notebook property bigDataPool referenceName. You can even do this manually for a couple of notebooks, but the more notebooks you have the more enoying it gets.
###################################
# Validate and Deploy Synapse
###################################
- task: Synapse workspace deployment@2
  displayName: 'Validate and Deploy Synapse'
  inputs:
	operation: validateDeploy
	ArtifactsFolder: '$(Pipeline.Workspace)/SynapseArtifact'
	azureSubscription: ${{ parameters.ServiceConnection }}
	ResourceGroupName: ${{ parameters.Synapse_ResourceGroupName }}
	TargetWorkspaceName: ${{ parameters.Synapse_WorkspaceName }}
	DeleteArtifactsNotInTemplate: true
	DeployManagedPrivateEndpoints: true
	OverrideArmParameters: '
	  -LS_AKV_Secrets_properties_typeProperties_baseUrl				https://${{ parameters.KeyVault_Name }}.vault.azure.net/
	  -LS_ADLS_Datalake_properties_typeProperties_url				https://${{ parameters.Datalake_Name }}.dfs.core.windows.net/
	  -LS_ASQL_Metadata_connectionString							${{ parameters.Metadata_Connectionstring }}
	  -NB_myFirstNotebook_properties_bigDataPool_referenceName		${{ parameters.Synapse_SparkpoolName }}
	  -NB_mySecondNotebook_properties_bigDataPool_referenceName		${{ parameters.Synapse_SparkpoolName }}
	  -NB_myThirdNotebook_properties_bigDataPool_referenceName		${{ parameters.Synapse_SparkpoolName }}
	'

You can make it even easier by generating an override for each notebook in your Synapse workspace. For this we need these three steps:

1) Create variable
First create a YAML variable in your pipeline. For this example we used the name OverrideParams. The value is just an empty string.
jobs:
    - deployment: DeploymentJob${{ parameters.Env }}
      displayName: Deployment Job ${{ parameters.Env }} 
      environment: Deploy-to-${{ parameters.Env }}
      variables: 
      - name: OverrideParams
        value: ""

      strategy:
        runOnce:
          deploy:
            steps:

2) Add PowerShell task
Next is adding a PowerShell task that will be filling the above variable with an override list. The PowerShell loops through all your notebooks in the artifact. It creates one override for each notebook and stores it in a PowerShell string variable. The last step is to use the PowerShell variable to fill the YAML variable.
            ##################################
            # Edit Notebook sparkpool reference
            ##################################
            - powershell: |
                # Determine notebook subfolder in synapse artifact
                $Path = Join-Path -Path "$(Pipeline.Workspace)" -ChildPath "SynapseArtifact\notebook\"

                # Get all notebook files
                $notebooks = Get-ChildItem -Path $Path

				# Create string variable for all overrides
                [string]$overridelist = ""

                # Loop through notebook files
                foreach ($notebook in $notebooks)
                {
				  # Generate an override for each notebook, make sure to end
				  # with a space to separate each override. Don't use a line
				  # feed or carriage return, because the value should be 1 line
                  $overridelist += "-$($notebook.Basename)_properties_bigDataPool_referenceName   mysparkpool "
                }
				# Show list for debug purposes
                Write-Host "overridelist:`r`n$($overridelist)"
				# Fill the YAML variable value with the value of the PowerShell variable
                Write-Host "##vso[task.setvariable variable=OverrideParams;]$overridelist"
              displayName: 'Edit Notebook sparkpool reference'
Note if you are using the template files then you have to create an alternative loop

3) Use YAML variable in Override
Last step is to add the YAML variable in the OverrideArmParameters part. Now run your deployment and see your invalid reference errors disappear!
            ###################################
            # Validate and Deploy Synapse
            ###################################
            - task: Synapse workspace deployment@2
              displayName: 'Validate and Deploy Synapse'
              inputs:
                operation: validateDeploy
                ArtifactsFolder: '$(Pipeline.Workspace)/SynapseArtifact'
                azureSubscription: ${{ parameters.ServiceConnection }}
                ResourceGroupName: ${{ parameters.Synapse_ResourceGroupName }}
                TargetWorkspaceName: ${{ parameters.Synapse_WorkspaceName }}
                DeleteArtifactsNotInTemplate: true
                DeployManagedPrivateEndpoints: true
                OverrideArmParameters: '
				  -LS_AKV_Secrets_properties_typeProperties_baseUrl				https://${{ parameters.KeyVault_Name }}.vault.azure.net/
				  -LS_ADLS_Datalake_properties_typeProperties_url				https://${{ parameters.Datalake_Name }}.dfs.core.windows.net/
				  -LS_ASQL_Metadata_connectionString							${{ parameters.Metadata_Connectionstring }}
                  $(OverrideParams)
                  '
Conclusion
This solution uses a little, fairly simple PowerShell script so solve all your invalid reference errors during deployment. It doesn't change the Spark Pool in the Notebook Activity, but just the default Spark Pool in the notebook itself. So you can still have multiple Spark Pools for various jobs if you set it in the Notebook Activity.

As mentioned before, if you use the template files TemplateForWorkspace.json and TemplateParametersForWorkspace.json for the deployment then you have to retrieve the JSON objects for the notebooks in those files and create a similar loop as in step 2.


Saturday, 21 September 2024

Synapse - ReferenceError: Response is not defined

Case
My Synapse CICD deployment pipeline is failing with some kind of error pointing to a javascript file main.js: ReferenceError: Response is not defined
ReferenceError: Response is not defined


When using the Synapse Workspace Deployment addon for Azure Devops, it gives me an error (and it did work before) when trying to deploy a Synapase Analytics Workspace:
ReferenceError: Response is not defined
    at Module../node_modules/@trident/data-access-artifact/src/lib/models/http.js (D:\a\1\s\downloads\main.js:360446:40)
    at __webpack_require__ (D:\a\1\s\downloads\main.js:668203:42)
    at Module../node_modules/@trident/data-access-artifact/src/lib/models/index.js (D:\a\1\s\downloads\main.js:360536:63)
    at __webpack_require__ (D:\a\1\s\downloads\main.js:668203:42)
    at Module../node_modules/@trident/data-access-artifact/src/lib/clients/artifact-client.js (D:\a\1\s\downloads\main.js:359333:65)
    at __webpack_require__ (D:\a\1\s\downloads\main.js:668203:42)
    at Module../node_modules/@trident/data-access-artifact/src/lib/clients/index.js (D:\a\1\s\downloads\main.js:359814:74)
    at __webpack_require__ (D:\a\1\s\downloads\main.js:668203:42)
    at Module../node_modules/@trident/data-access-artifact/src/index.js (D:\a\1\s\downloads\main.js:359310:70)
    at __webpack_require__ (D:\a\1\s\downloads\main.js:668203:42)

Entire error


Solution
This Synapse addon for DevOps requires node.js on your Azure DevOps agent. If you installed an older(/wrong) version of node.js then you will get this error. If you installed node.js in your YAML pipeline then you just need to raise the version. At the moment version 18 is the minimum version that works, but 22 also works. However it shifted a lot the past years. I think it started with version 10.

###################################
# Installs Node.js on agent
###################################
- task: NodeTool@0
  displayName: 'Install Node.js'
  inputs:
    versionSpec: '22.x'
    checkLatest: true  

Conclusion
Just make sure to regularly check available node.js versions and then try if they already work with your Synapse release proces. In the past the most recent version didn't always worked for me.


Monday, 1 January 2024

Toggle Azure Synapse Triggers during deployment

Case
To turn of the Synapse triggers before deployment and turning them back of after deployment, we used a PowerShell script for ADF that we rewritten for Synapse. However now there is a new activity available that avoids the use of scripting, but it is a bit hidden if you mainly use YAML for pipelines.
Azure Synapse Toggle Triggers Dev (Preview)


Solution
If you go the release pipelines (not YAML, but the visual variant) and under add task search for Synapse then you will find the Synapse workspace deployment activity, but also the Azure Synapse Toggle Triggers Dev. It's already out there for a couple months but still preview (probably to busy with Fabric at the moment). For these tasks you need to add the Synapse addon to Azure DevOps, but if you are already using the deployment task then you already have it. The postfix of the taskname is Dev, so it is to be expected that they will remove it once it is General Available.
Synapse Tasks


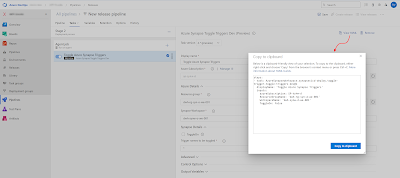
Since we have a preference for YAML we need to know what the task name is and which properties are available. There is no YAML documentation available, but it you fill in the form in the release pipeline then you can view the YAML code. And by clicking on the circled i icon you will get some more info about the properties.
View YAML code


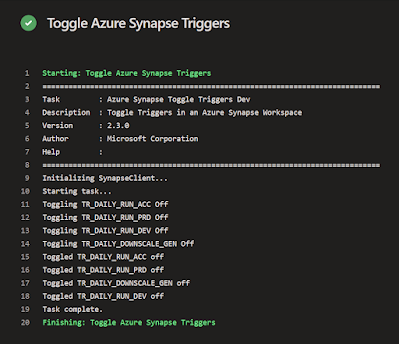
First the YAML code for toggling off all triggers which you need to do before deploying a new version of Synapse. With and without parameters.
steps:
- task: AzureSynapseWorkspace.synapsecicd-deploy.toggle-trigger.toggle-triggers-dev@2
  displayName: 'Toggle Azure Synapse Triggers'
  inputs:
    azureSubscription: SP-synw-d
    ResourceGroupName: 'dwh-synw-d-we-001'
    WorkspaceName: 'dwh-synw-d-we-001'
    ToggleOn: false
    Triggers: '*'
    
    
- task: AzureSynapseWorkspace.synapsecicd-deploy.toggle-trigger.toggle-triggers-dev@2
  displayName: 'Toggle Azure Synapse Triggers'
  inputs:
    azureSubscription: ${{ parameters.SerCon }}
    ResourceGroupName: ${{ parameters.Synapse_ResourceGroupName }}
    WorkspaceName: ${{ parameters.Synapse_WorkspaceName }}
    ToggleOn: false
    Triggers: '*'
Toggle all trigger OFF


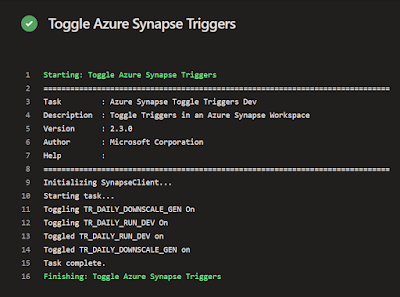
Then the same code but now for enabling certain triggers. Again with and without parameters.
steps:
- task: toggle-triggers-dev@2
  displayName: 'Toggle Azure Synapse Triggers'
  inputs:
    azureSubscription: SP-synw-d
    ResourceGroupName: 'dwh-synw-d-we-001'
    WorkspaceName: 'dwh-synw-d-we-001'
    ToggleOn: true
    Triggers: 'TR_DAILY_RUN_DEV,TR_DAILY_DOWNSCALE_GEN'


- task: toggle-triggers-dev@2
  displayName: 'Toggle Azure Synapse Triggers'
  inputs:
    azureSubscription: ${{ parameters.SerCon }}
    ResourceGroupName: ${{ parameters.Synapse_ResourceGroupName }}
    WorkspaceName: ${{ parameters.Synapse_WorkspaceName }}
    ToggleOn: true
    Triggers: '${{ parameters.Synapse_EnableTriggers }}'
Toggle specific triggers ON


You can remove the long prefix in the task name and just keep toggle-triggers-dev@2. Property ToggleOn set to 'false' means stop the triggers and 'true' means start the mentioned triggers. The triggers property shoud contain a '*' to stop/start everything, but you probably only want to enable certain triggers on each environment. In that case you can use 'trigger1,trigger2,trigger3'  to do that, but without spaces around each comma. With extra spaces you will get an error that the trigger is not found. In the error message you can see the extra space in front of the trigger name.
##[error]Refer to above logs for more details:
The Trigger TR_DAILY_DOWNSCALE_GEN was not found


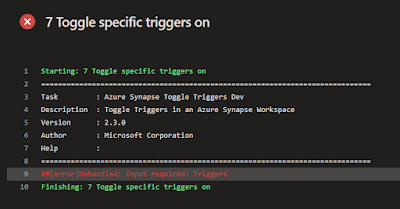
An other issue is that the Triggers property must be filled. If you have one environment where you don't want to start any of the triggers then you will get an error saying that the property is required. I would rather see a warning instead or an other user friendly solution that works with some of the YAML shortcomings.
##[error]Unhandled: Input required: Triggers


You can solve this by adding a YAML condition to the task where you check whether the list of triggers is empty. If it is, the task will be skipped. Unfortunately you cannot use a parameter in a condition. The workaround is to read directly from a variable group:
- task: toggle-triggers-dev@2
  displayName: 'Toggle Azure Synapse Triggers'
  condition: ne(replace(variables.Synapse_EnableTriggers, ' ', ''), '')
  inputs:
    azureSubscription: ${{ parameters.SerCon }}
    ResourceGroupName: ${{ parameters.Synapse_ResourceGroupName }}
    WorkspaceName: ${{ parameters.Synapse_WorkspaceName }}
    ToggleOn: true
    Triggers: '${{ parameters.Synapse_EnableTriggers }}'

Alternatives
If you don't like that workaround there are two alternatives until Microsoft fixes the issue. You could use the OverrideParameters option to override the endTime property of a trigger during the Synapse deployment as showed here for Data Factory or use a PowerShell activity to enable the triggers just like for ADF. For this PowerShell option you need to create a PowerShell file in the repository under \CICD\PowerShell with the name SetTriggers.ps1 and the following code (Synapse version):

param
(
    [parameter(Mandatory = $true)] [String] $WorkspaceName,
    [parameter(Mandatory = $true)] [String] $ResourceGroupName,
    [parameter(Mandatory = $true)] [string] $EnableTriggers,
    [parameter(Mandatory = $false)] [Bool] $DisableAllTriggers = $true
)

Write-Host "Checking existance Resource Group [$($ResourceGroupName)]..."
Get-AzResourceGroup -Name $ResourceGroupName > $null
Write-Host "- Resource Group [$($ResourceGroupName)] found."

Write-Host "Checking existance Synapse Workspace [$($WorkspaceName)]..."
Get-AzSynapseWorkspace -ResourceGroupName $ResourceGroupName `
              -Name $WorkspaceName > $null
Write-Host "- Synapse Workspace [$($WorkspaceName)] found."

#Getting triggers
Write-Host "Looking for triggers..."
$Triggers = Get-AzSynapseTrigger -WorkspaceName $WorkspaceName
Write-Host "Found [$($Triggers.Count)] trigger(s)"

# Checking provided triggernames, first split into array
$EnabledTriggersArray = $EnableTriggers.Split(",")
Write-Host "Checking existance of ($($EnabledTriggersArray.Count)) provided triggernames."
# Loop through all provided triggernames
foreach ($EnabledTrigger in $EnabledTriggersArray)
{ 
    # Get Trigger by name
    $CheckTrigger = Get-AzSynapseTrigger    -WorkspaceName $WorkspaceName `
                                            -Name $EnabledTrigger `
                                            -ErrorAction Ignore # To be able to provide more detailed error

    # Check if trigger was found
    if (!$CheckTrigger)
    {
        throw "Trigger $($EnabledTrigger) not found in Synapse Workspace $($WorkspaceName) within resource group $($ResourceGroupName)"
    }
}
Write-Host "- All ($($EnabledTriggersArray.Count)) provided triggernames found."

##############################################
# Disable triggers
##############################################
# Check if all trigger should be disabled
if ($DisableAllTriggers)
{
   # Get all enabled triggers and stop them (unless they should be enabled)
   Write-Host "Getting all enabled triggers that should be disabled."
   $CurrentTriggers = Get-AzSynapseTrigger    -WorkspaceName $WorkspaceName `
                      | Where-Object {$_.RuntimeState -ne 'Stopped'} `
                      | Where-Object {$EnabledTriggersArray.Contains($_.Name) -eq $false}

   # Loop through all found triggers
   Write-Host "- Number of triggers to disable: $($CurrentTriggers.Count)."
   foreach ($CurrentTrigger in $CurrentTriggers)
   {
        # Stop trigger
        Write-Host "- Stopping trigger [$($CurrentTrigger.Name)]."
        try {
            Stop-AzSynapseTrigger -WorkspaceName $WorkspaceName -Name $CurrentTrigger.Name > $null
        } catch {
            Write-Host "error code 1, but disabling trigger that already is disabled"
        }
   }
}

##############################################
# Enable triggers
##############################################
# Loop through provided triggernames and enable them
Write-Host "Enable all ($($EnabledTriggersArray.Count)) provided triggers."

foreach ($EnabledTrigger in $EnabledTriggersArray)
{                   
    # Get trigger details
    $CheckTrigger = Get-AzSynapseTrigger     -WorkspaceName $WorkspaceName `
                                               -Name $EnabledTrigger

    # Check status of trigger
    if ($CheckTrigger.RuntimeState -ne "Started")
    {
        try {
            Write-Host "- Trigger [$($EnabledTrigger)] starting. This will take only a few seconds..."
            Start-AzSynapseTrigger      -WorkspaceName $WorkspaceName `
                                        -Name $EnabledTrigger
        } catch {
            Throw "Error enabling trigger '$EnabledTrigger': $Error[0].Message"
            exit 1
        }
    }
    else
    {
        Write-Host "- Trigger [$($EnabledTrigger)] already started"
    }
}
Then the YAML Code for after the deployment step:
- task: AzurePowerShell@5
  displayName: 'Enabling triggers per environment'
  inputs:
    azureSubscription: ${{ parameters.SerCon }}
    scriptType: filePath
    scriptPath: $(Pipeline.Workspace)\s\CICD\PowerShell\Set_Triggers.ps1
    scriptArguments:
      -WorkspaceName ${{ parameters.Synapse_WorkspaceName }} `
      -ResourceGroupName ${{ parameters.Synapse_ResourceGroupName }} `
      -EnableTriggers "${{ parameters.Synapse_EnableTriggers }}"
    azurePowerShellVersion: latestVersion
    pwsh: true
Conclusion
Microsoft is introducing a very promising new DevOps task for Synapse that will make you CICD task much easier. Hopefully it will be G.A. soon and the small bugs will be solved. In the mean while you could use one of the alternatives if you don't want to use a preview version of the task.

An other solution for Microsoft could be to just add these options in the current deployment task since you always need to stop all triggers first and than start some of the triggers once the new version has been deployed. Is there a good reason to have these as two separate tasks in DevOps? Let it know in the comments below.


ADDITION
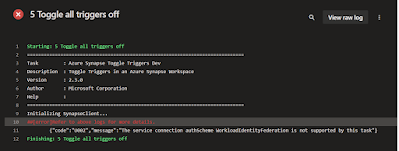
The new task toggle-triggers-dev@2 does not yet work with the new type of Azure Service Connection with Workload Identity federation. This will result in the following error: {"code":"U002","message":"The service connection authScheme WorkloadIdentityFederation is not supported by this task"}.
The service connection authScheme
WorkloadIdentityFederation is not supported by this task


Sunday, 24 December 2023

Deploying Synapse Serverless SQL pool with DevOps

Case
The external tables and other objects in my Synapse Serverless SQL pool are not stored in the GIT repository of Synapse. How do I deploy those objects through the DTAP street?

Release Synapse Serverless SQL Pools with DevOps


Solution
You can use the good old database project in Visual Studio with the SQL Server Data Tools (SSDT) addon to store the External tables, File formats and Data Stores in a Git repository and then use Azure DevOps with YAML pipelines to release the database objects through the DTAP street. Very similar to deploying a regular Azure SQL Database with some minor differences.


1) Download Visual Studio
First download and install Visual Studio 2022 then make sure to add the SQL Server Data Tools (SSDT) extention which will add the Database project option. If you already have Visual Studio 2022 then make sure to update it because versions before 17.7 don't support SSDT for Serverless SQL pools.
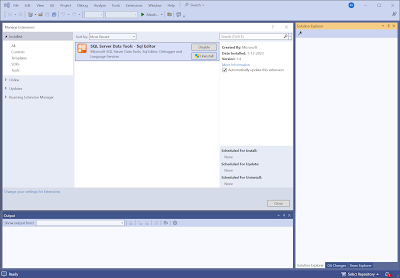
Visual Studio 2022 with SQL Server Data Tools


2) Create repository
This example is for Azure DevOps, but feel free to use Github instead. Create a new repository. In the root we have two folders:
  • CICD: to store all release-related files such as the YAML files. In fact there is a subfolder called YAML to store the .yml files
  • SQL: to store the database project from Visual Studio.
The repository folder structure


After you have created the initial folder structure you need to clone the repository to Visual Studio by hitting the clone button in the upper right corner.
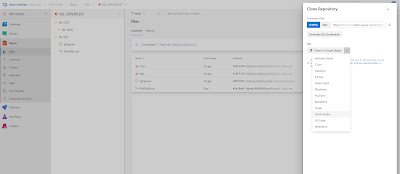
Clone repository to Visual Studio


3) Create new database project
Once in Visual Studio you now have a cloned repos folder. In the SQL folder we will create a new database project.
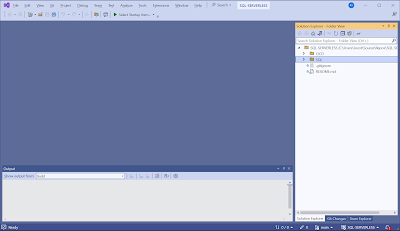
Cloned DevOps repository in VS2022


Create a new project via the File menu and search for SQL in the upper search textbox.
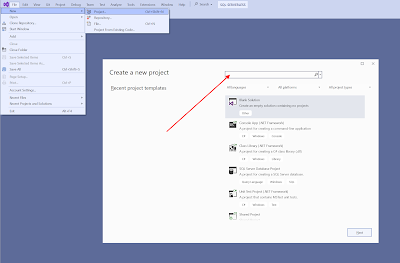
Create new project


Create the new SQL Server Database Project in the SQL folder from your repository. Since there will be only one project in the solution, the solution and project are stored in the same folder. Otherwise you will get an additional subfolder level.
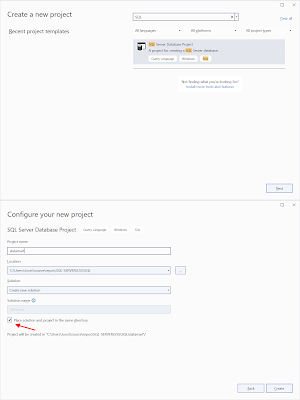
Create new SQL Server Database Project


4) Create Azure DevOps Service Connection
Wihtin your Azure DevOps project click on the Project settings and under Service connections create a new Service connection of the type Azure Resource Manager. You will need an Azure Entra Service Principal for this. Depending on the organization/projectsize/number of environments create one or more Service Connections. Ideally, one per DTAP environment.
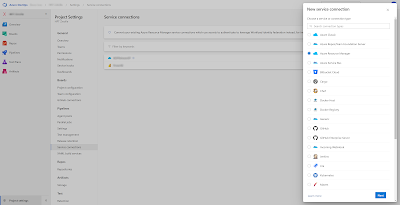
Create Service Connection


5) Give Service Principal access to database
Go to Synapse and open a new SQL Script. Then either create a new database in your Serverless SQL pool to store your external tables or use an existing one. Our example database is called datamart since it will host external tables from our gold layer a.k.a. the datamart with facts and dimensions for Power BI.

Then switch to your datamart database. Either via the use-command or via the selectbox. Once you are in your datamart database create an (external) user for your Service Principal (SP) that you used in the  Azure Devops Service connection from the previous step. After that we will need to give the SP enough rights to deploy all objects to this database: db_owner
Give Service Principal access to Serverless SQL pool DB


-- First create a new database (if you don't have one)
CREATE DATABASE datamart;

-- Once created switch to your (new) database
USE datamart;

-- Create a new database use for the Service Principal
-- used in the DevOps Service Connection
CREATE USER [myserviceprincipal] FROM EXTERNAL PROVIDER;

-- Give the Service Principal enough rights to create
-- external resources and a master key
ALTER ROLE [db_owner] ADD MEMBER [myserviceprincipal];
You have to repeat this for all your Serverless SQL pool DB's in your DTAP environment. Note that if you will do the SQL development within Synapse Studio, and not in Visual Studio, then you don't need to deploy to the Development environment and then you also don't need to give a SP access to your development environment. In that case only do this for Test, Acceptance and Production.

Tip: you can also give the SP access within Synapse by either making is Synapse Adminstrator or Synapse SQL administrator. However then it's access for everything wihtin Synapse or all Serverless SQL Pool database within Synapse. If you already are using the same SP to role out Synapse with Infra as Code (with BICEP or Terraform) then it already has the Synapse Admistrator role.

6) Master Key and External Resources
For this example we will use a basic example with the following code. Note the that the DeltaLocation is pointing to the Development environment of our dataplatform. During the deployment we will need to override this since each DTAP enviroment has its own Azure Storage Account.
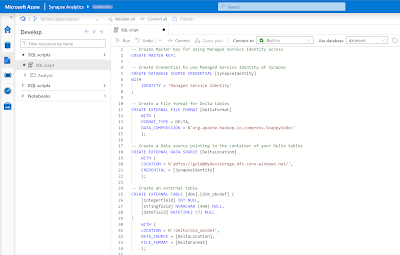
Create external table on delta table (for Power BI)


-- Create Master Key for using Managed Service Identity access
CREATE MASTER KEY;

-- Create Credential to use Managed Service Identity of Synapse
CREATE DATABASE SCOPED CREDENTIAL [SynapseIdentity]
WITH
    IDENTITY = 'Managed Service Identity'
;

-- Create a File format for Delta tables
CREATE EXTERNAL FILE FORMAT [DeltaFormat]
    WITH (
    FORMAT_TYPE = DELTA,
    DATA_COMPRESSION = N'org.apache.hadoop.io.compress.SnappyCodec'
    );

-- Create a Data source pointing to the container of your Delta tables
CREATE EXTERNAL DATA SOURCE [DeltaLocation]
	WITH (
	LOCATION = N'abfss://gold@mydevstorage.dfs.core.windows.net/',
    CREDENTIAL = [SynapseIdentity]
	);

-- Create an external table
CREATE EXTERNAL TABLE [dbo].[dim_abcdef] (
    [integerfield] INT NULL,
    [stringfield] NVARCHAR (400) NULL,
    [datefield] DATETIME2 (7) NULL
)
    WITH (
    LOCATION = N'/delta/dim_abcdef',
    DATA_SOURCE = [DeltaLocation],
    FILE_FORMAT = [DeltaFormat]
    );
You can encrypt the master key with an addional password. The credential with the Managed Service Identity (MSI) is so that this specific Synapse identity will be used to connect to the data source (the Delta table in your Azure Storage Account a.k.a. Datalake a.k.a. Delta Lake). This means that if you have access to the Serverless SQL Pool and its credentials, you also have access to the underlying storage account.

7) Schema Compare in Visual Studio
The datamart database located in the Serverless SQL pool of Synapse in the development is filled with all the above SQL objects like the external table. Now we want to get those objects to our database project. For this we need to do a schema compare in the database project by rightclicking the project in the Solution Explorer. The schema compare is between the development database and the database project.
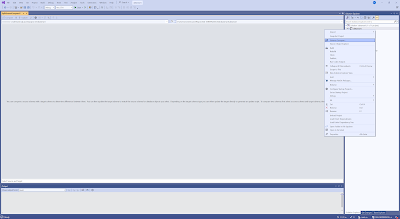
Schema Compare


In the Schema Compare window click on options to exclude Role Memberships and Users, because this is different for each environment in your DTAP street. This will result in not showing up in the list to compare. Otherwise you have to uncheck those each time you do a schema compare.
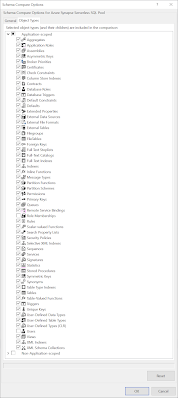
Application-scoped


You also want to add Database Scoped Credentials and Master Key in the Non-Application-scoped section. These are the first two items in the script from the previous step. Without these your external tables won't work in the test/acceptance/production database. Click OK to confirm the settings.
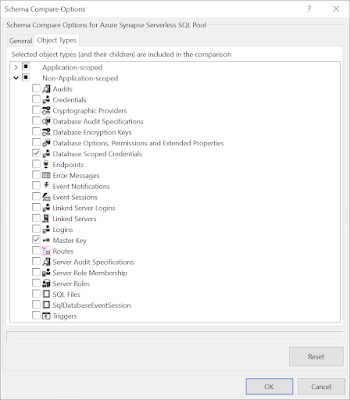
Non-Application-scoped


Now make sure your dev database is on the left side in the schema compare and the database project is on the right side. You can find the URL of your Serverless SQL pool in the Azure portal on the overview page of your Synapse. It's called Serverless SQL endpoint and looks like [synapsename]-ondemand.sql.azuresynapse.net.
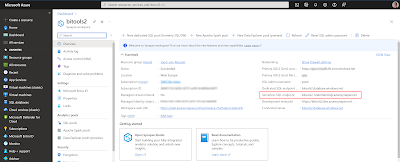
Azure Synapse Workspace overview page


Then hit the Compare button to see all the new objects that are not yet in your project. Tip: save this schema compare (including the changed options) in your database project. Then you can reuse it.
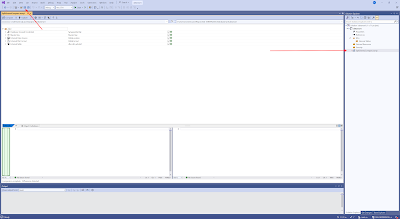
Result of schema compare


Verify the objects and hit the Update button to include them in your database project. 
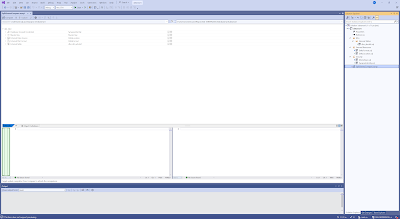
Result of the update


8) Override location of External Data Source
If you open the external data source, you will notice the hardcoded URL of the gold container in the development environment. Replace that URL by $(DeltaLocation)
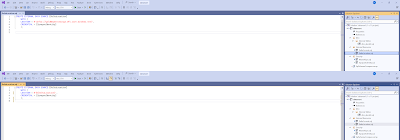
Replace hardcoded URL by variable


Go to the properties of your project (not the solution) and then go to the SQLCMD Variables. Enter a new variable called $(DeltaLocation) and enter the URL of your Development environment (the URL you just replaced). You only need to fill in the Default column. Save it.
Add variable to SQLCMD Variables


Now we need to create a Publish Profile file, which we can override during deployment in the YAML pipeline from Azure DevOps. Right click the project (not the solution) and click Publish. In this window fill in the values from your development environment (we will replace them later on): target database connection and the value of the SQLCMD variable. Then hit the Create Profile button which will add the Publish Profile file to your database project. After that Cancel the window because we will not publish via Visual Studio.
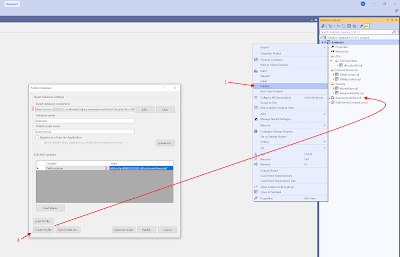
Publish Profile


9) Stage, Commit and Sync repository
The changes in Visual Studio need to go back to the repository in Azure DevOps. Brance strategy and brance policies are ignored in the explanation to keep things short and simpel.
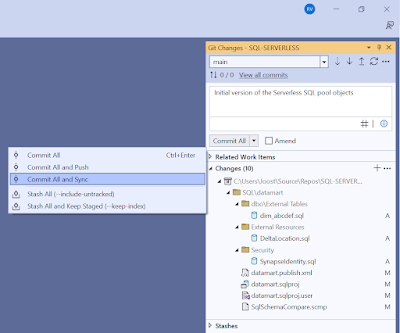
Commit and sync changes to Azure DevOps repos


Now all changes are stored in the Azure Repository. Next step is setting up the CICD proces.
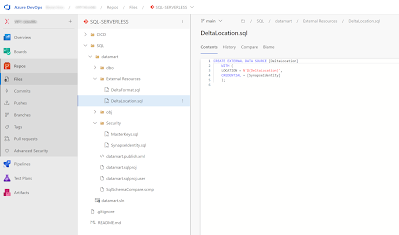
Azure DevOps repository


10) Pipeline Libarary - Variable Groups
To make the YAML scripts reusable for mulitple Serveless SQL pools of your DTAP street we need to create some Variable Groups in Azure DevOps. You can find them under Pipelines - Library. You need one for each of your DTAP environments and opionally one for general variables that don't change between the environments. 
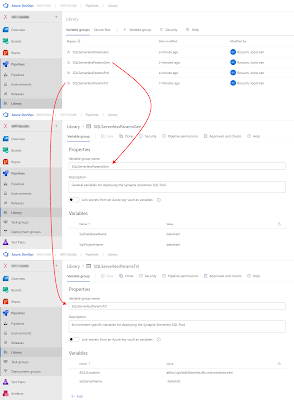
DevOps Variable Groups


Is this case we will store the database project name and the database name in the general variable group.  You could just use one variable because they probably often have the same value.
  • SqlDatabaseName - Name of the database within the Serverless SQL Pool
  • SqlProjectName - Name of the database project within Visual Studio
For the environment specific variable groups we have the name of the SQL server name which is equals to the Synapse Workspacename. So if you are also deploying the Synapse workspace then you could reuse that one. The other one is the storage account location.  
  • ADLSLocation - For replacing the storage account URL between environments
  • SqlServerName - For storing the name of the server (equals to Synapse workspacename)
11) YAML pipelines
Last development step is setting up the YAML files. This example has two YAML file located in the CDCD\YAML folder of the repository. Tip: Visual Studio Code has some nice YAML editors, but you can also just use the Azure DevOps website to create and edit the YAML files.

BuildSqlServerless.yml
The YAML starts with some general steps, like reading the variable group from the previous step. Then showing that it triggers when in one of those 4 branches a change happens in the SQL folder.
Step 1, checkout, is to get the repository content to the agent.
Step 2, treeview, is just for debugging and showing you all files on the agent. Useful for step 3
Step 3, build, builds the database project that was just retrieved from the repository
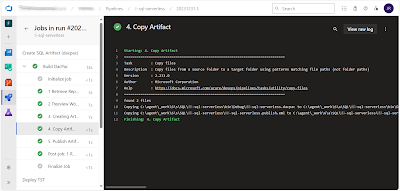
Step 4, copy, copies the files required for deployment to a artifact staging folder
Step 5, publish, publishes the artifact so that it can be used in the next YAML file
###################################
# General Variables
###################################
variables:
  - group: SQLServerlessParamsGen
  
###################################
# When to create a pipeline run
###################################
trigger:
  branches:
    include:
    - development
    - test
    - acceptance
    - main
  paths:
    include:
    - SQL/*
 
stages:
###################################
# Create DacPac Artifcat
###################################
- stage: CreateSQLArtifact
  displayName: Create SQL Artifact (dacpac)
 
  jobs:
  - job: Job
    displayName: 'Build DacPac'
    workspace:
      clean: all
    pool:
      vmImage: 'windows-latest'
      # name: my-agentpool
    steps:
 
    ###################################
    # 1 Retrieve Repository
    ###################################
    - checkout: self
      displayName: '1 Retrieve Repository'
      clean: true
 
    ###################################
    # 2 Show treeview of agent
    ###################################
    - powershell: |
        Write-Output "This is the folder structure within Pipeline.Workspace"
        tree "$(Pipeline.Workspace)" /F
      displayName: '2 Treeview Workspace'
 
    ###################################
    # 3 Build Visual Studio project
    ###################################
    - task: MSBuild@1
      displayName: '3. Creating Artifact'
      inputs:
        solution: '$(System.DefaultWorkingDirectory)/SQL/$(SqlProjectName)/$(SqlProjectName).sqlproj'
        msbuildArchitecture: x86
        msbuildVersion: latest
 
    ###################################
    # 4 Stage dacpac and publish.xml
    ###################################
    - task: CopyFiles@2
      displayName: '4. Copy Artifact'
      inputs:
        contents: |
          **\*.dacpac
          **\*.publish.xml
        TargetFolder: '$(build.artifactstagingdirectory)'
 
    ###################################
    # 5 Publish dacpac and xml artifact
    ###################################
    - task: PublishPipelineArtifact@1
      displayName: '5. Publish Artifact'
      inputs:
        targetPath: '$(Build.ArtifactStagingDirectory)'
        artifact: 'SQL_Dacpac'
        publishLocation: 'pipeline'
After that is calls the second YAML file that does the actual deployment. Because we want to reuse is for all environments you need to pass some parameter values that are comming from the variable groups from the previous step. The hardcoded parameter is the name of Azure DevOps Service Connection that uses the SP to connect to the database. The env parameter is just for some logging/debugging purposes to show to which environment you are deploying.
###################################
# Deploy Test environment
###################################
- stage: DeployTst
  displayName: Deploy TST
  variables:
    - group: SQLServerlessParamsTst
  pool:
    vmImage: 'windows-latest'
    # name: my-agentpool
  condition: and(succeeded(), eq(variables['Build.SourceBranchName'], 'test'))
  dependsOn: CreateSQLArtifact
  jobs:
    - template: DeploySqlServerless.yml
      parameters:
        env: TST
        ServiceConnection: SC-Synapse-T
        SqlServerName: $(SqlServerName)
        SqlDatabaseName: $(SqlDatabaseName)
        SqlProjectName: $(SqlProjectName)
        ADLSLocation: $(ADLSLocation)
###################################
# Deploy Acceptance environment
###################################
- stage: DeployAcc
  displayName: Deploy ACC
  variables:
    - group: SQLServerlessParamsAcc
  pool:
    vmImage: 'windows-latest'
    # name: my-agentpool
  condition: and(succeeded(), eq(variables['Build.SourceBranchName'], 'acceptance'))
  dependsOn: CreateSQLArtifact
  jobs:
    - template: DeploySqlServerless.yml
      parameters:
        env: ACC
        ServiceConnection: SC-Synapse-A
        SqlServerName: $(SqlServerName)
        SqlDatabaseName: $(SqlDatabaseName)
        SqlProjectName: $(SqlProjectName)
        ADLSLocation: $(ADLSLocation)

###################################
# Deploy Production environment
###################################
- stage: DeployPrd
  displayName: Deploy PRD
  variables:
    - group: SQLServerlessParamsTst
  pool:
    vmImage: 'windows-latest'
    # name: my-agentpool
  condition: and(succeeded(), eq(variables['Build.SourceBranchName'], 'main'))
  dependsOn: CreateSQLArtifact
  jobs:
    - template: DeploySqlServerless.yml
      parameters:
        env: PRD
        ServiceConnection: SC-Synapse-P
        SqlServerName: $(SqlServerName)
        SqlDatabaseName: $(SqlDatabaseName)
        SqlProjectName: $(SqlProjectName)
        ADLSLocation: $(ADLSLocation)

Build and publish artifact


DeploySqlServerless.yml
The second YAML file starts with the parameters that are required to call this script. Then the environment name in the job that you can use to set some approvals. The first step is just for debugging. Showing the parameter values and a treeview of the agent. You should be able to see the artifact folder which is useful to set up the deployment task where you need the paths of the dacpac and publish profile. In the AdditionalArguments property you can override the value of the Storage Account location. If you have multiple just repeat the entire value with a space between it.
parameters:
  - name: env
    displayName: Environment
    type: string
    values:
    - DEV
    - TST
    - ACC
    - PRD
  - name: ServiceConnection
    displayName: Service Connection
    type: string
  - name: SqlServerName
    displayName: Sql Server Name
    type: string
  - name: SqlDatabaseName
    displayName: Sql Database Name
    type: string
  - name: SqlProjectName
    displayName: Sql Project Name
    type: string
  - name: ADLSLocation
    displayName: Azure Data Lake Location
    type: string
 
 
jobs:
    - deployment: deploymentjob${{ parameters.Env }}
      displayName: Deployment Job ${{ parameters.Env }}
      environment: deploy-to-${{ parameters.Env }}
      strategy:
        runOnce:
          deploy:
            steps:
            ###################################
            # 1 Show environment and treeview
            ###################################
            - powershell: |
                Write-Output "Deploying ${{ parameters.SqlProjectName }} to DB ${{ parameters.SqlDatabaseName }} and server ${{ parameters.SqlServerName }} in the ${{ parameters.env }} environment"
                Write-Output "Changing SQLCMD variabele DeltaLocation to value ${{ parameters.ADLSLocation }}"
                tree "$(Pipeline.Workspace)" /F
              displayName: '1 Show environment and treeview Pipeline_Workspace'
 
            ###################################
            # 2 Deploy DacPac
            ###################################            
            - task: SqlAzureDacpacDeployment@1
              displayName: '2 Deploy DacPac'
              inputs:
                azureSubscription: '${{ parameters.ServiceConnection }}'
                AuthenticationType: 'servicePrincipal'
                ServerName: '${{ parameters.SqlServerName }}-ondemand.sql.azuresynapse.net'
                DatabaseName: '${{ parameters.SqlDatabaseName }}'
                deployType: 'DacpacTask'
                DeploymentAction: 'Publish'
                DacpacFile: '$(Pipeline.Workspace)/SQL_Dacpac/SQL/${{ parameters.SqlProjectName }}/bin/debug/${{ parameters.SqlProjectName }}.dacpac'
                PublishProfile: '$(Pipeline.Workspace)/SQL_Dacpac/SQL/${{ parameters.SqlProjectName }}/${{ parameters.SqlProjectName }}.publish.xml'
                AdditionalArguments: /Variables:DeltaLocation=${{ parameters.ADLSLocation }}
                IpDetectionMethod: 'AutoDetect'
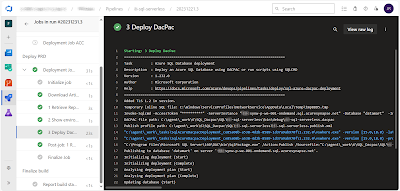
Deploy Serverless SQL pool database


Conclusion
In this post you learned to apply an 'old fashioned' solution to a relative new service. This solution doesn't only work for the Synapse Serverless SQL Pool, but also for the Synapse Dedicated SQL Pool.

There is still one bug/problem. For the Serverless SQL Pool it seems that updating the External Data Source is not possible. The first deployment is no problem, but altering statements are ignored. Probably because there are already external tables referencing this object. You are probably not updating this external source a lot to make it a big issue, but if you want to do it you can use a pre-deployment script in the database project to first drop those object.

In a next post we will show how to give Power BI access to this Synapse Serverless SQL Pool database.

Thanks to colleagues Ralph Koumans and Bart van Es for helping out setting it up.

Tuesday, 24 October 2023

Review Synapse notebooks with your GPT model

Case
Since the introduction of ChatGPT in late 2022, people have started to discover the various applications of Large Language Models (LLMs) in coding and beyond. LLM’s can be a helpful sparring partner in developing and reviewing code. As an IT consultant, I've started using LLMs in my coding practices. This made me wonder: ‘Can I automate the use of LLM in my development process?’. Which is Azure Synapse in my case.

And the short answer is: ‘yes, you can’


Solution
This blog serves as a step-by-step guide to integrating GPT 3.5 into your Azure DevOps pipeline for automated code reviews. The solution that I’m proposing checks which files have changed between the source branch and the target branch in a pull request. If one of these changed files is a Synapse notebook, the code is passed on the GPT model on your tenant with the request to provide feedback. The feedback given by the GPT model is posted as a comment in the pull request.

Before you start, make sure you have the following three resources set up and configured correctly. I’ll include links to other step-by-step guides to create the required resources.

Required resources:

*Access to the Microsoft Azure OpenAI service is limited at the time of writing.

1) Create a GPT model in Azure OpenAI service

Once you have gained access to the Azure OpenAI service you need to create an OpenAI service and deploy a model. Click here to follow the comprehensive guide by Christopher Tearpak on creating and deploying your GPT model in Azure. The result should be an OpenAI service resource:

Expected result after creating your own OpenAI Service


With a GPT model deployment:
Expected result after deploying your own GPT model


2) Setup and configure Azure DevOps

Scripts
Three scripts must be present in your repository. These scripts can be found at the SynapseBuildValidations repository (which also contains other useful build validation scripts).

Download the scripts from the SynapseBuildValidations repository. Here is what each script does:

  • get_GPT_feedback.py: Retrieves and passes your code to GPT and posts the feedback to the pull request. 
  • requirements.txt: Lists the required Python packages for the above script. 
  • GPT_code_review.yml: Contains the pipeline configuration.
Expected folder/file structure for your repository


Create variable group
Create a new library under “Pipelines” and give it the name: “GPT_connection_data”.
Add the following variables:

  • openai_api_base
  • openai_api_key
  • openai_api_type
  • openai_api_version
  • synapse_root_folder

The variables openai_api_base and openai_api_key can be found in the “Keys and Endpoint” tab in your OpenAI resource.

Find your Key and Endpoint in "Keys and Endpoint" of your OpenAI service


Copy the “Endpoint” to “Openai_api_base” and one of the keys to “openai_api_key”.
Openai_api_type needs to be filled with: “azure” and openai_api_version “2023-03-15-preview”.

The variable synapse_root_folder contains the path to the root folder containing the synapse files. In my case it’s just “Synapse”, because all the synapse files can be found in {repository_root}/Synapse
An example of my repository, where the synapse_root_folder is "Synapse"


After you’ve set all your variables, the resulting variable group should look like this:

Expected variable group in Azure DevOps


Create a pipeline

The GPT_code_review.yml contains the pipeline code needed to configure the agent and execute the get_GPT_feedback.py script. You need to create a new pipeline based on the GTP_code_review.yml.

Click here to follow the comprehensive guide by Xeladu on creating a pipeline.

The result should be as follows:

The resulting pipeline after following the guide


Disable “Override YAML continuous integration (CI) trigger”

Now you’ll need to disable the CI trigger of your new pipeline.
Open the pipeline in edit mode, select the three vertical dots and select “Trigger”
Select triggers to change the trigger settings


Then select your project under “Continuous integration”, check “Override the YAML CI trigger”, check disable CI and select “save”.

Steps to disable the CI trigger


Permit pipeline access to variable group resource

After you’ve disabled the CI trigger, you’ll need to start a run. During the run you’ll get a notification that the pipeline needs permission to access a resource. Click on the “View” button and permit the access to the variable group GPT_connection_data by clicking the “Permit” button. The run will continue and eventually fail.

Permit the pipeline to access the variable group


Note that this pipeline is designed to operate only within the context of a pull request. Because it’s dependent on a few system variables that are only present on the build agent during a pull request.

Set rights for build agent
The GPT feedback is posted in comments of the pull request. The build agent needs to have the right to post in the pull request. Go to “Project settings” and select “Repositories”, when you’re in “Repositories” select security and select your “{Projectname} Build Service“.
Steps to select the build service user


Once the build service user is selected, you must grant this user permission to contribute to pull requests.

Set the "Contribute to pull request" to Allow


After these actions, your build agent user has access to write comments to a pull request.

Add the pipeline as build validation
The final step is adding your GPT_Feedback_pipeline as build validation on your desired branch. Go to “Project settings”, select “Repositories” and select the repository where you want to add the pipeline (“DemoProject” in my example). With the repository select “Policies”
Steps to get to the branch you want to set the build validation to


Select the branch where you want to have the build validation.
Select the branch you want to set the build validation to


Within this branch, select the plus icon in the build validation component.
Select the plus to add a pipeline as build validation


In the “Add build policy” pop-up, select the build pipeline: “GPT_Feedback_Pipeline”, set a display name and select “Save”

Pop-up to select a pipeline
as build validation


Now you’re good to go! When you merge another branch into the branch on which you have enabled the branch validation the GPT_Feedback_pipeline will run.

3) Testing

Now its time to perform a pull request. You will see that the validation will first be queued. So this extra validation will take a little extra time, especially when you have a busy agent. The pipeline should always run without errors. When there is no feedback, there won’t be any comments. This means that your code is perfect :) or there aren’t any changes to any of the notebooks. However, when there is feedback, it will be posted in the comments.

Let’s see de build pipeline in action. First off, we need a new branch, in my case a feature branch
  1. Create a new branch in Synapse called Feature
  2. Create a new notebook
  3. Create some sample code in python or SQL
Sample code in Azure Synapse


  1. Create a pull request based on your new branch
  2. Fill out the details of your pull request and make sure you’re merging into the branch with the GPT build validation
  3. Confirm the creation of your pull request.
  4. Your pull request is created and the GPT_Feedback pipeline starts running
  5. After the pipeline has run successfully and the GPT model gave feedback for improvement. The feedback is posted in the comments of the merge request
GPT response in the comments of your pull request


4) Altering the feedback to your situation

The prompt sent to the GPT model is pre-determined and might not suit your specific situation. At the time of writing, the prompt is included in the get_GPT_feedback.py script. This script contains a get_gpt_response function. The first lines of this function are used to set three strings. These strings contain the prompt for the “system”, “user” and “assistant” roles passed to the GPT model. More on the use of these roles can be found here. To alter the prompts passed to the GPT model, you need to alter the strings: content_system_string, content_assistant_string and/or content_user_string.
Subset of the get_GPT_feedback.py where the GPT commands are set


Conclusion
In this post you learned how to integrate GPT into your deployment pipeline. Your pipeline will provide feedback on your changed of added synapse notebooks. The feedback is posted as comments in the pull request in Azure DevOps. You can customize the prompt to suit your specific needs.