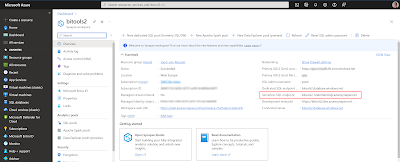
I have a Service Account for my data source in the Power BI Gateway, but how do I give this account access to the (External) Tables located in the Synapse Serverless SQL Pool database?
Solution
If you create a Data Lakehouse with Synapse then at the moment you still need to put the datamart as a set of external tables in the Synapse Serverless SQL Pool to make it easily accesable for Power BI. Giving access to it is very similar to the solution we showed to give readonly access to an Azure SQL Database when you have a Data Warehouse Achitecture. For a Data Lakehouse Architecture we use External Tables that point to a Delta Table instead of regular tables. This requires an extra step with a Database Scoped Credential.
 |
| Give Power BI Access to Delta Tables |
Solution
If you create a Data Lakehouse with Synapse then at the moment you still need to put the datamart as a set of external tables in the Synapse Serverless SQL Pool to make it easily accesable for Power BI. Giving access to it is very similar to the solution we showed to give readonly access to an Azure SQL Database when you have a Data Warehouse Achitecture. For a Data Lakehouse Architecture we use External Tables that point to a Delta Table instead of regular tables. This requires an extra step with a Database Scoped Credential.
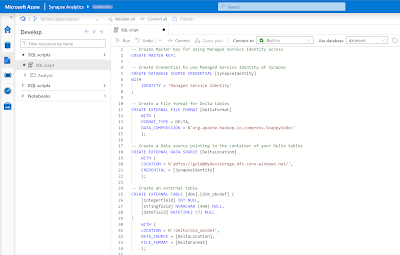
The starting position is that you have a database in the Synapse Serverless SQL Pool with some external tables pointing to your Delta Tables within your 'golden' container. Below the basic TSQL code for setting up those External Tables.
When you have created a whole set of those External Tables for your datamart, then you can add a user to the Serverless SQL Pool database which can be used by Power BI to create the Data Source in the Gateway.
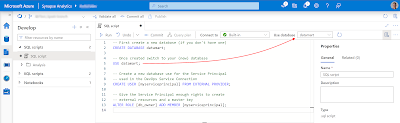
Conclusion- First step is to create a Master Key. We need this for the second step. You can make it more secure by adding a strong password for encryption.
- Second step is to create a Database Scoped Credential with the Managed Service Identity of the underlying Synapse Workspace. This allows us the give the underlying Synapse Workspace access to the 'golden' container instead of giving all the separate users access. There are alternatives so study the options to see which solution fits the security policy of your organization.
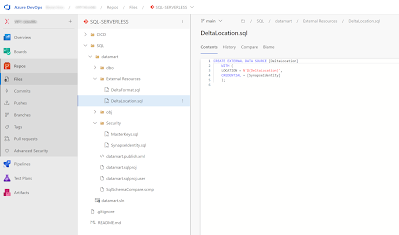
- Third step is creating an External Data Source that points to your 'golden' container where the Delta Tables are stored. Notice that it uses the credential from the previous step. The location is the URI pointing to a container in a Gen2 Storage Account. ABFSS is short for Azure Blob File System Secure. The format of the URI is: abfss://[containername]@[storageaccountname].dfs.core.windows.net/
- Fourth step is creating an External File Format where you can specify options for your source type (CSV/Parquet/JSON/Delta/etc). In this example the format for the Delta Table is very basic.
- The fifth and last step is creating an External Table that points to the Delta Table in your data lake. This means the data stays in the data lake and only the table structure is stored in the database. Notice the reference to your data source and file format from the previous steps. The location in the table is a folder path that starts in the root of your container and points to the Delta Table folder.
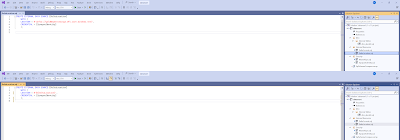
-- 1. Create Master Key for using Managed Service Identity access
CREATE MASTER KEY;

-- 2. Create Credential to use Managed Service Identity of Synapse
CREATE DATABASE SCOPED CREDENTIAL [SynapseIdentity]
WITH
    IDENTITY = 'Managed Service Identity'
;

-- 3. Create a Data source pointing to the container of your Delta tables
CREATE EXTERNAL DATA SOURCE [DeltaLocation]
	WITH (
	LOCATION = N'abfss://gold@mydevstorage.dfs.core.windows.net/',
    CREDENTIAL = [SynapseIdentity]
	);

-- 4. Create a File format for Delta tables
CREATE EXTERNAL FILE FORMAT [DeltaFormat]
    WITH (
    FORMAT_TYPE = DELTA,
    DATA_COMPRESSION = N'org.apache.hadoop.io.compress.SnappyCodec'
    );

-- 5. Create an external table
CREATE EXTERNAL TABLE [dbo].[dim_abcdef] (
    [integerfield] INT NULL,
    [stringfield] NVARCHAR (400) NULL,
    [datefield] DATETIME2 (7) NULL
)
    WITH (
    LOCATION = N'/delta/dim_abcdef',
    DATA_SOURCE = [DeltaLocation],
    FILE_FORMAT = [DeltaFormat]
    );
When you have created a whole set of those External Tables for your datamart, then you can add a user to the Serverless SQL Pool database which can be used by Power BI to create the Data Source in the Gateway.
- First you need to create a user. For this example we used a user from Microsoft Entra ID (Azure Active Directory). Therefor you see the FROM EXTERNAL USER. This is because our Synapse Workspace is created with the option 'Microsoft Entra authentication only'. Therefor database users or Shared Access Signatures are not allowed.
- The second step is to give this newly added user some access. In this simplified example we give the new user db_datareader access to the entire database. If you have a larger or more complex database then you can make this much more sophisticated by for example giving reader access to only a specific schema or table.
- The last step is giving the user permission to use the Database Scoped Credential that was used in the External Data Source that was used in the External Table. This is done with GRANT and the REFERENCES permission. Without this step you will not be able to query the External Tables.
-- 6. Service Account bekend maken op datamart database
CREATE USER [sa-pbi-workspace-d@xyz.com] FROM EXTERNAL PROVIDER;

-- 7. Service Account leesrechten geven op tabellen
ALTER ROLE [db_datareader] ADD MEMBER [sa-pbi-workspace-d@xyz.com]

-- 8. Service Account reference rechten geven op credential van Synapse
GRANT REFERENCES ON DATABASE SCOPED CREDENTIAL::SynapseIdentity TO [sa-pbi-workspace-d@xyz.com]
In this post we showed you how to give a user, that was created for Power BI, read-only access to the tables in your Azure Synapse Serverless SQL Pool database. Very similar to giving access to a regular database. Now you can use this user for your Power BI gateway datasource.
In the future we can hopefully use the Power BI Direct Lake mode on regular Azure Storage Accounts or write with Synapse to the Fabric One Lake.