I want to deploy my development Synapse workspace to the next environment (test, acceptance or production). What is the easiest way to automate this proces via DevOps? And is it possible to ignore the publish button just like in Data Factory.
 |
| Release Synapse Workspace via DevOps |
Solution
With the new (updated) Synapse add-on for DevOps it is much easier to release Synapse then it was to release Data Factory. And if you use the validateDeploy operation (instead of deploy) then you don't need the workspace_publish branch. It can directly read from the collaboration branch so that you don't have to use the publish button to initiate the CICD proces.
This solution contains of two separate main posts and a couple of side posts.
- Setup Synapse and DevOps in preparation of the pipeline.
- Setup the YAML pipeline to do the actual deployment (this post).
Addiontal posts
- Cleanup Synapse before deployment
- Cleanup Synapse after deployement (faster) comming soon
5) Preparation
Make sure to do the preparations described in the previous post. Add two empty files to the CICD\YAML folder (or your own folder setup):
- Synapse.yml
- DeploySynapse.yml
 |
| Add two YAML files |
6) The YAML pipeline
In this example we will create an artifact first and then deploy that artifact to the test/acceptance/production environment of Synapse, but depending on the branch strategy you could skip that step and directly publish from a branch in the repository. The artifact build and artifact publish are separated in two different YAML files.
Synapse.yml
First step is the trigger. When should the pipeline start? In this case if the branch name is equals to 'main' and the change is happening in the 'Synapse' folder. So changes in the 'CICD' folder will not trigger the pipeline.
###################################
# When to create a pipeline run
###################################
trigger:
  branches:
    include:
    - main
  paths:
    include:
    - Synapse/*
The second step is creating the first stage. It will become the first blue, green or red circle in the overview. It also cleans the workspace, which is handy for self-hosted agents. And it mentions the agent pool. In this case a Microsoft-hosted agent.stages:
###################################
# Create Artifact of Synapse files
###################################
- stage: CreateSynapseArtifact
displayName: Create Synapse Artifact
jobs:
- job: CreateArtifact
displayName: 'Create Actifact'
workspace:
clean: all
pool:
vmImage: 'windows-latest' #'ubuntu-latest'
steps:
The third block (step 1) retrieves the content of the repository to the agent. This allows us to create an artifact of the Synapse files that are stored in the repository. ###################################
# 1 Retrieve Repository
###################################
- checkout: self
displayName: '1 Retrieve Repository'
clean: true
The fourth block (step 2) is optional. It just shows a treeview of the agent which is very handy for debugging your YAML pipelines to make sure you are mentioning the right folder or file in any of the tasks. This is explained in detail in a previous post. ###################################
# 2 Show treeview of agent
###################################
- powershell: |
tree "$(Pipeline.Workspace)" /F
displayName: '2 Treeview of Pipeline.Workspace'
The fifth block (step 3) is the coping of all Synapse files to an artifact staging folder. Optionaly you could skip this part an publish directly from the Synapse folder. ###################################
# 3 Stage artifact
###################################
- task: CopyFiles@2
displayName: '3. Copy Artifact'
inputs:
contents: |
**\*.*
SourceFolder: 'Synapse'
TargetFolder: '$(build.artifactstagingdirectory)'
The sixth block (step 6) is publising all the files located in the artifact staging folder. ###################################
# 4 Publish artifact
###################################
- task: PublishPipelineArtifact@1
displayName: '4 Publish template as artifact'
inputs:
targetPath: $(Build.ArtifactStagingDirectory)
artifact: 'SynapseArtifact'
publishLocation: 'pipeline'
The last block in this YAML file is calling the next YAML file with parameters so that you can reuse this step for all environments (Test/Acceptance/Production). The values are now hardcoded in this example, but you should ofcourse try to use a variable group from the Pipeline Library. This makes it much easier to change those parameter values.This example contains 4 variables. The first is just to show the enviroment when writing values to the screen (debugging). The ServiceConnection is the name of your ARM Service Connection that you created in the preparation post. The last two are to point to the correct environment of Synapse.
The first code block are the parameters. In this example the 4 string parameters with the values that are provided in the first YAML file.
The second block consist of some starter code, but the environment piece is important if you want to add rules like approvals. So make sure to create a environment 'Deploy Synapse to ACC' or choose your own name.
Note 1: If you get an error Stderr: error: missing required argument 'factoryId', then please check this post
###################################
# Deploy Acceptance environment
###################################
- stage: DeployAcc
  displayName: Deploy ACC
#   variables:
#     - group: SynapseParametersAcc
  pool:
    vmImage: 'windows-latest'
  jobs:
    - template: DeploySynapse.yml
      parameters:
        Environment: ACC
        ServiceConnection: SynapseServiceConnection
        ResourceGroupName: rg_dwh_acc
        TargetWorkspaceName: dwhacc
DeploySynapse.yml
###################################
# Parameters
###################################
parameters:
  - name: Environment
    displayName: Environment
    type: string
    values:
    - TST
    - ACC
    - PRD
  - name: ServiceConnection
    displayName: Service Connection
    type: string
  - name: ResourceGroupName
    displayName: Resource Group Name
    type: string
  - name: TargetWorkspaceName
    displayName: Target Workspace Name
    type: string
The second block consist of some starter code, but the environment piece is important if you want to add rules like approvals. So make sure to create a environment 'Deploy Synapse to ACC' or choose your own name.
###################################
# Start
###################################
jobs:
    - deployment: deploymentjob${{ parameters.Environment }}
      displayName: Deployment Job ${{ parameters.Environment }}
      environment: Deploy Synapse to ${{ parameters.Environment }}

      strategy:
        runOnce:
          deploy:
            steps:
The third block (step 1) is about getting the data from the repository. If you use the artifact then you could skip this code because the job will automatically start with a download artifact step. If you want to directly start publising from the collaboration branch or you need to execute for example some extra PowerShell scripts from the repos as well then you need this step.
If you want to use the publish branch then you will find some example code for that as well. This allows you to keep the the YAML files in the collaboration branch instead of the publish branch. You will need to change the operation in the last step to 'deploy' and change some of its properties (not discribed in this post).
            ###################################
            # 1 Check out repository to agent
            ###################################
            # - checkout: 'git://YourProjectName/YourReposName@workspace_publish'
            #   path: workspace_publish
            - checkout: self
              displayName: '1 Retrieve Repository'
              clean: true
The fourth block (step 2) is again the optional treeview to check the path of folders and files on your agent. Very handy, but once your code works fine then you can comment-out this part. ###################################
# 2 Show environment and treeview
###################################
- powershell: |
Write-Output "Deploying Synapse in the ${{ parameters.Environment }} environment"
tree "$(Pipeline.Workspace)" /F
displayName: '2 Show environment and treeview Pipeline_Workspace'
The fifth and last block (step 3) is the actual deployment of Synapse. The DeleteArtifactsNotInTemplate option is to remove pipelines, datasets, linkedservice, etc. from your test/acceptance/production environment that you removed from the development environment. This is also the place where you can replace parameters and linked service which will be explained in a separate post.
            ###################################
            # 3 validateDeploy
            ###################################
            - task: Synapse workspace deployment@2
              displayName: '3 Deploy Synapse Workspace'
              inputs:
                operation: validateDeploy
                ArtifactsFolder: '$(Pipeline.Workspace)/SynapseArtifact'
                azureSubscription: ${{ parameters.ServiceConnection }}
                ResourceGroupName: ${{ parameters.ResourceGroupName }}
                TargetWorkspaceName: ${{ parameters.TargetWorkspaceName }}
                DeleteArtifactsNotInTemplate: true
                # OverrideArmParameters: '
                # -workspaceName $(syn_wrk_name)
                # -ls_akv_mykeyvault_properties_typeProperties_baseUrl $(syn_mykeyvault)
                # '
Note 1: If you get an error Stderr: error: missing required argument 'factoryId', then please check this post
Note 2: If you get an error: Stderr: 'node' is not recognized as an internal or external command, operable program or batch file, then please check this post
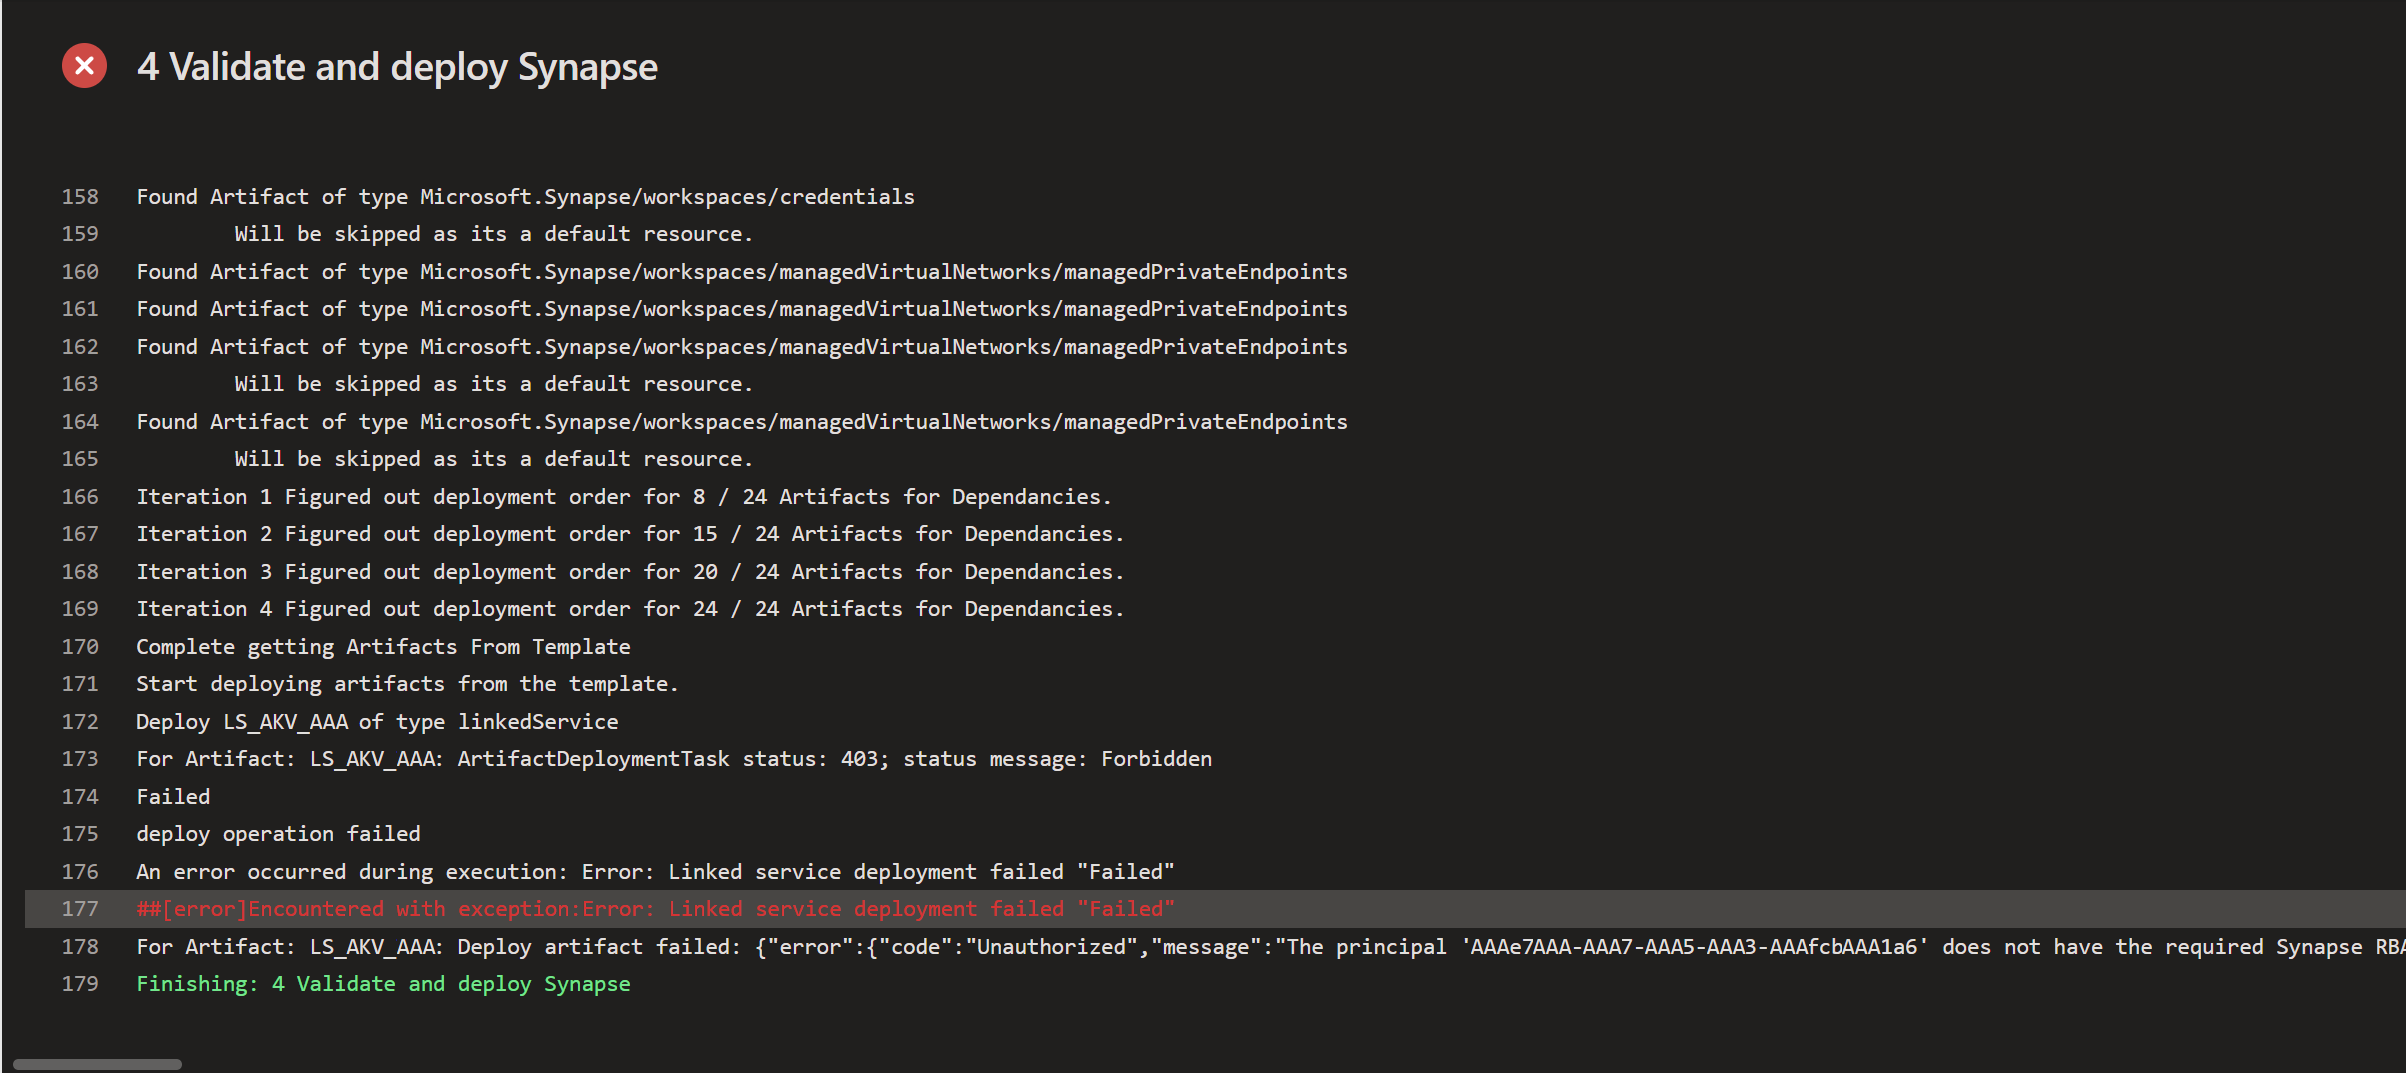
7) The result
Now create a pipeline of an existing YAML file in your reposity and make sure to run the pipeline (manually or triggered) to see the result.
 |
| Successfully deployed Synapse |
Conclusion
In this second post we described all the steps of the YAML pipeline and succesfully executed the pipeline. In a follow up post we will explain more details about overriding parameters during the deployment. Also see Microsofts own documentation for CICD for Synapse, but at the moment of writing it is not up to date with info of task version 2.
To see the available operations and related properties of this task you can also use the 'Show assistant' option in the YAML editor in Azure DevOps. An other option is to use the Release Pipeline editor and then hit the View YAML button.
 |
| Gui of the task via Show Assistant |
 |
| View YAML of Release pipeline task |