I want to deploy my development Synapse workspace to the next environment (test, acceptance or production). What is the easiest way to automate this proces via DevOps? And is it possible to ignore the publish button just like in Data Factory.
 |
| Release Synapse Workspace via DevOps |
Solution
With the new (updated) Synapse add-on for DevOps it is much easier to release Synapse then it was to release Data Factory. And if you use the validateDeploy operation (instead of deploy) then you don't need the workspace_publish branch. It can directly read from the collaboration branch so that you don't have to use the publish button to initiate the CICD proces.
This solution contains of two separate main posts and a couple of side posts.
- Setup Synapse and DevOps in preparation of the pipeline (this post).
- Setup the YAML pipeline to do the actual deployment.
Addiontal posts
- Cleanup Synapse before deployment
- Cleanup Synapse after deployement (faster) comming soon
1) Setup Git repository
Setup your Synapse Workspace to use a Git repository. You can find this in Synapse under the toolbox icon (manage) in the left menu. Beside choosing the right Collaboration branch (that differs per organization and branch strategy), it is also usefull to change the Root folder to for example /Synapse/. This allows you to create a separate folder in the root for your CICD files like YAML and PowerShell scripts.
 |
| Git repository setup in Synapse |
In your repository it should look something like this where the Synapse files are separated from the CICD files. Make sure to create a CICD folder and a YAML sub-folder to accommodate the pipeline files from the next post.
 |
| Synaose in the (DevOps) Repository |
2) Give Service Principal Access
To do the actual deployment of the Synapse Workspace, you want to use a Service Principal. Create one or ask your AAD administrator to provide one if you are not authorized to create one yourself.We want to give this Service Principal (SP) the minimal rights in the target workspace to do the deployment. For this we will give it the Synapse Artifact Publisher role within Synapse. You can do this in Synapse under the toolbox icon (manage) in the left menu. Then choose Access control and use the +Add button to give the SP the correct role. In the next step we will create a Service Connection in Azure DevOps with this SP. Do this for all target workspaces (tst/acc/prd).
 |
| Access control - Make SP Synapse Artifact Publisher |
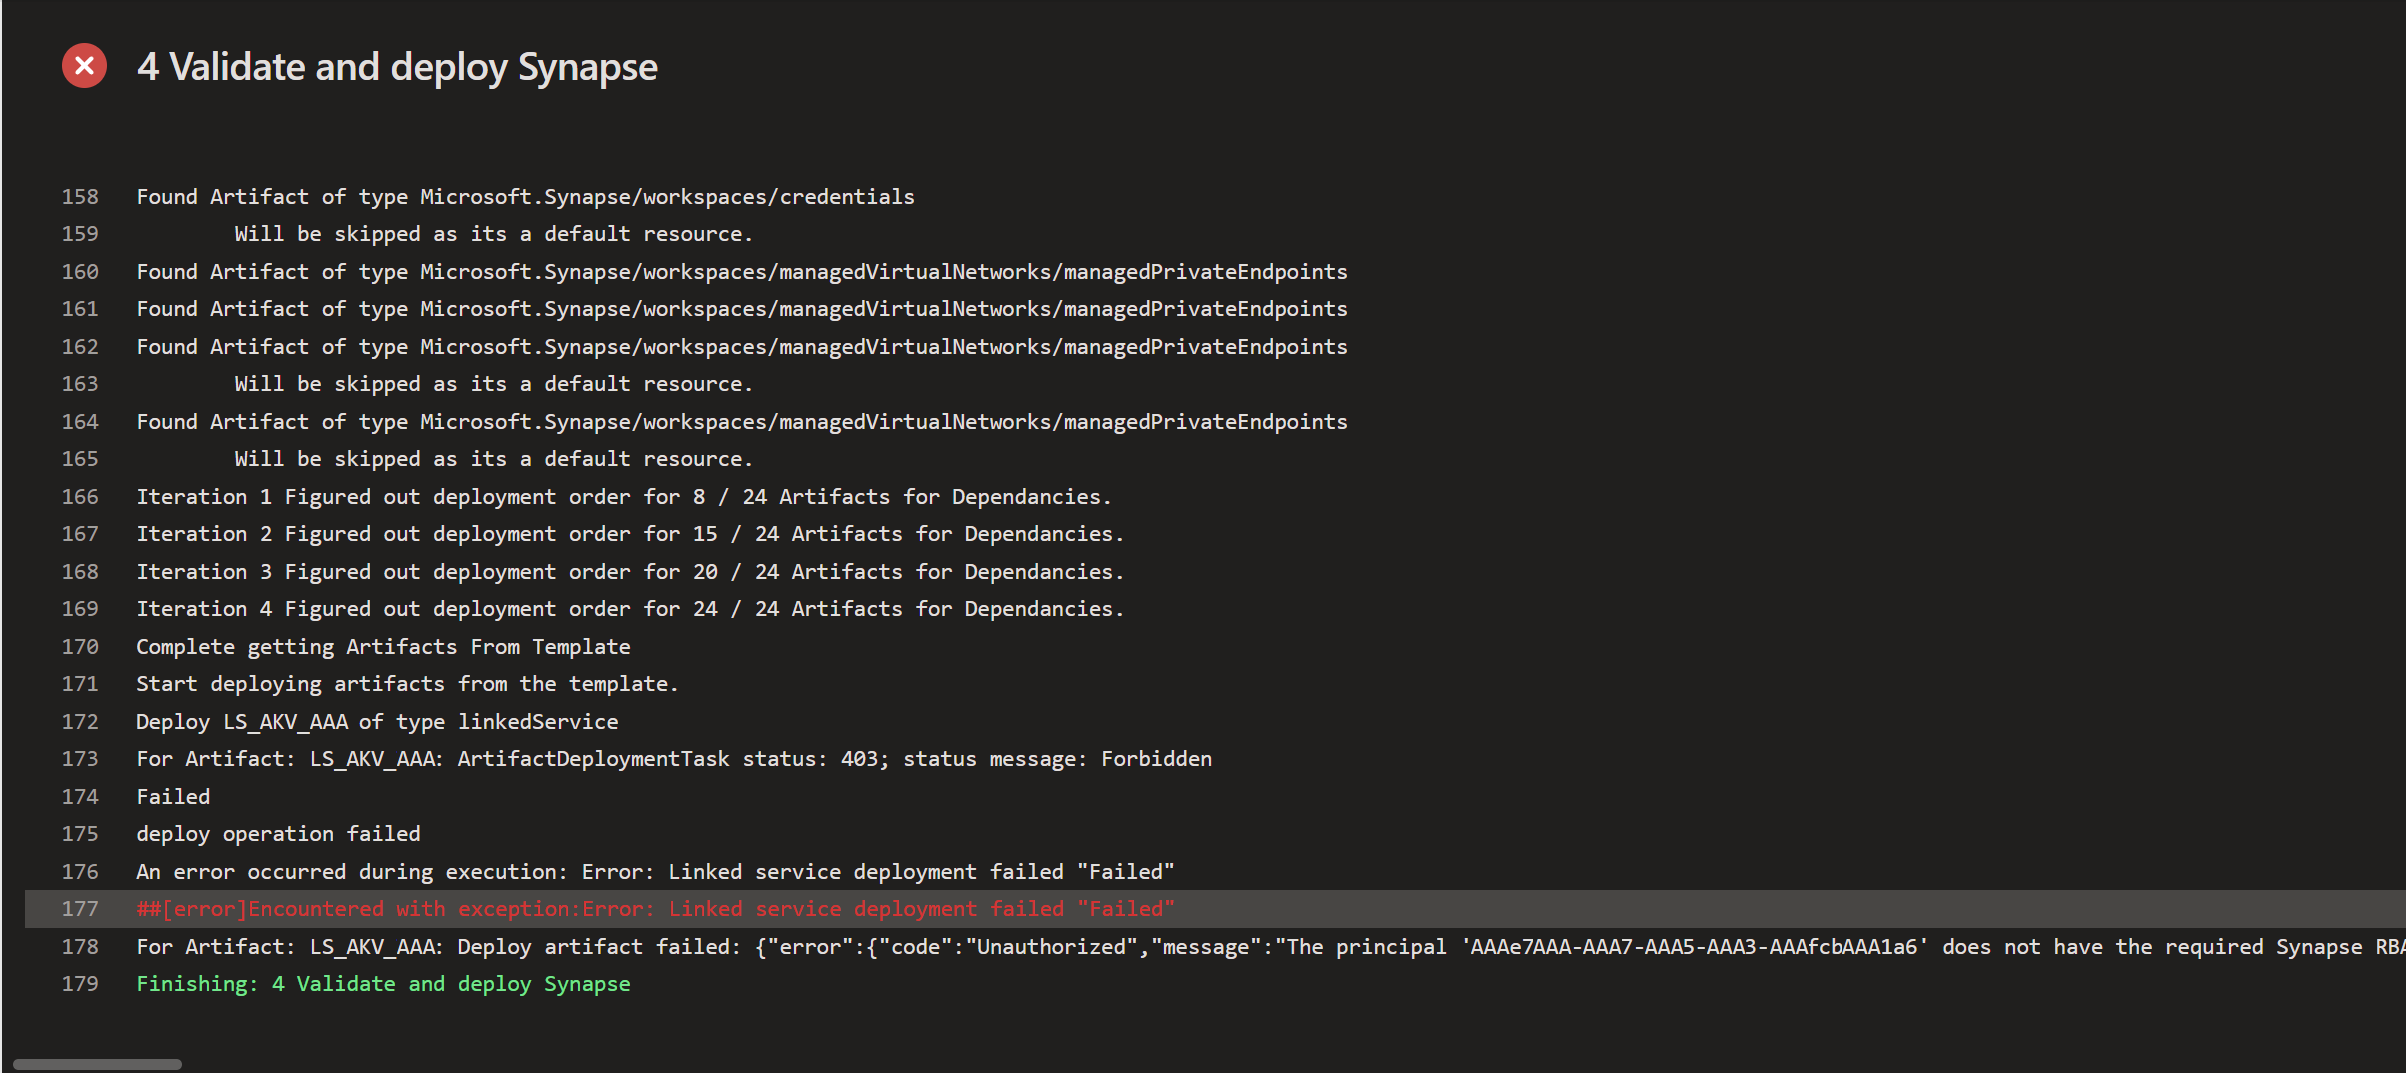
If your Service Principal didn't get the correct authorization then you will get the following error during the deployment in DevOps.
Start deploying artifacts from the template.
Deploy LS_AKV_AAA of type linkedService
For Artifact: LS_AKV_AAA: ArtifactDeploymentTask status: 403; status message: Forbidden
Failed
deploy operation failed
An error occurred during execution: Error: Linked service deployment failed "Failed"
##[error]Encountered with exception:Error: Linked service deployment failed "Failed"
For Artifact: LS_AKV_AAA: Deploy artifact failed: {"error":{"code":"Unauthorized","message":"The principal 'aaaaaaaa-bbbb-cccc-dddd-12345678' does not have the required Synapse RBAC permission to perform this action. Required permission: Action: Microsoft.Synapse/workspaces/linkedServices/write, Scope: workspaces/mySynapseAcc."}}
 |
| Unauthorized |
3) Setup DevOps Service Connection
The next step is to create a Service Connection in DevOps. In the Project settings of your DevOps project you can find the option Service connections under Pipelines. You need to create a new Service Connection of the type Azure Resource Manager (ARM) for which you need the Service Principal Id (application id), the Service principal key (the secret) and the Tenant Id of your Azure Active Directory. Make sure to give the service connection a useful name. You will need the Service Connection name in the YAML code of the next post.
 |
| Add Service Connection |
4) Add Synapse workspace deployment Add on
Microsoft made the deploy of a Synapse workspace a little easier then for Data Factory by creating a DevOps add-on for Synapse. You need to add this to your DevOps Organization by clicking the green button with Get it free. If you are not an DevOps Organization administrator then you need to ask someone else to approve the installation.
 |
| Synapse workspace deployment addon |
If you already have this add-on then make sure to update it to at least 2.3.0. You can find the add-on in the Organization Setting under General - Extensions.
 |
| Check version of extension |
Conclusion
In this first post we showed some preparations that are not that difficult, but you will need the right access for it or be able to ask a colleague for it that does have access to the AAD and the DevOps organization. In the next post we will create a YAML pipeline that consists of two YAML files to do the actual deployment.
Hi, as mentioned, did you managed to add any post on the 'override parameters' for the synapse deployment task?
ReplyDelete