Case
I want to downgrade the Tier of my Azure SQL DB automatically after working hours and upgrade it in the morning right before working hours to minimize the Azure costs. How do I do that in Azure?
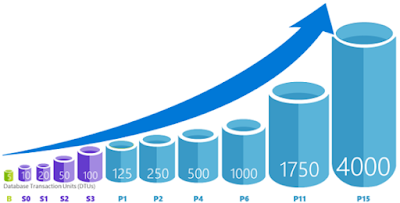 |
| Change the Tier of your SQL Azure DB |
Solution
You could solve this with a scripting language like PowerShell and run that PowerShell script each morning and evening with SQL Server Agent or Windows Scheduler, but for this solution I will use Azure Runbook with its scheduler. So the entire solution runs in Azure.
1) Automation Account
First we need an Azure Automation Account to run the Runbook. If you don't have one or want to create a new one, then search for Automation under Monitoring + Management and give it a suitable name, then select your subscription, resource group and location. For this example I will choose West Europe since I'm from the Netherlands.
 |
| Azure Automation Account |
2) Credentials
Next step is to create Credentials to run this runbook with. This works very similar to the Credentials in SQL Server Management Studio. Go to the Azure Automation Account and click on Credentials in the menu. Then click on Add New Credentials. You could just use your own Azure credentials, but the best options is to use a service account with a non-expiring password. Otherwise you need to change this regularly.
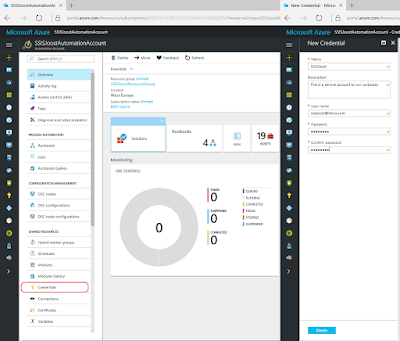 |
| Create new credentials |
3) Connections
This step is for your information only and to understand the code. Under Connections you will find a default connection named 'AzureRunAsConnection' that contains information about the Azure environment, like the tendant id and the subscription id. To prevent hardcoded connection details we will retrieve these two fields in the PowerShell code.
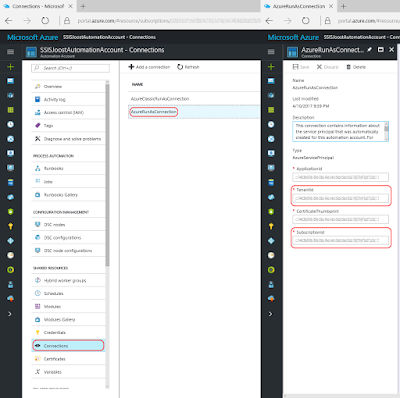 |
| Azure Connections |
4) Variables
An other option to prevent hardcoded values in your PowerShell code it to use Variables. We will use this option to provide the Resource Group, SQL Server Name and Database Name. Go to Variables and add a new variable for ResourceGroupName and add the name of the Resource Group that is used by your Azure DB. Then repeat this for ServerName (name only without .database.windows.net) and DatabaseName (the name of your database).
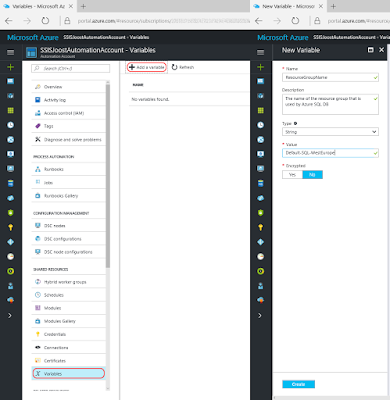 |
| Add variables |
5) Runbooks
Now it is time to add a new Azure Runbook for the PowerShell code. Click on Runbooks and then add a new runbook (There are also four example runbooks of which AzureAutomationTutorialScript could be useful as example). Give your new Runbook a suitable name and choose PowerShell as type.
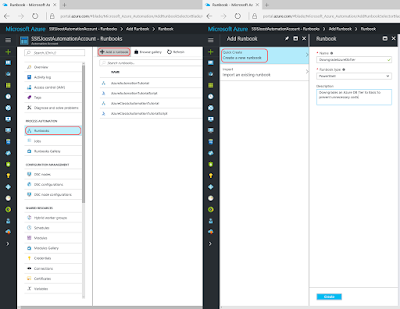 |
| Add Azure Runbook |
6) Edit Script
After clicking Create in the previous step the editor will we open. When editing an existing Runbook you need to click on Edit to edit the code. You can copy and paste the code below to your editor.
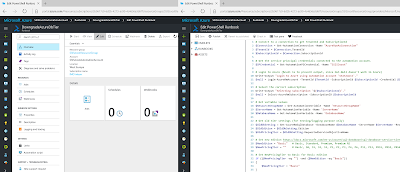 |
| Edit the PowerShell code |
# PowerShell code
# Connect to a connection to get TenantId and SubscriptionId
$Connection = Get-AutomationConnection -Name "AzureRunAsConnection"
$TenantId = $Connection.TenantId
$SubscriptionId = $Connection.SubscriptionId

# Get the service principal credentials connected to the automation account.
$SPCredential = Get-AutomationPSCredential -Name "SSISJoost"

# Login to Azure ($null is to prevent output, since Out-Null doesn't work in Azure)
Write-Output "Login to Azure using automation account 'SSISJoost'."
$null = Login-AzureRmAccount -TenantId $TenantId -SubscriptionId $SubscriptionId -Credential $SPCredential

# Select the correct subscription
Write-Output "Selecting subscription '$($SubscriptionId)'."
$null = Select-AzureRmSubscription -SubscriptionID $SubscriptionId

# Get variable values
$ResourceGroupName = Get-AutomationVariable -Name 'ResourceGroupName'
$ServerName = Get-AutomationVariable -Name 'ServerName'
$DatabaseName = Get-AutomationVariable -Name 'DatabaseName'

# Get old tier settings (for testing/logging purpose only)
$OldDbSetting = Get-AzureRmSqlDatabase -DatabaseName $DatabaseName -ServerName $ServerName -ResourceGroupName $ResourceGroupName
$OldEdition = $OldDbSetting.Edition
$OldPricingTier = $OldDbSetting.CurrentServiceObjectiveName

# Set new edition https://docs.microsoft.com/en-us/azure/sql-database/sql-database-service-tiers
$NewEdition = "Basic"   # Basic, Standard, Premium, Premium RS
$NewPricingTier = ""    # Basic, S0, S1, S2, S3, P1, P2, P3, P4, P6, P11, P13, PRS1, PRS2, PRS4, PRS6

# Set NewPricingTier to Basic for Basic edition
if (($NewPricingTier -eq "") -and ($NewEdition -eq "Basic"))
{
    $NewPricingTier = "Basic"
}

# Write old and new edition to screen (for testing/logging purpose only)
Write-Output "Changing Database Tier from $($OldEdition) ($($OldPricingTier)) to $($NewEdition) ($($NewPricingTier)) "

# Set new tier
$null = Set-AzureRmSqlDatabase -DatabaseName $DatabaseName -ServerName $ServerName -ResourceGroupName $ResourceGroupName -Edition $NewEdition -RequestedServiceObjectiveName $NewPricingTier

# Show done when finished (for testing/logging purpose only
Write-Output "Done"
Note 1: This is a very basic script. No error handling has been added. Check the AzureAutomationTutorialScript for an example. Finetune it for you own needs.
Note 2: There are often two versions of an method like Set-Azure
RmSqlDatabase and Set-AzureSqlDatabase. Always use the one with "Rm" in it (Resource Managed), because that one is for the new Azure portal. Without Rm is for the old/classic Azure portal.
Note 3: Because Azure Automation doesn't support Out-Null I used an other trick with the $null =. However the Write-Outputs are for testing purposes only. Nobody sees them when they are scheduled.
Note 4: This also works for Azure Data Warehouses. Just use other
Tiers like DWU400.
7) Testing
You can use the Test Pane menu option in the editor to test your PowerShell scripts. When clicking on Run it will first Queue the script before Starting it. Running takes about two minutes.
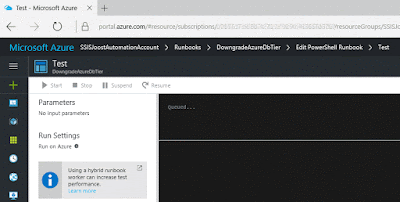 |
| Testing the script in the Test Pane |
8) Publish
When your script is ready, it is time to publish it. Above the editor click on the Publish button. Confirm overriding any previously published versions.
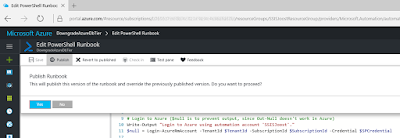 |
| Publish the Runbook |
9) Schedule
And now that we have a working and published Azure Runbook, we need to schedule it. Click on Schedule to create a new schedule for your runbook. For this downgrade script I created a schedule that runs every working day on 7:00PM (19:00). The upgrade script could for example be scheduled on working days at 7:00AM. Now you need to hit the refresh button in the SQL Databases overview in Azure to see if it really works. It takes a few minutes to run, so don't worry too soon.
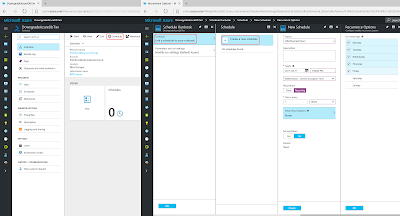 |
| Add Schedule |
Summary
In this post you saw how you can upgrade and downgrade your Azure SQL Databases to save some money in Azure during the
quiet hours. The screenshots only show the downgrade script. For the upgrade version you have a couple of options. You could create one script with a parameter that indicates an upgrade or downgrade. An other option is to use a fancy if-construction that uses the current tier and/or time to decide whether you need an upgrade or downgrade. Or just
create two separate scripts for upgrade and downgrade.


