Showing posts with label SQL_DB. Show all posts

Wednesday 22 March 2023

DevOps - Get-SpnAccessToken is obsolete

Case
I'm deploying my SQL Server database via DevOps with the SqlAzureDacpacDeployment@1 task in YAML, but it is giving me a warning: ##[warning]The command 'Get-SpnAccessToken' is obsolete. Use Get-AccessTokenMSAL instead. This will be removed. It is still working, but the warning message is not very reassuring. 
The command 'Get-SpnAccessToken' is obsolete.
Use Get-AccessTokenMSAL instead.
This will be removed


Solution
This warning message appeared somewhere late 2022 and there is no new version of the dacpac deployment task available at the moment. When searching for this message it appears that other tasks like AzureFileCopy@5 have the same issue. The word MSAL (Microsoft Authentication Library) in the message points to a new(er) way to acquire security tokens.

To get more info you could run the pipeline in debug modes by Enabling system diagnostics.
Enable system diagnostics


Then you will get see a lot of extra messages and right above the warning you will see a message about USE_MSAL (empty) and that its default value is false.
USE_MSAL


It is just a warning and Microsoft will probably solve it some day. If you want to get rid of it you can set an environment variable called USE_MSAL to true within your pipeline. When set to true the task will use MSAL instead of ADAL to obtain the authentication tokens from the Microsoft Identity Platform. The easiest way to do this is writing one line of PowerShell code in a PowerShell task: ##vso[task.setvariable variable=USE_MSAL]true 

###################################
# USE_MSAL to avoid warning
###################################
- powershell: |
    Write-Host "Setting USE_MSAL to true to force using MSAL instead of ADAL to obtain the authentication tokens."
    Write-Host "##vso[task.setvariable variable=USE_MSAL]true"
  displayName: '3 Set USE_MSAL to true'

###################################
# Deploy DacPac
###################################             
- task: SqlAzureDacpacDeployment@1
  displayName: '4 Deploy DacPac' 
  inputs:
    azureSubscription: '${{ parameters.ServiceConnection }}'
    AuthenticationType: 'servicePrincipal'
    ServerName: '${{ parameters.SqlServerName }}.database.windows.net'
    DatabaseName: '${{ parameters.SqlDatabaseName }}' 
    deployType: 'DacpacTask'
    DeploymentAction: 'Publish'
    DacpacFile: '$(Pipeline.Workspace)/SQL_Dacpac/SQL/${{ parameters.SqlProjectName }}/bin/debug/${{ parameters.SqlProjectName }}.dacpac'
    PublishProfile: '$(Pipeline.Workspace)/SQL_Dacpac/SQL/${{ parameters.SqlProjectName }}/${{ parameters.SqlProjectName }}.publish.xml'
    IpDetectionMethod: 'AutoDetect'

After this the warning will not appear anymore and your database will still get deployed. The extra step taks about a second to run.
Extra PowerShell Task


No more absolete warnings


Conclusion
In this post you learned how to get rid of the annoying The command 'Get-SpnAccessToken' is obsolete warning by setting one environment variable to true. You should probably check in a few weeks/months whether this workaround is still necessary or if there is a SqlAzureDacpacDeployment@2 version.


Saturday 12 November 2022

Deploy Azure SQL Databases via a DevOps pipeline

Case
A while ago we did a post about deploying an Azure SQL Database via Azure DevOps using the deployment pipelines. Since that post we mostley used YAML pipelines. So in this post an update on how to accomplish the same with a YAML pipeline.
Deploy Azure SQL DB with DevOps


Solution
The starting point of this post is that you have a Visual Studio database project connected to the DevOps repository.

1) Variable Groups
First we start with some variable groups to parameterize the YAML code. For this example we have one General variable group with variables like the (visual studio) projectname, databasename and service connection (if each environment uses the same service connection). Then there are also variable groups per environment (Development, Test, Acceptance, Production) with variables like the SQL Server name and service connection (if each environment uses a different service connection).
Pipelines > Library > Variable Groups


Whether you need a variable group for DEV depends on how you do your SQL development. Some teams do the development in the central development database and use the compare option in Visual Studio to update the SQL project. In that case you don't want to deploy the project to the DEV database.
Example of variables in variable groups


2) Environments
Second preparation step is the creation of enviroments. This allows you to add approvals and checks for specific environments. You probably want some approvals before you update your production environment. You can reuse these environments for other deployments like ADF, Synapse or Power BI.

Pipelines > Environments


Same note about the DEV environment as in the previous step. If you don't deploy to DEV then you don't need the 'Devploy to DEV' environment.

3) Repos folder structure
Our folder structure in the repos is as follows (if you use a different structure you need to adjust the YAML to it). We have a SQL folder with a subfolder for our Visual Studio database project. The name of the project/folder is stored in the variable group (see step 1). We also have a CICD folder in the root where we store everything that is deployment related. For SQL deployment we only have a subfolder called YAML for the pipelines, but for other deployments we also have a subfolder for PowerShell scripts.
Folder structure of repos


In the YAML folder we have a BuildSQL.yml and this is the main pipeline file that you will be using to add a new pipeline. It calls DeploySQL.yml once for each environment.

4) Build pipeline
Lets explain the YAML of the build pipeline. It first starts by adding the general variable group to the pipeline so that you are able to use those variables from step 1.

Next is the trigger that shows you when the pipeline will be started. In this example it listens to changes in multiple branches, but only when those changes happen in the SQL folder. This part will be different per branche strategy.

Then we have the stages. The first stage is de build stage where the artifact is created and published for later use. In the Job part we have two noteworthy items: workspace clean will first clean your agent before starting. This is handy if you have a self-hosted agent instead of a Microsoft hosted agent. The agent pool that will be used is the second important part. Name is voor self-hosted agents and vmImage is for Microsoft hosted agents.

Then the steps withing the first stage.
  1. Checkout will retrieve the repository content to your agent. We need the visual studio project on the agent to build it.
  2. The treeview step is an optional debug step to show you where the files are on your agent after the checkout. It makes it easier to specify the paths in the next steps. You can remove it or comment it out when your are ready with your pipeline.
  3. The MSBuild step will build your SQL project and create a dacpac file which you need for deployment. This is equals to building your project within Visual Studio. If you have a self-hosted agent you will need to either install Visual Studio or msbuild on your VM.
  4. The Copy step copies the generated dacpac file to a stage folder, but also copies the publish file with settings for publishing your project.
  5. The last step is to publish the copied files as an artifact
The last stages of this YAML file are copies of each other and then slitly changed for the enviroment specific settings. You can add or remove stages if you have more or less environments.

In these stages you first see that the environment specific variable group is added to the pipeline and it shows which agent will be used for the deployment. If your Azure SQL server only uses private endpoints then the self-hosted agent is required because the Microsoft hosted agents won't be able to connect to your server.

The condition part in this example is optional and depends on the branch strategy. Remove that line if you don't use multiple branches for deployment. The last part of these stages is calling the second YAML file and passing values from the specifi variable group as parameters to the second YAML file.

###################################
# General Variables
###################################
variables:
  - group: SQLParamsGen


###################################
# When to create a pipeline run
###################################
trigger:
  branches:
    include:
    - Development
    - Acceptance
    - main
  paths:
    include:
    - SQL/*

stages:
###################################
# Create DacPac Artifcat
###################################
- stage: CreateSQLArtifact
  displayName: Create SQL Artifact (dacpac)

  jobs:
  - job: Job
    displayName: 'Build DacPac'
    workspace:
      clean: all
    pool:
      name: DataPlatform
      # vmImage: 'windows-latest' 
    steps:

    ###################################
    # 1 Retrieve Repository
    ###################################
    - checkout: self
      displayName: '1 Retrieve Repository'
      clean: true

    ###################################
    # 2 Show treeview of agent
    ###################################
    - powershell: |
        Write-Output "Dit is de tree omgeving"
        tree "$(Pipeline.Workspace)" /F
      displayName: '3 Treeview Workspace and ArmTemplateOutput content '

    ###################################
    # 3 Build Visual Studio project
    ###################################
    - task: MSBuild@1
      displayName: '3. Creating Artifact'
      inputs:
        solution: '$(System.DefaultWorkingDirectory)/SQL/$(SqlProjectName)/$(SqlProjectName).sqlproj'
        msbuildArchitecture: x86
        msbuildVersion: latest

    ###################################
    # 4 Stage dacpac and publish
    ###################################
    - task: CopyFiles@2
      displayName: '4. Copy Artifact'
      inputs:
        contents: |
          **\*.dacpac
          **\*.publish.xml
        TargetFolder: '$(build.artifactstagingdirectory)'

    ###################################
    # 5 Publish dacpac and xml artifact
    ###################################
    - task: PublishPipelineArtifact@1
      displayName: '5. Publish Artifact'
      inputs:
        targetPath: '$(Build.ArtifactStagingDirectory)'
        artifact: 'SQL_Dacpac'
        publishLocation: 'pipeline'


###################################
# Deploy Dev environment
###################################
- stage: DeployDev
  displayName: Deploy DEV
  variables:
    - group: SQLParamsDev
  pool:
    name: DataPlatform
    # vmImage: 'windows-latest'
  condition: eq(variables['Build.SourceBranchName'], 'Development')
  jobs:
    - template: DeploySQL.yml
      parameters:
        env: DEV
        ServiceConnection: $(ServiceConnection)
        SqlServerName: $(SqlServerName)
        SqlDatabaseName: $(SqlDatabaseName)
        SqlProjectName: $(SqlProjectName)


###################################
# Deploy Acc environment
###################################
- stage: DeployAcc
  displayName: Deploy ACC
  variables:
    - group: SQLParamsAcc
  pool:
    name: DataPlatform
    # vmImage: 'windows-latest'
  condition: eq(variables['Build.SourceBranchName'], 'Acceptance')
  jobs:
    - template: DeploySQL.yml
      parameters:
        env: ACC
        ServiceConnection: $(ServiceConnection)
        SqlServerName: $(SqlServerName)
        SqlDatabaseName: $(SqlDatabaseName)
        SqlProjectName: $(SqlProjectName)


###################################
# Deploy Prd environment
###################################
- stage: DeployPrd
  displayName: Deploy PRD
  variables:
    - group: SQLParamsPrd
  pool:
    name: DataPlatform
    # vmImage: 'windows-latest'
  condition: eq(variables['Build.SourceBranchName'], 'Main')
  jobs:
    - template: DeploySQL.yml
      parameters:
        env: PRD
        ServiceConnection: $(ServiceConnection)
        SqlServerName: $(SqlServerName)
        SqlDatabaseName: $(SqlDatabaseName)
        SqlProjectName: $(SqlProjectName)
5) Deploy pipeline
The second YAML file does the deployment of the dacpac to your Azure SQL Database. It starts with the YAML parameters. You can specify allowed values or default values for your parameters.

The job part specifies which enviroment you want to use (see step 2) and then the steps of the deployment:
  1. The checkout retrieves to files from the repos to the agent. For this example it is not necessary, but if you perform some extra steps like executing a PowerShell then you need this to get the PowerShell file to your agent.
  2. The treeview step is an optional debug step to show you where the artifact files are on your agent. You can remove it or comment it out when you don't need it anymore.
  3. The SqlAzureDacpacDeployment@1 is the actual deployment step for the dacpac and it also adds the publish profile file. If you don't use a publish profile then remove that line. Note that if you are using a self-hosted agent then you need to install SqlPackage.exe on that VM for this step.
###################################
# Parameters
###################################
parameters:
  - name: env
    displayName: Enviroment
    type: string
    values: 
    - DEV
    - ACC
    - PRD
  - name: ServiceConnection
    displayName: Service Connection
    type: string
  - name: SqlServerName
    displayName: Sql Server Name
    type: string
  - name: SqlDatabaseName
    displayName: Sql Server Name
    type: string
  - name: SqlProjectName
    displayName: Sql Project Name
    type: string


jobs:
  - deployment: deploymentjob${{ parameters.env }}
    displayName: Deployment Job ${{ parameters.env }} 
    environment: Deploy to ${{ parameters.env }}
    strategy:
      runOnce:
        deploy:
          steps:
          ###################################
          # 1 Check out repository to agent
          ###################################
          - checkout: self
            displayName: '1 Retrieve Repository'
            clean: true 
 
          ###################################
          # 2 Show environment and treeview
          ###################################
          - powershell: |
              Write-Output "Deploying ${{ parameters.SqlProjectName }} to DB ${{ parameters.SqlDatabaseName }} and server ${{ parameters.SqlServerName }} in the ${{ parameters.env }} environment"
              tree "$(Pipeline.Workspace)" /F
            displayName: '2 Show environment and treeview Pipeline_Workspace'

          ###################################
          # 3 Deploy DacPac
          ###################################             
          - task: SqlAzureDacpacDeployment@1
            displayName: '3 Deploy DacPac' 
            inputs:
              azureSubscription: '${{ parameters.ServiceConnection }}'
              AuthenticationType: 'servicePrincipal'
              ServerName: '${{ parameters.SqlServerName }}.database.windows.net'
              DatabaseName: '${{ parameters.SqlDatabaseName }}' 
              deployType: 'DacpacTask'
              DeploymentAction: 'Publish'
              DacpacFile: '$(Pipeline.Workspace)/SQL_Dacpac/SQL/${{ parameters.SqlProjectName }}/bin/debug/${{ parameters.SqlProjectName }}.dacpac'
              PublishProfile: '$(Pipeline.Workspace)/SQL_Dacpac/SQL/${{ parameters.SqlProjectName }}/${{ parameters.SqlProjectName }}.publish.xml'
              IpDetectionMethod: 'AutoDetect'


6) Azure DevOps Service Connection
Make sure you have a DevOps Service Connection (type Azure Resource Manager) and also make sure that your Azure SQL Server uses Azure Active Directory authentication (see your server in the Azure Portal and then go to Azure Active Directory in the left menu to check it).
Azure DevOps Project Service Connection


The Service Principal behind this Service Connection should be either a member of the Azure Active Directory group that is specified under Azure Active Directory admin on that page or...
Azure Active Directory authentication with AAD group


... or you can add the Service Principal as an user with a TSQL command
-- Add your Azure AD Service Principal as external to SQL DB
CREATE USER [YourServicePrincipal] FROM EXTERNAL PROVIDER;

-- Add db_owner role to your Service Principal
ALTER ROLE [db_owner] ADD MEMBER [YourServicePrincipal]
If you don't have a Service Principal then it is also possible to use a SQL database user. Please see the documentation of the Azure SQL Database deployment v1 task for that.

7) Testing
Now go to pipelines and add a new YAML pipeline based on an existing YAML file in your repository and select the BuildSQL.yml file. Then either run it manually or change something in your database project in the repos to trigger pipeline.
Run your new SQL Deployment pipeline


Conclusion
In this post you learned how to deploy your Azure SQL Databases with a YAML pipeline in Azure DevOps. Note that if you don't have public endpoints on your Azure SQL Server that you will need a self-hosted agent in your Azure subscription (a Virtual Machine with Devops software) because the Microsoft hosted agents will use public endpoints. This will be described a next post.

Update when you get a Get-SpnAccessToken is obsolete warning during deployment then check this solution.

Friday 13 May 2022

DevOps: SQL Server - NETFramework v4.5 not found

Case
I have a DevOps pipeline to build and deploy my Azure SQL Server Database, but it is giving an .NET Framework error stating that it can't find the framework version. It did work before, how can I solve it?
error MSB3644: The reference assemblies for
 .NETFramework,Version=v4.5 were not found.


The entire error message in Azure DevOps:
##[section]Starting: 1. Creating Artifact
==============================================================================
Task         : MSBuild
Description  : Build with MSBuild
Version      : 1.199.0
Author       : Microsoft Corporation
Help         : https://docs.microsoft.com/azure/devops/pipelines/tasks/build/msbuild
==============================================================================
##[command]"D:\a\_tasks\MSBuild_c6c4c611-aa2e-4a33-b606-5eaba2196824\1.199.0\ps_modules\MSBuildHelpers\vswhere.exe" -version [17.0,18.0) -latest -format json
##[command]"C:\Program Files\Microsoft Visual Studio\2022\Enterprise\MSBuild\Current\Bin\msbuild.exe" "D:\a\1\s\SQL\myDWH\myDWH.sqlproj" /nologo /nr:false /dl:CentralLogger,"D:\a\_tasks\MSBuild_c6c4c611-aa2e-4a33-b606-5eaba2196824\1.199.0\ps_modules\MSBuildHelpers\Microsoft.TeamFoundation.DistributedTask.MSBuild.Logger.dll";"RootDetailId=|SolutionDir=D:\a\1\s\SQL\myDWH|enableOrphanedProjectsLogs=true"*ForwardingLogger,"D:\a\_tasks\MSBuild_c6c4c611-aa2e-4a33-b606-5eaba2196824\1.199.0\ps_modules\MSBuildHelpers\Microsoft.TeamFoundation.DistributedTask.MSBuild.Logger.dll"  /p:_MSDeployUserAgent="VSTS_3aa34741-51f2-4a22-9768-a5deca3bfa4e_build_17_0"
Build started 5/13/2022 2:36:44 PM.
##[error]C:\Program Files\Microsoft Visual Studio\2022\Enterprise\MSBuild\Current\Bin\Microsoft.Common.CurrentVersion.targets(1221,5): Error MSB3644: The reference assemblies for .NETFramework,Version=v4.5 were not found. To resolve this, install the Developer Pack (SDK/Targeting Pack) for this framework version or retarget your application. You can download .NET Framework Developer Packs at https://aka.ms/msbuild/developerpacks
Project "D:\a\1\s\SQL\myDWH\myDWH.sqlproj" on node 1 (default targets).
C:\Program Files\Microsoft Visual Studio\2022\Enterprise\MSBuild\Current\Bin\Microsoft.Common.CurrentVersion.targets(1221,5): error MSB3644: The reference assemblies for .NETFramework,Version=v4.5 were not found. To resolve this, install the Developer Pack (SDK/Targeting Pack) for this framework version or retarget your application. You can download .NET Framework Developer Packs at https://aka.ms/msbuild/developerpacks [D:\a\1\s\SQL\myDWH\myDWH.sqlproj]
_CleanRecordFileWrites:
  Creating directory "obj\Debug\".
Done Building Project "D:\a\1\s\SQL\myDWH\myDWH.sqlproj" (default targets) -- FAILED.

Build FAILED.

"D:\a\1\s\SQL\myDWH\myDWH.sqlproj" (default target) (1) ->
(GetReferenceAssemblyPaths target) -> 
  C:\Program Files\Microsoft Visual Studio\2022\Enterprise\MSBuild\Current\Bin\Microsoft.Common.CurrentVersion.targets(1221,5): error MSB3644: The reference assemblies for .NETFramework,Version=v4.5 were not found. To resolve this, install the Developer Pack (SDK/Targeting Pack) for this framework version or retarget your application. You can download .NET Framework Developer Packs at https://aka.ms/msbuild/developerpacks [D:\a\1\s\SQL\myDWH\myDWH.sqlproj]
    0 Warning(s)
    1 Error(s)

Time Elapsed 00:00:01.97
##[error]Process 'msbuild.exe' exited with code '1'.
##[section]Finishing: 1. Creating Artifact
Solution
This error is probably because you have a DevOps agent of the type windows-latest and that recently changed to the newer Windows-2022 and .Net Framework version 4.5 is out of support since April 26, 2022.

The solution is simple:
  • Go to Visual Studio and open your database project
  • Find your project in the Solution Explorer pane
  • Right click your project and go to the properties
  • Go to the tab SQLCLR and find Target framework
  • Change the .NET Framework to a higher version (4.7.2 or 4.8)
  • Now save your project and make sure the change goes to your repository so that your build pipeline can do its work correctly
Change .NET Framework version in SQLCLR pane


Another option is to downgrade your DevOps Agent from 'windows-latest' to 'windows-2019'. An even simpler change, but probably only a temporary change to postpone the real change.

Conclusion
In this post you learned how to solve the .NET framework not found error in two ways. A temporary quick-win by changing the agent type and a little more 'permanent' change in the Visual Studio project (until that versio also goes out of support).

Sunday 20 February 2022

ADF Snack - Give ADF access to SQL DB via MSI

Case
I'm using Azure Data Factory to populate tables in an Azure SQL Database. I want to avoid using SQL Server authentication/Basic authentication. What is the best alternative?
Using the Managed Service Identie of ADF


Solution
Recently we showed how to give ADF access to a Data Lake via its Managed Service Identity. You can also use that to give ADF access within your database. This will save you the hassle of using accounts and passwords within ADF (or Azure Key Vault).

 
1) Enable Azure Active Directory authentication
First make sure you are using Azure AD authentication for your Azure SQL Server by adding an Azure Active Directory admin within your SQL Server. Without an AAD admin you cannot add AAD users (or Data Factories) to your database.

Go to your Azure SQL Server (not the database) and under Azure Active Directory in the left menu you can check and change this option. To try it out you just could add your own AAD account as AAD admin.
Enable Azure Active Directory authentication


2) Create user in SQL DB
Now use your favourite query tool and login to your database with an AAD account that has the db_owner role. Execute the following create-user-command on your database. The user is the name of your Azure Data Factory. 
-- Add your Azure Data Factory as external to SQL DB
CREATE USER [YourDataFactoryName] FROM EXTERNAL PROVIDER;

-- Check the permissions of your Azure Data Factory
SELECT	DISTINCT pri.principal_id
,		pri.name
,		pri.type_desc
,		pri.authentication_type_desc
,		per.state_desc
,		per.permission_name
FROM	sys.database_principals AS pri
JOIN	sys.database_permissions AS per
		ON per.grantee_principal_id = pri.principal_id
WHERE	pri.name = 'YourDataFactoryName'

-- Remove all permission of your Azure Data Factory
DROP USER [YourDataFactoryName]
This command gives your ADF connect permissions on your database. This is enough to test the connection of a Linked Service in ADF, but is not enough to actually do something with the data.
Add ADF as extermal user


3) Give data permissions
Next step is to give your ADF a database role so that it is able to read or write data depending on your needs. This can be done with the stored procedure sp_addrolemember or via the ALTER ROLE command
-- Two options to add a DB role to your ADF

-- Add db_datareader role to your ADF
EXEC sp_addrolemember N'db_datareader', N'YourDataFactoryName'

-- Add db_datawriter role to your ADF
ALTER ROLE [db_datawriter] ADD MEMBER [YourDataFactoryName]

-- Check roles of your ADF
SELECT				DP1.name AS DatabaseRoleName
,					isnull (DP2.name, 'No members') AS DatabaseUserName   
FROM				sys.database_role_members AS DRM  
RIGHT OUTER JOIN	sys.database_principals AS DP1  
					ON DRM.role_principal_id = DP1.principal_id  
LEFT OUTER JOIN		sys.database_principals AS DP2  
					ON DRM.member_principal_id = DP2.principal_id  
WHERE				DP1.type = 'R'
AND					DP2.name = 'YourDataFactoryName'

-- Two options to remove the role from your ADF
-- EXEC sp_droprolemember N'db_datareader', N'YourDataFactoryName'
-- ALTER ROLE [db_datawriter] DROP MEMBER [YourDataFactoryName]
Give ADF permission to read and/or write data


4) Create Linked Service via MSI
Now create a new Linked Service in ADF and use Managed Identity as the Authenication type. When you do this you don't have to fill in a password. Hit the Test connection button to see if it works.
Linked Service to your database via MSI


If it's failing check the firewall/VNet/Subnet settings or check whether you executed the above queries on the correct database.
22300 - Cannot connect to SQL Database:
'bitools2.database.windows.net', Database:
'bitools2', User: ''. Check the linked
service configuration is correct, and
make sure the SQL Database firewall
allows the integration runtime to
access. A severe error occurred on the
current command. The results, if any,
should be discarded., SqlErrorNumber=0,
Class=11,State=0, Activity ID: abcdfe.


Conslusion
In this blogpost you learned how easy it is to give ADF persmissions within your database without using accounts and passwords. Note that those permissions are totally different than when you want to scale your database. The same method with the Managed Service Identity can be used to give ADF access to your Azure Storage Account or Azure Key Vault.


Monday 5 July 2021

SQL Snack: Create readonly DB user in Azure SQL DB

Case
I want to create a SQL Server user in my Azure SQL Database that can only read tables and view from a specific schema so I can use it for example to import data in to Power BI.
Azure SQL Database user


Solution
Since Azure SQL DB has no gui for this task we have to write some (simple) T-SQL code. So login in your Azure SQL DB with your favorite SQL editor. For example  Azure Data Studio or the good old SQL Server Management Studio.

1) Create Login
First step is to create a Login with a password. This is done on the Master database.
-- Create Login on Master DB
CREATE LOGIN PowerBI
    WITH PASSWORD = 'B0bd4f211122cf9a03f64c81ba0f0d8f!';
Create Login on Master DB


2) Create User
The next step is to create the actual user connected to the Login from step 1. The username can differ from the Login name, but in most cases they will match. The next step must be executed on the DB where you want to give this user access.
-- Create user on DB
CREATE USER PowerBI
    FOR LOGIN PowerBI
Create user for Login on DB (not master)


However you can also execute it on the Master database as well (with the extra default). This will save you filling in the database name when you create the connection, which is very annoying especially within SSMS where you have to set it on the Connections Property tab.
-- Create user on Master DB (note the extra default schema)
CREATE USER PowerBI
    FOR LOGIN PowerBI
    WITH DEFAULT_SCHEMA=[dbo];
Create user for Login  on Master DB as well


Connect to specific DB


3) Grant access to Schema
Last step is to grant SELECT access on a specific database schema. This is instead of using using fixed database roles such as db_datareader.
-- Allow only SELECT queries on the DB schema 'DWH'
GRANT SELECT ON SCHEMA :: DWH 
    TO PowerBI
    WITH GRANT OPTION;


Conclusion
In this post you learned how to add a SQL Server user that can only execute select queries on tables and views in a specific database schema. Super handy when you created some views for your dataset in Power BI, but you don't want to show all tables and view in Power BI.

Monday 20 April 2020

Databases in DevOps - Publishing profile

Case
I can’t release my database project due an error “data loss could occur”
error code


Updating database (Failed)
*** Could not deploy package.
Warning SQL72015: The column [dbo].[Table1].[ColumnToRemove] is being dropped, data loss could occur. 

This happens due the fact that my source table changed/removed a column that’s still available in the target table.


Solution
When deploying a database project, you can add an publish file with this deployment. In this file (it’s a xml file) you can set/adjust certain settings
First, we setup visual studio and secondly, we adjust je build pipeline

1) Visual Studio
Here we are going to create the publish file
  • Right click on the solution and click “Publish”
  • Then a new window pop-up, go to “Advanced”
  • Uncheck - 'Block incremental deployment if data loss might occur’ checkbox.
Publish settings - general


  • Go to the second tab and check - 'DROP objects in target but not in project' and click “ok”
Publish settings - drop


  • Then select “Create profile” and a new a ‘***.publish.xml’ will be added to the solution

Add publish file


  • The next step is, is to add the publish file to source control “add ignored file to source control”
Add to source control


2) DevOps 
First, we edit the build pipeline
  • Go to Azure DevOps -> Pipelines -> Pipelines
  • Then edit your pipeline (please see the blog of Joost for creating a pipeline)
  • Go to the task “Copy files” and add to ‘contents’ “**\*.publish.xml” 
Build pipeline


Last step, is to add the xml file to the release pipeline
  • Go to pipelines -> release
  • Then edit your pipeline and add the publish file
Release pipeline


Summary
In this post you learned how to add a Publish Profile file. In this file you can change the publish settings. In this example we did want to make it possible to truncate tables when a column has been removed.
But it can also be used to disable the deployment of security-related objects to our database, like:
  • ExcludeUsers
  • ExcludeLogins
  • ExcludeDatabaseRoles


Sunday 2 February 2020

Schedule Up/Downscale Azure SQL Database (API)

Case
I want to up- and downscale my Azure SQL Database within my ADF pipeline. You recently showed how do this with Powershell code in an Automation Runbook, but that is too much coding for me. You also showed how to do this with some simple TSQL code, but that requires a lot of database permissions for the ETL user. Is there a codeless solution in Azure Data Factory which doesn't require permissions within my Azure SQL Database?
Change the Tier of your SQL Azure DB


Solution
Yes: Rest API! And don't worry there is no coding required. For this example we will use the Web activity to call the Rest API of SQL Server. This doesn't require any coding or permissions within the database itself. However you need ofcourse some permissions to change the database Pricing Tier. For this we will be using managed identities for Azure resources: we will give the Azure Data Factory permissions to the Azure SQL Server.

For this example we assume you already have an ADF with a pipeline for your ETL which we will extend with an upscale and a downscale.
Stage multiple tables in a foreach loop


1) Assign permissions to ADF
The permissions will be granted to the Azure SQL Server and not to a specific database. To change the database Pricing Tier with ADF, we need a role that can only change the database settings, but nothing security related: Contributer, SQL DB Contributer or SQL Server Contributer.
  • Go to the Azure SQL Server of the database that you want to up- or downscale with ADF
  • In the left menu click on Access control (IAM)
  • Click on Add, Add role assignment
  • In the 'Role' drop down select 'SQL DB Contributer'
  • In the 'Assign access to' drop down select Data Factory
  • Search for your Data Factory, select it and click on Save
Note: if you forget this step you will get an error while executing the pipeline in ADF
Not enough permissions


{
    "errorCode": "2108",
    "message": "{\"error\":{\"code\":\"AuthorizationFailed\",\"message\":\"The client 'xxxxxx-xxxx-xxxx-xxxx-xxxxxxxxxxxx' with object id 'xxxxxx-xxxx-xxxx-xxxx-xxxxxxxxxxxx' does not have authorization to perform action 'Microsoft.Sql/servers/databases/write' over scope '/subscriptions/xxxxxx-xxxx-xxxx-xxxx-xxxxxxxxxxxx/resourceGroups/Joost_van_Rossum/providers/Microsoft.Sql/servers/bitools2/databases/Stage' or the scope is invalid. If access was recently granted, please refresh your credentials.\"}}",
    "failureType": "UserError",
    "target": "Upscale Stage DB",
    "details": []
}

2) Get URL Rest API
Now it is almost time to edit your ADF pipeline. The first step will be adding a Web activity to call the Rest API, but before we can do that we need to determine the URL of this API which you can find here. Check the api version because it changes regularly.

https://management.azure.com/subscriptions/{subscriptionId}/resourceGroups/{resourceGroupName}/providers/Microsoft.Sql/servers/{serverName}/databases/{databaseName}?api-version=2021-02-01-preview

Within this URL you need to replace all parts that start and end with a curly bracket: {subscriptionId}, {resourceGroupName}, {serverName} and {databaseName} (including the brackets themselves). Don't use a URL (bitools2.database.windows.net) for the database server name, but use only the name:

https://management.azure.com/subscriptions/xxxxxx-xxxx-xxxx-xxxx-xxxxxxxxxxxx/resourceGroups/Joost_van_Rossum/providers/Microsoft.Sql/servers/bitools2/databases/Stage?api-version=2021-02-01-preview

3) JSON message for Rest API
The Rest API expects a JSON message with the pricing tier for which you can find the details here under SKU. For some reason the location is required in these messages. Here are two example which you need to adjust for your requirements:
{"sku":{"name":"S1","tier":"Standard"}, "location": "West Europe"}
or
{"sku":{"name":"Basic","tier":"Basic"}, "location": "West Europe"}

3) Upscale DB
Go to your existing ADF pipeline to add an upscale (and downscale) activity
  • Add a Web activity in front of the existing Lookup activity
  • Give it a descriptive name: Upscale Stage DB
  • Go to the Settings tab of the Web activity
  • For URL enter the URL you created in step 2
  • For Method choose PUT
  • Add a new Header called 'Content-Type' with the value 'application/json'
  • Copy the JSON message that you create in step 3 to the Body
  • Collapse Advanced at the bottum
  • Choose MSI (old name for Managed Instance) as authentication
  • Enter 'https://management.azure.com/' in the Resource field. This is the URL for Managed Identity
Add Web activity to call Rest API


4) Downscale DB
Repeat the previous step, but now add the downscale activity at the end
  • Add a second Web activity, but now after your ETL activity (foreach in this example)
  • Give it a descriptive name: Downscale Stage DB
  • Go to the Settings tab of the Web activity
  • For URL enter the URL you created in step 2
  • For Method choose PUT
  • Add a new Header called 'Content-Type' with the value 'application/json'
  • Copy the JSON message that you create in step 3 to the Body
  • Collapse Advanced at the bottum
  • Choose MSI (old name for Managed Instance) as authentication
  • Enter 'https://management.azure.com/' in the Resource field
Adding an upscale and downscale via Rest API


Conclusion
In this post you learned how to give a resource (ADF) access to an other resource (SQL Server) via Managed Identities. Then we showed you how to call a Rest API in an ADF pipline Web activity for which we didn't have to write any code at all. From all the different options we showed you to Up- and Downscale an Azure SQL Database this is probably the easiest and safest method especially when you want to incorporate in your ETL process. An other positive thing is that the Rest API call is synchronous which means it doesn't start the ETL before the database has been upscaled. So no extra wait activities required.

Saturday 1 February 2020

Schedule Up/Downscale Azure SQL Database (TSQL)

Case
You recently showed how to up- or downscale my Azure SQL Database with Powershell code in an Automation Runbook, but is there a way to do this without Powershell?
Change the Tier of your SQL Azure DB


Solution
Changing the database Pricing Tier can also be done with some TSQL script. First we will show you how to do this in Sql Server Mangement Studio (SSMS) and then how you could also do this in Azure Data Factory (ADF).

A) SSMS
To change the Pricing Tier in SSMS you first need to connect SSMS to your Azure SQL Database and make sure to select the right database (not master) in your query window.

A1) Retrieve pricing tier
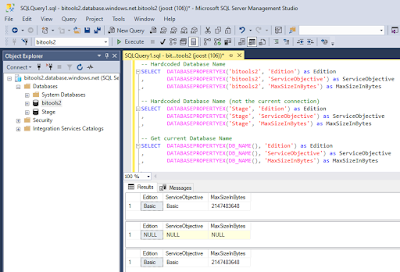
First a query to retrieve the Pricing Tier (Edition, Server Objective and Max Size). This can be done with a hardcode name or by using DB_NAME() within the DATABASEPROPERTYEX() command. However since you cannot retrieve the data from database X when connected to database Y (it will return NULL) the second options is the easiest.
-- Hardcoded Database Name
SELECT DATABASEPROPERTYEX('bitools2', 'Edition') as Edition
,  DATABASEPROPERTYEX('bitools2', 'ServiceObjective') as ServiceObjective
,  DATABASEPROPERTYEX('bitools2', 'MaxSizeInBytes') as MaxSizeInBytes

-- Get current Database Name
SELECT DATABASEPROPERTYEX(DB_NAME(), 'Edition') as Edition
,  DATABASEPROPERTYEX(DB_NAME(), 'ServiceObjective') as ServiceObjective
,  DATABASEPROPERTYEX(DB_NAME(), 'MaxSizeInBytes') as MaxSizeInBytes

Retrieve Database Pricing Tier


A2) Change pricing tier
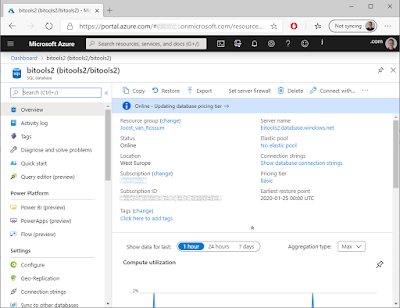
The next step is to change the Pricing Tier with an ALTER DATABASE command in SSMS. If you go to the portal right after executing the ALTER statement you will see a message Updating database pricing tier. When executing the command in SSMS it immediately shows that it is completed, however it takes a few moments to actually finish the command.
-- Change Princing Tier to Basic (only when size < 2GB)
ALTER DATABASE [bitools2] MODIFY (EDITION ='Basic');

-- Change Pricing Tier to Standard S1 with size set to 250GB
ALTER DATABASE [bitools2] MODIFY (EDITION ='Standard', SERVICE_OBJECTIVE = 'S1', MAXSIZE = 250 GB);

-- Change Pricing Tier to Standard S1 (withoud mentioning edition and size)
ALTER DATABASE [bitools2] MODIFY (SERVICE_OBJECTIVE = 'S1');

-- Change Pricing Tier to lowest Standard (S0)
ALTER DATABASE [bitools2] MODIFY (EDITION ='Standard');

Pricing Tier changes after execution the alter script


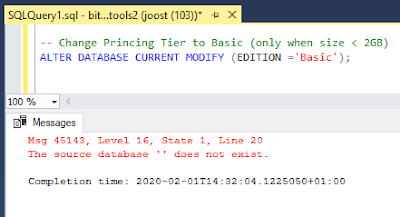
Note: According to the documentation you could also use CURRENT (instead of the database name) to alter the current database. However that failed on my laptop (SSMS 18.4). Please write your suggestions in the comments.
The source database '' does not exist.


B) Azure Data Factory
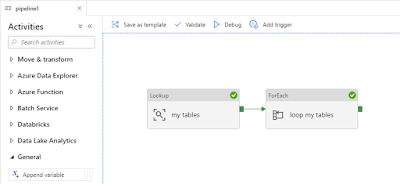
You could also execute this script in ADF to upscale your Azure SQL Database before the ETL (or ELT) starts and then downscale it afterwards. For this example we will add these ADF activities in our existing stage pipeline from a previous blog post to upscale the sink database (our stage database).
Stage multiple tables in a foreach loop


B1) Upscale DB
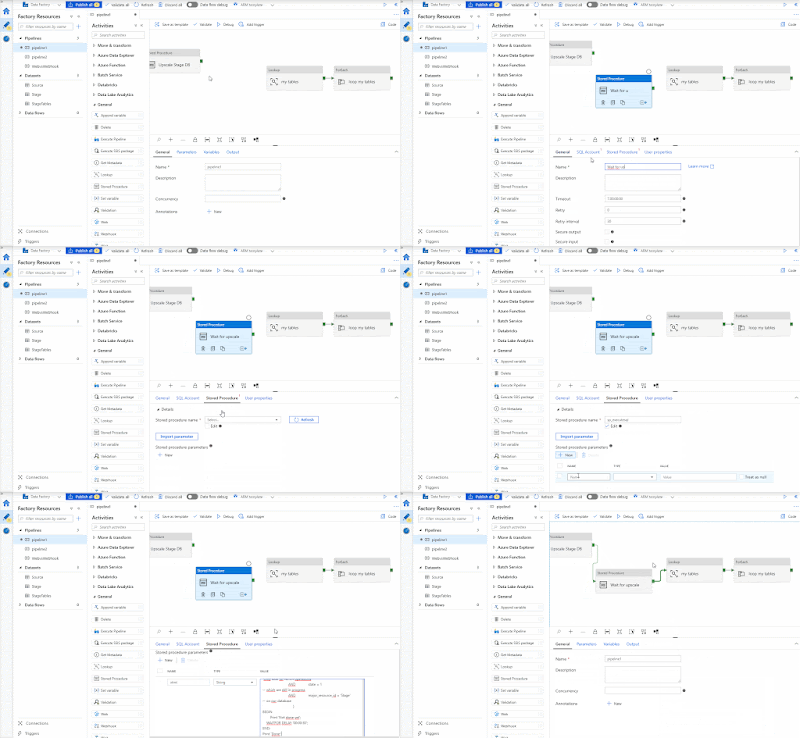
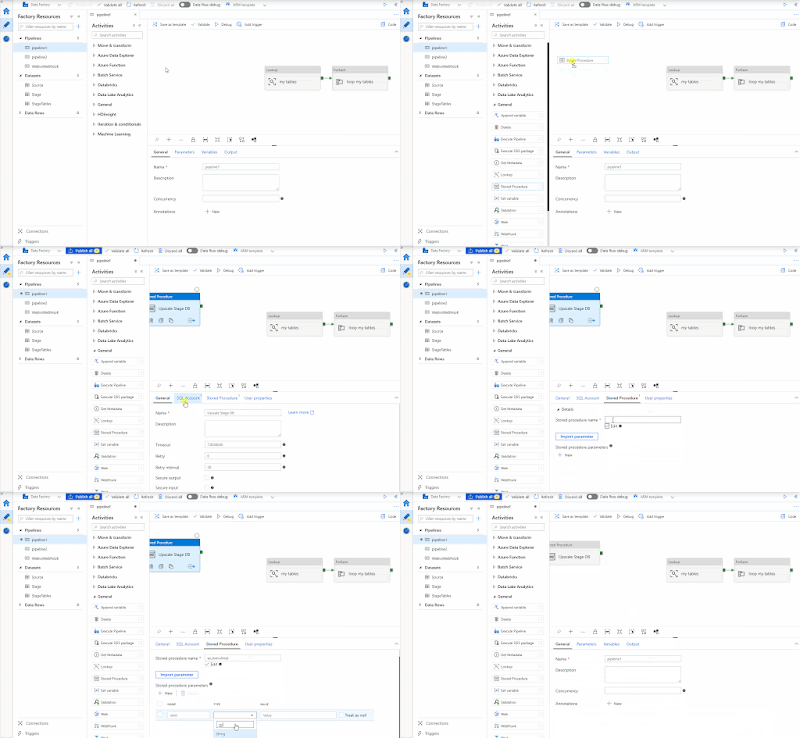
First we will add a Stored Procedure activity which executes the ALTER script from above to upscale the stage database.
  • Add the stored procedure activity in front of the existing Lookup activity
  • Give it a descriptive name: Upscale Stage DB
  • Make sure to use the same Linked service connection as your sink (Stage database)
  • Use 'sp_execute' for the Stored Procedure name
  • Add a new string parameter named 'stmt' and add the ALTER query as value (change DB name)
-- Change Pricing Tier to Standard S1 with size set to 250GB
ALTER DATABASE [Stage] MODIFY (EDITION ='Standard', SERVICE_OBJECTIVE = 'S1', MAXSIZE = 250 GB);

Upscale DB in ADF


B2) Wait for upscale to be finished
Now you want to wait until the database has been upscaled before you start the ETL because during the upscale some queries will be cancelled. For this we will execute a query on the MASTER database (because queries will be cancelled on the Stage DB). This query will check whether the view sys.dm_operation_status still has an active ALTER query on our Stage DB.
  • Add a Stored Procedure Activity between the Upscale and the Lookup
  • Give it a descriptive name: Wait for upscale
  • Use a connection to the master database as Linked Service
  • Use 'sp_execute' for the Stored Procedure name
  • Add a new string parameter named 'stmt' and add the query below as value (change DB name)
  • Connect all activities in the pipeline: Upscale => Wait => Lookup
-- Wait until pricing tier has changed (retry ever 30 second)
WHILE EXISTS (
    SELECT  * 
    FROM    sys.dm_operation_status
    WHERE   operation = 'ALTER DATABASE' -- Only look for ALTER operations
    AND     state = 1                    -- which are still in progress
    AND     major_resource_id = 'Stage'  -- on our database
    )
BEGIN
    WAITFOR DELAY '00:00:30';
END;
Bijschrift toevoegen


B3) Downscale DB
After the foreach loop is done we can add an other Stored Procedure activity to downscale the Stage database.
  • Add the stored procedure activity after the existing ForEach activity
  • Give it a descriptive name: Downscale Stage DB
  • Make sure to use the same Linked service connection as your sink (Stage database)
  • Use 'sp_execute' for the Stored Procedure name
  • Add a new string parameter named 'stmt' and add the ALTER query as value (change DB name)
  • Connect the ForEach activity to the Downscale Acticity
-- Change Princing Tier to Basic (only when size < 2GB)
ALTER DATABASE [Stage] MODIFY (EDITION ='Basic');
Upscale, Wait, ETL and Downscale


Note: A big downside of using this method in Azure Data Factory is that you need a lot of permissions on your database. Which in most cases you don't want do give to your ETL account. In a next blog post we will show you an other alternative: Rest API.

Conclusion

In this post you learned how to change the database Pricing Tier with some simple TSQL script instead of a Powershell. Probably most suitable during development to temporarily upscale your DB to make the queries faster. But it could also be very useful to integrate the scaling in your ETL (or ELT) proces to minimize the time for a more expensive/faster database. In a next blog post we will introduce you to the Rest API which is very suitable for ADF.