Showing posts with label SQL. Show all posts

Sunday 5 December 2021

Delta Lake support in Azure Synapse Analytics

Case
Delta Lake is already widely used in Azure Data Bricks, but now it is also available in Synapse Analytics. How can I use it there to store history and do 'time travel' in my historical data?
Synapse now supports Delta Lake


Solution
Delta Lake is now so called General Available (GA) in Synapse Analytics, but at the time of writing Microsoft is still implementing new Delta Lake features in Synapse. 

This example uses a Synapse Pipeline with a Copy Data Activity to ingest data from the source and then calls a Python Delta Lake script (other languages are possible) via the Notebook activity.


Prerequisites
You need to make sure that you (for debugging) and the Managed Service Identity (MSI) of your Synapse Analytics workspace have access to the Azure Data Lake with the Role Storage Blob Data Contributor.
  • In the Azure Portal go to the Storage Account used by the Synapse Analytics workspace
  • In the left menu click on Access Control (IAM)
  • Click on + Add and choose Add role assignment
  • Search for Storage Blob Data Contributor, select the role and click on Next
  • Click on + Select members and find your Synapse workspace and find yourself and click Select
  • Optionally add an description about the why. Then click on Review + assign (twice)
At time of writing our Apache Spark Pool uses version 3.1 with Delta Lake 1.0. If you are using an older version (2.4) of Spark then you get Delta Lake version 0.6 which is slightly different. If newer versions appear then just try the newest Spark Pool.
Apache Spark pool Additional Settings


1) Code cell 1: parameters
The first code cell is for the parameters that can be overridden by parameters from the Notebook activity in the pipeline. For more details see our post about notebook parameters. For debugging within the notebook we used real values.
# path of the data lake container
data_lake_container = 'abfss://yourbronzecontainer@yourdatalake.dfs.core.windows.net'

# The ingestion folder where your parquet file are located
ingest_folder = 'parquetstage'

# The bronze folder where your Delta Tables will be stored
bronze_folder = 'bronze'

# The name of the table
table_name = 'residences'

# The wildcard filter used within the bronze folder to find files
source_wildcard = 'residences*.parquet'

# A comma separated string of one or more key columns (for the merge)
key_columns_str = 'Id'
Parameters


2) Code cell 2: import modules and functions
The second code cell is for importing all required/useful modules. For this basic example we two import s:
  • DeltaTable.delta.tables for handling delta tables
  • notebookutils for file system utilities (removing delta table folder)
# Import modules
from delta.tables import DeltaTable
from notebookutils import mssparkutils
Imports


3) Code cell 3: filling delta lake
Now the actual code for filling the delta lake tables with parquet files from the data lake. Note: code is very basic. It checks whether the Delta Lake table already exists. If not it creates the Delta Lake table and if it already exists it merges the new data into the existing table. If you have transactional data then you could also do an append instead of a merge.

# Convert comma separated string with keys to array
key_columns = key_columns_str.split(',')  
 
# Convert array with keys to where-clause for merge statement
conditions_list = [f"existing.{key}=updates.{key}" for key in key_columns]
 
# Determine path of source files from ingest layer
source_path = os.path.join(data_lake_container_bronze, ingest_folder, source_wildcard)
 
# Determine path of Delta Lake Table 
delta_table_path = os.path.join(data_lake_container_bronze, bronze_folder, table_name)

# Read file(s) in spark data frame
sdf = spark.read.format('parquet').option("recursiveFileLookup", "true").load(source_path)
 
# Check if the Delta Table exists
if (DeltaTable.isDeltaTable(spark, delta_table_path)):
    print('Existing delta table')
    # Read the existing Delta Table
    delta_table = DeltaTable.forPath(spark, delta_table_path)
 
    # Merge new data into existing table
    delta_table.alias("existing").merge(
        source = sdf.alias("updates"),
        condition = " AND ".join(conditions_list)
         
    ).whenMatchedUpdateAll(
    ).whenNotMatchedInsertAll(
    ).execute()
 
    # For transactions you could do an append instead of a merge
    # sdf.write.format('delta').mode('append').save(delta_table_path)
 
else:
    print('New delta table')
    # Create new delta table with new data
    sdf.write.format('delta').save(delta_table_path)
Adding file to Delta Lake


4) Viewing the Delta Table in notebook
If you run the notebook with the code of the first three steps a couple of times with changed/extra/less records then history will be build in the delta table. For debugging purposes you can add an extra code cell to view the data and the various versions of the data.

To check the current version of the data you can use the following code:
display(spark.read.format('delta').load(delta_table_path))
Get current version of data


And with this code you can investigage the history versions of the data. In this case there are two versions:
# Get all versions
delta_table = DeltaTable.forPath(spark, delta_table_path)
display(delta_table.history())
Get versions of data


To retrieve one specific version you could use something like this (where the 0 is the version from the above picture):
# Get one specific version
display(spark.read.format("delta").option("versionAsOf", "0").load(delta_table_path))
Get specific version of data


You can also use a datetime to retrieve data from the Delta Lake by using timestampAsOf instead of versionAsOf:
# Get one specific version with timestamp filter
display(spark.read.format("delta").option("timestampAsOf", "2021-12-05 19:07:00.000").load(delta_table_path))
Get specific version of data with datetime filter


To remove the entire Delta Lake table (and all history) you could use something like:
# Delete Delta Table (folder)
mssparkutils.fs.rm(delta_table_path, recurse=True)
Delete Delta Table


4) Viewing the Delta Table in Serverless SQL Pool
At the moment of writing you can query the Detla Lake in a Serverless SQL Pool, but you cannot yet use the 'time-travel' feature. Please upvote this feature here.

The first option is to use an OPENROWSET query within a SQL Script in your Synapse Workspace:
-- Query the Delta Lake
SELECT TOP 10 *
FROM OPENROWSET(
    BULK 'abfss://yourcontainer@yourdatalake.dfs.core.windows.net/deltalake/places/',
    FORMAT = 'delta') as rows
ORDER BY Id;
Query the Delta Lake via an OPENROWSET query


A second option is using Polybase by creating an External Table on the Delta Lake. This does requery you to create a database within the Serverless SQL Pool because you can't do that on the master database.
-- Query the Delta Lake

-- Create database because it wont work on the master database
CREATE DATABASE MyDwh;

-- Create External Data Source
CREATE EXTERNAL DATA SOURCE DeltaLakeStorage
WITH ( location = 'abfss://yourcontainer@yourdatalake.dfs.core.windows.net/deltalake/' );

-- Create External File Format
CREATE EXTERNAL FILE FORMAT DeltaLakeFormat
WITH ( FORMAT_TYPE = DELTA );

-- Create External Table
CREATE EXTERNAL TABLE Residence (
     Id int,
     Residence VARCHAR(50)
) WITH (
        LOCATION = 'places', --> the root folder containing the Delta Lake files
        data_source = DeltaLakeStorage,
        FILE_FORMAT = DeltaLakeFormat
);

-- Get Data from your Delta Lake Table
SELECT          TOP 10 * 
FROM            Residence
ORDER BY        Id


Conclusion
In this post you learned how to create and query a Delta Lake within your Synapse Analytics Workspace. The main advantage is of course that you now don't need Azure Data Bricks if you are already using Synapse. Making your Data Platform architecture just slightly more clearer and easier. 

A disadvantage, at the moment of writing, is the lack of time-traveling withing the Serverless SQL Pool environment. This means you're now forced to use notebooks to create your Data Warehouse when the latest version of your data is just not enough. So please upvote this feature here. There are some more limitations and know issues in the current version, but we think at least some of them will be solved in feature updates.

Thanks to colleague Jeroen Meidam for helping!


Monday 5 July 2021

SQL Snack: Create readonly DB user in Azure SQL DB

Case
I want to create a SQL Server user in my Azure SQL Database that can only read tables and view from a specific schema so I can use it for example to import data in to Power BI.
Azure SQL Database user


Solution
Since Azure SQL DB has no gui for this task we have to write some (simple) T-SQL code. So login in your Azure SQL DB with your favorite SQL editor. For example  Azure Data Studio or the good old SQL Server Management Studio.

1) Create Login
First step is to create a Login with a password. This is done on the Master database.
-- Create Login on Master DB
CREATE LOGIN PowerBI
    WITH PASSWORD = 'B0bd4f211122cf9a03f64c81ba0f0d8f!';
Create Login on Master DB


2) Create User
The next step is to create the actual user connected to the Login from step 1. The username can differ from the Login name, but in most cases they will match. The next step must be executed on the DB where you want to give this user access.
-- Create user on DB
CREATE USER PowerBI
    FOR LOGIN PowerBI
Create user for Login on DB (not master)


However you can also execute it on the Master database as well (with the extra default). This will save you filling in the database name when you create the connection, which is very annoying especially within SSMS where you have to set it on the Connections Property tab.
-- Create user on Master DB (note the extra default schema)
CREATE USER PowerBI
    FOR LOGIN PowerBI
    WITH DEFAULT_SCHEMA=[dbo];
Create user for Login  on Master DB as well


Connect to specific DB


3) Grant access to Schema
Last step is to grant SELECT access on a specific database schema. This is instead of using using fixed database roles such as db_datareader.
-- Allow only SELECT queries on the DB schema 'DWH'
GRANT SELECT ON SCHEMA :: DWH 
    TO PowerBI
    WITH GRANT OPTION;


Conclusion
In this post you learned how to add a SQL Server user that can only execute select queries on tables and views in a specific database schema. Super handy when you created some views for your dataset in Power BI, but you don't want to show all tables and view in Power BI.

Thursday 23 March 2017

Loading tables by using BIML and meta architecture

Case

How can we simplify the process of loading database tables and reduce the time needed to create SSIS packages.

Solution

There are several steps that need to be taken prior to creating such a solution.
These steps are:
  1. Create the databases 'Repository' and 'Staging' and required schema's
  2. Create a Meta table called 'Layer' and a table called 'TableList' in the repository database
  3. Create the Sales tables in the Sales database
  4. Fill the Meta tables with the required meta data
  5. Create a BIML script that will create the Extract and Load SSIS package
  6. Generate the package using BIML Express in Visual Studio 2015 to create the SSIS package
For this solution the following prerequisites need to be met;
  • SQL Server will be used as source and destination platform
  • The Adventure Works 2014 database will be used as source
  • The selected tables from the Adventure Works database are present in the destination database and all required schema’s and specific datatypes, if applicable (we will be using a few tables from the Person schema that do not use custom datatypes)
  • Visual Studio 2015 is installed (Community/Professional/Enterprise)
  • BIML Express is installed

1) - Create the databases and schema's

In this step the databases 'Repository' and Staging are created and the required schema's.
--Create the databases Repository and Staging and required schema's
CREATE DATABASE [Repository] CONTAINMENT = NONE ON  PRIMARY 
( NAME = N'Repository', FILENAME = N'D:\Program Files\Microsoft SQL Server\MSSQL13.MSSQLSERVER\MSSQL\DATA\Repository.mdf' , SIZE = 7168KB , MAXSIZE = UNLIMITED, FILEGROWTH = 1024KB )
 LOG ON 
( NAME = N'Repository_log', FILENAME = N'D:\Program Files\Microsoft SQL Server\MSSQL13.MSSQLSERVER\MSSQL\DATA\Repository_log.ldf' , SIZE = 5184KB , MAXSIZE = 2048GB , FILEGROWTH = 10%)
GO
ALTER DATABASE [Repository] SET RECOVERY SIMPLE;
GO
USE Repository
go
CREATE SCHEMA rep
GO
CREATE DATABASE [Staging] CONTAINMENT = NONE ON  PRIMARY 
( NAME = N'Staging', FILENAME = N'D:\Program Files\Microsoft SQL Server\MSSQL13.MSSQLSERVER\MSSQL\DATA\Staging.mdf' , SIZE = 7168KB , MAXSIZE = UNLIMITED, FILEGROWTH = 1024KB )
 LOG ON 
( NAME = N'Staging_log', FILENAME = N'D:\Program Files\Microsoft SQL Server\MSSQL13.MSSQLSERVER\MSSQL\DATA\Staging_log.ldf' , SIZE = 5184KB , MAXSIZE = 2048GB , FILEGROWTH = 10%)
GO
ALTER DATABASE [Staging] SET RECOVERY SIMPLE;
GO
USE Staging
go
CREATE SCHEMA Sales
GO

2) - Create the Meta tables

During this step we will be creating the meta tables 'Layer' and 'TableList'. The first table will contain the id, name and prefix of the layers present in the Datawarehouse environment. In this blog the only entry present is the Staging area id and name. Normally this table also holds the name of for example the Datawarehouse and Datamart layer or any other layers present in a Business Intelligence environment.
The column 'LayerId' is used in the other table named 'TableList' and is used to make the distinction between the table names present in the respective layer. In this blog there will only be Staging Area tables described.
The table 'TableList' contains the following columns;
  • LayerId - The id of the layer the table belongs to
  • TableName - The name of the table
  • SchemaName - The name of the schema of the table
  • TableType - The type of the table (fe. user table)
  • LoadOrderNr - The order in which the tables are loaded (or created by other processes)
  • WhereClause - Any optional where clause that is used during the load proces (Default this column must be set to '1 = 1')
  • ActiveInd - Indicates if the table is active or inactive during the BIML creation proces
  • InsertDate - The date when the table entry was inserted in the 'TableList' table
Note: Some of the above columns are not or less applicable to the BIML script in this post, but they are used in other generic scripts used to create and load datawarehouse packages (more about this in future posts)
--Create the meta tables
USE [Repository]
GO
IF OBJECT_ID('[rep].[Layer]', 'U') IS NOT NULL
BEGIN
 DROP TABLE [rep].[Layer]
END
GO
CREATE TABLE [rep].[Layer](
 [LayerId] [smallint] NOT NULL,
 [LayerName] [nvarchar](50) NOT NULL,
 [LayerPrefix] [nvarchar](10) NOT NULL,
) ON [PRIMARY]
GO
IF OBJECT_ID('[rep].[TableList]', 'U') IS NOT NULL
BEGIN
 DROP TABLE [rep].[TableList]
END
GO
CREATE TABLE [rep].[TableList](
 [LayerId] [smallint] NULL,
 [TableName] [nvarchar](100) NULL,
 [SchemaName] [nvarchar](100) NULL,
 [ServerNr] [smallint] NULL,
 [TableType] [nvarchar](100) NULL,
 [LoadOrderNr] [int] NULL,
 [WhereClause] [nvarchar](250) NULL,
 [PrimaryKey] [nvarchar](250) NULL,
 [ActiveInd] [nchar](1) NULL,
 [InsertDate] [datetime] NULL
) ON [PRIMARY]
GO

3) - Create the Sales tables

During this step we will be creating the Sales tables in the target database Staging.
--Create the Sales tables
USE Staging
GO
CREATE TABLE [Sales].[ShoppingCartItem](
 [ShoppingCartItemID] [int] IDENTITY(1,1) NOT NULL,
 [ShoppingCartID] [nvarchar](50) NOT NULL,
 [Quantity] [int] NOT NULL,
 [ProductID] [int] NOT NULL,
 [DateCreated] [datetime] NOT NULL,
 [ModifiedDate] [datetime] NOT NULL,
) ON [PRIMARY]
GO
CREATE TABLE [Sales].[SpecialOffer](
 [SpecialOfferID] [int] IDENTITY(1,1) NOT NULL,
 [Description] [nvarchar](255) NOT NULL,
 [DiscountPct] [smallmoney] NOT NULL,
 [Type] [nvarchar](50) NOT NULL,
 [Category] [nvarchar](50) NOT NULL,
 [StartDate] [datetime] NOT NULL,
 [EndDate] [datetime] NOT NULL,
 [MinQty] [int] NOT NULL,
 [MaxQty] [int] NULL,
 [rowguid] [uniqueidentifier] ROWGUIDCOL  NOT NULL,
 [ModifiedDate] [datetime] NOT NULL,
) ON [PRIMARY]
GO
CREATE TABLE [Sales].[SpecialOfferProduct](
 [SpecialOfferID] [int] NOT NULL,
 [ProductID] [int] NOT NULL,
 [rowguid] [uniqueidentifier] ROWGUIDCOL  NOT NULL,
 [ModifiedDate] [datetime] NOT NULL,
) ON [PRIMARY]
GO

4) - Fill the meta tables with the required meta data

After creating the database and metadata tables, they need to be filled with the meta data that will be used by the BIML script in the next step ('BIML Load_STG_Tables_From_Microsoft.biml').
The script provided below inserts the layer information used in this blog and the table meta information of those tables for which the SSIS load proces will be created.

If you want to test the Where Clause functionality you can replace the value '1 = 1' with '1 = 1 AND ShoppingCartItemID = 2' in the column 'WhereClause' in the table 'TableList' for the tablename 'sales.ShoppingCartItem'. This will place a filter on the table.
The BIML script will use the meta table information to create one SSIS package with the name 'SSIS STG Load STG Tables SQL.dtsx'

--Insert the meta information in the meta tables
USE [Repository]
GO
TRUNCATE TABLE [rep].[Layer];
TRUNCATE TABLE [rep].[TableList];
INSERT [rep].[Layer] ([LayerId], [LayerName], [LayerPrefix]) VALUES (1, N'staging', N'stg');
INSERT [rep].[TableList] ([LayerId], [TableName], [SchemaName], [TableType], [LoadOrderNr], [WhereClause], [ActiveInd], [InsertDate]) VALUES (1, N'SpecialOffer', N'Sales', N'user_table', 1, N'1 = 1', N'1', CAST(GETDATE() AS DateTime));
INSERT [rep].[TableList] ([LayerId], [TableName], [SchemaName], [TableType], [LoadOrderNr], [WhereClause], [ActiveInd], [InsertDate]) VALUES (1, N'SpecialOfferProduct', N'Sales', N'user_table', 1, N'1 = 1', N'1', CAST(GETDATE() AS DateTime));
INSERT [rep].[TableList] ([LayerId], [TableName], [SchemaName], [TableType], [LoadOrderNr], [WhereClause], [ActiveInd], [InsertDate]) VALUES (1, N'ShoppingCartItem', N'Sales', N'user_table', 1, N'1 = 1', N'1', CAST(GETDATE() AS DateTime));
GO

5) - Create the BIML script

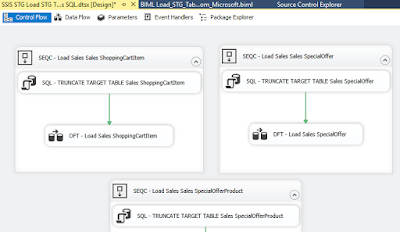
Once the previous steps have been executed it is time to create the BIML script. The BIML script starts with declaring the information needed to create the connection strings to the different database and the server(s) where they recide on. For this example all the databases are SQL Server 2016 databases. It would also be possible to store that information in a meta table but for this post the information is placed inside the BIML script. The BIML script will create one package with the name 'SSIS STG Load STG Tables SQL' and for each table in the 'TableList' table a sequence container will be created with two SSIS components. The first component is a SQL Task component that will use a T-SQL command to truncate the target table. The second component is a Data Flow Task containing a Source and Destination component which will load the data from the target to the source table. Alle the sequence components are executed parallel to each other.

--The BIML code that can be placed inside a BIML file.

    
    <# 
        string pRepServerName    = "localhost"; 
        string pRepDatabaseName  = "Repository";
        string pRepProvider      = "SQLNCLI11.1;Integrated Security=SSPI";
        string pRepSchema        = "rep";
      
        string pSourceServerName = "localhost";
        string pSourceDBName     = "AdventureWorks2014";
        string pSourceProvider   = "SQLNCLI11.1;Integrated Security=SSPI";
        string pSourceSchema     = "Sales";
        
        string pTargetServerName = "localhost";
        string pTargetDBName     = "Staging";
        string pTargetProvider   = "SQLNCLI11.1;Integrated Security=SSPI";
        string pTargetSchema     = "Sales";
    #>
  
    
    <#
        string pLayer            = "Staging";
     #>
    
    <#
    string csRepository = String.Format("Data Source={0};Initial Catalog={1};Provider={2};Auto Translate=False;"
          ,pRepServerName, pRepDatabaseName, pRepProvider);
   
    string csSource = String.Format("Data Source={0};Initial Catalog={1};Provider={2};Auto Translate=False;"
          ,pSourceServerName, pSourceDBName, pSourceProvider);
    
    string csTarget = String.Format("Data Source={0};Initial Catalog={1};Provider={2};Auto Translate=False;"
          ,pTargetServerName, pTargetDBName, pTargetProvider);      
    #>


                <#
                  StringBuilder sMETAGetTableName = new System.Text.StringBuilder();
                  
                  sMETAGetTableName.Append("SELECT ");
                  sMETAGetTableName.Append("    TableName ");
                  sMETAGetTableName.Append("  , SchemaName ");
                  sMETAGetTableName.Append("  , WhereClause ");
                  sMETAGetTableName.Append("FROM ");
                  sMETAGetTableName.Append(pRepSchema);
                  sMETAGetTableName.Append(".TableList AS TAB ");
                  sMETAGetTableName.Append("INNER JOIN ");
                  sMETAGetTableName.Append(pRepSchema);
                  sMETAGetTableName.Append(".Layer AS LYR ");
                  sMETAGetTableName.Append("  ON ( TAB.LayerId = LYR.LayerId) ");
                  sMETAGetTableName.Append("WHERE 1 = 1 ");
                  sMETAGetTableName.Append(" AND TAB.ActiveInd = 1 ");
                  sMETAGetTableName.Append(" AND LYR.LayerName = '");
                  sMETAGetTableName.Append(pLayer);
                  sMETAGetTableName.Append("' ");
                  sMETAGetTableName.Append("ORDER BY ");
                  sMETAGetTableName.Append("   TAB.LoadOrderNr");
                  
                  DataTable tblMETATableNames = ExternalDataAccess.GetDataTable(csRepository, sMETAGetTableName.ToString());
                  foreach (DataRow METATableNameRow in tblMETATableNames.Rows) {
                #>
                 <#=METATableNameRow["TableName"] #>" ConstraintMode="Linear">
                    
                        "
                                    ResultSet="None"
                                    ConnectionName="OLEDB Target">
                            TRUNCATE TABLE <#=pTargetSchema #>.<#=METATableNameRow["TableName"] #> 
                            
                        
                        ">
                            
                                "
                                             ConnectionName="OLEDB Source"
                                             ValidateExternalMetadata="false">
                                    SELECT
        CAST(1 AS INTEGER) AS DUMMY_COLUMN
<#                                          StringBuilder sGETSelectColumn = new System.Text.StringBuilder();
                                            sGETSelectColumn.Append("SELECT " );
                                            sGETSelectColumn.Append("     col.name AS column_name " );
                                            sGETSelectColumn.Append("FROM sys.columns AS col " );
                                            sGETSelectColumn.Append("INNER JOIN sys.objects AS obj " );
                                            sGETSelectColumn.Append("    ON(col.object_id = obj.object_id) " );
                                            sGETSelectColumn.Append("INNER JOIN sys.types AS typ " );
                                            sGETSelectColumn.Append("    ON(col.user_type_id = typ.user_type_id)" );
                                            sGETSelectColumn.Append("WHERE   1 = 1 " );
                                            sGETSelectColumn.Append("   AND obj.name = '"+ METATableNameRow[0].ToString() +"'");
                                            DataTable tblSelectColumn = ExternalDataAccess.GetDataTable(csSource, sGETSelectColumn.ToString());
                                            foreach (DataRow SelectColumn in tblSelectColumn.Rows) {
#>
        , [<#=SelectColumn["COLUMN_NAME"] #>]
<# } #>FROM <#=METATableNameRow["SchemaName"] #>.<#=METATableNameRow["TableName"] #>
WHERE <#=METATableNameRow["WhereClause"] #>


                                " 
                                                  ConnectionName="OLEDB Target">
                                    " />


                <# } #>


<#@ template language="C#" hostspecific="true"#>
<#@ import namespace="System.Data"#>
<#@ import namespace="System.Data.SqlClient"#>
<#@ import namespace="System.Text"#>

6) - Generate the package using BIML Express

Once the BIML file has been created it is time to generate the SSIS package by using BIML Express in Visual Studio 2015.
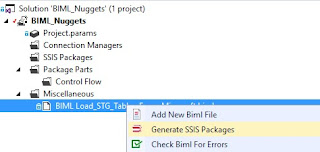
The package can be simply generated by right clicking the BIML package and selecting 'Generate SSIS Packages'.
Using BIML Expres to generate the package

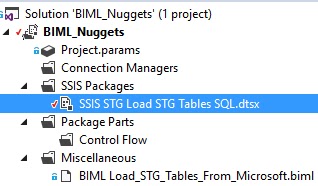
The package has been generated by BIML

Using BIML Expres to generate the package

Summary

In this post we create the following components;
  • Repository database and one schema
  • Staging database and one schema
  • Two meta tables to be used by the BIML script from this post (and possible future posts)
  • Three Staging tables
  • A BIML file called 'BIML Load_STG_Tables_From_Microsoft.biml'
  • A generated SSIS Package named 'SSIS STG Load STG Tables SQL.dtsx'

Tuesday 21 February 2017

Use BIML and csv files to create tables

Case
The case is about importing flat files (CSV’s) without the necessity of metadata. Because BIML always checks if the tables are accessible before creating the packages, the first step is to create the tables with BIML and the second step is to create the SSIS packages for transporting the data.

  1. Creating tables in the database 
  2. Packages to fill this database

Because of the size of the solution I’ve created two separate solutions, one for creating the tables and a second for creating the SSSI packages. You can click on the link to go to the other solution (which I will deploy later this month).


Solution - Creating tables with BIML
In this solution, we create a BIML that is going to create the tables and all the columns are defined as strings.
We have to create two BIML scripts, the first script for defining the table definition and the second for creating the actual package.

1) CSV files
For this example we are using two CSV files (age and sickleave) which are comma separated and have columnnames on the first row. These columnnames will be used in the create table statement

the drop map


content csv file


2) Tabledefinitions
The first biml is called “1_TableDefinitions.biml”
In this biml we define the path were the CSV files are located, an array with the names of the csv files and also some string which we going to use further in the code.
We use two “foreach loops”, the first one loops trough the array with files and the second one loops trough the actual file (to extract the column names).

Normally (without the loop) the code should look like this:

< tables>
 <columns>
   <column datatype="Int32" identityincrement="1" identityseed="1" name="AgeID">
   <column datatype="Int32" name="AgeFrom">
   <column name="AgeTo">
   <column datatype="String" length="255" name="AgeCategoryEmployee">
  </columns>
 </columns>
</tables>

Default BIML uses INT as an default datatype, in this case we use a string.
Now we add the loop in place and the complete code looks like this
<Biml xmlns="http://schemas.varigence.com/biml.xsd">

<#  
    string Prefix="Man";
    
    // the locatie of the csv's'
    string path = @"D:\Drop\Man";
    // Put all the filenames with the extension csv in a string array
    string[] myFiles = Directory.GetFiles(path, "*.csv");
    // string that will be filled with the filename
    string filename;
    // string array for columnnames extracted from CSV
    string[] myColumns;
#>
        <Connections>
            <OleDbConnection 
            Name="OLEDB_STG_<#=Prefix#>" 
            ConnectionString="Data Source=APPL43;Initial Catalog=dummy_STG;Provider=SQLNCLI11.1;Integrated Security=SSPI;Auto Translate=False;">
            </OleDbConnection>
        </Connections>
        <Databases>
             <Database ConnectionName="OLEDB_STG_<#=Prefix#>" Name="dummy_STG"/>
        </Databases>
       <Schemas>
              <Schema Name="dbo" DatabaseName="dummy_STG" Owner="dbo"/>
       </Schemas>
       <Tables>
            <!-- loop trough the array of files-->
            <#  foreach(string filePath in myFiles) 
                {
               // extract the filename from the path to use as tablename     
               fileName = Path.GetFileNameWithoutExtension(filePath);
            
            #>
            <Table Name="<#=Prefix#>_<#=fileName#>" SchemaName="dummy_STG.dbo">
                <Columns>
                   <!-- loop trough the file looking for the columnnames-->
                    <#
                    // read first row of csv to extract to columnnames
                    // and split on comma to create an array
                    StreamReader myFile = new StreamReader(filePath);

                    myColumns = myFile.ReadLine().Split(',');
                    // close file after reading first line
                    myFile.Close();

                    // Loop through column array
                    foreach(string myColumn in myColumns) 
                    {  
                    #>
                      <Column Name="<#=myColumn#>" DataType="String" Length="255"></Column>
                 <#  }   #>
                </Columns>    
            </Table>
            <# }#>
       </Tables>
</Biml>
 
<#@ template language="C#" hostspecific="true"#>
<#@ import namespace="System.IO"#>


3) CreateTable
Secondly we are going to create the biml, called 2_CreateTables.biml. which creates the actual package that contains the create statements to generate the tables.
BIML has an method to create SQL tables “RootNode.Tables.First().GetTableSql();”
We use this method to create ‘SQL create statement’ the of table

The code looks like this

<Biml xmlns="http://schemas.varigence.com/biml.xsd">
    <Packages>
        <Package Name="CreateTables" AutoCreateConfigurationsType="None" ConstraintMode="Linear">
            <Tasks>
                <# 
                // Loop trough the table definition os the first biml
                foreach(var table in RootNode.Tables) {#>
                <ExecuteSQL Name="SQL - Drop_Create <#=table.Name#>" ConnectionName="<#=table.Connection.Name#>">
                    <DirectInput>
                        <#=table.GetTableSql()#>    
                    </DirectInput>
                </ExecuteSQL>
                <# } #>
            </Tasks>
        </Package>
    </Packages>
</Biml>

<!--Includes/Imports for C#-->
<#@ template language="C#" hostspecific="true"#>
<#@ import namespace="System.Data"#>
<#@ import namespace="System.Data.SqlClient"#>


We’ve created 2 bimls, 1_TableDefinitions.biml and 2_CreateTables.biml. Now comes the important part (I’m using Biml Express) for generating the package. First we click on 1_TableDefinitions and secondly on and 2_CreateTables, if you have selected the 2 biml scripts  you click with your right mouse on 1_TableDefinitions.biml and generate SSIS packages. If you do this otherwise, you will get an empty SSIS package. .

Generate SSIS package


Below you can see the result of your BIML scripts: a package with an execute SQL Task for each table you need to create.
Visual studio


The actual create statement looks like this

SET ANSI_NULLS ON
SET QUOTED_IDENTIFIER ON
GO
-------------------------------------------------------------------
IF EXISTS (SELECT * from sys.objects WHERE object_id = OBJECT_ID(N'[dbo].[Man_Age]') AND type IN (N'U'))
DROP TABLE [dbo].[Man_Age]
GO

CREATE TABLE [dbo].[Man_Age]
(
-- Columns Definition
 [AgeID] nvarchar(255) NOT NULL 
, [AgeFrom] nvarchar(255) NOT NULL 
, [AgeTo] nvarchar(255) NOT NULL 
, [AgeCategoryEmployee] nvarchar(255) NOT NULL 
, [AgeCategoryClient] nvarchar(255) NOT NULL 

-- Constraints

)
ON "default"
WITH (DATA_COMPRESSION = NONE)
GO
-------------------------------------------------------------------


Summary
We created two biml scripts one for creating to table definition and one which creates the actuale packages.The result in Management Studio looks like this.

Management studio result


In the next blog I’m going to explain how to create SSIS packages that transport the data from the csv files


Sunday 29 January 2017

Create and populate Time Dimension

Case
We have sensors in our building that output data every minute which we want to use in a dimensional model. Therefore we need a Time Dimension to aggregate data on parts of the day. How do you create and populate a Time Dimension?
International Time Dimension


Solution
Since creating and populating a Time Dimension is a one-time job, T-SQL is probably the best way to accomplish this. For this example we need a Time Dimension on minute level and therefore we have created a loop that executes a insert query 1440 times (24hours * 60minutes).

Besides the hours and minutes we also want to add a name of the day part in two languages and a couple of time strings in both 12 and 24hour notation to make this dimension usable for various countries.


-- Drop the table if it already exists
IF OBJECT_ID('dbo.DimTime', 'U') IS NOT NULL 
BEGIN
    DROP TABLE dbo.DimTime;
END

-- Then create a new table
CREATE TABLE [dbo].[DimTime](
    [TimeId] [int] IDENTITY(1,1) NOT NULL,
    [Time] [time](0) NULL,
    [Hour] [int] NULL,
    [Minute] [int] NULL,
    [MilitaryHour] int NOT null,
    [MilitaryMinute] int NOT null,
    [AMPM] [varchar](2) NOT NULL,
    [DayPartEN] [varchar](10) NULL,
    [DayPartNL] [varchar](10) NULL,
    [HourFromTo12] [varchar](17) NULL,
    [HourFromTo24] [varchar](13) NULL,
    [Notation12] [varchar](10) NULL,
    [Notation24] [varchar](10) NULL
);

-- Needed if the dimension already existed
-- with other column, otherwise the validation
-- of the insert could fail.
GO

-- Create a time and a counter variable for the loop
DECLARE @Time as time;
SET @Time = '0:00';

DECLARE @counter as int;
SET @counter = 0;


-- Two variables to store the day part for two languages
DECLARE @daypartEN as varchar(20);
set @daypartEN = '';

DECLARE @daypartNL as varchar(20);
SET @daypartNL = '';


-- Loop 1440 times (24hours * 60minutes)
WHILE @counter < 1440
BEGIN

    -- Determine datepart
    SELECT  @daypartEN = CASE
                         WHEN (@Time >= '0:00' and @Time < '6:00') THEN 'Night'
                         WHEN (@Time >= '6:00' and @Time < '12:00') THEN 'Morning'
                         WHEN (@Time >= '12:00' and @Time < '18:00') THEN 'Afternoon'
                         ELSE 'Evening'
                         END
    ,       @daypartNL = CASE
                         WHEN (@Time >= '0:00' and @Time < '6:00') THEN 'Nacht'
                         WHEN (@Time >= '6:00' and @Time < '12:00') THEN 'Ochtend'
                         WHEN (@Time >= '12:00' and @Time < '18:00') THEN 'Middag'
                         ELSE 'Avond'
                         END;

    INSERT INTO DimTime ([Time]
                       , [Hour]
                       , [Minute]
                       , [MilitaryHour]
                       , [MilitaryMinute]
                       , [AMPM]
                       , [DayPartEN]
                       , [DayPartNL]
                       , [HourFromTo12]
                       , [HourFromTo24]
                       , [Notation12]
                       , [Notation24])
                VALUES (@Time
                       , DATEPART(Hour, @Time) + 1
                       , DATEPART(Minute, @Time) + 1
                       , DATEPART(Hour, @Time)
                       , DATEPART(Minute, @Time)
                       , CASE WHEN (DATEPART(Hour, @Time) < 12) THEN 'AM' ELSE 'PM' END
                       , @daypartEN
                       , @daypartNL
                       , CONVERT(varchar(10), DATEADD(Minute, -DATEPART(Minute,@Time), @Time),100)  + ' - ' + CONVERT(varchar(10), DATEADD(Hour, 1, DATEADD(Minute, -DATEPART(Minute,@Time), @Time)),100)
                       , CAST(DATEADD(Minute, -DATEPART(Minute,@Time), @Time) as varchar(5)) + ' - ' + CAST(DATEADD(Hour, 1, DATEADD(Minute, -DATEPART(Minute,@Time), @Time)) as varchar(5))
                       , CONVERT(varchar(10), @Time,100)
                       , CAST(@Time as varchar(5))
                       );

    -- Raise time with one minute
    SET @Time = DATEADD(minute, 1, @Time);

    -- Raise counter by one
    set @counter = @counter + 1;
END

Below a very basic example of the usage of this Time Dimension. The LightsAttrium is 0 or 1 indicating whether the lights in the atrium are on or off. By using the average of that during a daypart (night, moning, etc) it shows the percentage of the lights being on. At night it's almost always on and during the afternoon it's off most of the time.
Basic example of usage.


Conclusion
Above a very complete, but yet still basic, example of a Time Dimension. You can add or remove columns for your own specific purposes (let us know the additions in the comments below). Extending this to for example seconds is very easy. Just change the 1440 in the WHILE to 86400 (24*60*60) and change the DATEADD at the bottom to "second" instead of "minute".