Monday 20 November 2017

CTAS - The fastest way to load data on a MPP system

Case

What is the fastest way to using Extract Load Transform (ELT) on a Massively Parallel Processing (MPP) system like on a Azure SQL Datawarehouse.

CTAS: The way to go!


Solution

When Extracting, Loading and Transforming data on a MPP system like Azure SQL Data Warehouse there are several ways to do just that. Currently Create Table As Select (CTAS) is by far the fastest.

Whats is a MPP system?
MPP stands for Massively Parallel Processing and is a database system that uses a control node to distribute the data across several seperate Compute Nodes. This makes it possible to load very large amounts of data in a fast way. All this is done automatically and for the end-user it appears to be one database. When you use traditional ETL software like SSIS to extract, load and transform data you make use of the memory that is allocated to the SSIS system and thus take the data out of the database, which is far less efficient.

How a MPP looks like under the hood


1) What is CTAS?
CTAS stands for Create Table As Select. As the name suggests the operation creates a new table using a select statement and is super fast. CTAS is fast because the data stays on the MPP and thus makes use of all the capabilities of a MPP system.

2) How to use CTAS
When you create a CTAS statement, you can choose to set two options, namely;
  • Distribution options - Setting this option is mandatory
  • Table options - Setting this option is optional. When not supplied a Clustered ColumnStore Index is used.

Distribution options

When you create the CTAS command you can choose between HASH, ROUND ROBIN or Replicate as distribution option.

HASH is used to divide the data in equal sized sections and distribute them to the nodes using a distribution column. When doing this you try to evenly distribute the data on the available nodes. Choosing the correct distribution key here is paramount otherwise you can get skew on the distribution between the nodes. To put it simply; when you have 4 nodes and the data is not distributed evenly then it hurts the data retrieval speed. For example you want to use this option when creating Fact tables that are large (or very large Dimension tables). You can check for skew using the command DBCC PDW_SHOWSPACEUSED
--Creating a table using CTAS and Hash
CREATE TABLE dbo.CTASHash
WITH
(
DISTRIBUTION = HASH(FactCallCenterID)
)
AS
SELECT 
   FactCallCenterID
 , DateKey
 , WageType
 , Calls
 , AutomaticResponses
 , Orders
 , IssuesRaised
 , AverageTimePerIssue
 , ServiceGrade
FROM dbo.FactCallCenter

ROUND ROBIN is used when you dont want to choose a distribution column but are fine when the data is distributed randomly across the nodes. This is also the default option when you do not define a distribution option. This option is used for example for Staging tables. It is advised to always explicitly define the ROUND ROBIN in the CTAS statement.
--Creating a table using CTAS and Round Robin
CREATE TABLE dbo.CTASRobin
WITH
(
 DISTRIBUTION = ROUND_ROBIN
)
AS
SELECT 
   AccountKey
 , ParentAccountKey
 , AccountCodeAlternateKey
 , ParentAccountCodeAlternateKey
 , ValueType
 , CustomMemberOptions
FROM dbo.DimAccount

REPLICATE is used to put the data on every node available so it can be used for quick access. This is useful when creating regular sized Dimensions. When the data is available on each and every node then it safes on moving the data between nodes when using joins. The full table will be available on all nodes.
--Creating a table using CTAS and Replicate
CREATE TABLE dbo.CTASReplicate
WITH
(
 DISTRIBUTION = REPLICATE
)
AS
SELECT 
   ScenarioKey
 , ScenarioName
FROM dbo.DimScenario
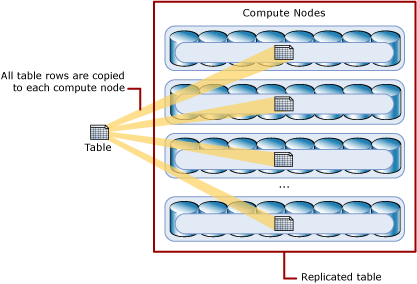
Replicated table

Table options

Besides choosing the distribution option, you can optionally also use the following table options;

CLUSTERED COLUMNSTORE INDEX is a table option that is one of the most efficient ways to store data in Azure DWH. It improves data compression and query performance for data warehousing workloads and outperform Clustered Index and Heap tables. That makes them the best choice for large tables. Using a Clustered Columnstore Index is considered to be the best choice when you are unsure which table option you should best use. It is also the default table option when you only use one of the distribution options.
--Creating a table using CTAS and Clustered Columnstore Index
CREATE TABLE dbo.CTASRobinCluster
WITH
(
   DISTRIBUTION = ROUND_ROBIN
 , CLUSTERED COLUMNSTORE INDEX
)
AS
SELECT 
   AccountKey
 , ParentAccountKey
 , AccountCodeAlternateKey
 , ParentAccountCodeAlternateKey
 , ValueType
 , CustomMemberOptions
FROM dbo.DimAccount

HEAP is a table option that is usefull when temporarily loading data on Azure DWH and is the fastest way to load your data into a table. It is not advisable to use a heap table when the data in the table is frequently grouped together. That is because the data must be sorted before it can be grouped.
--Creating a table using CTAS and Heap
CREATE TABLE dbo.CTASRobinHEAP
WITH
(
   DISTRIBUTION = ROUND_ROBIN
 , HEAP)
AS
SELECT 
   AccountKey
 , ParentAccountKey
 , AccountCodeAlternateKey
 , ParentAccountCodeAlternateKey
 , ValueType
 , CustomMemberOptions
FROM dbo.DimAccount

CLUSTERED INDEX is a table option that you use when you want to sort and store the data rows in the table based on a specific column. The disadvantage of using a Clusted Index table is that only queries that use the defined Clustered Index column benefit from the index. This can be somewhat fixed by using additional Nonclustered indices, but that would increase use of space and processing time.
--Creating a table using CTAS and Clustered Index
CREATE TABLE dbo.CTASRobinClusteredIndex
WITH
(
 DISTRIBUTION = ROUND_ROBIN,
 CLUSTERED INDEX (AccountKey)
)
AS
SELECT 
   AccountKey
 , ParentAccountKey
 , AccountCodeAlternateKey
 , ParentAccountCodeAlternateKey
 , ValueType
 , CustomMemberOptions
FROM dbo.DimAccount

PARTITION is the table option that you use when you want to determine how the rows are grouped within each distribution. To use it you need to choose a partition column name. This column can be of any data type. You use partitioning to improve query performance and data maintenance and it avoids transaction logging. Using partitioning during the load proces can also substantially improve performance.
--Creating a table using CTAS and Partition
CREATE TABLE dbo.CTASRobinPartition
WITH
(
 DISTRIBUTION = HASH(ProductKey),
 CLUSTERED COLUMNSTORE INDEX,
 PARTITION
    (
        OrderDateKey RANGE RIGHT FOR VALUES
        (
        20000101,20010101,20020101,20030101,20040101,20050101,20060101,20070101,20080101,20090101,
        20100101,20110101,20120101,20130101,20140101,20150101,20160101,20170101,20180101,20190101,
        20200101,20210101,20220101,20230101,20240101,20250101,20260101,20270101,20280101,20290101
        )
    )
)
AS
SELECT 
 ProductKey
 ,OrderDateKey
 ,DueDateKey
 ,ShipDateKey
 ,SalesAmount
 ,TaxAmt
FROM dbo.FactInternetSales

3) Advantages of CTAS
With CTAS you are able to create and recreate tables using a specific distribution type and its very fast. If you have created HEAP tables and want to see if a different distribution type is a better option, then you can simply recreate the table using CTAS with the desired Distribution option. Simply create a copy of the table with a different name, drop the old table and rename the copy table to the original table name.
--Creating a table using CTAS and Partition
CREATE TABLE dbo.CTASRenameTemp
WITH
(
 DISTRIBUTION = ROUND_ROBIN
)
AS
SELECT 
 *
FROM dbo.DimAccount;

DROP TABLE dbo.CTASRename;

RENAME OBJECT dbo.CTASRenameTempTO CTASRename;

3) CTAS tips
When you create a copy a table using CTAS and do not manipulate any of the columns, all the settings of the columns are left intact. For example the datatype and nullability. When you (re)create a column in the table then you explicitly have to cast the table and optionally use the ISNULL() function to set the nullability of the column. For the latter if you do not use the ISNULL() function then the column automatically is created allowing NULL. In below example the first column allows NULL's and the second doesnt.
--CTAS Tips
CREATE TABLE dbo.CTASCasting
WITH
(
 DISTRIBUTION = ROUND_ROBIN
)
AS
SELECT 
   CAST(ValueType AS VARCHAR(100)) AS ValueTypeNull
 , ISNULL(CAST(ValueType AS VARCHAR(100)),'Do not allow NULL') AS ValueTypeNotNull
FROM dbo.DimAccount;
Summary

With CTAS you can quickly create and recreate tables without having to build complex ETL processes. It is fast, flexible and easy to use and it gives you the option to build different styles of tables that are best used in different scenario's like fast loading or fast data retrieving. And if you want to test the table with other options then you simply recreate it with the data.

Thursday 16 November 2017

Cognitive functions U-SQL: emotion, age & gender

Case
U-SQL has cognitive capabilities to analyse pictures of persons to detect age, gender and emotions. How do they work and do I need Azure Cognitive Service?
U-SQL Cognitive Capabilities


Solution
Good news is that you only need Azure Data Lake (Analytics and Store) with a U-SQL job. Downside is that U-SQL does not yet have the full functionality of Azure Cognitive Services, but all the basics are available. In a previous blog post we showed the basics of the cognitive capabilities in U-SQL and an example of tagging images to add descriptive labels to it. If you never used U-SQL before then first read that post. This follow-up post continues with two new examples. Detecting  emotions and detecting age & gender .

Starting point
The starting point of this blog post is an Azure Data Lake Store (ADLS) with a collection of 'random' pictures of humans. We have a folder called 'faces' that contains random images which we wil use for these next two examples.
Test faces


1) Emotions Script
The emotion script scans the pictures for faces and then tries to determine the emotion of each face (anger, contempt, disgust, fear, happiness, neutral, sadness, surprise). For each face it shows where it was located in the picture and then shows its emotion and the confidence rate for that emotion.
Me a few weeks ago at a party


Referencing assemblies
For emotion scanning we need one extra reference called "ImageEmotion".
// Needed for image extraction and emotions
REFERENCE ASSEMBLY ImageCommon;
REFERENCE ASSEMBLY ImageEmotion;

Extract image files
This code, to extract image files from an ADLS container, is exactly the same as in the previous examples .
// Get the image data from ADLS container
@images =
    EXTRACT     FileName string, 
                ImgData byte[]
    FROM        @"/faces/{FileName}.jpg"
    USING new Cognition.Vision.ImageExtractor();

Transform data
Scanning the images for faces and their emotion is done by cross joining the images rowset to the EmotionApplier method. The column names, datatypes and column order are fixed, but you can add aliases for different column names or change the order in the SELECT part of the query.

The query returns one record per face on the image. Besides the emotion you also get a confidence rate, the number of faces, the face number and the position on the image.
// Query detects emotion and the confidence
// If there are multiple faces it creates
// one record for each face. It also show
// the position of the face on the picture.
@emotions =
    SELECT FileName.ToLower() AS FileName,
        Details.NumFaces,
        Details.FaceIndex,
        Details.RectX,
        Details.RectY,
        Details.Width,
        Details.Height,
        Details.Emotion,
        Details.Confidence
    FROM @images 
    CROSS APPLY
        USING new Cognition.Vision.EmotionApplier() AS Details(
            NumFaces int, 
            FaceIndex int, 
            RectX float,
            RectY float,
            Width float,
            Height float, 
            Emotion string, 
            Confidence float);

Output data
This is the same code as in the previous examples to output the detected emotions to a file in an ADLS container.
// Output the emotions rowset to a CSV file
// located in the Azure Data Lake Store
OUTPUT @emotions
    TO "/faces/emotions.csv"
    ORDER BY    FileName
    USING Outputters.Csv(outputHeader: true);
Download the complete script here.

The result
Now the emotion script is ready to run. Click on the submit button and wait for the job to finish. This could take a few moments! Then browse to the ADLS folder and preview the file to see the result.
The result with in red the happy man from above


2) Age/gender Script
The age/gender script scans the pictures for faces and then tries to determine the age en gender of each face. It is very similar to the emotion script.
Me at 43


Referencing assemblies
For age and gender scanning we need one extra reference called "FaceSdk".
// Needed for image extraction and age/gender
REFERENCE ASSEMBLY ImageCommon;
REFERENCE ASSEMBLY FaceSdk;

Extract image files
Again the same code as in the previous examples to extract image files from an ADLS container.
// Get the image data from ADLS container
@images =
    EXTRACT 
        FileName string, 
        ImgData byte[]
    FROM @"/faces/{FileName}.jpg"
    USING new Cognition.Vision.ImageExtractor();

Transform data
Scanning the images for age and gender and their emotion is done by cross joining the images rowset to the EmotionApplier method. The columnnames, datatypes and order are fixed, but you can add aliases for different columnnames.

The query returns one record per face on the image. Besides the age and gender you also get the number of faces, the face number and the position on the image.
// Query detects age and gender
// If there are multiple faces it creates
// one record for each face. It also show
// the position of the face on the picture.
@faces_analyzed =
    SELECT FileName.ToLower() AS FileName,
        Details.NumFaces,
        Details.FaceIndex,
        Details.RectX, Details.RectY, Details.Width, Details.Height,
        Details.FaceAge,
        Details.FaceGender
    FROM @images
    CROSS APPLY
        USING new Cognition.Vision.FaceDetectionApplier() AS Details(
            NumFaces int, 
            FaceIndex int, 
            RectX float, RectY float, Width float, Height float, 
            FaceAge int, 
            FaceGender string);

Output data
Outputting the data to ADLS uses the same code as in the previous examples.
// Output the gender and age rowset to a CSV file
// located in the Azure Data Lake Store
OUTPUT @faces_analyzed
    TO "/faces/agegender.csv"
    USING Outputters.Csv(outputHeader: true);
Download the complete script here.

The result
Now the age and gender script is ready to run. Click on the submit button and wait for the job to finish. This could take a few moments! Then browse to the ADLS folder and preview the file to see the result.
The result with my photo in red


Summary
This post showed you how to use U-SQL to detect emotion, age and gender from pictures. The next step could be to join these examples in one big script. When you want to try that, keep in mind that the ON clause uses two = instead of one (C# instead of TSQL): ON a.FileName == e.FileName. If you want to try these scripts your self, then you can only do that in the Azure portal. The U-SQL projects for Visual Studio do not yet support these extensions.

As said before the functionality in U-SQL is not yet the same as in Azure Cognitive Services which has much more options (and there my age was estimated at 39 with the same picture). Hopefully this will change, but for now the basics are working. Keep an eye on the Data Lake topic page where we will post new examples when more functionality is available.

Cognitive functions U-SQL: image tagging

Case
U-SQL has cognitive capabilities to analyse images. How do they work? Do I need Azure Cognitive-services?
U-SQL Cognitive Capabilities


Solution
Good news is that you only need Azure Data Lake (Analytics and Store) with a U-SQL job. Downside is that U-SQL does not yet have the full functionality of Azure Cognitive Services, but all the basics are available. This blog post starts with a very simple image extraction script to explain the basics of the U-SQL cognitive functions. In the second example we will tag images to add descriptive labels to them.

In a second post we will also show how to detect faces on images and extract emotion, gender and age from them. The base of these scripts are all very similar.

Starting point
The starting point of this blog post is an Azure Data Lake Store (ADLS) with a collection of 'random' images. We have a folder called 'objects' that contains random object images which we wil use for these first two scripts.
The content of ADLS container with random google image pictures


Create ADLA environment
To start we need to create a new Azure Data Lake Analytics (ADLA) environment and connect it to the existing ADLS with the image collection. Go to the Azure portal and click on New in the top left corner of the dashboard and locate ADLA under "Data + Analytics". Supply the basic stuff like name, subscription, resource group and location. One of the last steps is selecting the ADLS (or create a new one). Unless you have a good reason to deviate, it is wise to use the same location for ADLS and ADLA to prevent unnecessary data trafic around the world which could make your queries slower and therefore costing you extra money.
Creating new ADLA and connect it to ADLS


Install U-SQL Extensions
To make use of the cognitive functions in U-SQL, we first need to install the extensions. Go to Sample Scripts in the menu of ADLA and then click on Install U-SQL Extensions in the header. This assembly installation takes a few minutes, but you only have to do this once per ADLA.
Install U-SQL extensions


You can check the internal database in the Data Explorer to see which assemblies are installed. The Data Explorer button can be found on the ADLA overview page in the header.
Check which assemblies are installed


A) Basic script
Let's start with a very basic example: Extracting image files from an ADLS container and create a CSV file with all filenames in it.

1) Create new job
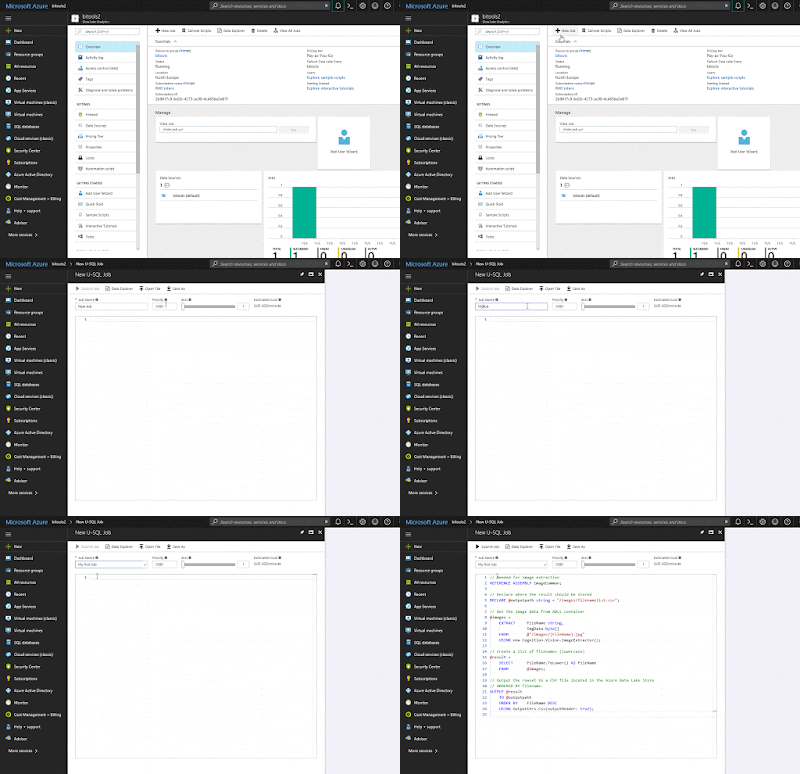
On the ADLA overview page click on +New Job and then give it a suitable name before we start coding.
Create new U-SQL job


2) Referencing assemblies
The cognitive image scripts in U-SQL always start with adding references. For image extraction we need to add a reference to "ImageCommon".
// Needed for image extraction
REFERENCE ASSEMBLY ImageCommon;

3) Extract image files
Next step is to extract the actual files from the ADLS container and store them in a rowset variable called @images. The ImageExtractor method can only get the filename and the actual bytes of the file. The order and datatype of these columns are fixed, but you can use different column names.

It looks a bit like a T-SQL SELECT statement, but because we are getting unstructured data it starts with EXTRACT instead of SELECT and we need to specify the data type. The FROM does not get the data from a table, but from the ADLS container called "objects" and the construction with {FileName}.jpg is a wildcard to only get JPG images from that container.
// Get the image data from ADLS container
@images =
    EXTRACT     FileName string,
                ImageData byte[]
    FROM        @"/objects/{FileName}.jpg"
    USING new Cognition.Vision.ImageExtractor();

4) Transform data
For our CSV with filenames we only want to extract the filename column from the rowset variable called @images. This is done with a very simple SELECT query on the rowset variable from the previous step to extract the required data.
// Create a list of filenames
@result = 
    SELECT      FileName
    FROM        @images;

You can add an ORDER BY clause, but it requires to add FETCH to specify the number of rows that you want to select and sort. By default the ORDER BY is case sensitive (just like C#). You can overcome this by adding .ToLower() after the column name.
// Create a orderd list of filenames
// Note 1: ORDER BY requires the FETCH option to supply the nummer of rows
// Note 2: ORDER BY is case sensitive. Workaround: add .ToLower() 
// Note 3: ORDER BY can be moved to OUTPUT section (below TO)
@result = 
    SELECT      FileName
    FROM        @images
    ORDER BY    FileName.ToLower() 
    FETCH       10 ROWS;

5) Output data
Last step is to save the data in a CSV file in an ADLS container. In this example we are outputting the rowset variable @result that was created in the previous step. The outputter.csv has many options to format your CSV file, but they are all optional.
// Output the rowset to a CSV file located in the Azure Data Lake Store
OUTPUT @result
    TO "/objects/filenamelist.csv"
    USING Outputters.Csv(outputHeader: true, quoting: false);

Instead of a hardcoded path in the OUTPUT section you could also use a variable to move the hardcoded part to the top of your script.
// Declare where the result should be stored
DECLARE @outputpath string = "/objects/filenamelist.csv";

// Output the rowset to a CSV file located in the Azure Data Lake Store with variable
OUTPUT @result
    TO @outputpath
    USING Outputters.Csv();

There is an alternative place for the ORDER BY. You can also add it in the OUTPUT section right below the TO clause. It does not allow the FETCH option, which is a good thing, but it also does not allow the .ToLower() workaround (causing a case sensitive ordering). You could solve that by lowering it in the @result rowset instead.
// Create a list of filenames (lowercase)
@result = 
    SELECT      FileName.ToLower() AS FileName
    FROM        @images;

// Output the rowset to a CSV file located in the Azure Data Lake Store
// ORDERED BY filename descending.
OUTPUT @result
    TO "/objects/filenamelist.csv"
    ORDER BY    FileName DESC
    USING Outputters.Csv(outputHeader: true);
Download the complete script here.

6) Run Job
Now the script is ready to run. To improve the performance we increase the AUs a little bit, but this increases the costs. In a later post the optimal settings will be explained. Then click on the submit button and wait for the job to finish. This could take a few moments!
Running the job (not the actual speed)


7) The result
When the job has finished you can preview the result file in ADLS. Use the Data Explorer to browse to the folder and then preview the generated CSV file.
Preview result in Data Explorer


B) Tagging script
Image tagging means that it will scan the images and add descriptive words to it including a probability rate to show you how certain it is about that particular word. If you have a picture of someone cycling in the mountains then it will add words like bicycle, mountain, outdoor, person, sky.
Example


Referencing assemblies
For image tagging we need one extra reference called "ImageTagging".
// Needed for image extraction and tagging
REFERENCE ASSEMBLY ImageCommon;
REFERENCE ASSEMBLY ImageTagging;

Extract image files
This is the same code as in the previous example to extract image files from an ADLS container.
// Get the image data from ADLS container
@images =
    EXTRACT     FileName string, 
                ImgData byte[]
    FROM        @"/objects/{FileName}.jpg"
    USING new Cognition.Vision.ImageExtractor();

Transform data
Tagging the images is a two step action where it first adds (zero, one or) multiple tags and the probability in value pairs. The second step is to convert all those value pairs to a string which we can export. It also shows the number of tags added.
// Process the images and add multiple tag pairs (tag and probability rate)
// NumObjects contains the number of tag pairs added to the image
@tags =
    PROCESS  @images 
    PRODUCE  FileName,
             NumObjects int,
             Tags SQL.MAP<string, float?>
    READONLY FileName
    USING new Cognition.Vision.ImageTagger();

// We need to convert the tagpairs to a string which we can export
// The string will look like: bicycle:0.9998484;outdoor:0.9164549;transport:0.7914466
@tags_serialized =
    SELECT  FileName.ToLower() AS FileName,
    NumObjects AS TagsCount,
    String.Join(",", Tags.Select(x => String.Format("{0}:{1}", x.Key, x.Value))) AS TagsString
    FROM  @tags;

Output data
This is the same code as in the previous example to output the filename and tags to a file in an ADLS container. Only the variablename and filename did change.
// Output the rowset to a CSV file located in the Azure Data Lake Store
OUTPUT @tags_serialized
    TO "/objects/tagging.csv"
    ORDER BY    FileName
    USING Outputters.Csv(outputHeader: true);
Download the complete script here.

The result
Now the script is ready to run. Click on the submit button and wait for the job to finish. Again, this could take a few moments! Then browse to the ADLS folder and preview the file to see the result.
The result with in red the cyclist from above


Note:
The tagging in Azure Cognitive Services - Computer vision API has some additional options, but we will show that in a future post.

Summary
In this post you saw how to extract images from ADLS and process them with U-SQL in ADLA. We also showed how tagging of images works and in the next post we will handle the scanning of faces for emotions, gender and age. If you want to try these scripts your self, then you can only do that in the Azure portal. The U-SQL projects for Visual Studio do not yet support these extensions.