Showing posts with label AZURE. Show all posts

Saturday 18 January 2020

Azure snack: prevent accidental deletes (with locks)

Case
It probably never happened to you, but how do you prevent accidental deletions of Azure resources by you or your co-workers?
Oops deleting the wrong resource :-(


Solution
Accidental deletions of Azure resources (for example by clicking on the wrong button) are probably very rare because you have to confirm the deletion by typing the name of the resource. Deleting the wrong resource (for example a resource with the same name in a different resource group) is more likely.

Microsoft added a very simple, but also very effective solution for this with the Locks option. You can add locks on Subscription level, Resource Group level and Resource level. There are two different type of locks:
  • Read-only: Authorized users can't change a thing and therefor they also can't delete the resource
  • Delete: Authorized users can change the resource, but they can't delete the resource

Note: although you might be a contributor or owner for the resource. A lock overrides that authorization.

1) Determine level and lock type
First step is to determine which resource(s) you want to protect and where you want to add the lock. On the Subscription level is probably a bit too protective in most cases and on individual resources might be too much work. Resource group is the most likely choice. Next step is to decide which lock you want to add: read-only or delete. If you want to exaggerate you could even add multiple locks on the same level or on different levels.

2) Add lock
Now it's time to add the actual lock for preventing an unwanted delete.
  • Go to the Subscription, Resource Group or Resource and click in the left menu on Locks. On Subscription level it is called 'Resource locks'.
  • Click on the + Add button
  • Enter the Lock name. E.g. 'Prevent Accidental Deletes'
  • Choose the lock type: read-only or delete
  • Enter a note why you have added this lock and hit the OK button
Add a delete lock


Note: Removing a lock can be done in the same spot.

3) Testing
To test this you probably want to create a dummy resource and then try to delete it. When you delete the resource it initially looks like you will succeed, but then you will get the following error message (it also shows where you can find the lock).
Failed to delete logic app AWS.
The scope '/subscriptions/1x1111x1-1x1x-1111-xx11-1x1111x1x11x/resourceGroups/Joost_van_Rossum/providers/Microsoft.Logic/workflows/AWS' 
cannot perform delete operation because following scope(s) are locked: '/subscriptions/1x1111x1-1x1x-1111-xx11-1x1111x1x11x/resourceGroups/Joost_van_Rossum'.
Please remove the lock and try again.
Try to delete resource with lock


Summary
In this post you saw how to use locks for (accidental) delete prevention of Azure resources. Probably most useful for mixed environments to protect the production resources. There are a few considerations when using locks:

To add or remove a Lock you need to have the role Owner or User Access Administrator. This means you can also use a deletion Lock to really prevent deletions by people with the Contributer role. They can still edit the resource, but are not allowed to delete the resource.

If you have Azure Automation runbooks scheduled to upscale or downscale a resource with a read-only lock then you first have to remove the lock in the PowerShell script before making the changes. Same applies to Azure DevOps when your deployment changes a resource in Azure with a lock.

The locks only prevents 'Azure changes'. However it does not prevent deletions or changes within for example an Azure SQL database.

Wednesday 5 June 2019

Staging with the Azure Data Factory Foreach Loop

Case
When we where using SSIS we could use BIML to generate a whole bunch of staging packages for all tables in a certain database. Is there a similar solution for Data Factory where I don't have to create pipelines for all tables?
ForEach loop in Azure Data Factory


Solution
Azure Data Factory (ADF) has a For Each loop construction that you can use to loop through a set of tables. This is similar to BIML where you often create a For Each loop in C# to loop through a set of tables or files.

To keep things very simple for this example, we have two databases called Source and Stage. We already generated three tables in the Stage database that have the same structure and datatypes as in the Source database. We will empty the stage tables before filling them.

1) Create view in Stage
First we need a list of tables that we can use to loop through. For this example we used a view in the Stage database that retrieves all tables from the information schema. You can finetune this view with for example a where clause or use a filled table instead.
CREATE VIEW [dbo].[StageTables]
AS
  SELECT TABLE_SCHEMA
  ,      TABLE_NAME
  FROM   INFORMATION_SCHEMA.TABLES
  WHERE  TABLE_TYPE = 'BASE TABLE'
GO

Note: Use QUOTENAME to make deviating tablenames monkeyproof. It will add brackets around schema and table names.

2) Create Dataset for view
Now go to ADF (Author & Monitor dashboard) and create a new Dataset for the view above.
ADF - Add Dataset


Select the right Data Store (Azure SQL Server in our example) and give your dataset a suitable name like 'StageTables'. Next add a new (or select an existing) Linked service. Then select the newly created view.
ADF - New Dataset


3) Create Dataset for Source tables
Next we will create a Dataset for the tables in the Source database, but instead of pointing to a particular table we will use a Parameter called 'SourceTable'. First go to the Parameters tab and create the variable. Then return to the Connection tab where the tablename can now be filled with Dynamic Content: @dataset().SourceTable
ADF - Create Dataset with parameter


4) Create Dataset for Stage tables
Now repeat the exact same steps to create a Dataset for the Stage tables and call the Dataset 'Stage' and the Parameter 'StageTable'. The tablename can then be filled with Dynamic Content: @dataset().StageTable

5) Create Pipeline
At this point we have three Datasets (StageTables, Source and Stage) and two Linked Services (to the Source and Stage database). Now it's time to create the pipeline that exists of a Lookup (under General) and a ForEach (under Iteration & Conditionals).
ADF - Pipeline with Lookup and Foreach


6) Add Lookup
In the newly created pipeline we first need to add a Lookup activity that points to the Dataset called StageTables which points to the view. You can hit the Preview data button to check the tables.
ADF - Add Lookup


7) Add Foreach
Next step is adding a Foreach activity that loops through the result of the lookup. On the Settings tab you can provide the items you want to loop though. In our case the output of the preceding Lookup activity from the previous step: @activity('my tables').output.value
On the Activities tab we can add a new activity that we want to execute for all our staging tables. For this example only a Copy Data activity which we will configure in the next step.
ADF - Configure ForEach


Note: on the Settings tab you will also see the setting 'Batch count', this is the maximum number of parallel executions of the Copy Data Activity. If you have a lot of tables then you should probably max it with this setting!


8) Copy Data Activity
The last step is to configure the Copy Data Activity to copy the data from the Source to the Stage database. First give it a suitable name like: stage my table. Then go to the Source tab and select  'Source' (from step 3) as the Source dataset.
Because we added a parameter to this dataset, a new field called 'sourcetable' will appear. With an expression we will add the schema name and a table name from the ForEach loop construction: @concat(item().TABLE_SCHEMA,'.',item().TABLE_NAME)
Next we will repeat this for the Sink tab where we will use the Sink dataset called 'Stage'. The expression for the table name is the same as above: @concat(item().TABLE_SCHEMA,'.',item().TABLE_NAME)
ADF - Copy Data in ForEach


9) Truncate Stage
To empty the Stage tables, you could of course add a Stored Procedure Activity before the Copy Data Activity to execute a Truncate or Delete statement. However the Copy Data Activity has a Pre-copy script option on the Sink tab that you can use to execute this same statement (thx colleague David van der Velden for the idea). Add the following expression:
@concat('TRUNCATE TABLE ', item().TABLE_SCHEMA,'.',item().TABLE_NAME)
ADF - Copy Data Pre-copy script


Summary
In this post you have seen a BIML-SSIS alternative in Azure Data Factory to stage tables with the ForEach construction. If you want to stage an other table you can just add the empty table to the stage database and the ForEach will fill it automatically.


Friday 31 May 2019

Azure - Incremental load using ADF Data Flows

Case
Recently Microsoft introduced a new feature for Azure Data Factory (ADF) called Mapping Data Flows. This allows you to do data transformations without writing and maintaining code. Similar to SSIS, but then in the Cloud. How can we use Mapping Data Flows to build an incremental load?


Solution
First, it is good to know that Mapping Data Flows is not the only feature that is part of "Data Flows". Microsoft announced also Wrangling Data Flows. The main difference between these two features is that Mapping Data Flows is more traditional "ETL" with a known source and destination, while Wrangling Data Flows is suited for preparing data and store this dataset in Azure Data Lake for example. From here, it can be used as input for Machine Learning or doing transformations later on. Currently it is in Limited Private Preview. In a future post we will explain more about Wrangling Data Flows and show you how it actually works.

In this post we are going to set up an incremental load for a Data Warehouse (DWH) scenario using Mapping Data Flows. We want to load our Staging layer incremental. We use a so-called Watermark for this. An example of a watermark is a column that contains the last modified time or id. We already configured an Azure Data Factory and we are using an Azure SQL Database with sample data from WideWorldImporters. We use the "Orders" table.

Note:
Here you will find an tutorial of an incremental load using an ADF pipeline with several activities.

1) Create table for watermark(s)
First we create a table that stores the watermark values of all the tables that are suited for an incremental load. The table contains the following columns:

--Create Watermark table
CREATE TABLE [dbo].[WatermarkTable](
 [WatermarkTableName] [nvarchar](255) NULL
, [WatermarkColumn] [nvarchar](255) NULL
, [WatermarkValue] [nvarchar](255) NULL
) ON [PRIMARY]
GO

2) Fill watermark table
Add the appropriate table, column and value to the watermark table. The value must be the last loaded date or id. This is a one-time insert, because after this the watermark value will be updated after each load. In our case the table contains the following record:

Azure SQL Database - Watermark value for Orders

3) Create Linked Service
Before we can start building the Data Flow, we first have to make a connection with our database. Go to Connections and click on 'New'. Select Azure SQL Database and give it a suitable name. Select your Azure subscription and then select the correct server, database and fill in the credentials.

Azure Data Factory - Create Linked Service


4) Create Data Flow
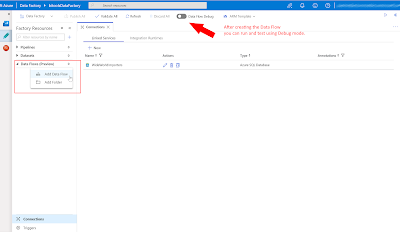
Now lets build the Data Flow itself. Click on Add Data Flow and give it a suitable name. Important to know is that you can test your Data Flow components by turning on the Data Flow Debug mode. Be aware of the costs, because it will spin up a Databricks cluster and that is hourly billed. More information about the debug mode here.
Azure Data Factory - Create Data Flow


Note:
After creating the Data Flow, we can only save it by adding at least one source and one sink.

The goal of this Data Flow is to include only data from the source table / query that is greater then the watermark value that is stored from the previous load. Below we will explain each component of this flow individually.

Source 1: source table / query
In this Data Flow the first source is the source table / query. Click on "Add Source", give it a suitable name and click on new "Source dataset". Select "Azure SQL Database" and select the Linked Service we created earlier. Now go back to the source and click on "Source Options". Select "Query" and write the query. Click on "Import Schema" and at last we can preview our data. We have turned on the Debug mode to import the schema and preview the data.
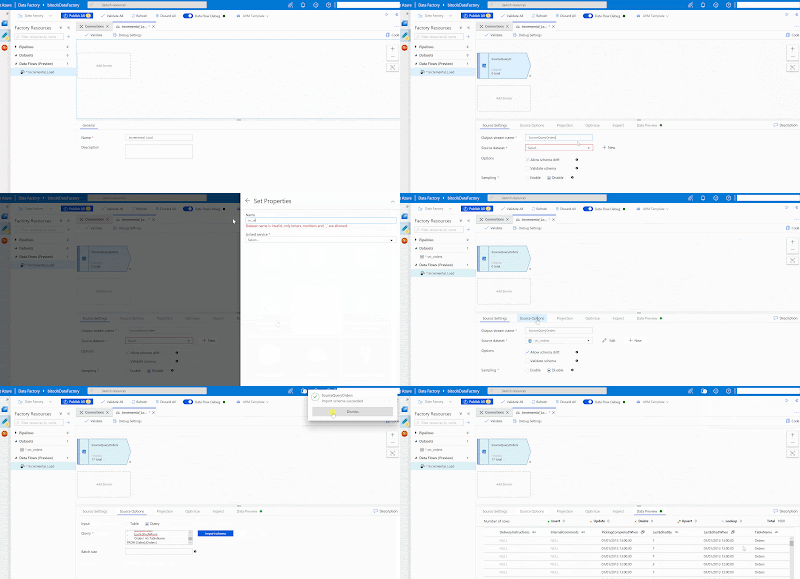
Azure Data Factory - Add Source in Data Flows


We used the following query. As you can see, we added a column that contains the table name from which we want to retrieve the watermark value.

--Create source query
SELECT
 [OrderID]
, [CustomerID]
, [SalespersonPersonID]
, [PickedByPersonID]
, [ContactPersonID]
, [BackorderOrderID]
, [OrderDate]
, [ExpectedDeliveryDate]
, [CustomerPurchaseOrderNumber]
, [IsUndersupplyBackordered]
, [Comments]
, [DeliveryInstructions]
, [InternalComments]
, [PickingCompletedWhen]
, [LastEditedBy]
, [LastEditedWhen]
, 'Orders' AS TableName
FROM [Sales].[Orders]

Source 2: watermark table
This source contains a simple query of the watermark table. The setup is the same as source 1, only with a different query. Later on we will make sure we only select the watermark value from the correct table in the watermark table (with a Join).

--Create watermark table query
SELECT 
 [WatermarkTableName]
, [WatermarkColumn]
, [WatermarkValue]
FROM [dbo].[WatermarkTable]
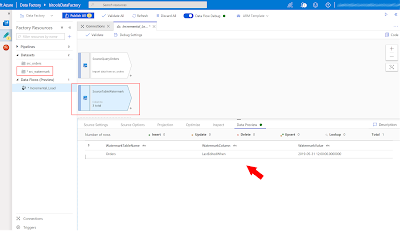
Azure Data Factory - Source WatermarkTable


Derived Column
It can occur that the watermark values has different datatypes. That is why we use the 'nvarchar' datatype to store the values. In this case the watermark is a 'datetime' and we have to convert this to make a successful join to the watermark table. We use the expression language of Mapping Data Flow for this, more information here.
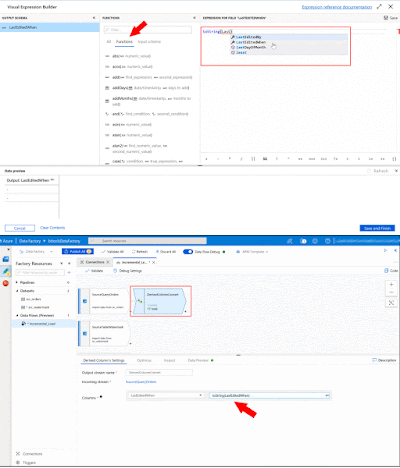
Azure Data Factory - Use Mapping Data Flow expression language


Join
We use a join to combine data from different sources. We can choose between 'Full outer', 'Inner', 'Left outer', 'Right outer' or a 'Cross' join. Here we want to make sure that the watermark value of the specific table is used for the incremental load. We use a 'Left outer', but you can also use a 'Inner' here because all the records contain the same table. A join on watermark table is more future proof, because a join on the watermark column is not going to work when you have multiple watermark tables with the same watermark column name.
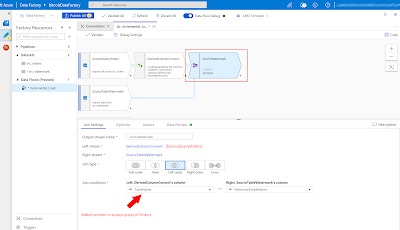
Azure Data Factory - Use Join component


Filter
Because you can only use the "Join" component with two columns that are equal to each other, we use "Filter" to include only the records where the watermark value from the source table / query is greater then the latest watermark value.

Azure Data Factory - Filter out old records


Select
In SSIS you can map the columns from source to destination in the destination. If you do not want to load a column, you do not map it. Here we have to use the "Select" component to select the relevant columns. Thank you Ronny Albouts for mention this.

Azure Data Factory - Map or unmap columns


Derived Column 2
Before we choose the destination, we will convert the column"LastEditedWhen" back to a date using a new "Derived Column" component. Otherwise we cannot map this column with the 'Orders_Incremental' table, because we use the original table definition of 'Orders' and here the datatype is a date (time).
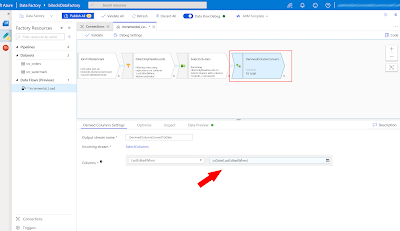
Azure Data Factory - Convert back to date before Sink


Sink
In ADF a destination is called "Sink". Here we will select our destination table called "Orders_Incremental". The table definition is the same as "Orders". Create the Sink dataset and automatically the columns will map. You can turn off 'Auto Mapping' to make manual changes.
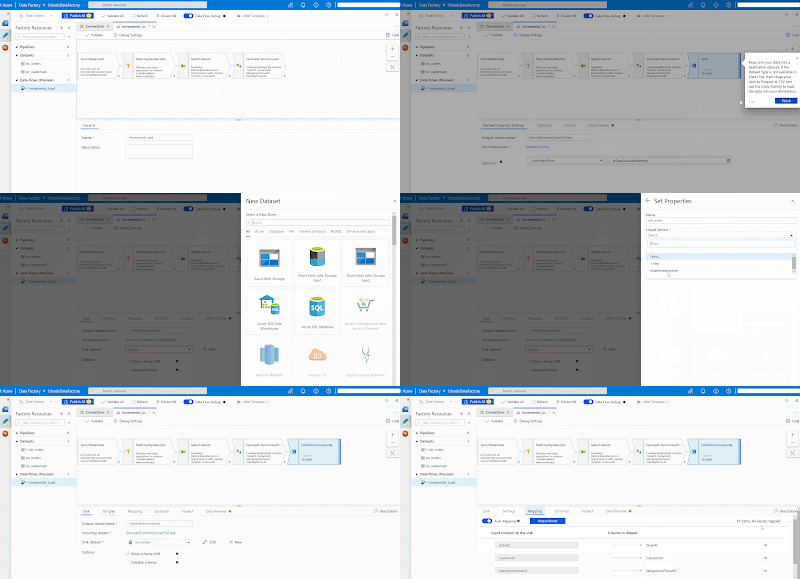
Azure Data Factory - Add Sink in Data Flows


Note:
If the destination type is not available, you can store the data into CSV format or Blob Storage and use a Copy Activity to load the data in your preferred destination.

Result
After the Data Flow is ready, go back to "Pipelines" and create a new one. In here we will select the Data Flow activity and select the Data Flow we have created earlier. Now run the pipeline and let's take a look at the result, it is working!
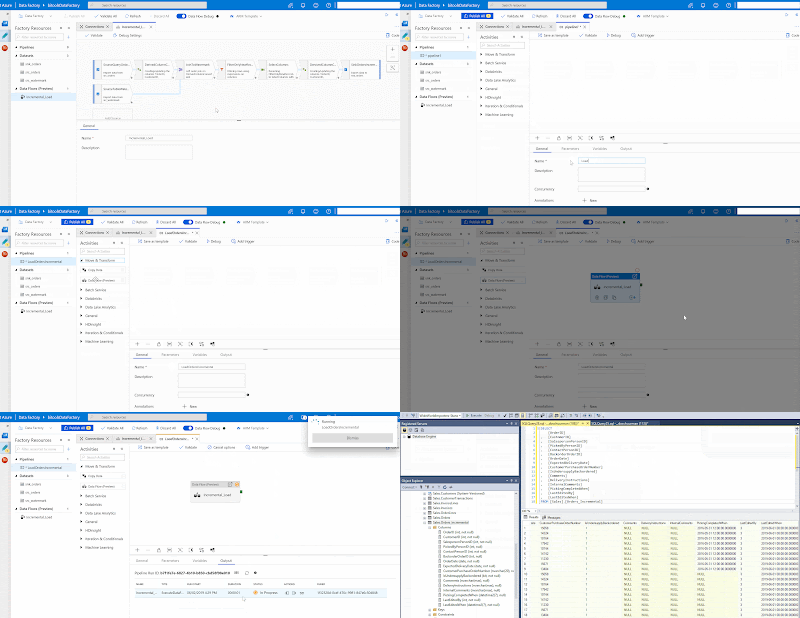
SQL Server Management Studio - Result of Incremental Load

Note:
To make it as generic as possible, it is prefered to use the "Derived Column" component to add a new column (similar to SSIS). In this way you will keep the source query 'clean'. Unfortunately this is not working at the moment and Microsoft is investigating this issue.

Update Watermark
At last we have to update the watermark value to the last known value, in this case the date of "LastEditedWhen". Therefore we will use the following simple Stored Procedure.

/* Create Stored Procedure */
CREATE PROCEDURE [dbo].[usp_UpdateWatermark] 
 @tableName nvarchar(255)

AS

BEGIN

 DECLARE 
 /* ============= Variables ============= */
  @watermarkValue  nvarchar(255) 

 /* Determine latest Watermark value from input table */
 SELECT 
  @watermarkValue = MAX([LastEditedWhen]) 
 FROM [Sales].[Orders_Incremental] AS T

 /* Update Watermark table */
 UPDATE [dbo].[WatermarkTable]
 SET  [WatermarkValue]  = @watermarkValue 
 WHERE [WatermarkTableName] = @tableName

END
GO

Add the Stored Procedure activity at the end of the pipeline. The result should look like this.
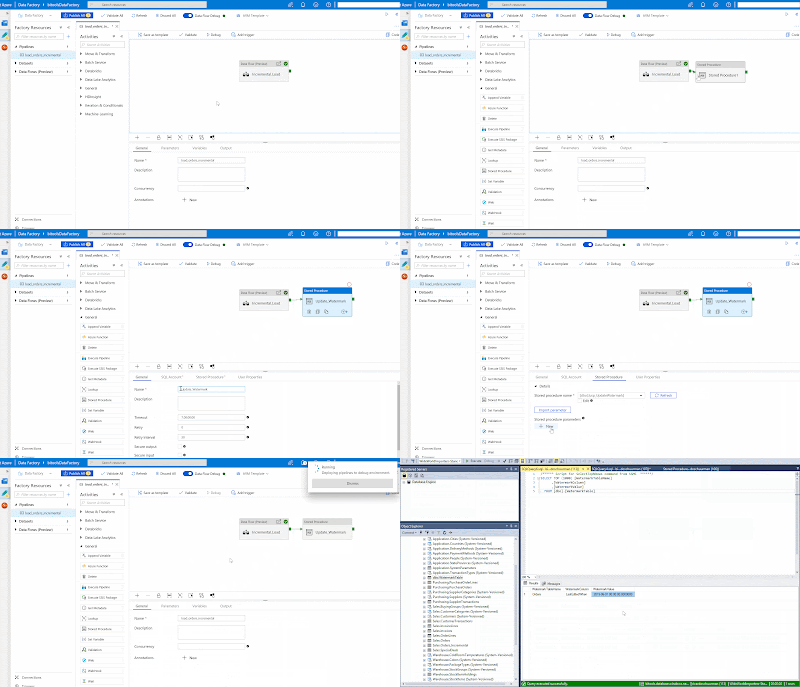
Azure Data Factory - Update Watermark using SP


As you can see the T-SQL is hard coded. In a next post we will show you how to setup a dynamic pipeline so that you can reuse the Stored Procedure activity for every table in an Incremental Load batch.

Conclusion
In this post we showed you how to create an incremental load scenario for your Data Warehouse using Mapping Data Flows inside Azure Data Factory. With Mapping Data Flows, you can transform and clean up your data like a traditional ETL tool (SSIS).

This is just the beginning of Mapping Data Flows, we will expect more and more functions to make this grow into the new "SSIS in the cloud".

Monday 18 February 2019

ADF snack: Pipeline templates

Case
I'm regularly creating the same kind of pipelines in Azure Data Factory. Is there a way to copy or reuse them without writing JSON?
ADF Templates


Solution
If you are working within one Data Factory then you could just clone the pipeline by clicking the three dots behind the template that you want to copy. After that, a new copy of the pipeline will be created.
Clone a pipeline


But Microsoft has also recently introduced pipeline templates which could help you with this. The template gallery contains several templates from Microsoft, but you can also add your own templates. However, using a Git Repository is required for this option. To add a new pipeline from a template, click on the + icon after the filter text box and then choose Pipeline from template. Now find the right template and fill in all the required fields for each activity.
Choosing a pipeline template


To add your own pipeline as a template you first need to open your pipeline. Then press the Save as template option in the top menu. Now you can give your new template a name and then press the Save template button in the bottom right.

Creating a new pipeline template


Summary

In this post we showed you how to use the new pipeline template option in Azure Data Factory. This could be handy when you are creating a lot of similar pipelines, click here for an example.

Next to this the templates from Microsoft could also be a quick start when you do not have any templates and you are starting from scratch. 

Thursday 31 January 2019

Introducing Azure Function Activity to Data Factory

Case
Last month Microsoft released the new Azure Function Activity for Azure Data Factory (ADF). This should make it easier to integrate Azure Function code in Data Factory. How does it work?
Azure Function activity in Azure Data Factory


Solution
Using Azure Functions (like other API's) was already possible via the Web Activity, but now ADF has its own activity which should make the integration be even better.
Azure Functions via the Web Activity


For a project at a client we where already using the Web Activity for a Azure Function with an HTTP trigger and to use this code with the new activity, we did need to slightly change the code. Note that I'm not a die hard .NET developer, but I got some help from my colleague Walter ter Maten.

1) HttpResponseMessage to IActionResult
The standard function did return an HttpResponseMessage, but for Azure Function Activity in the ADF pipeline it needs to return a json object. Below you find a very simple and partial code purely to show the differences in the function call and the return code. Also notice the extra reference/using.

Partial old code with the HttpResponseMessage (Web Activity only):
//C# Code
using System.Linq;
using System.Net;
using System.Net.Http;
using System.Threading.Tasks;
using Microsoft.Azure.WebJobs;
using Microsoft.Azure.WebJobs.Extensions.Http;
using Microsoft.Azure.WebJobs.Host;

namespace Calculate
{   
    public static class Calculate
    {
        [FunctionName("SumNumbers")]
        public static async Task<HttpResponseMessage> SumNumbersFunction([HttpTrigger(AuthorizationLevel.Function, "get", "post", Route = null)]HttpRequestMessage req, TraceWriter log)
        {
            int number1 = 0;
            int number2 = 0;

            // Log start
            log.Info("C# HTTP trigger function processed a request.");

            // Get request body
            dynamic data = await req.Content.ReadAsAsync<object>();
            number1 = data?.number1 ?? 0;
            number2 = data?.number2 ?? 0;

            // Log parameters
            log.Info("Number1:" + number1.ToString());
            log.Info("Number2:" + number2.ToString());

            return req.CreateResponse(HttpStatusCode.OK, "The result is " + (number1 + number2).ToString());
        }
    }
}

Partial new code with the IActionResult (Azure Function Activity and Web Activity):
//C# Code
using System.Linq;
using System.Net;
using System.Net.Http;
using System.Threading.Tasks;
using Microsoft.Azure.WebJobs;
using Microsoft.Azure.WebJobs.Extensions.Http;
using Microsoft.Azure.WebJobs.Host;
using Microsoft.AspNetCore.Mvc;  // Added

namespace Calculate
{   
    public static class Calculate
    {
        [FunctionName("SumNumbers")]
        public static async Task<IActionResult> SumNumbersFunction([HttpTrigger(AuthorizationLevel.Function, "get", "post", Route = null)]HttpRequestMessage req, TraceWriter log)
        {
            int number1 = 0;
            int number2 = 0;

            // Log start
            log.Info("C# HTTP trigger function processed a request.");

            // Get request body
            dynamic data = await req.Content.ReadAsAsync<object>();
            number1 = data?.number1 ?? 0;
            number2 = data?.number2 ?? 0;

            // Log parameters
            log.Info("Number1:" + number1.ToString());
            log.Info("Number2:" + number2.ToString());

            return new OkObjectResult(new { Result = "OK" });
        }
    }
}

We also needed to install the Microsoft.AspNetCore.Mvc NuGet Package. In the tools menu from Visual Studio you will find the NuGet Package Manager. Then search for this package and click the install button. After that you can add the new Using (Microsoft.AspNetCore.Mvc) in the code.
Bijschrift toevoegen


2) Get Function Key and App URL
In the next step we need to specify the Function URL and the Function Key. You can find them in the Azure Portal and then locate the specific function.
Function App URL


For the Function Key you need to go to Manage in you function and then copy the Function Key.
Function Key


3) Azure Function Activity
Now you can replace the Web Activity by an Azure Function Activity. Drag the new activity to the pipeline canvas and give it a suitable name. Next create a new Azure Function Linked Server. This is where you need the two strings from the previous step. After that enter the name of the function you want to execute, choose the Method and fill in the Body (copy it from the Web Activity).
Now delete the Web Activity and debug the pipeline to check the Function. Also check the Monitor (log) of your Azure Function to see whether it was successfully executed.
Replace Web Activity by Azure Function Activity


Summary
In this post you saw how to use the new Azure Function activity in the Azure Data Factory pipeline. It is fairly easy, but we did have to make a small change to the code. If you don't change the code you will get this error:
{
    "errorCode": "3600",
    "message": "Error calling the endpoint.",
    "failureType": "UserError",
    "target": "Sum this"
}
For now I did not see any improvements other than that you now can use the Function Key in Azure Functions which also allows you to revoke access for a specific key.

Saturday 30 June 2018

Power Apps Snack: Add confirmation to delete button

Case
I generated an app with Microsoft PowerApps, but the delete button is missing a confirmation and deletes records a bit too easy. Is there an option to ask something like "are you sure?".
Need some delete confirmation


Solution
There is no out of the box option, but you could change the delete button action a little bit. In this example we will add two more hidden buttons (Confirm and Cancel). The Delete button will unhide these buttons. The Confirm will then do the actual delete and the Cancel will hide the buttons again.

1) Create variable
The first step is to create a Boolean variable for this screen that will be used to show or hide buttons. In the screens pane on the left side click on the screen with the Delete button. Then add the following expression in the OnVisible property: UpdateContext({isVisible: false}). Now you have a variable called isVisible.
Add screen variable with value 'false'


2) Add Confirmation and Cancel icons
Add two icons to your screen via the Insert ribbon. One for the Confirmation action and one for the delete. Also add a label above it with a text like "Are you sure?".
Add icons and label


3) Move delete code
Now Cut and Paste the OnSelect code from the Delete button to the Confirm button and change the Delete button code to UpdateContext({isVisible: true}). This will change the variable value from false to true.
Switch delete code


Add the following 'reverse' code to the OnSelect of the Cancel button: UpdateContext({isVisible: false}). This will change the variable value back from true to false.

4) Hide buttons and label
Since we don't want to show the icons when you haven't clicked on the delete button, we need to change the Visibily property of the two icons and the label. We will replace the default value 'true' to the isVisible variable.
Change Visibility


The intermediate result is a delete button with a confirmation.
Delete with confirmation


5) Disable other buttons
To finish it off we can disable the other buttons so that the user has to confirm or cancel the delete. To accomplish this we need to adjust an expression in the DisplayMode property of the Delete and Edit button. You need to add: && !isVisible to the if contruction. To make it a little more visable that the buttons are disabled you could change their disabled font color to grey.
Final adjustments


The result


Summary
In this post you learned how to add a confirmation visual to a delete button and learned how to add and use variables to change properties of items on your screen (because you cannot use code like: btnCancel.Visible = true).

The (value of the) variable is only usable on this screen. Other screens cannot use it. In a next post we will show you how to pass values from one screen to another screen.

Note that Microsoft PowerApps isn't part of Azure, but part of Office 365. However this tool could be very useful in Business Intelligence / Data Warehouse projects to replace manually created Excel / CSV source files with for example forecast data or simple lists that don't come from a source system. Users often 'accidentally' damage such files for example by adding or deleting columns. With PowerApps you can prevent that. An other great way to use Power Apps is within Power BI as an input form, but more about that in a next blog.


Monday 4 June 2018

Execute Logic Apps in Azure Data Factory (V2)

Case
In an earlier post, we showed you how to use Azure Logic Apps for extracting email attachments without programming skills. The attachments contain the source files. Because this step is part of an Data Warehouse solution, it would be nice to run this together with the ETL process that needs these source files. How can we archive this?

Azure Data Factory V2 - Execute Azure Logic App


Solution
In the first few years of Azure, it was not possible to run your Data Warehouse process entirely in the Cloud. Of course, you could store the data in Azure SQL Database or Azure SQL Data Warehouse (see here for the differences between these two), but when you are using SQL Server Integration Services (SSIS) you still had to run this on-premise or create a custom Virtual Machine. Until recently. This post explains how you can execute SQL Server Integration Services (SSIS) packages in Azure, using Azure Data Factory (ADF) V2.

Besides running SSIS packages in ADF V2, you can also execute other Azure services in here. For example: Azure Databricks, Azure Data Lake Analytics (U-SQL scripts) and HDInsight (services like Hadoop, Spark, Hive etc.).

This post shows you how to execute an Azure Logic App inside ADF V2.

1) Add and configure activity
Create a new pipeline or edit an existing one. Select "General" and choose the Web activity. Give it a suitable name and go to Settings. Fill in the URL, corresponding to the one inside the HTTP trigger in the Azure Logic App, you created earlier:

Azure Logic App - URL in HTTP Trigger


Select the "POST" API Method. Now add a Header and enter the following:
  • KEY: Content-Type
  • VALUE: application/json
When you are finished, click Publish All.

Azure Data Factory V2 - Configure Web Activity


NOTE:
Nowadays the Body is also mandatory, enter the following: @concat('{','}')

2) Run pipeline
After you have published your pipeline, go to Trigger and select Trigger (Now). You can also run the pipeline without publishing it: using Debug. In this mode you will see the result of the pipeline run in the bottom at Output.

NOTE:
If you do not publish your pipeline, you are getting the following error when you are trying to use Trigger (Now):

Pipeline Error - Use Trigger (now) without publishing


NOTE 2:
If you do not publish your pipeline, you are getting the following warning when you want to access the monitor screen:

Pipeline Warning - Go to Monitor without publishing


3) Result
Once you have triggered the pipeline, go to Monitor on the left in the menu. Default it will open the Pipeline Runs overview, but you can also select the Integration Runtimes or Trigger Runs overview at the top.

You can also watch the Runs history of the Logic App:


View Result - Logic App run history


Summary
This post explains how you can manage other ETL, next to SSIS, in your Data Warehouse using one orchestrator. In this case we execute an Azure Logic App using Azure Data Factory (V2).

Click here to see how you can also execute a SSIS package using Azure Logic Apps.