Showing posts with label POWERAPPS. Show all posts

Monday, 31 May 2021

Power Apps Snack: Add an Attachments control

Case
I have a SQL server table with a varbinary field that I want to populate via a Power Apps form, but there seems to be no control for it! In the Media-menu of the Power Apps editor you can find a control to add an image, but it is limited to picture files such as jpg, png, gif and bmp. Is there a control to add other type of files such as pdf files?
The 'hidden' attachments control


Solution
Yes there is an 'hidden' attachment control that we use via a little workaround (thx to colleague Dustin Felipa). So there is an attachments control, but it is only available for SharePoint lists. The trick is to create a temporary screen and form connected to a SharePoint list. After that you can copy and paste that attachment control to your own screen (and then remove the SharePoint screen and connection).

There is a small downside: It didn't yet get it to work within a form with the Submit function. So you have to use a Patch command instead.

1) Create a new screen
Within your app where you need the attachment control create a new empty screen. This will allow us to later on copy the attachment control from this dummy screen to the real screen.
Add temporary new screen


2) Create new data source
Then create a new connection to a SharePoint site. Then choose a list within this site. It must be a list and not a document folder otherwise the control won't appear in the next step.
SharePoint list


3) Create form on SharePoint list
On the new screen add an edit form and use the new SharePoint list as the datasource. Now you can add fields to the edit form. Make sure to select at least the field with the paper clip icon in front of it.
Add attachment field


Now you have a form with a working attachments control. Note that it is a collection of multiple attachments, but you can set the max number of attachments to 1.
Working attachment control


4) Copy and paste
Now copy the control (not the entire datacard) and paste it on your own screen. I used an empty screen for this example. Now you can hit the play button to test the control.
Playing with the attachment control


5) Code
As mentioned before I didn't get it to work within a form in combination with the submit form function. But you can use the Patch function. Since this is a collection you either need to pick the first item with a First or use a ForAll loop to repeat the Patch for all attachments.

// Get first
Patch(
    '[dbo].[myAttachments]',
    {
        Attachment: First(AttachmentBox.Attachments).Value,
        Filename: First(AttachmentBox.Attachments).Name
    }
);

// Get all
ForAll(
    AttachmentBox.Attachments,
    Patch(
        '[dbo].[myAttachments]',
        {
            Attachment: Value,
            Filename: Name
        }
    );
    
)

Now the files are in my table where the Attachment column has the Varbinary(max) datatype.
Now the file are in my attachments table


Conclusion
In this post you learned how to add an attachment control to your app. I hope/suspect that Microsoft will make it available for more data sources because this workaround is a little cumbersome. In a next post we will show you how to use this same control to send emails with attachments from within Power Apps. This requires an additional rename step.

Monday, 4 January 2021

Power Apps Snack: Don't repeat yourself (again)

Case
I have some pieces of code in my Power Apps formula that gets repeated multiple times. I don't want to repeat that same piece of code, not only because that is dull, but also because it's very maintenance-sensitive? A simple change in the formula needs to be adjusted in all repeated pieces of code. Is there a better solution?
Use the With function to not repeat yourself


Solution
Yes there is a better solution then repeating the same piece of code over and over. Last year we showed you an option with a custom 'method', but there is also the WITH function that you probably already know from other languages like T-SQL.

For this example we will revisit an old blogpost to get all selected items from a combobox in a label:
Mulitselect ComboBox in Power Apps


The basic solution is using a concat and concatenate function which looks like:
Concat(
    ComboBox_multiselect.SelectedItems.ProductKey,
    Concatenate(
        Text(ProductKey),
        ","
    )
)
This will result in a string with "PrdKey1,PrdKey2,PrdKey3," If you want to get ride of the last comma you can use a left: LEFT(mystring, LEN(mystring) - 1). This is where the code repeating starts:
Left(
    Concat(
        ComboBox_multiselect.SelectedItems.ProductKey,
        Concatenate(
            Text(ProductKey),
            ","
        )
    ),
    Len(
        Concat(
            ComboBox_multiselect.SelectedItems.ProductKey,
            Concatenate(
                Text(ProductKey),
                ","
            )
        )
    ) - 1
)
The trick is to store the result of the code that needs to be repeated in a 'variable' called myProducts with the With function. After that you can use that 'variable' so that you don't need to repeat yourself:
With(
    {
        myProducts: Concat(
            ComboBox_multiselect.SelectedItems.ProductKey,
            Concatenate(
                Text(ProductKey),
                ","
            )
        )
    },
    Left(
        myProducts,
        Len(myProducts) - 1
    )
)

Conclusion
In this post you learned how NOT to repeat yourself by using the With function in Power Apps. Perhaps the code reduction of this basic example is not that big, but we all know that those small pieces of code can quickly get out of control.


Friday, 24 April 2020

Power Apps Snack: Don't repeat yourself

Case
I have some pieces of code in my Power App that I use for several buttons, but I don't want to create multiple copies of that code. Is there a way to create a method or function with custom code that I can call from various buttons?
Power Apps and custom functions


Solution
No, Power Apps does not support methods or functions like real programming languages. However you can use the SELECT function. This function allows you to execute code from other objects on your screen, but only objects that have an OnSelect event.

Example 1: basics
For this example add two buttons to the screen: Button1 and Button2. In the OnSelect of Button1 add a simple Notify expression:
Notify(
    "Hello",
    NotificationType.Success,
    1000
)
Notify in OnSelect of Button1


In the OnSelect of Button2 add the Select expression:
Select(Button1)
Select in OnSelect of Button2


The Result
Now hit the play button to see the preview of your app. Then click both buttons and see the Notify showing for both buttons. You can even make Button1 invisible if you don't want to execute that code by it self, but only via other buttons.
Testing simple Select solution


Example 2: parameters
By adding variables to the game you can even have some parameters for your new 'function'. Now change the OnSelect code of Button2 to:
UpdateContext({myParam: "Joost"});
Select(Button1)

And then add a third (and optional a fourth) button with the following OnSelect code:
UpdateContext({myParam: "Mark"});
Select(Button1)

Then change the OnSelect code of Button1 to:
Notify(
    "Hello " & myParam,
    NotificationType.Success,
    1000
)
And make Button1 invisible by setting the Visible property to false.

The Result
Now hit the play button again to see the preview of your changes. Click both visible buttons and see the Notify that now shows a different name for both buttons.
Testing Select with 'parameter'


Conclusion
In this post you learned how NOT to repeat yourself with the Select function in Power Apps. Perhaps not the same features as in JavaScript, C# or any other language, but very useful to keep your code more clean. By hiding the buttons and giving them a descriptive, function-like name they could act like real programming functions.

An other great trick is to use the WITH function which is explained in an other post.


Saturday, 21 March 2020

Embed a Power BI tile in Power Apps with filters

Case
I want to include a Power BI tile in my Power App. Is it possible to manipulate the Power BI tile with data from the Power App?
Power BI tile in Power Apps with filter


Solution
Power Apps has its own charts. So why would you want to use a Power BI tile in your Power App in the first place? The charts from Power Apps are pretty fast, but since Power Apps is not a reporting tool the functionality is quite basic. The two major disadvantages are:

  • The charts don't have options in the GUI for sorting, filtering or grouping. So either your Data Source is already prepared or you to do that with functions in Power Apps (Filter, GroupBy, SortByColumns, etc.). Not ideal, especially not for large datasets.
  • The charts are very basic (Column, Line or Pie chart). You could combine a column and line chart by creating two separate charts and then lay the line chart over the column chart. Again workable, but not ideal.


Let's see how you can add a Power BI tile to your Power App and what you have to do to make it more dynamic with filters.

1) Pin visual to dashboard
Power Apps can only add Power BI visuals that are pinned to a dashboard. Go to your Power BI report on PowerBI.com and click on the little pin icon above the Visual that you need in Power Apps. After that specify to which existing or new Power BI Dashboard you want to publish it.
Pin your visual to a dashboard


2) Add Visual to Power Apps
In the Insert menu of Power Apps you see the Charts submenu in which you will find the option to add a Power BI tile. Adding it is very straight forward. Just select the right Workspace, Dashboard and then the Tile.
Adding a Power BI tile to Power Apps


3) Adding dynamic filters
If you go to the properties of the new Power BI tile in Power Apps you will find the TileUri property. This is the URL of your Power BI tile which you can extend with filters. The standard URL looks something like:
"https://app.powerbi.com/embed?dashboardId=11111111-aaaa-1234-aaaa-111111111111&tileId=11111111-aaaa-1234-aaaa-111111111111&groupId=11111111-aaaa-1234-aaaa-111111111111&config=abc123abc123abc123abc123abc123abc123abc123abc123abc123abc123abc123abc123abc123abc123abc1230%3d"
The DATA TileUri


You can simply add a filter to this URL by adding an extra parameter to the querystring. Let's say we have a field called Department in the table FactInternetSales and we want to filter on the value 'Amsterdam'.
The field on which we want to filter


Before the last double quote of the TileUri you must add &filter=[tablename]/[columnname] eq '[value]'. The result looks like:

"https://app.powerbi.com/embed?dashboardId=11111111-aaaa-1234-aaaa-111111111111&tileId=11111111-aaaa-1234-aaaa-111111111111&groupId=11111111-aaaa-1234-aaaa-111111111111&config=abc123abc123abc123abc123abc123abc123abc123abc123abc123abc123abc123abc123abc123abc123abc1230%3d&filter=FactInternetSales/Department eq 'Amsterdam'"

Note that filter is in lowercase otherwise it won't work. For more OData like filter examples see the documentation of Power BI filters. A great tip is to first test the query string filter in Power BI itself and then copy and paste it to Power Apps. After that you can replace the hard-coded value 'Amsterdam' by a value from for example a drop drown.
Adding a Drop Down to use it in the filter


With the drop down the URL looks like:

"https://app.powerbi.com/embed?dashboardId=11111111-aaaa-1234-aaaa-111111111111&tileId=11111111-aaaa-1234-aaaa-111111111111&groupId=11111111-aaaa-1234-aaaa-111111111111&config=abc123abc123abc123abc123abc123abc123abc123abc123abc123abc123abc123abc123abc123abc123abc1230%3d&filter=FactInternetSales/Department eq '" & ddDepartment.Selected.Department & "'"
If your table name or field name contains spaces, dashes or non-ansi characters you need to replace those with special characters in your query string.

4) The result
Now you can hit the play button and test the dynamic filter. It works very well, but it isn't super fast. Therefore you shouldn't have more than three Power BI tiles loaded at the same time. With the property LoadPowerBIContent you can control which tile is loading.

When clicking on the Power BI tile in your Power App the user will be redirected to Power BI online to do some more in-depth analysis. If you don't want that you need to set the PowerBIInteractions property to false (default is true).
Testing the dynamic filter


Conclusion
In this post you learned how to use Power BI tiles, that are published to a dashboard, in Power Apps. Very straight forward to use and they have way more options than the built-in charts. One last point for attention. If you use these Power BI tiles then make sure that your Power Apps users have a Power BI licence and are authorized to the used tiles.

Thursday, 19 March 2020

Power Apps Snack: Loop through combobox items

Case
I want get the product ID's of all selected items from my combobox in Power Apps, but the DisplayFields property of the combobox only shows the product name. How do I get the corresponding ID's?
Mulitselect ComboBox in Power Apps


Solution
You can loop though the collection of selected items of your combobox with the SelectedItems function. Below you will find a couple of code examples. For this example we are using a table called MyProducts with data from Adventure Works.
Table with sample data


Loop through selection
If multi select is turned off (basicly a DropDown with a search option) then you can use the Selected function, just like for the ComboBox.
ComboBox_singleselect.Selected.ProductKey

When multiselect is turned on, you must use SelectedItems. Getting a comma separated list of ProductKeys (instead of ProductNames) can be done with the following script. To test it you could add a label with this script in the Text property to show the result:
Concat(
    ComboBox_multiselect.SelectedItems.ProductKey,
    Concatenate(
        Text(ProductKey),
        ","
    )
)

This will result in a string with "PrdKey1,PrdKey3,PrdKey3," If you want to get ride of the last comma you can use a left: LEFT(mystring, LEN(mystring) - 1):
Left(
    Concat(
        ComboBox_multiselect.SelectedItems.ProductKey,
        Concatenate(
            Text(ProductKey),
            ","
        )
    ),
    Len(
        Concat(
            ComboBox_multiselect.SelectedItems.ProductKey,
            Concatenate(
                Text(ProductKey),
                ","
            )
        )
    ) - 1
)

Or if you want to keep your code a little cleaner then you could first store the result in a variable and then use the LEFT on the variable. To test this add the UpdateContext to the OnChange of the ComboBox and the Left to the Text property of your label.
// Store concat with trailing comma in variable
UpdateContext(
    {
        SelProds: Concat(
            ComboBox_multiselect.SelectedItems.ProductKey,
            Concatenate(
                Text(ProductKey),
                ","
            )
        )
    }
);

// Remove last comma
Left(SelProds, Len(SelProds) - 1)
Update: better solution to not repeat the code is by using the WITH function

Get specific item from alle selected items
You can also get specific items from the selection.
// First item
First(ComboBox_multiselect.SelectedItems.ProductKey).ProductKey

// Second item
First(
    LastN(
        ComboBox_multiselect.SelectedItems.ProductKey,
        CountRows(ComboBox_multiselect.SelectedItems.ProductKey) - 1
    )
).ProductKey

// Thirth item
First(
    LastN(
        ComboBox_multiselect.SelectedItems.ProductKey,
        CountRows(ComboBox_multiselect.SelectedItems.ProductKey) - 2
    )
).ProductKey

To keep your code a little cleaner you could first store the selection in a collection in the OnChange event of the ComboBox.
// Store selection in collection
ClearCollect(
    ProdSel,
    ComboBox_multiselect.SelectedItems.ProductKey
);

// First item
First(ProdSel).ProductKey

// Second item
First(
    LastN(
        ProdSel,
        CountRows(ProdSel) - 1
    )
).ProductKey

// Thirth item
First(
    LastN(
        ProdSel,
        CountRows(ProdSel) - 2
    )
).ProductKey


Maximize selection
An other need trick is that you could maximize the number of selected items by adding the following script to the OnChange of the ComboBox.
If(
    CountRows(ComboBox_multiselect.SelectedItems) > 4,
    Notify(
        "You reached the maximum of 4 items",
        NotificationType.Error,
        2000
    )
)

Or you could combine that with filling a boolean variable that you can use to disable/hide the save button
If(
    CountRows(ComboBox_multiselect.SelectedItems) > 4,
    UpdateContext({ValidationError: false});
    Notify(
        "You reached the maximum of 4 items",
        NotificationType.Error,
        2000
    ),
    UpdateContext({ValidationError: true})
);

Conclusion
In this code snippet post you learned how to retrieve the selected items from a Power Apps ComboBox. When multi select is turned on you should use SelectedItems instead if Selected. This returns a collection of all selected Items from the ComboBox.

Bug: the formulas only work with string columns. Solution is to add the integerfield to the displayfields of the ComboBox.
Add non-string fields to DisplayFields

Thursday, 12 March 2020

Power Apps: Get next item from gallery

Case
I am using a gallery on my overview page to see all records and on my details page I want a button to go to the next item from my gallery without first going back to my overview page.
Generated App with dynamic Next button


Solution
For this example we will use a generated PowerApp based on a product table that came from the AdventureWorks database.

In this generated app you know which item is selected in the product gallery, but you don't know which product is next because there is no expression for this. To solve this we will:
  1. Create a new collection based on the gallery with only the key column (to keep it small). 
  2. Then create a copy of that collection with an extra column that contains an auto-increment (auto-number).  
A preview of both collections


This second collection can then be used to query the successive product row for a specific product key. The product key of this successive product row can then be used to retrieve all data from that product to display it in the Display form.

1) Pass through product key via variable
First step is to slightly change the navigation command on the overview page. We will pass on a variable that contains the active product key to the details page. In the OnSelect action of the gallery we will change the existing code with an extra line:
// Old code
Navigate(
    DetailScreen1,
    ScreenTransition.None
)

// New code (with the variable)
Navigate(
    DetailScreen1,
    ScreenTransition.None,
    {MyProductKey: BrowseGallery1.Selected.ProductKey}
)
Change navigate in OnSelect of gallery


2) Change item code on details page
On the details page where you see all columns/attributes of the product we need to change the Item code of the Display form. The standard code retrieves the selected item from the gallery on the overview page, but we will use the variable from step 1 instead.
// Old code
BrowseGallery1.Selected

// New code
// Get first row from dataset 'MyProducts'
// that is filtered with our new variable
First(
    Filter(
        '[dbo].[MyProducts]',
        ProductKey = MyProductKey
    )
)
Change Item from Display form


3) Add Next button
The last part of this solution is to add a button and a lot of code for its OnSelect action. Adding the rownumber to the collection can be done in a couple of ways, but this flexible code is very well documented by powerappsguide.com.
// Create new collection with only the key column
// from the gallery (key=ProductKey)
ClearCollect(
    MyProductGallery,
    ShowColumns(
        BrowseGallery1.AllItems,
        "ProductKey"
    )
);


// Create new collection based on first
// collection with one extra column that
// contains an auto increment number "MyId"
Clear(MyNumberedProductGallery);
ForAll(
    MyProductGallery,
    Collect(
        MyNumberedProductGallery,
        Last(
            FirstN(
                AddColumns(
                    MyProductGallery,
                    "MyId",
                    CountRows(MyNumberedProductGallery) + 1
                ),
                CountRows(MyNumberedProductGallery) + 1
            )
        )
    )
);


// Retrieve next item from gallery and
// store its id (ProductKey) in a variable
// called 'MyNextProductKey'
// Steps:
// 1) use LookUp to retrieve the new id (MyId) from the new collection
// 2) use that number to only get records with a higher number by using a Filter
// 3) get First record from the filtered collection
// 4) get ProductKey column and store it in a variable
UpdateContext(
    {
        MyNextProductKey: First(
            Filter(
                MyNumberedProductGallery,
                MyId > LookUp(
                    MyNumberedProductGallery,
                    ProductKey = MyProductKey,
                    MyId
                )
            )
        ).ProductKey
    }
);


// Only when MyNextProductKey is not empty
// change the value of MyProductKey which
// will result in retrieving new data to
// the Display form.
// An empty value only occurs for the last
// record. The If statement could be extended
// with for example navigating back to the
// overview page when it is empty:
// Navigate(BrowseScreen1, ScreenTransition.None)
If (
    !IsBlank(MyNextProductKey),
    UpdateContext({MyProductKey: MyNextProductKey})
)
Adding a next button to the details screen


For adding a previous button you just need to change the filter to 'smaller then' and then select the last record instead of the first.
UpdateContext(
    {
        MyPrevProductKey: Last(
            Filter(
                MyNumberedProductGallery,
                MyId < LookUp(
                    MyNumberedProductGallery,
                    ProductKey = MyProductKey,
                    MyId
                )
            )
        ).ProductKey
    }
);

4) The Result
Now lets start the app add test the Next button. The nice part is that you can filter or sort the gallery anyway you like and the next button will still go to the next record from that gallery.
Test the new next button


Summary
In this post you learned how to retrieve the next (and previous) item from a gallery. You could also add this code to a save button to create a save-and-edit-next-record action which saves the user a few extra clicks by not going back to the overview page to find the next record to edit.

For an approve and go to next record button where your gallery is getting smaller and smaller each time you approve a record you could also do something very simple in your form to get next item
// Old code
BrowseGallery1.Selected

// Alternative code
First(BrowseGallery1.AllItems)


Saturday, 23 March 2019

Power Apps Snack: Refresh Power BI (automatically)

Case
A while ago we blogged about the integration of PowerApps and Power BI. This allows you to change data from within your Power BI report! One downside was that you still had to refresh the Power BI data manually (or by using the API and Flow). How can you automate the refresh?
The new PowerApps Visualization in Power BI


Solution
Microsoft recently updated PowerApps with the ability to refresh Power BI. Now you can add the refresh command PowerBIIntegration.Refresh() right after your SubmitForm or Patch command. That is all!
PowerBIIntegration.Refresh()


Note: For me it didn't work for existing PowerApps. I had to create a new PowerApp to get the refresh option available. We will follow up on that.
Update 25-03-2019: The Refresh() function gets added to PowerApps from the visual on creation. Therefore it will not be available for existing PowerApps. The workaround for now is creating a new app and then copy and paste the items from the existing app. Please upvote this uservoice request.

Refresh without clicking on the Refresh button in Power BI


Summary
Finally we have an even better integration of PowerApps and Power BI. No more clicking on refresh buttons. Also note the new PowerApps Visualization in Power BI. It got a total makeover with some handy explanations about the integration of both tools. See the top picture. Also see this link for more PowerApps updates

Monday, 12 November 2018

Power Apps: Add Microsoft Flow to delete records

Case
In a previous post you wrote that Microsoft Flow could help to delete records with my PowerApps. How do you add a Flow to PowerApps?
PowerApps ♥ Flow


Solution
To add a new Flow to PowerApps we have two options. First could go to Microsoft Flow and create a new Flow that starts with a 'PowerApps button' trigger and then go to PowerApps and use the new Flow (see step 7). The second option is to start from PowerApps and then use the menu to create a new Flow. For this example we will start from PowerApps.

The starting position is a table called Job with a primary key called JobId for which we have generated a PowerApps app. We will replace the code of the delete button to use a Flow instead.

1) Create new Flow
Edit your PowerApps app and go to the Action menu and click on Flows. A new pane will appear where you can edit existing Flows for PowerApps or you could create a new one from scratch. Click on 'Create a new flow'. This will open a new tab with Microsoft Flow.
Create new Flow


2) Rename Flow
It's important to rename the Flow before you save it otherwise the old default name will show in PowerApps. You can do this by clicking on the text 'PowerApps button' on the top left side op the Flow editor: 'DeleteJob'. A suitable descriptive name will also make it easier to find your Flow and will make your code more readable. You could also include the name of your PowerApps app. This will make it easier to understand the purpose of your Flow in case you have a whole bunch of them.
Rename Flow


3) New Step - SQL Server - Delete Row
Next step is the actual deleting part. Since our source is an Azure SQL Server Database we first search for 'SQL Server' and then choose 'Delete row'. If you already have database connections (like the ones in PowerApps) then you can reuse them. Click on the three dotes menu to change the connection.
Delete Row


Note: If you want to delete multiple records then you should use 'Execute a SQL query' or 'Execute stored procedure'. For this example we will only delete one row at a time.

4) Rename Step
Now first rename the SQL action. This will give the parameters in the next step better names. Again, click on the three dotes menu to change the name of the action: SQL Delete Job.
Rename SQL Action


5) Step Parameters
In the Table name property select the name of the table in which you want to delete records. In the Row id property we will add a parameter that will ask PowerApps for the value of the primary key column. If you click on the textbox you can add an expression. Go to the Dynamic content tab and click on 'See more' in the PowerApps row. This will show the option 'Ask in PowerApps'. Select it and you will see the new expression in the textbox.
Parameters


6) Save and Close
Now we are done with the Flow. Click on the save button and then close the tab to return to PowerApps editor. The list of existing Flows will now automatically show the newly created Flow.
Save and close


7) Use new Flow in PowerApps
Select the icon or button where you want to execute the Flow and then add the code: [NameOfYourFlow].Run([PrimaryKeyValue])

Is should look something like this. The Back() returns to the previous screen.
DeleteJob.Run(BrowseGallery1.Selected.JobId)
Add flow to icon


You could also add Back() to return to the previous screen:
DeleteJob.Run(BrowseGallery1.Selected.JobId);Back()
8) The result
Now it is time to test the newly added delete icon/button.
The generated app with the new delete icon


Conclusion
This post showed you how to add a Microsoft Flow to delete records within you PowerApps. This is especially useful in case you have more than 500 records in your table. The steps are fairly simple, but please keep in mind to use good descriptive names for the Flow and the steps within the Flow. This will make the code in the PowerApps more readable.


Wednesday, 31 October 2018

Power Apps Snack: RemoveIf not deleting all records

Case
I my PowerApp I want to delete records in a table with RemoveIf, but it doesn't remove all records selected with the condition parameter.
Remove record(s) in PowerApps


Solution
This problem occurs when the source table has more than 500 records. Because RemoveIf is a non-deligated function it will not deligate the delete instruction to the source. Instead it will first get 500 records (that number can be changed) and then delete only within these 500 records.

There are two solutions:

1) Change Data row limit for non-delegable queries
One option is to change that magic 500 number to for example 1000. You can do this in the App Settings under Advanced settings, but there is one caveat when changing that. It could cause performance issues because it will then first 'download' the 1000 records before it will start deleting.
And what if you have tens of thousands of records or even millions? That is not something you want to 'download' to your app! So be careful with this magic number.
Data row limit for non-delegable queries


2) Use Microsoft Flow
An alternative is to use Microsoft Flow to delete records in large tables. You can create a new Action for your button that executes a Microsoft Flow that does the deletion via a Stored Procedure or query.
Adding Microsoft Flow to your PowerApps


There is of course a little downside. The free edition of Flow only allows 750 runs per month and the Office 365 only 2000 runs per month. Above these numbers you need Flow Plan 1 or 2 with 4500 and 15000 runs per month. Or you can buy an additional 50000 runs per month for USD $40.00. If you are sure you don't need these high numbers then you have a good, free alternative.


Conclusion
This post showed you two alternative solutions both with their own pros and cons. There is a third alternative which I haven't tested yet and that is to create a custom connector. Or you could just add a PowerApps Idea to suggest Microsoft to solve this and post the URL in the comments below.

Friday, 31 August 2018

Power Apps Snack: Pass values to other screen

Case
I want to navigate to a new screen and get a value from the calling screen to filter a specific record on that new screen. Most examples (including 'Start from data') filter a record with the selected item from a specific gallery (on a specific screen) with:
BrowseGallery1.Selected
However I want to call this screen from various calling screens (not just one). Is there a push meganism instead of  a pull meganism to filter the record on the new screen?
Navigating to a new screen from various screens


Solution
The solution is to pass a value from the calling screen to the new screen. The Navigate function has an optional argument called 'UpdateContextRecord' which allows you to pass a record to the new screen which on its turn updates the context variable on the new screen. Then you can use that variable to filter a specific record.


1) Calling screen(s)
In PowerApps a record with one column (a variable) looks like:
{myIntColumn:123}

If you put this in the 'UpdateContextRecord' argument from the Navigate function it looks like:
Navigate(myNewScreen, 
         ScreenTransition.None, 
         {myIntValue:123})


The hardcoded '123' should of course be replaced with some code to get the value from a gallery column on the calling screen. The Value function converts the string to a number:
Navigate(myNewScreen,
         ScreenTransition.None,
         {myIntValue:Value(ThisItem.myIntColumn)})

You need to repeat this on all calling screens that want to navigate to this new screen.

2) New screen
On the new screen this record will be pushed to a new context variable which can be used in for example a LookUp function in the Item property of a form:
LookUp('[dbo].[myTable]', myIntColumn=myIntValue)
Changed from pull to push


Alternative form item formula:
First(Filter('[dbo].[myTable]',myIntColumn= myIntValue))
Conclusion
In this post you learned how to pass through variables from one screen to an other. This can be used to pass through values for filters from several screens instead of just reading values from one screen.

Wednesday, 29 August 2018

Power Apps: Introduce Power Apps for Power BI

Case
With PowerApps, Microsoft brought a new element to the existing world of reporting and dashboarding inside the Microsoft BI stack. For example, you can connect and customize your data using PowerApps. How does this work and how can you use PowerApps inside Power BI?

Power BI Marketplace - PowerApps custom visual


Solution
Important to know is that Microsoft PowerApps is part of Office 365. In case your organization does not have an Office 365 licence, PowerApps will cost 7 or 40 dollar per user per month. With a license, you can start building your own apps. There are more features available for an additional cost. More details about pricing here.

In this post we want to show you how you can connect to your data and store new data in an Azure SQL Database using PowerApps. For this example, you can give as Sales Employee approval (or not) on the report. This all happens in a Power BI dashboard using PowerApps.

1) Create new PowerApp
We will build the PowerApp using the Power BI Desktop and service. First, you have to create a new report in Power BI Desktop and add the PowerApps custom visual to the report. Choose PowerApps from the marketplace. Notice that this visual is still in Preview.

Power BI Desktop - Add PowerApps custom visual


For our example, we will use data from WideWorldImportersDW (Azure SQL Database) and import the "Employee" dimension and "Sales" fact table. We have implemented a number of transformations to keep only sales employees and created a 'Employee Full Name' column with values like 'Schuurman, Ricardo'. We choose the columns 'Employee Full Name' and 'Profit' in the PowerApps custom visual.

After you have published your report and opened it in the Power BI service, you will see the option Create new. You will be redirected to the development portal of PowerApps.

Power BI Service - Create new PowerApp using custom visual

Note:
When you create a new PowerApp using the Power BI service, a new dataset for the Power BI data will automatically be created with the name "'PowerBIIntegration'.Data".

2) Build PowerApp
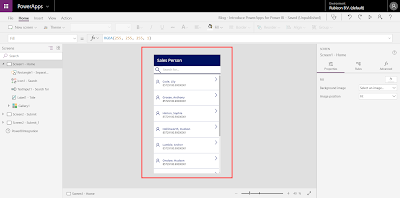
Once you are in the development portal, you can start building your app. In a next post we will fine tune the app and explain and show you several elements of the PowerApp.

PowerApps Studio - Developing the PowerApp


Important to know is that we have created a new table in WideWorldImportersDW, called "SalesApproval".

USE [WideWorldImportersDW]

CREATE TABLE [PowerBI].[SalesApproval](
 [SalesApprovalKey] [int] IDENTITY(1,1) NOT NULL,
 [EmployeeFullName] [nvarchar](100) NULL,
 [Profit] [numeric](20, 8) NULL,
 [Approved] [nvarchar](50) NULL,
 [Comment] [nvarchar](max) NULL,
 CONSTRAINT [PK_Dimension_Employee] PRIMARY KEY CLUSTERED 
(
 [SalesApprovalKey] ASC
)WITH (STATISTICS_NORECOMPUTE = OFF, IGNORE_DUP_KEY = OFF) ON [PRIMARY]
) ON [PRIMARY] TEXTIMAGE_ON [PRIMARY]
GO

In this table we will store the data we have filled with the PowerApp. Later on we will show you how to do this and which data will be stored.

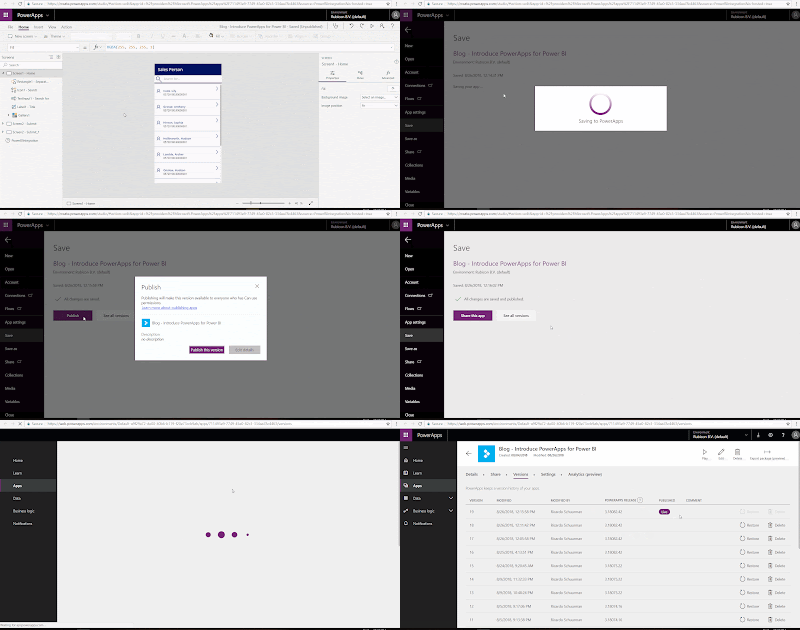
When you are done developing, you have to save and publish the PowerApp. After this, the app is live and available in several applications, such as Power BI and Microsoft Teams.

PowerApps Studio - Publishing the PowerApp


Note:
After saving and publishing your PowerApp it can happen that the PowerApp is missing the Power BI data the next time you open it. To fix this, go to the Power BI service and add a new Power Apps custom visual in the report. Select the right columns (in PowerApps Data) and click on Choose app. Add your existing app and go to the PowerApps Studio. Now your PowerApp is working again, including the Power BI data.

3) Result
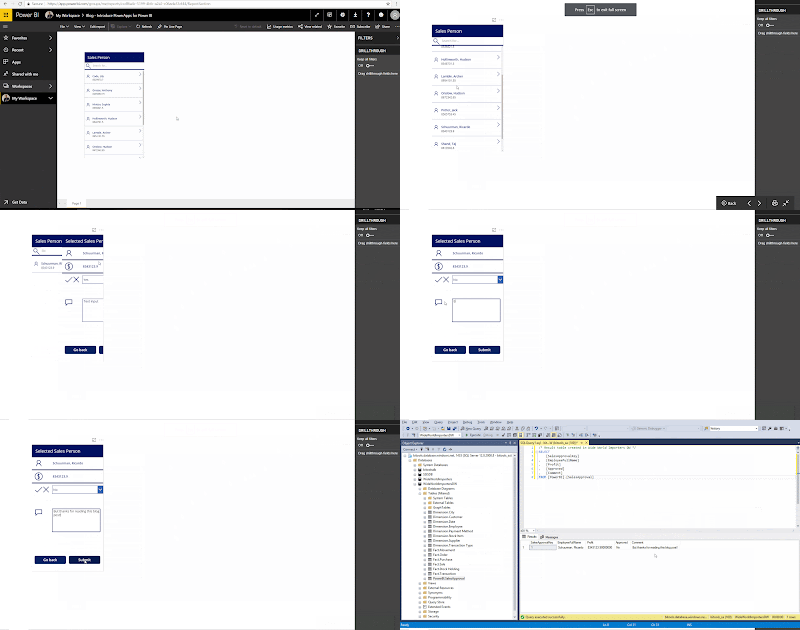
Let's see if we can use this PowerApp in Power BI and store the result in the table "SalesApproval" we created earlier. Go to the Power BI service and open the report. Search for the right sales person (this is you as sales person if this dashboard is live) and fill in the form:
Yes or No for approval and associated comment (Text input). Press Submit when you are done.

Now if we look at the table in SQL Server Management, we see a new record containing the data we have filled in. Cool!

Power BI Service - Submit data in PowerApp (custom visual) and result


You can download the Power BI report here and the first version of the corresponding PowerApp we used for this post here. Use the Export (preview) and Import (preview) feature to add the app in your environment.

Note:
The Export and Import feature is still in preview. After preview, you must have PowerApps Plan 2 trial or PowerApps Plan 2 paid license for this feature.

Summary
In this post you saw how to use the PowerApps custom visual in Power BI. For this example we used PowerApps to approve (or not) a sales report and store this data in an Azure SQL Database.

In a next post we will describe and explain how this PowerApp is build. We will also customize the app to make it more user friendly.