Case
The external tables and other objects in my Synapse Serverless SQL pool are not stored in the GIT repository of Synapse. How do I deploy those objects through the DTAP street?
 |
| Release Synapse Serverless SQL Pools with DevOps |
Solution
You can use the good old database project in Visual Studio with the SQL Server Data Tools (SSDT) addon to store the External tables, File formats and Data Stores in a Git repository and then use Azure DevOps with YAML pipelines to release the database objects through the DTAP street. Very similar to deploying a regular Azure SQL Database with some minor differences.
1) Download Visual Studio
First download and install
Visual Studio 2022 then make sure to add the
SQL Server Data Tools (SSDT) extention which will add the Database project option. If you already have Visual Studio 2022 then make sure to update it because versions before 17.7 don't support SSDT for Serverless SQL pools.
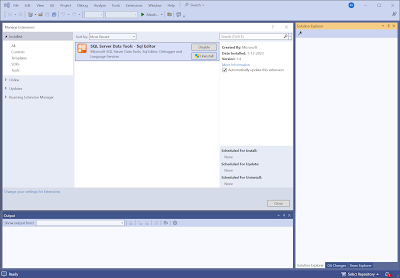 |
| Visual Studio 2022 with SQL Server Data Tools |
2) Create repository
This example is for Azure DevOps, but feel free to use Github instead. Create a new repository. In the root we have two folders:
- CICD: to store all release-related files such as the YAML files. In fact there is a subfolder called YAML to store the .yml files
- SQL: to store the database project from Visual Studio.
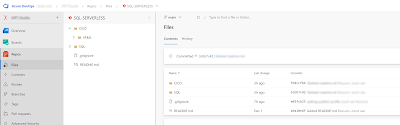 |
| The repository folder structure |
After you have created the initial folder structure you need to clone the repository to Visual Studio by hitting the clone button in the upper right corner.
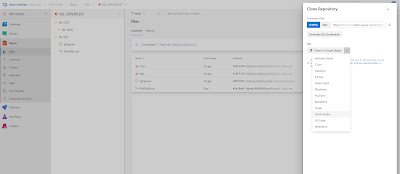 |
| Clone repository to Visual Studio |
3) Create new database project
Once in Visual Studio you now have a cloned repos folder. In the SQL folder we will create a new database project.
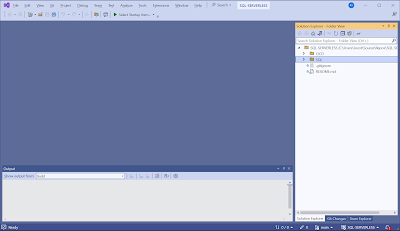 |
| Cloned DevOps repository in VS2022 |
Create a new project via the File menu and search for SQL in the upper search textbox.
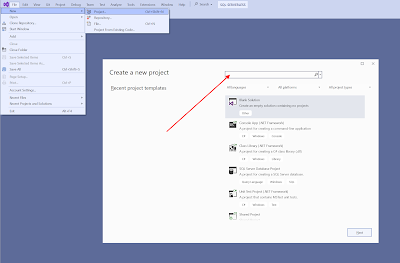 |
| Create new project |
Create the new SQL Server Database Project in the SQL folder from your repository. Since there will be only one project in the solution, the solution and project are stored in the same folder. Otherwise you will get an additional subfolder level.
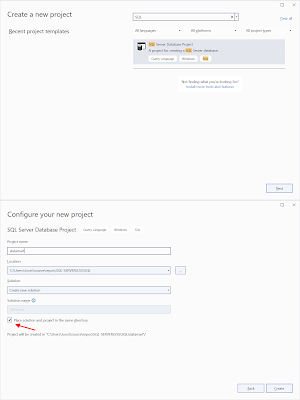 |
| Create new SQL Server Database Project |
4) Create Azure DevOps Service Connection
Wihtin your Azure DevOps project click on the Project settings and under Service connections create a new Service connection of the type Azure Resource Manager. You will need an Azure Entra Service Principal for this. Depending on the organization/projectsize/number of environments create one or more Service Connections. Ideally, one per DTAP environment.
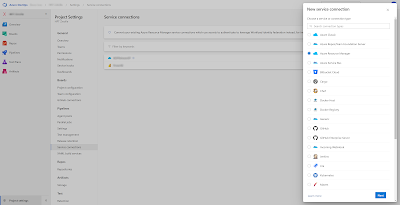 |
| Create Service Connection |
5) Give Service Principal access to database
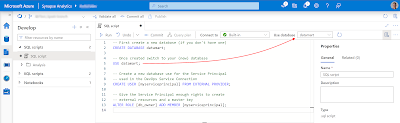
Go to Synapse and open a new SQL Script. Then either create a new database in your Serverless SQL pool to store your external tables or use an existing one. Our example database is called datamart since it will host external tables from our gold layer a.k.a. the datamart with facts and dimensions for Power BI.
Then switch to your datamart database. Either via the use-command or via the selectbox. Once you are in your datamart database create an (external) user for your Service Principal (SP) that you used in the Azure Devops Service connection from the previous step. After that we will need to give the SP enough rights to deploy all objects to this database: db_owner
 |
| Give Service Principal access to Serverless SQL pool DB |
-- First create a new database (if you don't have one)
CREATE DATABASE datamart;

-- Once created switch to your (new) database
USE datamart;

-- Create a new database use for the Service Principal
-- used in the DevOps Service Connection
CREATE USER [myserviceprincipal] FROM EXTERNAL PROVIDER;

-- Give the Service Principal enough rights to create
-- external resources and a master key
ALTER ROLE [db_owner] ADD MEMBER [myserviceprincipal];
You have to repeat this for all your Serverless SQL pool DB's in your DTAP environment. Note that if you will do the SQL development within Synapse Studio, and not in Visual Studio, then you don't need to deploy to the Development environment and then you also don't need to give a SP access to your development environment. In that case only do this for Test, Acceptance and Production.
Tip: you can also give the SP access within Synapse by either making is
Synapse Adminstrator or Synapse SQL administrator. However then it's access for
everything wihtin Synapse or
all Serverless SQL Pool database within Synapse. If you already are using the same SP to role out Synapse with Infra as Code (with
BICEP or Terraform) then it already has the Synapse Admistrator role.
6) Master Key and External Resources
For this example we will use a basic example with the following code. Note the that the DeltaLocation is pointing to the Development environment of our dataplatform. During the deployment we will need to override this since each DTAP enviroment has its own Azure Storage Account.
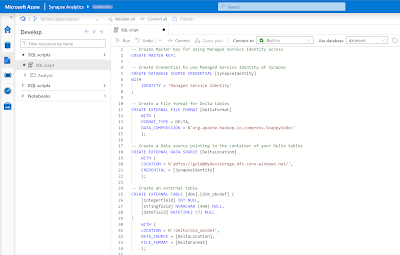 |
| Create external table on delta table (for Power BI) |
-- Create Master Key for using Managed Service Identity access
CREATE MASTER KEY;

-- Create Credential to use Managed Service Identity of Synapse
CREATE DATABASE SCOPED CREDENTIAL [SynapseIdentity]
WITH
    IDENTITY = 'Managed Service Identity'
;

-- Create a File format for Delta tables
CREATE EXTERNAL FILE FORMAT [DeltaFormat]
    WITH (
    FORMAT_TYPE = DELTA,
    DATA_COMPRESSION = N'org.apache.hadoop.io.compress.SnappyCodec'
    );

-- Create a Data source pointing to the container of your Delta tables
CREATE EXTERNAL DATA SOURCE [DeltaLocation]
	WITH (
	LOCATION = N'abfss://gold@mydevstorage.dfs.core.windows.net/',
    CREDENTIAL = [SynapseIdentity]
	);

-- Create an external table
CREATE EXTERNAL TABLE [dbo].[dim_abcdef] (
    [integerfield] INT NULL,
    [stringfield] NVARCHAR (400) NULL,
    [datefield] DATETIME2 (7) NULL
)
    WITH (
    LOCATION = N'/delta/dim_abcdef',
    DATA_SOURCE = [DeltaLocation],
    FILE_FORMAT = [DeltaFormat]
    );
You can encrypt the
master key with an addional password. The
credential with the Managed Service Identity (MSI) is so that this specific Synapse identity will be used to connect to the
data source (the Delta table in your Azure Storage Account a.k.a. Datalake a.k.a. Delta Lake). This means that if you have access to the Serverless SQL Pool and its credentials, you also have access to the underlying storage account.
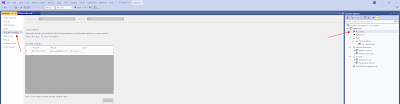
7) Schema Compare in Visual StudioThe datamart database located in the Serverless SQL pool of Synapse in the development is filled with all the above SQL objects like the external table. Now we want to get those objects to our database project. For this we need to do a schema compare in the database project by rightclicking the project in the Solution Explorer. The schema compare is between the development database and the database project.
 |
| Schema Compare |
In the Schema Compare window click on options to exclude Role Memberships and Users, because this is different for each environment in your DTAP street. This will result in not showing up in the list to compare. Otherwise you have to uncheck those each time you do a schema compare.
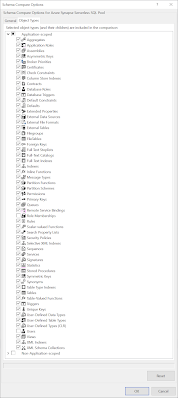 |
| Application-scoped |
You also want to add Database Scoped Credentials and Master Key in the Non-Application-scoped section. These are the first two items in the script from the previous step. Without these your external tables won't work in the test/acceptance/production database. Click OK to confirm the settings.
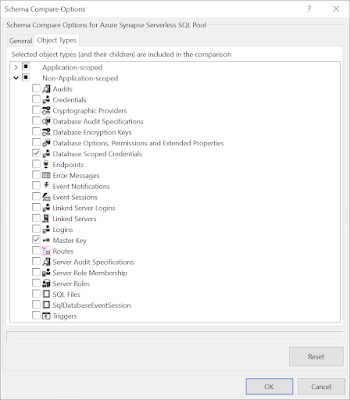 |
| Non-Application-scoped |
Now make sure your dev database is on the left side in the schema compare and the database project is on the right side. You can find the URL of your Serverless SQL pool in the Azure portal on the overview page of your Synapse. It's called Serverless SQL endpoint and looks like [synapsename]-ondemand.sql.azuresynapse.net.
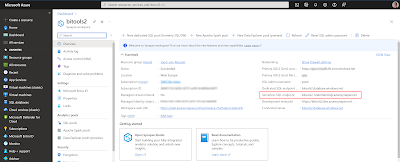 |
| Azure Synapse Workspace overview page |
Then hit the Compare button to see all the new objects that are not yet in your project. Tip: save this schema compare (including the changed options) in your database project. Then you can reuse it.
 |
| Result of schema compare |
Verify the objects and hit the Update button to include them in your database project.
 |
| Result of the update |
8) Override location of External Data Source
If you open the external data source, you will notice the hardcoded URL of the gold container in the development environment. Replace that URL by $(DeltaLocation)
 |
| Replace hardcoded URL by variable |
Go to the properties of your project (not the solution) and then go to the SQLCMD Variables. Enter a new variable called $(DeltaLocation) and enter the URL of your Development environment (the URL you just replaced). You only need to fill in the Default column. Save it.
 |
| Add variable to SQLCMD Variables |
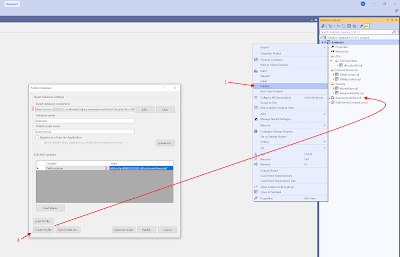
Now we need to create a Publish Profile file, which we can override during deployment in the YAML pipeline from Azure DevOps. Right click the project (not the solution) and click Publish. In this window fill in the values from your development environment (we will replace them later on): target database connection and the value of the SQLCMD variable. Then hit the Create Profile button which will add the Publish Profile file to your database project. After that Cancel the window because we will not publish via Visual Studio.
 |
| Publish Profile |
9) Stage, Commit and Sync repository
The changes in Visual Studio need to go back to the repository in Azure DevOps. Brance strategy and brance policies are ignored in the explanation to keep things short and simpel.
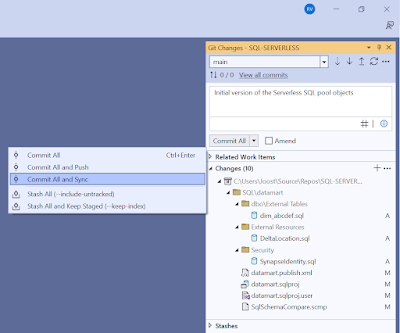 |
| Commit and sync changes to Azure DevOps repos |
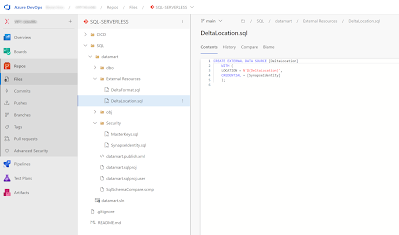
Now all changes are stored in the Azure Repository. Next step is setting up the CICD proces.
 |
| Azure DevOps repository |
10) Pipeline Libarary - Variable Groups
To make the YAML scripts reusable for mulitple Serveless SQL pools of your DTAP street we need to create some Variable Groups in Azure DevOps. You can find them under Pipelines - Library. You need one for each of your DTAP environments and opionally one for general variables that don't change between the environments.
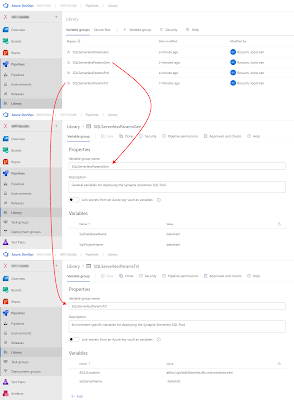 |
| DevOps Variable Groups |
Is this case we will store the database project name and the database name in the general variable group. You could just use one variable because they probably often have the same value.
- SqlDatabaseName - Name of the database within the Serverless SQL Pool
- SqlProjectName - Name of the database project within Visual Studio
For the environment specific variable groups we have the name of the SQL server name which is equals to the Synapse Workspacename. So if you are also deploying the Synapse workspace then you could reuse that one. The other one is the storage account location.
- ADLSLocation - For replacing the storage account URL between environments
- SqlServerName - For storing the name of the server (equals to Synapse workspacename)
11) YAML pipelines
Last development step is setting up the YAML files. This example has two YAML file located in the CDCD\YAML folder of the repository. Tip: Visual Studio Code has some nice YAML editors, but you can also just use the Azure DevOps website to create and edit the YAML files.
BuildSqlServerless.yml
The YAML starts with some general steps, like reading the variable group from the previous step. Then showing that it triggers when in one of those 4 branches a change happens in the SQL folder.
Step 1, checkout, is to get the repository content to the agent.
Step 2,
treeview, is just for debugging and showing you all files on the agent. Useful for step 3
Step 3, build, builds the database project that was just retrieved from the repository
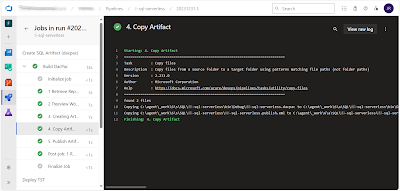
Step 4, copy, copies the files required for deployment to a artifact staging folder
Step 5, publish, publishes the artifact so that it can be used in the next YAML file
###################################
# General Variables
###################################
variables:
  - group: SQLServerlessParamsGen

###################################
# When to create a pipeline run
###################################
trigger:
  branches:
    include:
    - development
    - test
    - acceptance
    - main
  paths:
    include:
    - SQL/*

stages:
###################################
# Create DacPac Artifcat
###################################
- stage: CreateSQLArtifact
  displayName: Create SQL Artifact (dacpac)

  jobs:
  - job: Job
    displayName: 'Build DacPac'
    workspace:
      clean: all
    pool:
      vmImage: 'windows-latest'
      # name: my-agentpool
    steps:

    ###################################
    # 1 Retrieve Repository
    ###################################
    - checkout: self
      displayName: '1 Retrieve Repository'
      clean: true

    ###################################
    # 2 Show treeview of agent
    ###################################
    - powershell: |
        Write-Output "This is the folder structure within Pipeline.Workspace"
        tree "$(Pipeline.Workspace)" /F
      displayName: '2 Treeview Workspace'

    ###################################
    # 3 Build Visual Studio project
    ###################################
    - task: MSBuild@1
      displayName: '3. Creating Artifact'
      inputs:
        solution: '$(System.DefaultWorkingDirectory)/SQL/$(SqlProjectName)/$(SqlProjectName).sqlproj'
        msbuildArchitecture: x86
        msbuildVersion: latest

    ###################################
    # 4 Stage dacpac and publish.xml
    ###################################
    - task: CopyFiles@2
      displayName: '4. Copy Artifact'
      inputs:
        contents: |
          **\*.dacpac
          **\*.publish.xml
        TargetFolder: '$(build.artifactstagingdirectory)'

    ###################################
    # 5 Publish dacpac and xml artifact
    ###################################
    - task: PublishPipelineArtifact@1
      displayName: '5. Publish Artifact'
      inputs:
        targetPath: '$(Build.ArtifactStagingDirectory)'
        artifact: 'SQL_Dacpac'
        publishLocation: 'pipeline'
After that is calls the second YAML file that does the actual deployment. Because we want to reuse is for all environments you need to pass some parameter values that are comming from the variable groups from the previous step. The hardcoded parameter is the name of Azure DevOps Service Connection that uses the SP to connect to the database. The env parameter is just for some logging/debugging purposes to show to which environment you are deploying.
###################################
# Deploy Test environment
###################################
- stage: DeployTst
  displayName: Deploy TST
  variables:
    - group: SQLServerlessParamsTst
  pool:
    vmImage: 'windows-latest'
    # name: my-agentpool
  condition: and(succeeded(), eq(variables['Build.SourceBranchName'], 'test'))
  dependsOn: CreateSQLArtifact
  jobs:
    - template: DeploySqlServerless.yml
      parameters:
        env: TST
        ServiceConnection: SC-Synapse-T
        SqlServerName: $(SqlServerName)
        SqlDatabaseName: $(SqlDatabaseName)
        SqlProjectName: $(SqlProjectName)
        ADLSLocation: $(ADLSLocation)

###################################
# Deploy Acceptance environment
###################################
- stage: DeployAcc
  displayName: Deploy ACC
  variables:
    - group: SQLServerlessParamsAcc
  pool:
    vmImage: 'windows-latest'
    # name: my-agentpool
  condition: and(succeeded(), eq(variables['Build.SourceBranchName'], 'acceptance'))
  dependsOn: CreateSQLArtifact
  jobs:
    - template: DeploySqlServerless.yml
      parameters:
        env: ACC
        ServiceConnection: SC-Synapse-A
        SqlServerName: $(SqlServerName)
        SqlDatabaseName: $(SqlDatabaseName)
        SqlProjectName: $(SqlProjectName)
        ADLSLocation: $(ADLSLocation)

###################################
# Deploy Production environment
###################################
- stage: DeployPrd
  displayName: Deploy PRD
  variables:
    - group: SQLServerlessParamsTst
  pool:
    vmImage: 'windows-latest'
    # name: my-agentpool
  condition: and(succeeded(), eq(variables['Build.SourceBranchName'], 'main'))
  dependsOn: CreateSQLArtifact
  jobs:
    - template: DeploySqlServerless.yml
      parameters:
        env: PRD
        ServiceConnection: SC-Synapse-P
        SqlServerName: $(SqlServerName)
        SqlDatabaseName: $(SqlDatabaseName)
        SqlProjectName: $(SqlProjectName)
        ADLSLocation: $(ADLSLocation)
 |
| Build and publish artifact |
DeploySqlServerless.yml
The second YAML file starts with the parameters that are required to call this script. Then the environment name in the job that you can use to set some approvals. The first step is just for debugging. Showing the parameter values and a treeview of the agent. You should be able to see the artifact folder which is useful to set up the deployment task where you need the paths of the dacpac and publish profile. In the AdditionalArguments property you can override the value of the Storage Account location. If you have multiple just repeat the entire value with a space between it.
parameters:
- name: env
displayName: Environment
type: string
values:
- DEV
- TST
- ACC
- PRD
- name: ServiceConnection
displayName: Service Connection
type: string
- name: SqlServerName
displayName: Sql Server Name
type: string
- name: SqlDatabaseName
displayName: Sql Database Name
type: string
- name: SqlProjectName
displayName: Sql Project Name
type: string
- name: ADLSLocation
displayName: Azure Data Lake Location
type: string
jobs:
- deployment: deploymentjob${{ parameters.Env }}
displayName: Deployment Job ${{ parameters.Env }}
environment: deploy-to-${{ parameters.Env }}
strategy:
runOnce:
deploy:
steps:
###################################
# 1 Show environment and treeview
###################################
- powershell: |
Write-Output "Deploying ${{ parameters.SqlProjectName }} to DB ${{ parameters.SqlDatabaseName }} and server ${{ parameters.SqlServerName }} in the ${{ parameters.env }} environment"
Write-Output "Changing SQLCMD variabele DeltaLocation to value ${{ parameters.ADLSLocation }}"
tree "$(Pipeline.Workspace)" /F
displayName: '1 Show environment and treeview Pipeline_Workspace'
###################################
# 2 Deploy DacPac
###################################
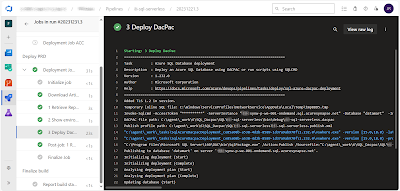
- task: SqlAzureDacpacDeployment@1
displayName: '2 Deploy DacPac'
inputs:
azureSubscription: '${{ parameters.ServiceConnection }}'
AuthenticationType: 'servicePrincipal'
ServerName: '${{ parameters.SqlServerName }}-ondemand.sql.azuresynapse.net'
DatabaseName: '${{ parameters.SqlDatabaseName }}'
deployType: 'DacpacTask'
DeploymentAction: 'Publish'
DacpacFile: '$(Pipeline.Workspace)/SQL_Dacpac/SQL/${{ parameters.SqlProjectName }}/bin/debug/${{ parameters.SqlProjectName }}.dacpac'
PublishProfile: '$(Pipeline.Workspace)/SQL_Dacpac/SQL/${{ parameters.SqlProjectName }}/${{ parameters.SqlProjectName }}.publish.xml'
AdditionalArguments: /Variables:DeltaLocation=${{ parameters.ADLSLocation }}
IpDetectionMethod: 'AutoDetect'
 |
| Deploy Serverless SQL pool database |
Conclusion
In this post you learned to apply an 'old fashioned' solution to a relative new service. This solution doesn't only work for the Synapse Serverless SQL Pool, but also for the Synapse Dedicated SQL Pool.
There is still one bug/problem. For the Serverless SQL Pool it seems that updating the
External Data Source is not possible. The first deployment is no problem, but altering statements are ignored. Probably because there are already external tables referencing this object. You are probably not updating this external source a lot to make it a big issue, but if you want to do it you can use a pre-deployment script in the database project to first drop those object.
In a
next post we will show how to give Power BI access to this Synapse Serverless SQL Pool database.