Sunday 26 March 2023

Synapse - Change Data Feed (CDF) on delta tables

Case
I like the data versioning of the Delta Tables and I know how to get data from different versions, but how can I combine that in one query to get for example the changes during a year to create a nice fact table about certain changes.
Change Data Feed in Synapse


Solution
Change Data Feed (CDF) is still a bit new. The currently supported Delta Lake version in the Synapse workspace is 2.2.0. This version does not yet not support CDF for SQL queries. This shoud be available in Delta Lake 2.3.0 according to the release documentation. Luckily you can already use PySpark to get this information.
Current Delta Lake version in Synapse


1) Enable Change Data Feed
First you have to enable the Change Data Feed option on your Delta table. From that point in time you can use CDF. The property is called enableChangeDataFeed.

You can alter your existing tables with an Alter statement
%%sql

ALTER TABLE silver.Cities
  SET TBLPROPERTIES (delta.enableChangeDataFeed = true);
For new Delta Tables you can also do this in the Create Table command.
%%sql

CREATE TABLE Silver.Cities (Id INT, City STRING, Population INT)
  TBLPROPERTIES (delta.enableChangeDataFeed = true);
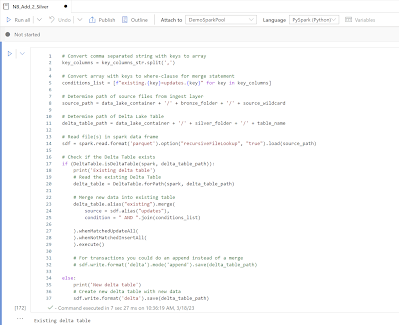
And if you used the PySpark code from our previous post, then you can add an option just in front of the save.
sdf.write.format('delta').option("delta.enableChangeDataFeed", "true").save(delta_table_path)
To check whether it is enabled on your Delta Table you can use the following command.
%%sql

SHOW TBLPROPERTIES silver.cities
CDF is enabled


2) Check available data versions
Now that we have the Change Data Feed option available, lets check which data versions we have with the DESCRIBE HISTORY command. In the first example you will see that CDF is enabled after table creation in the second version (1). This means you can not include the first version (0) in the CDF command.

You will get an error if you set the range wrong while getting CDF info:
AnalysisException: Error getting change data for range [0 , 4] as change data was not
recorded for version [0]. If you've enabled change data feed on this table,
use `DESCRIBE HISTORY` to see when it was first enabled.
Otherwise, to start recording change data, use `ALTER TABLE table_name SET TBLPROPERTIES
(delta.enableChangeDataFeed=true)`.
CDF available from version 1


In the second example it was enabled during the Delta table creation and therefore CDF is available from the first version (0).
CDF available from version 0


3) Query CDF data
When you query the CDF data you will get some extra columns:
  • _change_type: showing what action was taken to change the data - insert, update_preimage, update_postimage and delete
  • _commit_version: showing the version number of the data
  • _commit_timestamp: showing the timestamp of the data change
If you want particular versionnumbers when getting the data, then you can use startingVersion and endingVersion as an option while reading the data. Only startingVersion is also permitted.
%%pyspark

df = spark.read.format("delta") \
  .option("readChangeFeed", "true") \
  .option("startingVersion", 0) \
  .option("endingVersion", 5) \
  .table("Silver.cities")

display(df.sort("City","_commit_version"))
Filter CDF on version numbers


Probably more useful is to query date ranges, then you can use startingTimestamp and endingTimestamp as an option. Only startingTimestamp is also permitted.
%%pyspark

df = spark.read.format("delta") \
  .option("readChangeFeed", "true") \
  .option("startingTimestamp", '2023-03-26 11:07:23.008') \
  .table("Silver.cities")

display(df.sort("City","_commit_version"))
Filter CDF on timestamps


If you want to use the new column _commit_timestamp from the next record to create a new column called end_timestamp in the current record, then you need to play with the lead() function (just like in TSQL).
%%pyspark

from pyspark.sql.window import Window
from pyspark.sql.functions import lead 

df = spark.read.format("delta") \
  .option("readChangeFeed", "true") \
  .option("startingTimestamp", '2023-03-26 11:07:23.008') \
  .table("Silver.cities")

# Create window for lead
windowSpec  = Window.partitionBy("City").orderBy("_commit_version")

# Remove update_preimage records, add new column with Lead() and then sort
display(df.filter("_change_type != 'update_preimage'")
           .withColumn("_end_timestamp",lead("_commit_timestamp",1).over(windowSpec))
           .sort("City","_commit_version"))
Create end_timestamp with lead function


Conclusions
In this post you learned the basics of the Change Data Feed options in Synapse. This feature is available in Delta Lake 2.0.0 and above, but it is still in experimental support mode. For now you have to use PySpark instead of Spark SQL to query the data in Synapse.

Besides creating nice fact tables to show data changes during a certain periode this feature could also be useful to incremental load a large fact table with only changes from the silver layer. Creating audit trails for data changes over time could also be an interesting option. The CDF option is probably the most useful when there are not that many changes in a table.

In a later post, when Delta Lake 2.3.0 is available in Synapse, we will explain the Spark SQL options for CDF. Special thanks to colleagues Roelof Jonkers and Martijn Broeks for helping out.


Wednesday 22 March 2023

DevOps - Get-SpnAccessToken is obsolete

Case
I'm deploying my SQL Server database via DevOps with the SqlAzureDacpacDeployment@1 task in YAML, but it is giving me a warning: ##[warning]The command 'Get-SpnAccessToken' is obsolete. Use Get-AccessTokenMSAL instead. This will be removed. It is still working, but the warning message is not very reassuring. 
The command 'Get-SpnAccessToken' is obsolete.
Use Get-AccessTokenMSAL instead.
This will be removed


Solution
This warning message appeared somewhere late 2022 and there is no new version of the dacpac deployment task available at the moment. When searching for this message it appears that other tasks like AzureFileCopy@5 have the same issue. The word MSAL (Microsoft Authentication Library) in the message points to a new(er) way to acquire security tokens.

To get more info you could run the pipeline in debug modes by Enabling system diagnostics.
Enable system diagnostics


Then you will get see a lot of extra messages and right above the warning you will see a message about USE_MSAL (empty) and that its default value is false.
USE_MSAL


It is just a warning and Microsoft will probably solve it some day. If you want to get rid of it you can set an environment variable called USE_MSAL to true within your pipeline. When set to true the task will use MSAL instead of ADAL to obtain the authentication tokens from the Microsoft Identity Platform. The easiest way to do this is writing one line of PowerShell code in a PowerShell task: ##vso[task.setvariable variable=USE_MSAL]true 

###################################
# USE_MSAL to avoid warning
###################################
- powershell: |
    Write-Host "Setting USE_MSAL to true to force using MSAL instead of ADAL to obtain the authentication tokens."
    Write-Host "##vso[task.setvariable variable=USE_MSAL]true"
  displayName: '3 Set USE_MSAL to true'

###################################
# Deploy DacPac
###################################             
- task: SqlAzureDacpacDeployment@1
  displayName: '4 Deploy DacPac' 
  inputs:
    azureSubscription: '${{ parameters.ServiceConnection }}'
    AuthenticationType: 'servicePrincipal'
    ServerName: '${{ parameters.SqlServerName }}.database.windows.net'
    DatabaseName: '${{ parameters.SqlDatabaseName }}' 
    deployType: 'DacpacTask'
    DeploymentAction: 'Publish'
    DacpacFile: '$(Pipeline.Workspace)/SQL_Dacpac/SQL/${{ parameters.SqlProjectName }}/bin/debug/${{ parameters.SqlProjectName }}.dacpac'
    PublishProfile: '$(Pipeline.Workspace)/SQL_Dacpac/SQL/${{ parameters.SqlProjectName }}/${{ parameters.SqlProjectName }}.publish.xml'
    IpDetectionMethod: 'AutoDetect'

After this the warning will not appear anymore and your database will still get deployed. The extra step taks about a second to run.
Extra PowerShell Task


No more absolete warnings


Conclusion
In this post you learned how to get rid of the annoying The command 'Get-SpnAccessToken' is obsolete warning by setting one environment variable to true. You should probably check in a few weeks/months whether this workaround is still necessary or if there is a SqlAzureDacpacDeployment@2 version.


Monday 20 March 2023

Synapse - Creating Silver Delta Tables

Case
I want to create and fill a Silver layer based on parquet files in my bronze layer. Is there a simple way to create and populate the tables automatically.
Adding files to your Silver layer


Solution
You can create a notebook for this and then call that notebook from your Synapse pipeline with some parameters (location, table name and keys). This allows you to for example loop through all your ingested source files from the bronze (raw/ingest) layer and then call this notebook for each file to add them to the Silver layer. We can also add the silver tables directly to the Lake database for easy querying later on.

Note: that this example is a technical source based Silver layer. So not realy cleansed, curated or conformed.

1) Create notebook
Go to the developer tab in Synapse and create a new Notebook. Give it a suitable name and make sure the language is PySpark. Sooner or later you want to test this Notebook, so attach it to a SparkPool. Optionally you can add a Markdown cell to explain this notebook.
New Synapse Notebook


2) Code cell 1: parameters
The first code cell is for the parameters that can be overridden by parameters from the Notebook activity in the pipeline. Toogle the parameters option to make is a parameter cell. For more details see our post about notebook parameters. For debugging within the notebook we used real values.

For this example everything (bronze and silver) is in the same container. So you might want to add more parameters to split those up. This example uses parquet files as a source. If you want for example CSV then you need to change the format in the mail code to fill the Spark Data Frame with data.
# path of the data lake container (bronze and silver for this example)
data_lake_container = 'abfss://mysource@datalakesvb.dfs.core.windows.net'
# The ingestion folder where your parquet file are located
bronze_folder = 'Bronze'
# The silver folder where your Delta Tables will be stored
silver_folder = 'Silver'
# The name of the table
table_name = 'SalesOrderHeader'
# The wildcard filter used within the bronze folder to find files
source_wildcard = 'SalesOrderHeader*.parquet'
# A comma separated string of one or more key columns (for the merge)
key_columns_str = 'SalesOrderID'
Parameters


3) Code cell 2: import modules and functions
The second code cell is for importing all required/useful modules. For this basic example we have only one import:
# Import modules
from delta.tables import DeltaTable
Import Delta Table module


3) Code cell 3: filling delta lake
Now the actual code for filling the delta lake tables with parquet files from the data lake. Note: code is very basic. It checks whether the Delta Lake table already exists. If not it creates the Delta Lake table and if it already exists it merges the new data into the existing table. If you have transactional data then you could also do an append instead of a merge.

# Convert comma separated string with keys to array
key_columns = key_columns_str.split(',')  

# Convert array with keys to where-clause for merge statement
conditions_list = [f"existing.{key}=updates.{key}" for key in key_columns]

# Determine path of source files from ingest layer
source_path = data_lake_container + '/' + bronze_folder + '/' + source_wildcard 

# Determine path of Delta Lake Table 
delta_table_path = data_lake_container + '/' + silver_folder + '/' + table_name

# Read file(s) in spark data frame
sdf = spark.read.format('parquet').option("recursiveFileLookup", "true").load(source_path)

# Check if the Delta Table exists
if (DeltaTable.isDeltaTable(spark, delta_table_path)):
    print('Existing delta table')
    # Read the existing Delta Table
    delta_table = DeltaTable.forPath(spark, delta_table_path)

    # Merge new data into existing table
    delta_table.alias("existing").merge(
        source = sdf.alias("updates"),
        condition = " AND ".join(conditions_list)
        
    ).whenMatchedUpdateAll(
    ).whenNotMatchedInsertAll(
    ).execute()

    # For transactions you could do an append instead of a merge
    # sdf.write.format('delta').mode('append').save(delta_table_path)

else:
    print('New delta table')
    # Create new delta table with new data
    sdf.write.format('delta').save(delta_table_path)
Adding data to new or existing Delta Table


4) Code cell 4: Adding Delta Table to Lake Database
The last step is optional, but very useful: adding the Delta Table to the Lake Database. This allows you to query the Delta Table by its name instead of its path in the Data Lake. Make sure you first add a Silver layer to that Lake database. See this post for more details (step 1).
# Adding the Delta Table to the Delta Database for easy querying in other notebooks or scripts within Synapse.
spark.sql(f'CREATE TABLE IF NOT EXISTS Silver.{table_name} USING DELTA LOCATION \'{delta_table_path}\'')

# Spark SQL version
#  CREATE TABLE Silver.MyTable
#  USING DELTA
#  LOCATION 'abfss://yourcontainer@yourdatalake.dfs.core.windows.net/Silver/MyTable'
Adding Delta Table to Lake Database


5) Creating Pipeline
Now it is time to loop through your ingested files and call this new Notebook for each file to create the Silver Layer Delta Tables. You have to provide values for all parameters in the notebook. Since you need the key column(s) of each table to do the merge you probably need to store these somewhere.

For the ingestion we often store the table/file names from each source that we want to download to the data lake in a meta data table. In this table we also store the key column(s) from each table.

Call Notebook in ForEach loop


Synapse doesn't retrieve the parameters from the Notebook. You have to add them manually as Base parameters in the Settings tab.
Calling Notebook


If you enter a column or set of columns for the key that are not unique you will get an error the second time you run (first time the merge is not used). 
Cannot perform Merge as multiple source rows matched and attempted to modify the same target row in the Delta table in possibly conflicting ways. By SQL semantics of Merge, when multiple source rows match on the same target row, the result may be ambiguous as it is unclear which source row should be used to update or delete the matching target row. You can preprocess the source table to eliminate the possibility of multiple matches.

6) Result
Now you can run your pipeline and check whether the silver layer of you Lake database is populated with new tables. And you can create a new notebook with Spark SQL or PySpark to check the contents of the tables to see wether the Time Travel works.
Running the pipeline that calls the new Notebook


Delta Lake folders in the Data Lake


Conclusions
In this post you learned how to create and populate a (source based) silver layer of your Lake House Delta Tables. An easy quick start for your lake house. If you have multiple sources with similar data then you should also consider creating a real cleansed, curated and conformed silver layer manually. In a later post we will show you some of those manual steps in Spark SQL or PySpark.

Special thanks to colleague Heleen Eisen for helping out with the PySpark.


Sunday 19 March 2023

Synapse - Using Spark SQL to time travel Delta Tables

Case
In a previous blog post you showed how to create and query Delta Tables with PySpark for a Lake House, however most Data Warehouse people are more familiar with the SQL language. How can you query a Delta Table with the good old SQL language?
Using Spark SQL to time travel Delta Tables


Solution
In that previous blog post we showed you that you can query the Delta Tables in for example a SQL Serverless pool by creating External Tables on those Delta Tables. This allows you to use TSQL to query Delta Tables, but it doesn't allow you to use time travel. You always get the latest version of the data.
External Tables on Delta in Serverless SQL Pool


However we can use Synapse Notebooks with Spark SQL as a language which is very similar to TSQL to query Delta Tables. This allows you to time travel the data in a familiar language.

1) Add Delta Table to Lake Database
For easily querying Delta Tables you first need make the Delta Tables visible in Synapse by adding them to the Lake Database. We explained this in the previous blog post.
Adding Delta Table to Lake Database


Once the Delta Table is available in the Lake Database you can query it like a regular table. By default you will see the latest version of the data.
%%sql
SELECT * FROM silver.cities
The alternative is to use the entire path:
%%sql
SELECT * FROM delta.`abfss://mysource@mydatalake.dfs.core.windows.net/silver/cities`
2) Show historical versions
You can check which historical versions are available with the DESCRIBE HISTORY command.
%%sql
DESCRIBE HISTORY silver.cities
Show versions of the Delta Table


Besides showing the history you can also check where the Delta Table is stored in your Data Lake with the DESCRIBE EXTENDED command. It will give you various details like the location of the Delta Table.
See details of Delta Table


3) Show specifict version by version number
With the DESCRIBE HISTORY command you get a table with various versions of your table. The fist column shows the version number that starts with 0 for the initial version of the table.

When you query a Delta Table you can add VERSION AS OF X behind the query where you replace the X by the version number. In this example we take version 2 (the third version of the table).
%%sql
SELECT * FROM silver.cities VERSION AS OF 2
Showing version 2 of the Delta Table


4) Show specifict version by date
Time traveling with a specific version number is cumbersome because you first need to determine the version you need. Lucily you can also get a version that was active on a specific date by adding TIMESTAMP AS OF "2022-01-01" behind the query.
%%sql
SELECT * FROM silver.cities TIMESTAMP AS OF "2022-01-01"
Showing version of a specific date


Conclusions
In this post you learned how to time travel a Delta Table with Spark SQL. The same options as with PySpark, but for some people just a little bit more readable. In a next post we will discus Change Data Feed to get data changes between versions.

Synapse - Add existing Delta Table to Lake Database

Case
How can I query my lake house files and tables in Synapse without specifying the entire data lake path for each file or table?
Querying your Lake House in Synapse


Solution
In the Data tab (left menu) of the Synapse Workspace you can create a Lake database and then add your files and tables to it. By default there is already a Lake Database present called 'default', but it won't be visible until you add tables to it or add other databases.

1) Create database
Let's create a new database. We will create one for bronze, silver and gold. For the files we could create a separate database called Ingest for easy querying. In the documentation they will either mention a CREATE DATABASE or a CREATE SCHEMA command. They are the same thing.
  • Create a new notebook with either SPARK SQL or PySpark as language.
  • Attach it to a spark pool
  • In the first Code block add the code below and execute it. The IF NOT EXISTS and the COMMENT are optional.
%%sql
CREATE DATABASE IF NOT EXISTS Ingest COMMENT 'Raw files';
CREATE DATABASE IF NOT EXISTS Bronze COMMENT 'Raw Layer';
CREATE DATABASE IF NOT EXISTS Silver COMMENT 'Validated Layer';
CREATE DATABASE IF NOT EXISTS Gold COMMENT 'Enriched Layer';
%%pyspark
spark.sql(f'CREATE DATABASE IF NOT EXISTS Ingest COMMENT \'Raw files\';');
spark.sql(f'CREATE DATABASE IF NOT EXISTS Bronze COMMENT \'Raw Layer\';');
spark.sql(f'CREATE DATABASE IF NOT EXISTS Silver COMMENT \'Validated Layer\';');
spark.sql(f'CREATE DATABASE IF NOT EXISTS Gold COMMENT \'Enriched Layer\';');
SPARK SQL Code block


Now go to the Data and then you will see a Lake database list with 4 databases (default + the three you created)
Synapse Lake databases


2) Create table on Parquet file
For the raw files we will create a table base on the parquet (or flat) files from your ingestion from the source into the data lake. If the file has timestamp in the name you could even use a wildcard in the path.
  • Go back to your notebook and create a second Code block
  • Add the code below and execute it. It will create a table in the Ingest Lake database
  • Then go to the Data tab and then unfold the Ingest database and then its tables (if you are to fast then you might have to refresh the tables list.
%%sql
CREATE TABLE IF NOT EXISTS Ingest.Cities
USING PARQUET
Location 'abfss://mysource@mydatalake.dfs.core.windows.net/Ingestfolder/Cities*.parquet'
%%pyspark
spark.sql(f'CREATE TABLE IF NOT EXISTS Ingest.{table_name} USING PARQUET LOCATION \'{parquet_path}\'')

Lake table based on a Parquet file from the data lake


3) Create table on Delta Table
For the Bronze (or Silver or Gold) layer we will create a table based on an existing Delta Table from the data lake.
  • Go back to your notebook and create a third Code block
  • Add the code below and execute it. It will create a table in the Bronze Lake database
  • Then go to the Data tab and then unfold the Bronze (or Silver or Gold) database and then its tables (if you are to fast then you might have to refresh the tables list.
%%sql
CREATE TABLE IF NOT EXISTS Bronze.Cities
USING DELTA
Location 'abfss://mysource@mydatalake.dfs.core.windows.net/Bronze/Cities'
$$pyspark
spark.sql(f'CREATE TABLE IF NOT EXISTS Bronze.{table_name} USING DELTA LOCATION \'{delta_table_path}\'')

Lake table based on a Delta Table from the data lake


4) Query the new tables
Now you can query the files and delta tables like a regular database table in either a notebook with a Spark pool running or a SQL script. There is one difference between those two. In the SQL Script you get the default dbo schema between the database name and the table name. This in mandatory for the SQL script, but not allowed in a notebook.
Query in notenbook with SPARK SQL


Query in a SQL Script


5) Create views on new tables
You can also create views on those new tables where you already add some business logic that is usefull for other colleagues working with this data or you can create views for dimensions and facts. You could even create views for dimensions and facts on your silver table and then serve them to Power BI
Create view on new tables


Conclusion
In this post you learned how to make your data lake files and delta lake tables easier to query. A few extra steps for each table, but after that querying is much easier. In a future post we will show you how to do this directy during the INGEST and DELTA steps. Then you don't have any manual steps for each new file or table.

In the next post we will show you how to use timetravel on those Delta Tables with SPARK SQL. This post is the start position of that post.

Special thanks to colleague Martijn Broeks for helping out.

Sunday 5 March 2023

Synapse snack - Get child pipeline value to parent

Case
We can pass values from the parent pipeline to the child pipeline via parameters, but how do we get return values from the child pipeline to the parent pipeline?
Pipeline return value


Solution
In the past we used a Webhook activity to call a child pipeline via the Rest API and then we can use a Web activity in the child pipeline to return a value via the callbackuri. This workaround was way to complex and you end up with to different executions that are not related to each other.

Last month Microsoft introduced for both Synapse Worksapce and Azure Data Factory, the new Pipeline return value option in the Set variable activity. This allows you to return one or more HARDCODED values to the child pipeline.

1) Child pipeline - Set Variable
First we need to create a child pipe that we will be calling from a parant pipeline in the next step. The only required activity is the Set Variable activity
  • So first create a new pipeline. We called it PL_Child
  • Add a Set Variable activity to the canvas of your child pipeline. Ours is called Return Value
  • In the Settings tab of the activity set the Variable type to Pipeline return value (preview)
  • Now you can create a new string variable with a hardcoded return value. For expressions you need to change the type to for example Expression. Note that compared to pipeline variables you have way more types to choose from.
Return value


Note that this is not an existing pipeline variable so other activities cannot change its value. Also note that the Value field cannot be overruled with an expression. So only hardcode values.

2) Parent pipeline - Execute Pipeline
Now we need the parent pipeline that will be calling the child pipeline to get the return value.
  • Create a new pipeline. Ours is called PL_Parent
  • Add a Execute Pipeline activity to the canvas of your new pipeline
  • Set it to execute the Child pipeline of step 1
  • Make sure the Wait on completion is checked!
Execute Pipeline to retrieve return value


Note that if you execute this parent pipeline that you won't see the return value in the Output window. This means we need an other activity to see that return value.
Output with no visible return value


3) Get return value
To get the return value you can use an expression with a pipelineReturnValue after the output of your Execute Pipeline activity followed by the name of your return value: @activity('EPL_GetAnswer').output.pipelineReturnValue.MyAnswer

In this example we will store the return value in a pipeline variable. Note that if you used anything else than String, Boolean or Array that you need to add a type conversion in the expression:
@string(activity('EPL_GetAnswer').output.pipelineReturnValue.MyAnswer)
Read return value from output


Output showing return value


Note that you cannot have multiple Set Variable activities running and all returning values (even if they use different names). Then it will only return one of those causing an error in your expression. You can have mulitple Set Variable activities returning values if you put them in for example an if construction so that only one will run.


Conclusions
In this little snack you learn about the new preview(!) feature in ADF and Synapase to return values from the child to the parent pipeline. A very nice new feature that we were waiting for al long time, it could use some small improvements like the expressions (why do we need an expression type?) and an option to see the output of the Execute pipeline activity.