Showing posts with label RICARDO. Show all posts

Sunday 18 December 2022

ADF Snack - Global parameters deployment resets Networking settings

Case
After deployment of Azure Data Factory (ADF) via Azure DevOps pipelines, I noticed that the Network Access settings has been changed from "Private endpoint" to "Public endpoint". How can we prevent this overwrite during deployment?

Azure portal - Networking settings of ADF


Solution
For this we need to make use of the new mechanism to include global parameters in your ARM template, instead of the old mechanism via de GUI ('Manage' - 'Author' - 'Global Parameters'). 

ADF portal - Old mechanism to include global parameters


Another solution that is part of the old mechanism, this PowerShell script, has already been updated and includes now the following code that is necessary to fix this.
Set-AzDataFactoryV2 -InputObject $dataFactory -Force -PublicNetworkAccess $dataFactory.PublicNetworkAccess
1) Include global parameters in ARM template
The first step is to include the global parameters on a different place then in the past. Go to "Manage", then "Source control" and click on "ARM template". Check the box to include the parameters.


ADF portal - New mechanism to include global parameters


2) Edit parameter configuration
Next we need to add some additional code to the ARM template parameter definition file. The location where to include the global parameters has changed. 
"Microsoft.DataFactory/factories/globalparameters": {
     "properties": {
             "*": { 
                 "value": "=" 
             }
     }
},
The file will now look like something like this. You can remove the old global parameter configuration "Microsoft.DataFactory/factories" if you want, but for now I keep this to show the difference.

ADF portal - Result of edit parameter configuration


Click here for more information and the current default parameterization template.

3) Change release pipeline
If you are using YAML to publish the changes, the only thing you have to edit is the overrideParameters property for the following task:
AzureResourceManagerTemplateDeployment@3.

Search the following part of your global parameters code.
dataFactory_properties_globalParameters_
Replace this with the following code.
default_properties_
This part of your code will now look like something like this.
overrideParameters: > 
  -default_properties_GP_AzureSynapseServerName_value $(AzureSqlDedicatedPoolServerName) 
  -default_properties_GP_AzureSynapseDatabaseName_value $(AzureSqlDedicatedPoolName) 
  -default_properties_GP_AzureResourceGroupName_value $(AzureResourceGroupName) 
  -default_properties_GP_AzureSubscriptionId_value $(AzureSubscriptionId) 
  -default_properties_GP_AzureKeyvaultSecretsURL_value $(AzureKeyVaultUrl) 

Conclusion
In this post you learned how to use the new mechanism to include global parameters in your ARM template for Azure Data Factory. Besides resolving the issue where the endpoint settings has been changed after a deployment, it will also be a future proof solution. For now Microsoft continue the support of the old mechanism, but the question (as always) is for how long.

Sunday 21 November 2021

ADF Release - Use parameters to enable Triggers

Case
During deployment of Azure Data Factory (ADF) via Azure DevOps pipelines I want to make sure that a certain trigger is only executed on Production and not on the lower environments. How can we do this without writing code (low-code)?

ADF Trigger


Solution
This is possible by changing the ARM template parameter definition which on its turn will switch certain properties into overridable parameters during deployment. However, the triggers are not included by default in the parameter file. There is also a limitation that you cannot override every property, for example runtimeState to activate and deactivate the trigger. The workaround for this is to use the endTime property. 

More information about which properties are parameterized can be found here.

1) Understand parameters in ADF
Before we start overriding properties in the ARM template, it is good to understand the parameters in general. As you know, when start building your ADF, one of the first things you do is creating a Linked Service. By default, ADF knows that for example a connection string or using a Key Vault in a Linked Service should be parameterize, because the database server or the URL will be different per environment in a DTAP. The result is always two ARM template files: the content itself (ARMTemplateForFactory.json) and the parameters that can be overwritten (ARMTemplateParametersForFactory.json). Another file holds the definition of the parameters (arm-template-parameters-definition.json). 

When you start developing in a new ADF, the ARM template parameters file (result) only contains the ADF name that can be overwritten. When you have created a Linked Service, for example Azure Blob Storage, the file should look something like below. 
{
    "$schema": "https://schema.management.azure.com/schemas/2015-01-01/deploymentParameters.json#",
    "contentVersion": "1.0.0.0",
    "parameters": {
        "factoryName": {
            "value": "bitools-d-adf-dwh"
        },
        "LS_ABLB_bitools_connectionString": {
            "value": ""
        }
    }
}
You can check this via "Manage - ARM template - Export ARM template".

ADF Portal - Check the parameters


2) Check Trigger code
Now back to our trigger. Based on the documentation, we know which properties we can parameterize for a trigger. Lets have a look at the code of the trigger itself.
  • In the ADF portal go to Manage (toolbox icon in left menu) and then to Triggers
  • Find your trigger and hover your mouse on it and click on the code icon {}
ADF portal - Check the code of your trigger

See below the JSON code of the trigger. You can override everything that is related to typeProperties. Unfortunately the runtimeState property is not one of them.
{
    "name": "Trigger_Master",
    "properties": {
        "description": "Test",
        "annotations": [],
        "runtimeState": "Started",
        "pipelines": [
            {
                "pipelineReference": {
                    "referenceName": "PL_Master",
                    "type": "PipelineReference"
                }
            }
        ],
        "type": "ScheduleTrigger",
        "typeProperties": {
            "recurrence": {
                "frequency": "Day",
                "interval": 1,
                "startTime": "2021-01-01T00:00:00Z",
                "endTime": "2021-01-02T00:00:00Z",
                "timeZone": "UTC",
                "schedule": {
                    "minutes": [
                        10
                    ],
                    "hours": [
                        0
                    ]
                }
            }
        }
    }
}
Now that we have identified which properties can be parameterized, we need to know which property we want to override for our use case. As you know, we need to make sure the trigger should not be executed on every environment. One way to do this is to set the end date (and time) of a trigger. This property is called endTime. For example: a trigger with an end date on "01/02/2021 12:00 AM" will not be executed because this is in the past. When the end date is "12/31/9999 12:00 AM", the trigger will be executed because it is in the future.

Go to your trigger and set an end date and time in the future, for example 12/31/9999 12:00 AM.

ADF portal - Specify end date for trigger


3) ARM template
Next step is to override the endTime property in the ARM template parameter definition. Unlike integration runtime or linked services properties, we need to add this property first. 
  • In the ADF portal go to Manage (same as step 2) and then to ARM template
  • Click on Edit parameter configuration
  • Search for "Microsoft.DataFactory/factories/triggers" and add the endTime property (that is part of recurrence) within typeProperties, set the value to "=:-endTime" and click the OK button. See below how your JSON should look like for the trigger part.
    "Microsoft.DataFactory/factories/triggers": {
        "properties": {
            "pipelines": [
                {
                    "parameters": {
                        "*": "="
                    }
                },
                "pipelineReference.referenceName"
            ],
            "pipeline": {
                "parameters": {
                    "*": "="
                }
            },
            "typeProperties": {
                "scope": "=",
                "recurrence": {
                    "endTime": "=:-endTime"
                }
            }
        }
    },
Now check the ARM template parameters via "Manage - ARM template - Export ARM template" (see step 1) and the result should look like this.
{
    "$schema": "https://schema.management.azure.com/schemas/2015-01-01/deploymentParameters.json#",
    "contentVersion": "1.0.0.0",
    "parameters": {
        "factoryName": {
            "value": "bitools-d-adf-dwh"
        },
        "LS_ABLB_bitools_connectionString": {
            "value": ""
        },
        "Trigger_Master_endTime": {
            "value": "9999-12-31T00:00:00Z"
        }
    }
}
In this case, we have set the default by using "=" in front of the value. Adding a minus - in front of parameter name (endTime) will remove "_properties_typeProperties" from the parameter name. More information here.

Note:
The global parameters are also not set by default. Click here how to include them in the ARM template parameters file as well.

4) Adjust release pipeline
If you are using YAML to publish the changes then the only thing you have to change is the overrideParameters property by adding the new parameter Trigger_Master_endTime and adding either a variable or a hardcoded value. The > behind the property helps you to break the string over multiple lines and keep the YAML code more readable.
          ###################################
          # Deploy ADF Artifact
          ###################################
          - task: AzureResourceManagerTemplateDeployment@3
            displayName: '4 Deploy ADF Artifact'
            inputs:
              deploymentScope: 'Resource Group'
              azureResourceManagerConnection: 'sc_mcacc-adf-devopssp'
              subscriptionId: $(DataFactorySubscriptionId)
              action: 'Create Or Update Resource Group'
              resourceGroupName: $(DataFactoryResourceGroupName)
              location: 'West Europe'
              templateLocation: 'Linked artifact'
              csmFile: '$(Pipeline.Workspace)/ArmTemplatesArtifact/ARMTemplateForFactory.json'
              csmParametersFile: '$(Pipeline.Workspace)/ArmTemplatesArtifact/ARMTemplateParametersForFactory.json'
              overrideParameters: > 
                -factoryName $(DataFactoryName)
                -LS_ABLB_bitools_connectionString $(AzureBlobConnectionString)
                -Trigger_Master_endTime $(AzureDataFactoryTriggerEndTimeActive)
              deploymentMode: 'Incremental'

            env: 
                SYSTEM_ACCESSTOKEN: $(System.AccessToken)
And if you're using the Release pipelines with the ARM template deployment task then you can just go to the Override template parameters property, click on the edit button and replace the value with a new value or a variable from a variable group.

ARM template deployment - Override template parameters


Conclusion
In this post you learned how to add and override properties of a trigger during deployment via Azure DevOps. This allows you to activate or deactivate a trigger for that environment during deployment using ARM templates without writing any code

In a previous post we showed you how to accomplish this for a Linked Service in combination with Azure Key Vault.

Wednesday 30 June 2021

Introduction to Azure DevOps for Developers

Case
I want to store, build and release my code after development. How does this and more all come together in Azure DevOps?


Solution

First it is important to agree on a way of working, regardless of the tools that can help. Especially when you are part of a team. Consider, for example, the use of version control (if so, which branching strategy), test and deployment moments, code reviews and registration of activities.

For this solution, we distinguish the following activities for supporting and implementing a way of working:
  1. Configure Git
  2. Define a branching strategy
  3. Define user stories 
  4. Create and approve code reviews
  5. Automatically build the code
  6. Automatically release the code
  7. Support testing
  8. Capture release to production
How can we translate this into the use of the services in Azure DevOps? 
Well, lets have a look at the picture below.  


Azure DevOps - Using Pipelines, Repos, Boards and Test Plans

In this blog post we will go deeper into each aspect and which service can be used.

Repos
This service enables you to manage, monitor, build, commit, verify and push your project code including all the other information about your project.

1) Configure Git
Configure Git for version control and code collaboration. This includes everything from creating a repository, determining the collaboration branch and configuring branch policies such as minimum number of reviewers or code comment(s) needs to be processed.

2)
Branching strategy
Define a branching strategy including "collaboration" and "feature" branches. This is a more detailed step, also how to handle "hotfixes" for instance, then only determine the collaboration branch. More information about the strategy around Git branching can be found here.

4)
Create and approve code reviews
Create and approve code reviews using Pull Requests. This always ensures a four eyes principle. More information about Pull Requests can be found here.

8)
Capture release to production
Create a Tag inside a Git repository after a successful release to production. This helps you to check the current or past production version at any time. It can happen for example that one of your stakeholders has other work to do and even after testing, he/she has questions about some functionality that was released the previous sprint and a new release has already taken place.

Boards
This service will manage your software projects and makes use of known frameworks like "Scrum" and "Kanban" that are supported by default.

3)
Define user stories
Define user stories to describe the activities and link those user stories to the code. You link user stories to features and epics to group work.

Pipelines
This service will bring together Continuous Integration (CI) and Continuous Delivery (CD) of your code and application using pipelines.

5) Automatically build the code
One of the most important things is working code. In a technical way, we say that your code should "compile" or "build" successfully. In addition to this, you can also write unit tests and add those to your build pipeline. With this, you do not have to worry about running it manually or to forget a test, before your code will be merged into the collaboration branch. 

In a separate blog post we will show you how to setup a basic build.

6) Automatically release the code
After a successfully build, you want to release your code to a next environment. With Releases you can setup a pipeline to automate this process. 

In a separate blog post we will show you how to setup a basic release.

7) Support testing
Besides unit testing, that can be part of both build and release pipelines, you can also add functional testing. For example the Business Acceptance Test (BAT) when you are releasing to the acceptance environment. You can run the test cases, that you have stored in Azure Test Plans, manually or it can be automated as part of the release. More information about Test Plans can be found here.

Conclusion
In this post you saw a high overview of how you can use Azure DevOps as part of your development process and how it can helps to deliver your software (in an automated way) including testing. With all those different services and options it is a lot and it will take some time and initial investment, but it pays off in the long run. That is why it is important, apart from Azure DevOps, to pay attention for which way of working suits your team the best.

In next blog posts we will go deeper into certain services in Azure DevOps, such as the pipelines that contains a build and release.

Sunday 22 March 2020

Build dynamic pipelines in Azure Data Factory

Case
I want to create multiple Azure Data Factory (ADF) pipelines that are using the same source and sink location, but with different files and tables. How can we do this in ADF when taking extensibility and maintainability of your pipelines into account?


Solution
Let's say we have a scenario where all the source files are stored into our Azure Storage, for example Blob Storage. We want to load these files into a traditional Data Warehouse (DWH) using an Azure SQL Database, that contains a separate schema for the Staging layer. Earlier we showed you how you can do this using a Foreach Loop in one single pipeline. For this scenario we will not this because:
  • Not loading all Staging tables every day on the same time. 
    • Sometimes it will only load 3 of the total 5 files, because not all the files are coming for a certain day and can be different per day. 
    • Load can be spread during the day, several moments.
  • Be more flexible per Staging load.
    • In most cases you want to have the same Staging load for every table, but sometimes transformations can be different or you need an extra table to prepare the dataset.
  • The use of technical columns in Staging table.
    • In most cases you want to store some metadata, for example "inserted date" and "inserted by". When using a "Copy Data Activity", you have to configure the mapping section when the source and sink fields are not equal. 
One of the solutions is building dynamic pipelines. This will be a combination of parameters, variables and naming convention. The result will be a dynamic pipeline, that we can clone to create multiple pipelines using the same source and sink dataset. In this blog post we will focus on the Staging layer. Of course you can implement this for every layer of your DWH.

Note:
When working in a team, it is important to have a consistent way of development and have a proper naming convention in place. This contributes to the extensibility and maintainability of your application. Click here for an example of naming convention in ADF.

Pipeline

For this solution, we will create a pipeline that contains the following activities:
  • Copy Data activity (load data from source to sink)
  • Stored Procedure activity (update technical columns)
The source will be a CSV file and is stored in a Blob container. The data is based on the customer sales table from WideWorldImporters-Standard. The file will be delivered daily.

Storage account
bitoolssa
Blob container
sourcefiles
Blob folder
WWI
File name*
SalesCustomers20200322.csv
* this is the blog post date, but it should be the date of today

Note:
Blob storage containers only have virtual folders which means that the folder name is stored in the filename. Microsoft Azure Storage Explorer will show it as if it are real folders.

1) Linked Service

Open the ADF portal, go to Connections - Linked services and and click on New. Select Azure Blob Storage and give it a suitable (generic) name. Make connection with your storage account. Create another Linked service for Azure SQL Database, because that will be our destination (sink). Click here how to make connection using Azure Key Vault.
ADF portal - Create Linked Service


2) Dataset (source)

Click New dataset and select Azure Blob Storage. The format is DelimitedText. Give it a suitable (generic) name and select the Linked Service for Blob Storage that we created earlier. 

Once you click 'OK', it will open the dataset automatically. Go to Parameters and add the following:
  • Container -> type "String"
  • Directory -> type "String"
  • File -> type "String"
  • ColumnDelimiter -> type "String"
Go to Connection and now use the applicable parameters to fill File path. You can apply dynamic content for each setting. For now, we also added a parameter for "Column delimiter". At last, we use First row as header.

Click Publishing to save your content locally. For now we did not configure a Git Repository, but of course we recommend that.
ADF portal - Create Source Dataset


Note:
Use Preview data to verify if the source input is as expected by filling in the correct parameters values.

3) Dataset (sink)

Create another dataset for the sink. Choose Azure SQL Database and give it a suitable (generic) name. Select the Linked Service for Azure SQL Database that we created earlier and click 'OK'.

Add the following Parameters:
  • SchemaName (String)
  • TableName (string)
Go to Connection and click Edit. Fill in both parameters using dynamic content. 
ADF portal - Create Sink Dataset


4) Pipeline - Copy data

Create a new pipeline and include the schema and table name in the name, like "PL_Load_Stg_Customer". Go to Variables and add the following including values:
  • Container -> type "String" and value "sourcefiles"
  • Directory -> type "String" and value "WWI"
  • File -> type "String" and value "SalesCustomers"
  • ColumnDelimiter -> type "String" and value ","
Add the Copy data activity, go to Source and use dynamic content to assign the variables to the input parameters. For the file, we use also expression language to retrieve the correct name of the file dynamically: "@{variables('File')}@{formatDateTime(utcnow(), 'yyyyMMdd')}.csv"

Go to Sink and fill in the schema and table name. We use the SPLIT function to retrieve this from the pipeline name. We use a Pre-copy data script to truncate the table before loading.

At last, go to Mapping and click on Import schemas. This will automatically map the columns with the same names (source and sink). We will remove the columns that do not exists in the source, in this case our technical columns "InsertedDate" and "InsertedBy". We will fill those columns in the next activity.

ADF portal - Create Copy data activity


5) Pipeline - Stored Procedure

Add the Stored Procedure activity and give it a suitable name. In SQL Account, select the Linked service for Azure SQL Database that we created earlier. We created a SP, that contains dynamic SQL to fill the columns "InsertedDate" and "InsertedBy" for every Staging table. See code below.

/*
==========================================================================================================================
Stored Procedure [dbo].[uspPostLoadStaging]
==========================================================================================================================
Description:

This query will load the following columns:
- InsertedDate
- InsertedBy

In ADF, without using Data Flows (Mapping), you can combine a Copy data activity with a Stored Procedure in order to
fill those (technical) columns during execution of the pipeline. In SSIS this was done by the Derived Column task. 

==========================================================================================================================
Parameter     Parameter description
--------------------------------------------------------------------------------------------------------------------------
@InsertedDate    Date when the data was inserted into the Staging table.
@InsertedBy     Name of a service / account that has inserted the data into the Staging table.
==========================================================================================================================

==========================================================================================================================
Change history

Date  Who      Remark
--------------------------------------------------------------------------------------------------------------------------
2020-03-22 Ricardo Schuurman  Intial creation.
==========================================================================================================================
*/

CREATE PROCEDURE [dbo].[uspPostLoadStaging]
 @SchemaName   AS NVARCHAR(255)
, @TableName   AS NVARCHAR(255)
, @InsertedDate  AS DATETIME
, @InsertedBy   AS NVARCHAR(255)

AS
BEGIN

 SET NOCOUNT ON;
 BEGIN TRY

  DECLARE
   @QueryStep1    AS NVARCHAR(MAX)
  , @QueryStep2    AS NVARCHAR(MAX)

  -- ERROR variables
  , @errorMsg    AS NVARCHAR(MAX) = ''
  , @errorLine    AS NVARCHAR(MAX) = ''

  /* Example values of SP parameters
  , @SchemaName   AS NVARCHAR(255)
  , @TableName   AS NVARCHAR(255)
  , @InsertedDate  AS DATETIME
  , @InsertedBy   AS NVARCHAR(255)

  SET @SchemaName   = N'Stg'
  SET @TableName   = N'Customer'
  SET @InsertedDate  = GETDATE()
  SET @InsertedBy   = N'Test'

  */

  /* ================================================================================================================
   Step 1: Extract schema and table name (based on the ADF pipeline naming convention)
   ================================================================================================================ */

  -- Add LIKE condition for schema
  SET @SchemaName = '%' + @SchemaName + '%'

  SELECT 
   @QueryStep1 = '[' + [TABLE_SCHEMA] + '].[' + [TABLE_NAME] + ']'
  FROM [INFORMATION_SCHEMA].[TABLES]
  WHERE TABLE_TYPE = 'BASE TABLE' 
  AND TABLE_SCHEMA LIKE @SchemaName
  AND TABLE_NAME = @TableName

  /* ================================================================================================================
   Step 2: Execute Update statement using the fixed (technical) columns
   ================================================================================================================ */

  SET @QueryStep2 = N'
   UPDATE ' + @QueryStep1 + '
   SET 
    [InsertedDate]  = ''' + CONVERT(NVARCHAR(30),@InsertedDate, 120) + '''
   , [InsertedBy]  = ''' + @InsertedBy + ''';
  '

  EXEC SP_EXECUTESQL 
   @Query = @QueryStep2

 END TRY

  -------------------- Error Handling  --------------------

  BEGIN CATCH 

    SELECT 
     @errorMsg = ERROR_MESSAGE()
    , @errorLine = ERROR_LINE()

    SET @errorMsg = 'Error Occured with the following Message ' + @errorMsg + 'Error Line Number  '+ @errorLine;

    THROW 50001, @errorMsg, @errorLine;

  END CATCH

END


Create the SP in the database, go to Stored Procedure and select the SP. Click Import parameter and fill the parameters. We use the System variables 'Pipeline Name' and 'Pipeline trigger time' for "InsertedDate" and "InsertedBy". Reuse the values of "SchemaName" and "TableName" from the sink (copy data activity).
ADF portal - Create Stored Procedure activity


Note:
Instead of using a Stored Procedure with an update query, you can also use the metadata columns of ADF itself. More information here.

Result
Execute the pipeline in ADF (by clicking Debug) and check the result in SQL Server Management Studio. It works!


Note:
In case of a "SqlFailedToConnect" error, make sure the firewall of the Azure SQL Database allows the Integration Runtime of ADF to access. Go to the Azure portal or use sp_set_firewall_rule on the  database to create a firewall rule. 


Summary
In this blog post you saw how you can create a dynamic pipeline using parameters and variables in combination with a proper naming convention in ADF, for example the names of your pipelines. This way of working can contribute to a consistent solution and code. In case of a new Staging load table, clone the existing pipeline and use the schema and table name in the pipeline name. You only have to change the mapping in the copy data activity.

To make your pipelines even more dynamic, you can also use metadata that is stored in a database instead of ADF itself and retrieve it using the Stored Procedure activity. 

Friday 31 May 2019

Azure - Incremental load using ADF Data Flows

Case
Recently Microsoft introduced a new feature for Azure Data Factory (ADF) called Mapping Data Flows. This allows you to do data transformations without writing and maintaining code. Similar to SSIS, but then in the Cloud. How can we use Mapping Data Flows to build an incremental load?


Solution
First, it is good to know that Mapping Data Flows is not the only feature that is part of "Data Flows". Microsoft announced also Wrangling Data Flows. The main difference between these two features is that Mapping Data Flows is more traditional "ETL" with a known source and destination, while Wrangling Data Flows is suited for preparing data and store this dataset in Azure Data Lake for example. From here, it can be used as input for Machine Learning or doing transformations later on. Currently it is in Limited Private Preview. In a future post we will explain more about Wrangling Data Flows and show you how it actually works.

In this post we are going to set up an incremental load for a Data Warehouse (DWH) scenario using Mapping Data Flows. We want to load our Staging layer incremental. We use a so-called Watermark for this. An example of a watermark is a column that contains the last modified time or id. We already configured an Azure Data Factory and we are using an Azure SQL Database with sample data from WideWorldImporters. We use the "Orders" table.

Note:
Here you will find an tutorial of an incremental load using an ADF pipeline with several activities.

1) Create table for watermark(s)
First we create a table that stores the watermark values of all the tables that are suited for an incremental load. The table contains the following columns:

--Create Watermark table
CREATE TABLE [dbo].[WatermarkTable](
 [WatermarkTableName] [nvarchar](255) NULL
, [WatermarkColumn] [nvarchar](255) NULL
, [WatermarkValue] [nvarchar](255) NULL
) ON [PRIMARY]
GO

2) Fill watermark table
Add the appropriate table, column and value to the watermark table. The value must be the last loaded date or id. This is a one-time insert, because after this the watermark value will be updated after each load. In our case the table contains the following record:

Azure SQL Database - Watermark value for Orders

3) Create Linked Service
Before we can start building the Data Flow, we first have to make a connection with our database. Go to Connections and click on 'New'. Select Azure SQL Database and give it a suitable name. Select your Azure subscription and then select the correct server, database and fill in the credentials.

Azure Data Factory - Create Linked Service
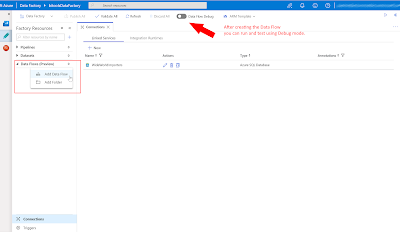


4) Create Data Flow
Now lets build the Data Flow itself. Click on Add Data Flow and give it a suitable name. Important to know is that you can test your Data Flow components by turning on the Data Flow Debug mode. Be aware of the costs, because it will spin up a Databricks cluster and that is hourly billed. More information about the debug mode here.

Azure Data Factory - Create Data Flow


Note:
After creating the Data Flow, we can only save it by adding at least one source and one sink.

The goal of this Data Flow is to include only data from the source table / query that is greater then the watermark value that is stored from the previous load. Below we will explain each component of this flow individually.

Source 1: source table / query
In this Data Flow the first source is the source table / query. Click on "Add Source", give it a suitable name and click on new "Source dataset". Select "Azure SQL Database" and select the Linked Service we created earlier. Now go back to the source and click on "Source Options". Select "Query" and write the query. Click on "Import Schema" and at last we can preview our data. We have turned on the Debug mode to import the schema and preview the data.

Azure Data Factory - Add Source in Data Flows


We used the following query. As you can see, we added a column that contains the table name from which we want to retrieve the watermark value.

--Create source query
SELECT
 [OrderID]
, [CustomerID]
, [SalespersonPersonID]
, [PickedByPersonID]
, [ContactPersonID]
, [BackorderOrderID]
, [OrderDate]
, [ExpectedDeliveryDate]
, [CustomerPurchaseOrderNumber]
, [IsUndersupplyBackordered]
, [Comments]
, [DeliveryInstructions]
, [InternalComments]
, [PickingCompletedWhen]
, [LastEditedBy]
, [LastEditedWhen]
, 'Orders' AS TableName
FROM [Sales].[Orders]

Source 2: watermark table
This source contains a simple query of the watermark table. The setup is the same as source 1, only with a different query. Later on we will make sure we only select the watermark value from the correct table in the watermark table (with a Join).

--Create watermark table query
SELECT 
 [WatermarkTableName]
, [WatermarkColumn]
, [WatermarkValue]
FROM [dbo].[WatermarkTable]

Azure Data Factory - Source WatermarkTable


Derived Column
It can occur that the watermark values has different datatypes. That is why we use the 'nvarchar' datatype to store the values. In this case the watermark is a 'datetime' and we have to convert this to make a successful join to the watermark table. We use the expression language of Mapping Data Flow for this, more information here.

Azure Data Factory - Use Mapping Data Flow expression language
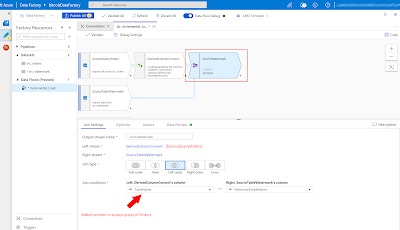


Join
We use a join to combine data from different sources. We can choose between 'Full outer', 'Inner', 'Left outer', 'Right outer' or a 'Cross' join. Here we want to make sure that the watermark value of the specific table is used for the incremental load. We use a 'Left outer', but you can also use a 'Inner' here because all the records contain the same table. A join on watermark table is more future proof, because a join on the watermark column is not going to work when you have multiple watermark tables with the same watermark column name.

Azure Data Factory - Use Join component


Filter
Because you can only use the "Join" component with two columns that are equal to each other, we use "Filter" to include only the records where the watermark value from the source table / query is greater then the latest watermark value.

Azure Data Factory - Filter out old records
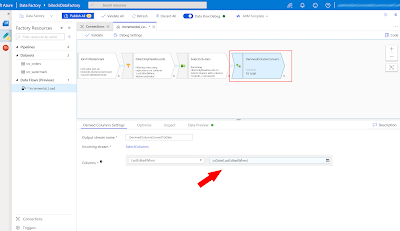


Select
In SSIS you can map the columns from source to destination in the destination. If you do not want to load a column, you do not map it. Here we have to use the "Select" component to select the relevant columns. Thank you Ronny Albouts for mention this.

Azure Data Factory - Map or unmap columns


Derived Column 2
Before we choose the destination, we will convert the column"LastEditedWhen" back to a date using a new "Derived Column" component. Otherwise we cannot map this column with the 'Orders_Incremental' table, because we use the original table definition of 'Orders' and here the datatype is a date (time).

Azure Data Factory - Convert back to date before Sink


Sink
In ADF a destination is called "Sink". Here we will select our destination table called "Orders_Incremental". The table definition is the same as "Orders". Create the Sink dataset and automatically the columns will map. You can turn off 'Auto Mapping' to make manual changes.

Azure Data Factory - Add Sink in Data Flows


Note:
If the destination type is not available, you can store the data into CSV format or Blob Storage and use a Copy Activity to load the data in your preferred destination.

Result
After the Data Flow is ready, go back to "Pipelines" and create a new one. In here we will select the Data Flow activity and select the Data Flow we have created earlier. Now run the pipeline and let's take a look at the result, it is working!

SQL Server Management Studio - Result of Incremental Load

Note:
To make it as generic as possible, it is prefered to use the "Derived Column" component to add a new column (similar to SSIS). In this way you will keep the source query 'clean'. Unfortunately this is not working at the moment and Microsoft is investigating this issue.

Update Watermark
At last we have to update the watermark value to the last known value, in this case the date of "LastEditedWhen". Therefore we will use the following simple Stored Procedure.

/* Create Stored Procedure */
CREATE PROCEDURE [dbo].[usp_UpdateWatermark] 
 @tableName nvarchar(255)

AS

BEGIN

 DECLARE 
 /* ============= Variables ============= */
  @watermarkValue  nvarchar(255) 

 /* Determine latest Watermark value from input table */
 SELECT 
  @watermarkValue = MAX([LastEditedWhen]) 
 FROM [Sales].[Orders_Incremental] AS T

 /* Update Watermark table */
 UPDATE [dbo].[WatermarkTable]
 SET  [WatermarkValue]  = @watermarkValue 
 WHERE [WatermarkTableName] = @tableName

END
GO

Add the Stored Procedure activity at the end of the pipeline. The result should look like this.

Azure Data Factory - Update Watermark using SP


As you can see the T-SQL is hard coded. In a next post we will show you how to setup a dynamic pipeline so that you can reuse the Stored Procedure activity for every table in an Incremental Load batch.

Conclusion
In this post we showed you how to create an incremental load scenario for your Data Warehouse using Mapping Data Flows inside Azure Data Factory. With Mapping Data Flows, you can transform and clean up your data like a traditional ETL tool (SSIS).

This is just the beginning of Mapping Data Flows, we will expect more and more functions to make this grow into the new "SSIS in the cloud".

Friday 29 March 2019

Azure - Reuse Power BI dataflows

Case
Microsoft recently introduced Power BI dataflows for self-service ETL or data preparation. It uses an Azure Data Lake Storage (ADLS), which is only visible to Power BI, to store the metadata and result of the dataflows. However, you can also bring your own storage account. How does that work and why would you want that?

Bring Your Own Storage in preview

Solution
As we mentioned earlier in our previous post, Power BI dataflows can be seen as a self-service data preparation tool. It is easy accessible, so that other people in your organization (besides IT) can get started with transforming and maintaining the data. Nowadays there are often several people / business analysts in a department who are maintaining Excel files. With Power BI dataflows you can centralize this process and contribute to the ideology of "one version of the truth".

When you bring your own ADLS Gen2 storage account (StorageV2) for Power BI dataflows, other services like Azure Data Factory or Azure Databricks could use that same data. This makes it possible to do light weight data preparations with an user-friendly tool for corporate data warehousing or data science. However Power BI dataflows does not (yet?) replace SSIS, Azure Data Factory or any other ETL tool. They could even write back data to the data lake to create 'external' dataflows that are not maintained in Power BI.

Configure and connect to your own storage account
First you have to create an ADLS Gen2 storage account. Make sure the storage account is on the same region as the Power BI tenant. Click here for the documentation of Microsoft that explains step by step how to create such account.

Next, execute the following steps to make a connection with your own storage account. Note that the last step is a one-time action that cannot be changed afterwards.

It requires the following permissions to make a connection:
  • Role "Owner" in the Azure Subscription (service administrator / classic administrator) to add an ADLS Gen2 storage account. This is also required to give the Power BI Service access to the storage account and Blob Container. 
  • Global Administrator in O365 or Azure Active Directory to connect your ADLS Gen2 storage account with dataflows. This has to be done in the Power BI admin portal. The role Power BI Service Administrator is not sufficient to perform those actions.

Power BI Service - Successfully connected to your own ADLS Gen2 storage account


Result
To actual store the dataflow definition and the related data files in your ADLS Gen2 storage account, you must create a new Power BI app workspace or update an existing one. In case of an update, make sure you do not already have dataflows stored in the workspace. Otherwise you cannot change this.

In this case we created a new workspace. Turn on Dataflow storage (preview) under "Advanced" settings. In this case we built the same (simple) dataflow as our previous post. Save your dataflow and click "Refresh".

Azure Storage Explorer
When the dataflow is refreshed, go to the Blob container you created earlier for your ADLS Gen2 storage account. Here you will find the definition (source code) of the dataflow and the output. Note that the content of the ADLS Gen2 storage account is only visible in Azure Storage Explorer. Click here to download.

Azure Data Explorer - Result in own ADLS Gen2 storage account


And now you can choose per workspace whether you want to use this new Data Lake. This only works for the new workspaces, that are at the moment also still in preview.
Power BI Workspace settings


Common errors
When you try to connect to your own storage account in the admin portal of the Power BI Service, you can get several errors.

You must have global administrator permissions
Only Global Administrators in Office 365 or Azure Active Directory are administrators in Power BI and therefore able to connect to the storage account. Click here for more information about administrator roles in Power BI.


There was a problem accessing your dataflow storage account
After creating your storage account , it can take up to 30 minutes to make a connection. Also make sure you avoid spelling mistakes.

Your storage account must be in the same Azure Active Directory tenant
This occurs for example when you are trying to make a connection with the ADLS storage account in the Power BI Service with an account outside the organization. In this case, the organization (subscription) is where the storage account is created.


Conclusion
In this post we showed you how to use your own Azure Data Lake Storage account instead of the default provided by Power BI using dataflows. This new feature has several possible use cases. For example:
  1. Data preparation for 'corporate' data warehousing by a business user with a user-friendly tool
  2. Data preparation for 'corporate' data science by a business user with a user-friendly tool
  3. Creating 'external' dataflows for Power BI with Azure Services like Data Factory or Databricks
  4. Using data from other CDM-compliant applications like Dynamics 365 and Office 365

We hope Microsoft will make it a bit easier to bring your own storage, because at the moment there are a lot of steps to take and you need a lot of rights to do it. This discourages to arrange this powerful option.

We also expect some more admin capabilities in Power BI, because at this moment you cannot change your dataflow storage once Power BI is connected to your own ADLS account (so be very careful). And for larger corporations one ADLS account is probably not enough. It is also expected that the integration and collaboration with other Azure services will be improved so that you are even more flexible in choosing the services in your BI landscape.