Showing posts with label MENNO. Show all posts

Monday 20 November 2017

CTAS - The fastest way to load data on a MPP system

Case

What is the fastest way to using Extract Load Transform (ELT) on a Massively Parallel Processing (MPP) system like on a Azure SQL Datawarehouse.

CTAS: The way to go!


Solution

When Extracting, Loading and Transforming data on a MPP system like Azure SQL Data Warehouse there are several ways to do just that. Currently Create Table As Select (CTAS) is by far the fastest.

Whats is a MPP system?
MPP stands for Massively Parallel Processing and is a database system that uses a control node to distribute the data across several seperate Compute Nodes. This makes it possible to load very large amounts of data in a fast way. All this is done automatically and for the end-user it appears to be one database. When you use traditional ETL software like SSIS to extract, load and transform data you make use of the memory that is allocated to the SSIS system and thus take the data out of the database, which is far less efficient.

How a MPP looks like under the hood


1) What is CTAS?
CTAS stands for Create Table As Select. As the name suggests the operation creates a new table using a select statement and is super fast. CTAS is fast because the data stays on the MPP and thus makes use of all the capabilities of a MPP system.

2) How to use CTAS
When you create a CTAS statement, you can choose to set two options, namely;
  • Distribution options - Setting this option is mandatory
  • Table options - Setting this option is optional. When not supplied a Clustered ColumnStore Index is used.

Distribution options

When you create the CTAS command you can choose between HASH, ROUND ROBIN or Replicate as distribution option.

HASH is used to divide the data in equal sized sections and distribute them to the nodes using a distribution column. When doing this you try to evenly distribute the data on the available nodes. Choosing the correct distribution key here is paramount otherwise you can get skew on the distribution between the nodes. To put it simply; when you have 4 nodes and the data is not distributed evenly then it hurts the data retrieval speed. For example you want to use this option when creating Fact tables that are large (or very large Dimension tables). You can check for skew using the command DBCC PDW_SHOWSPACEUSED
--Creating a table using CTAS and Hash
CREATE TABLE dbo.CTASHash
WITH
(
DISTRIBUTION = HASH(FactCallCenterID)
)
AS
SELECT 
   FactCallCenterID
 , DateKey
 , WageType
 , Calls
 , AutomaticResponses
 , Orders
 , IssuesRaised
 , AverageTimePerIssue
 , ServiceGrade
FROM dbo.FactCallCenter

ROUND ROBIN is used when you dont want to choose a distribution column but are fine when the data is distributed randomly across the nodes. This is also the default option when you do not define a distribution option. This option is used for example for Staging tables. It is advised to always explicitly define the ROUND ROBIN in the CTAS statement.
--Creating a table using CTAS and Round Robin
CREATE TABLE dbo.CTASRobin
WITH
(
 DISTRIBUTION = ROUND_ROBIN
)
AS
SELECT 
   AccountKey
 , ParentAccountKey
 , AccountCodeAlternateKey
 , ParentAccountCodeAlternateKey
 , ValueType
 , CustomMemberOptions
FROM dbo.DimAccount

REPLICATE is used to put the data on every node available so it can be used for quick access. This is useful when creating regular sized Dimensions. When the data is available on each and every node then it safes on moving the data between nodes when using joins. The full table will be available on all nodes.
--Creating a table using CTAS and Replicate
CREATE TABLE dbo.CTASReplicate
WITH
(
 DISTRIBUTION = REPLICATE
)
AS
SELECT 
   ScenarioKey
 , ScenarioName
FROM dbo.DimScenario
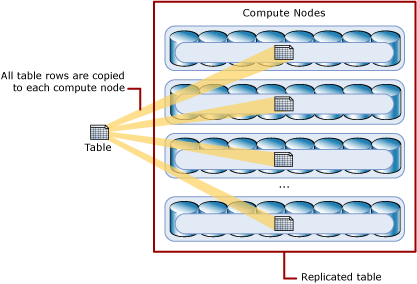
Replicated table

Table options

Besides choosing the distribution option, you can optionally also use the following table options;

CLUSTERED COLUMNSTORE INDEX is a table option that is one of the most efficient ways to store data in Azure DWH. It improves data compression and query performance for data warehousing workloads and outperform Clustered Index and Heap tables. That makes them the best choice for large tables. Using a Clustered Columnstore Index is considered to be the best choice when you are unsure which table option you should best use. It is also the default table option when you only use one of the distribution options.
--Creating a table using CTAS and Clustered Columnstore Index
CREATE TABLE dbo.CTASRobinCluster
WITH
(
   DISTRIBUTION = ROUND_ROBIN
 , CLUSTERED COLUMNSTORE INDEX
)
AS
SELECT 
   AccountKey
 , ParentAccountKey
 , AccountCodeAlternateKey
 , ParentAccountCodeAlternateKey
 , ValueType
 , CustomMemberOptions
FROM dbo.DimAccount

HEAP is a table option that is usefull when temporarily loading data on Azure DWH and is the fastest way to load your data into a table. It is not advisable to use a heap table when the data in the table is frequently grouped together. That is because the data must be sorted before it can be grouped.
--Creating a table using CTAS and Heap
CREATE TABLE dbo.CTASRobinHEAP
WITH
(
   DISTRIBUTION = ROUND_ROBIN
 , HEAP)
AS
SELECT 
   AccountKey
 , ParentAccountKey
 , AccountCodeAlternateKey
 , ParentAccountCodeAlternateKey
 , ValueType
 , CustomMemberOptions
FROM dbo.DimAccount

CLUSTERED INDEX is a table option that you use when you want to sort and store the data rows in the table based on a specific column. The disadvantage of using a Clusted Index table is that only queries that use the defined Clustered Index column benefit from the index. This can be somewhat fixed by using additional Nonclustered indices, but that would increase use of space and processing time.
--Creating a table using CTAS and Clustered Index
CREATE TABLE dbo.CTASRobinClusteredIndex
WITH
(
 DISTRIBUTION = ROUND_ROBIN,
 CLUSTERED INDEX (AccountKey)
)
AS
SELECT 
   AccountKey
 , ParentAccountKey
 , AccountCodeAlternateKey
 , ParentAccountCodeAlternateKey
 , ValueType
 , CustomMemberOptions
FROM dbo.DimAccount

PARTITION is the table option that you use when you want to determine how the rows are grouped within each distribution. To use it you need to choose a partition column name. This column can be of any data type. You use partitioning to improve query performance and data maintenance and it avoids transaction logging. Using partitioning during the load proces can also substantially improve performance.
--Creating a table using CTAS and Partition
CREATE TABLE dbo.CTASRobinPartition
WITH
(
 DISTRIBUTION = HASH(ProductKey),
 CLUSTERED COLUMNSTORE INDEX,
 PARTITION
    (
        OrderDateKey RANGE RIGHT FOR VALUES
        (
        20000101,20010101,20020101,20030101,20040101,20050101,20060101,20070101,20080101,20090101,
        20100101,20110101,20120101,20130101,20140101,20150101,20160101,20170101,20180101,20190101,
        20200101,20210101,20220101,20230101,20240101,20250101,20260101,20270101,20280101,20290101
        )
    )
)
AS
SELECT 
 ProductKey
 ,OrderDateKey
 ,DueDateKey
 ,ShipDateKey
 ,SalesAmount
 ,TaxAmt
FROM dbo.FactInternetSales

3) Advantages of CTAS
With CTAS you are able to create and recreate tables using a specific distribution type and its very fast. If you have created HEAP tables and want to see if a different distribution type is a better option, then you can simply recreate the table using CTAS with the desired Distribution option. Simply create a copy of the table with a different name, drop the old table and rename the copy table to the original table name.
--Creating a table using CTAS and Partition
CREATE TABLE dbo.CTASRenameTemp
WITH
(
 DISTRIBUTION = ROUND_ROBIN
)
AS
SELECT 
 *
FROM dbo.DimAccount;

DROP TABLE dbo.CTASRename;

RENAME OBJECT dbo.CTASRenameTempTO CTASRename;

3) CTAS tips
When you create a copy a table using CTAS and do not manipulate any of the columns, all the settings of the columns are left intact. For example the datatype and nullability. When you (re)create a column in the table then you explicitly have to cast the table and optionally use the ISNULL() function to set the nullability of the column. For the latter if you do not use the ISNULL() function then the column automatically is created allowing NULL. In below example the first column allows NULL's and the second doesnt.
--CTAS Tips
CREATE TABLE dbo.CTASCasting
WITH
(
 DISTRIBUTION = ROUND_ROBIN
)
AS
SELECT 
   CAST(ValueType AS VARCHAR(100)) AS ValueTypeNull
 , ISNULL(CAST(ValueType AS VARCHAR(100)),'Do not allow NULL') AS ValueTypeNotNull
FROM dbo.DimAccount;
Summary

With CTAS you can quickly create and recreate tables without having to build complex ETL processes. It is fast, flexible and easy to use and it gives you the option to build different styles of tables that are best used in different scenario's like fast loading or fast data retrieving. And if you want to test the table with other options then you simply recreate it with the data.

Thursday 23 March 2017

Loading tables by using BIML and meta architecture

Case

How can we simplify the process of loading database tables and reduce the time needed to create SSIS packages.

Solution

There are several steps that need to be taken prior to creating such a solution.
These steps are:
  1. Create the databases 'Repository' and 'Staging' and required schema's
  2. Create a Meta table called 'Layer' and a table called 'TableList' in the repository database
  3. Create the Sales tables in the Sales database
  4. Fill the Meta tables with the required meta data
  5. Create a BIML script that will create the Extract and Load SSIS package
  6. Generate the package using BIML Express in Visual Studio 2015 to create the SSIS package
For this solution the following prerequisites need to be met;
  • SQL Server will be used as source and destination platform
  • The Adventure Works 2014 database will be used as source
  • The selected tables from the Adventure Works database are present in the destination database and all required schema’s and specific datatypes, if applicable (we will be using a few tables from the Person schema that do not use custom datatypes)
  • Visual Studio 2015 is installed (Community/Professional/Enterprise)
  • BIML Express is installed

1) - Create the databases and schema's

In this step the databases 'Repository' and Staging are created and the required schema's.
--Create the databases Repository and Staging and required schema's
CREATE DATABASE [Repository] CONTAINMENT = NONE ON  PRIMARY 
( NAME = N'Repository', FILENAME = N'D:\Program Files\Microsoft SQL Server\MSSQL13.MSSQLSERVER\MSSQL\DATA\Repository.mdf' , SIZE = 7168KB , MAXSIZE = UNLIMITED, FILEGROWTH = 1024KB )
 LOG ON 
( NAME = N'Repository_log', FILENAME = N'D:\Program Files\Microsoft SQL Server\MSSQL13.MSSQLSERVER\MSSQL\DATA\Repository_log.ldf' , SIZE = 5184KB , MAXSIZE = 2048GB , FILEGROWTH = 10%)
GO
ALTER DATABASE [Repository] SET RECOVERY SIMPLE;
GO
USE Repository
go
CREATE SCHEMA rep
GO
CREATE DATABASE [Staging] CONTAINMENT = NONE ON  PRIMARY 
( NAME = N'Staging', FILENAME = N'D:\Program Files\Microsoft SQL Server\MSSQL13.MSSQLSERVER\MSSQL\DATA\Staging.mdf' , SIZE = 7168KB , MAXSIZE = UNLIMITED, FILEGROWTH = 1024KB )
 LOG ON 
( NAME = N'Staging_log', FILENAME = N'D:\Program Files\Microsoft SQL Server\MSSQL13.MSSQLSERVER\MSSQL\DATA\Staging_log.ldf' , SIZE = 5184KB , MAXSIZE = 2048GB , FILEGROWTH = 10%)
GO
ALTER DATABASE [Staging] SET RECOVERY SIMPLE;
GO
USE Staging
go
CREATE SCHEMA Sales
GO

2) - Create the Meta tables

During this step we will be creating the meta tables 'Layer' and 'TableList'. The first table will contain the id, name and prefix of the layers present in the Datawarehouse environment. In this blog the only entry present is the Staging area id and name. Normally this table also holds the name of for example the Datawarehouse and Datamart layer or any other layers present in a Business Intelligence environment.
The column 'LayerId' is used in the other table named 'TableList' and is used to make the distinction between the table names present in the respective layer. In this blog there will only be Staging Area tables described.
The table 'TableList' contains the following columns;
  • LayerId - The id of the layer the table belongs to
  • TableName - The name of the table
  • SchemaName - The name of the schema of the table
  • TableType - The type of the table (fe. user table)
  • LoadOrderNr - The order in which the tables are loaded (or created by other processes)
  • WhereClause - Any optional where clause that is used during the load proces (Default this column must be set to '1 = 1')
  • ActiveInd - Indicates if the table is active or inactive during the BIML creation proces
  • InsertDate - The date when the table entry was inserted in the 'TableList' table
Note: Some of the above columns are not or less applicable to the BIML script in this post, but they are used in other generic scripts used to create and load datawarehouse packages (more about this in future posts)
--Create the meta tables
USE [Repository]
GO
IF OBJECT_ID('[rep].[Layer]', 'U') IS NOT NULL
BEGIN
 DROP TABLE [rep].[Layer]
END
GO
CREATE TABLE [rep].[Layer](
 [LayerId] [smallint] NOT NULL,
 [LayerName] [nvarchar](50) NOT NULL,
 [LayerPrefix] [nvarchar](10) NOT NULL,
) ON [PRIMARY]
GO
IF OBJECT_ID('[rep].[TableList]', 'U') IS NOT NULL
BEGIN
 DROP TABLE [rep].[TableList]
END
GO
CREATE TABLE [rep].[TableList](
 [LayerId] [smallint] NULL,
 [TableName] [nvarchar](100) NULL,
 [SchemaName] [nvarchar](100) NULL,
 [ServerNr] [smallint] NULL,
 [TableType] [nvarchar](100) NULL,
 [LoadOrderNr] [int] NULL,
 [WhereClause] [nvarchar](250) NULL,
 [PrimaryKey] [nvarchar](250) NULL,
 [ActiveInd] [nchar](1) NULL,
 [InsertDate] [datetime] NULL
) ON [PRIMARY]
GO

3) - Create the Sales tables

During this step we will be creating the Sales tables in the target database Staging.
--Create the Sales tables
USE Staging
GO
CREATE TABLE [Sales].[ShoppingCartItem](
 [ShoppingCartItemID] [int] IDENTITY(1,1) NOT NULL,
 [ShoppingCartID] [nvarchar](50) NOT NULL,
 [Quantity] [int] NOT NULL,
 [ProductID] [int] NOT NULL,
 [DateCreated] [datetime] NOT NULL,
 [ModifiedDate] [datetime] NOT NULL,
) ON [PRIMARY]
GO
CREATE TABLE [Sales].[SpecialOffer](
 [SpecialOfferID] [int] IDENTITY(1,1) NOT NULL,
 [Description] [nvarchar](255) NOT NULL,
 [DiscountPct] [smallmoney] NOT NULL,
 [Type] [nvarchar](50) NOT NULL,
 [Category] [nvarchar](50) NOT NULL,
 [StartDate] [datetime] NOT NULL,
 [EndDate] [datetime] NOT NULL,
 [MinQty] [int] NOT NULL,
 [MaxQty] [int] NULL,
 [rowguid] [uniqueidentifier] ROWGUIDCOL  NOT NULL,
 [ModifiedDate] [datetime] NOT NULL,
) ON [PRIMARY]
GO
CREATE TABLE [Sales].[SpecialOfferProduct](
 [SpecialOfferID] [int] NOT NULL,
 [ProductID] [int] NOT NULL,
 [rowguid] [uniqueidentifier] ROWGUIDCOL  NOT NULL,
 [ModifiedDate] [datetime] NOT NULL,
) ON [PRIMARY]
GO

4) - Fill the meta tables with the required meta data

After creating the database and metadata tables, they need to be filled with the meta data that will be used by the BIML script in the next step ('BIML Load_STG_Tables_From_Microsoft.biml').
The script provided below inserts the layer information used in this blog and the table meta information of those tables for which the SSIS load proces will be created.

If you want to test the Where Clause functionality you can replace the value '1 = 1' with '1 = 1 AND ShoppingCartItemID = 2' in the column 'WhereClause' in the table 'TableList' for the tablename 'sales.ShoppingCartItem'. This will place a filter on the table.
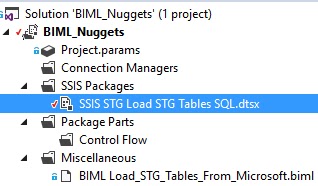
The BIML script will use the meta table information to create one SSIS package with the name 'SSIS STG Load STG Tables SQL.dtsx'

--Insert the meta information in the meta tables
USE [Repository]
GO
TRUNCATE TABLE [rep].[Layer];
TRUNCATE TABLE [rep].[TableList];
INSERT [rep].[Layer] ([LayerId], [LayerName], [LayerPrefix]) VALUES (1, N'staging', N'stg');
INSERT [rep].[TableList] ([LayerId], [TableName], [SchemaName], [TableType], [LoadOrderNr], [WhereClause], [ActiveInd], [InsertDate]) VALUES (1, N'SpecialOffer', N'Sales', N'user_table', 1, N'1 = 1', N'1', CAST(GETDATE() AS DateTime));
INSERT [rep].[TableList] ([LayerId], [TableName], [SchemaName], [TableType], [LoadOrderNr], [WhereClause], [ActiveInd], [InsertDate]) VALUES (1, N'SpecialOfferProduct', N'Sales', N'user_table', 1, N'1 = 1', N'1', CAST(GETDATE() AS DateTime));
INSERT [rep].[TableList] ([LayerId], [TableName], [SchemaName], [TableType], [LoadOrderNr], [WhereClause], [ActiveInd], [InsertDate]) VALUES (1, N'ShoppingCartItem', N'Sales', N'user_table', 1, N'1 = 1', N'1', CAST(GETDATE() AS DateTime));
GO

5) - Create the BIML script

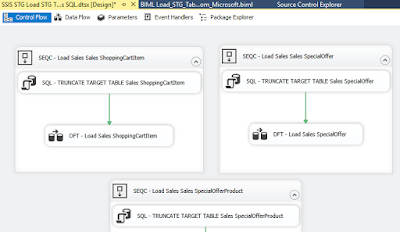
Once the previous steps have been executed it is time to create the BIML script. The BIML script starts with declaring the information needed to create the connection strings to the different database and the server(s) where they recide on. For this example all the databases are SQL Server 2016 databases. It would also be possible to store that information in a meta table but for this post the information is placed inside the BIML script. The BIML script will create one package with the name 'SSIS STG Load STG Tables SQL' and for each table in the 'TableList' table a sequence container will be created with two SSIS components. The first component is a SQL Task component that will use a T-SQL command to truncate the target table. The second component is a Data Flow Task containing a Source and Destination component which will load the data from the target to the source table. Alle the sequence components are executed parallel to each other.

--The BIML code that can be placed inside a BIML file.

    
    <# 
        string pRepServerName    = "localhost"; 
        string pRepDatabaseName  = "Repository";
        string pRepProvider      = "SQLNCLI11.1;Integrated Security=SSPI";
        string pRepSchema        = "rep";
      
        string pSourceServerName = "localhost";
        string pSourceDBName     = "AdventureWorks2014";
        string pSourceProvider   = "SQLNCLI11.1;Integrated Security=SSPI";
        string pSourceSchema     = "Sales";
        
        string pTargetServerName = "localhost";
        string pTargetDBName     = "Staging";
        string pTargetProvider   = "SQLNCLI11.1;Integrated Security=SSPI";
        string pTargetSchema     = "Sales";
    #>
  
    
    <#
        string pLayer            = "Staging";
     #>
    
    <#
    string csRepository = String.Format("Data Source={0};Initial Catalog={1};Provider={2};Auto Translate=False;"
          ,pRepServerName, pRepDatabaseName, pRepProvider);
   
    string csSource = String.Format("Data Source={0};Initial Catalog={1};Provider={2};Auto Translate=False;"
          ,pSourceServerName, pSourceDBName, pSourceProvider);
    
    string csTarget = String.Format("Data Source={0};Initial Catalog={1};Provider={2};Auto Translate=False;"
          ,pTargetServerName, pTargetDBName, pTargetProvider);      
    #>


                <#
                  StringBuilder sMETAGetTableName = new System.Text.StringBuilder();
                  
                  sMETAGetTableName.Append("SELECT ");
                  sMETAGetTableName.Append("    TableName ");
                  sMETAGetTableName.Append("  , SchemaName ");
                  sMETAGetTableName.Append("  , WhereClause ");
                  sMETAGetTableName.Append("FROM ");
                  sMETAGetTableName.Append(pRepSchema);
                  sMETAGetTableName.Append(".TableList AS TAB ");
                  sMETAGetTableName.Append("INNER JOIN ");
                  sMETAGetTableName.Append(pRepSchema);
                  sMETAGetTableName.Append(".Layer AS LYR ");
                  sMETAGetTableName.Append("  ON ( TAB.LayerId = LYR.LayerId) ");
                  sMETAGetTableName.Append("WHERE 1 = 1 ");
                  sMETAGetTableName.Append(" AND TAB.ActiveInd = 1 ");
                  sMETAGetTableName.Append(" AND LYR.LayerName = '");
                  sMETAGetTableName.Append(pLayer);
                  sMETAGetTableName.Append("' ");
                  sMETAGetTableName.Append("ORDER BY ");
                  sMETAGetTableName.Append("   TAB.LoadOrderNr");
                  
                  DataTable tblMETATableNames = ExternalDataAccess.GetDataTable(csRepository, sMETAGetTableName.ToString());
                  foreach (DataRow METATableNameRow in tblMETATableNames.Rows) {
                #>
                 <#=METATableNameRow["TableName"] #>" ConstraintMode="Linear">
                    
                        "
                                    ResultSet="None"
                                    ConnectionName="OLEDB Target">
                            TRUNCATE TABLE <#=pTargetSchema #>.<#=METATableNameRow["TableName"] #> 
                            
                        
                        ">
                            
                                "
                                             ConnectionName="OLEDB Source"
                                             ValidateExternalMetadata="false">
                                    SELECT
        CAST(1 AS INTEGER) AS DUMMY_COLUMN
<#                                          StringBuilder sGETSelectColumn = new System.Text.StringBuilder();
                                            sGETSelectColumn.Append("SELECT " );
                                            sGETSelectColumn.Append("     col.name AS column_name " );
                                            sGETSelectColumn.Append("FROM sys.columns AS col " );
                                            sGETSelectColumn.Append("INNER JOIN sys.objects AS obj " );
                                            sGETSelectColumn.Append("    ON(col.object_id = obj.object_id) " );
                                            sGETSelectColumn.Append("INNER JOIN sys.types AS typ " );
                                            sGETSelectColumn.Append("    ON(col.user_type_id = typ.user_type_id)" );
                                            sGETSelectColumn.Append("WHERE   1 = 1 " );
                                            sGETSelectColumn.Append("   AND obj.name = '"+ METATableNameRow[0].ToString() +"'");
                                            DataTable tblSelectColumn = ExternalDataAccess.GetDataTable(csSource, sGETSelectColumn.ToString());
                                            foreach (DataRow SelectColumn in tblSelectColumn.Rows) {
#>
        , [<#=SelectColumn["COLUMN_NAME"] #>]
<# } #>FROM <#=METATableNameRow["SchemaName"] #>.<#=METATableNameRow["TableName"] #>
WHERE <#=METATableNameRow["WhereClause"] #>


                                " 
                                                  ConnectionName="OLEDB Target">
                                    " />


                <# } #>


<#@ template language="C#" hostspecific="true"#>
<#@ import namespace="System.Data"#>
<#@ import namespace="System.Data.SqlClient"#>
<#@ import namespace="System.Text"#>

6) - Generate the package using BIML Express

Once the BIML file has been created it is time to generate the SSIS package by using BIML Express in Visual Studio 2015.
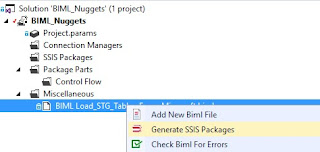
The package can be simply generated by right clicking the BIML package and selecting 'Generate SSIS Packages'.
Using BIML Expres to generate the package

The package has been generated by BIML

Using BIML Expres to generate the package

Summary

In this post we create the following components;
  • Repository database and one schema
  • Staging database and one schema
  • Two meta tables to be used by the BIML script from this post (and possible future posts)
  • Three Staging tables
  • A BIML file called 'BIML Load_STG_Tables_From_Microsoft.biml'
  • A generated SSIS Package named 'SSIS STG Load STG Tables SQL.dtsx'

Monday 4 July 2016

IoT Adventure

Case
What is Internet of Things (IoT)?

Solution
To discover the possibilities of IoT we started our own IoT project a few weeks ago. In this blog post series we will explain what we are doing and how we are doing it. The goal of the project is to create a couple of sensor stations, hang them in our office and create reports with the sensor data in PowerBI. No business case, just testing and learning.
IoT project overview


Sensor stations
We started by buying a couple of Microsoft IoT Packs for Raspberry Pi 2. This is a great starter kit to learn more about IoT with Microsoft technology. It has a couple of sensors in it like a Photo Cell and a Temperature, Pressure & Humidity sensor [details].
Microsoft Internet of Things Pack for Raspberry Pi 2


But to make it even more challenging/interesting we ordered a couple of extra sensors:
- Magnetic contact switches (door sensors) [details]
- Fast Vibration sensors (easy to trigger) [details]
- Motion sensors [details]
- Electret Microphone Amplifiers (to detect sounds) [details]
In total we spent around € 150,- per sensor station (including the Raspberry Pi).
Extra sensors


Within the following weeks we will blog about the following subjects of our IoT project:
- Setting up the Raspberry Pi with the sensors
- Reading the sensors with .NET
- Sending the data to the Azure IoT Hub
- Setting up Stream Analytics
- Creat reports in PowerBI

Joost, Mark, Menno and Ricardo


IoT Adventure: 1 - Setting up Raspberry Pi with sensors
IoT Adventure: 2 - Preparing development machine
IoT Adventure: 3 - Create Visual Studio Project for sensors
IoT Adventure: 4 - Sending sensor data to Azure IoT hub