CaseHow do I process my Azure Analysis Services (AAS) within Azure Data Factory (ADF) when the firewall of AAS is turned on? I 'm getting the following error:
Cannot connect to server 'bitools'. Client with IP Address '40.74.24.250' is not allowed to access the server. To enable access, use the Firewall settings in Azure Management Portal. It may take up to 5 minutes for this change to take effect. More information on configuring firewall and setting IP address ranges can be found here: https://go.microsoft.com/fwlink/?linkid=2099963
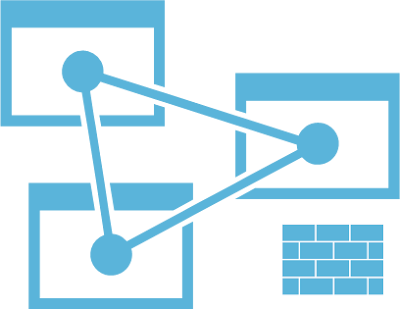 |
Azure Anaylis Services with firewall turned on
|
SolutionWithin ADF you have two options. The first option is to add the
IP addresses of ALL data factories within your region to the firewall of AAS. You can download a list and add those IP addresses to the firewall. You could even schedule a powershell script to do that for you to keep your firewall up-to-date in case the list changes. A downside could be that now a lot of data factories can access your AAS.
The second option is to retrieve the public IP address of your current ADF during runtime and then add it temporarily to the firewall of AAS. Note that this is a first attempt which still needs some improvement and testing to make it future proof. First a picture of the solution and then detailed steps of each activity.
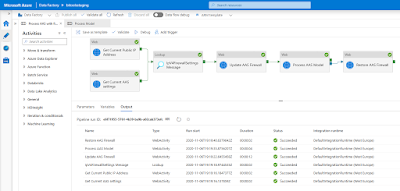 |
The solution
|
1) Add ADF as contributer to AAS
Since we will chance the service settings of AAS from within ADF, we will need to use Access control (IAM) to make our ADF a contributor for the AAS where we want to change the firewall. Note that this step will not give ADF access to the models, but only to the service.
- Go to your AAS in the Azure portal
- In the left menu click on Access control (IAM)
- Click on + Add and choose Add role assignment
- In the new Add role assignment pane select Contributor as Role
- In the Assign access to dropdown select Data Factory
- Select the right Subscription
- And then Select your Data Factory and click on the Save button
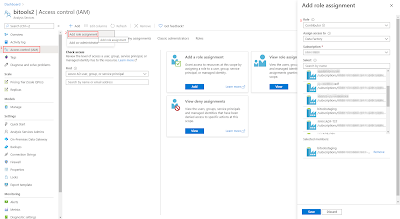 |
| Add ADF as Contributor to AAS |
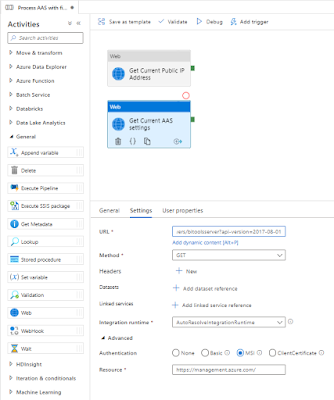
2) Get Current Public IP Address of ADF
Now back to ADF. You can execute a webrequest to one of the many public services to retrieve the public IP address of the ADF server that runs your pipeline:
- https://icanhazip.com
- https://ident.me
- https://ifconfig.me/ip
- https://ipinfo.io/ip
- http://smart-ip.net/myip
Now the steps to take:
- Create a new pipeline in ADF and add a Web activity
- Give the activity a descriptive name because we need it in a subsequent activity
- Add one of the above web addresses as URL on the Settings tab
- The last step is to select GET as method
In a subsequent activity that is connected to this Web activity we use the follow expression to retrieve the IP Address: @activity('Get Current Public IP Address').output.Response
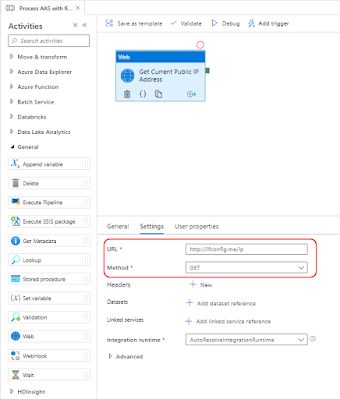 |
Get Public IP address of ADF
|
3) Get Current AAS settings
The Rest API that sets the firewall settings of AAS can unfortunately not add a single firewall rule. Instead it will delete all rules and then add news ones. To avoid other services or persons losing access to the AAS server we first need to retrieve the current settings. This is done via a Rest API. Therefore the first step is to determine the Rest API URL. Replace in the string below, the <xxx> values with the subscription id, resourcegroup name and servername of your Analysis Services. The Rest API method we will be using is '
Get Details':
https://management.azure.com/subscriptions/<xxx>/resourceGroups/<xxx>/providers/Microsoft.AnalysisServices/servers/<xxx>?api-version=2017-08-01
Example:
https://management.azure.com/subscriptions/aaaa-bbbb-123456-cccc/resourceGroups/RG_production/providers/Microsoft.AnalysisServices/servers/bitoolsserver?api-version=2017-08-01
Add a second Web activity to the pipeline
- Give the activity a descriptive name because we need it in a subsequent activity
- Add the above web address as URL on the Settings tab
- Next select GET as method
- Under Advanced set Authentication to MSI
- Set Resource to https://management.azure.com/
The Rest API will return a JSON message with ALL the settings of the service, including the firewall rules. In a next step we can retrieve these settings with the following expression:
@STRING(activity('Get Current AAS settings').output)
 |
Retrieve AAS Service settings
|
4) Merge current firewall settings with new ip address
In this step we will merge the current firewall settings (from step 3) with the runtime ip address of ADF (from step 2). Unfortunately the expression language of ADF is not that extensive (yet). For example the
indexof expression does not have a search starting position. Therefore for now we have chosen to merge those two with a little Stored Procedure. But please share your suggestion for alternatives in the comments.
First add the following Stored Procedure to one of your Azure SQL databases. It will return both the current firewall setting part of the entire JSON and the new adjusted firewall part. That first one can be used to restore the settings as final step.
T-SQL Stored Procedure
CREATE PROCEDURE [dbo].[UpdateIpV4FirewallSettings]
(
	@jsonmessage nvarchar(max)
,	@firewallRuleName nvarchar(50)
,	@ipAddress nvarchar(20)
)
AS
BEGIN
	-- =============================================
	-- Recieves the current AAS settings as a JSON
	-- message and extracts the firewall settings
	-- from it. Then the firerullname and the ip
	-- address are added.
	--
	-- The select query returns the new and old
	-- firewall settings to update and restore
	-- afterwards.
	-- =============================================

	SELECT	CAST(
				SUBSTRING(@jsonmessage, 1, 15) + -- properties
				SUBSTRING(@jsonmessage, CHARINDEX('"ipV4FirewallSettings":',@jsonmessage , 1), CHARINDEX(']',@jsonmessage , CHARINDEX('"ipV4FirewallSettings":',@jsonmessage , 1)) - CHARINDEX('"ipV4FirewallSettings":',@jsonmessage , 1)) + -- oldfirewallrules
				iif(CHARINDEX('"firewallRuleName":"' + @firewallRuleName, @jsonmessage , 1) > 0 OR CHARINDEX(@ipAddress, @jsonmessage , 1) > 0,'',',{"firewallRuleName":"' + @firewallRuleName +'","rangeStart":"' + @ipAddress + '","rangeEnd":"' + @ipAddress + '"}') + -- newfirewallrules
				SUBSTRING(@jsonmessage,CHARINDEX('],"enablePowerBIService":',@jsonmessage , 1), CHARINDEX('}',@jsonmessage , CHARINDEX('],"enablePowerBIService":',@jsonmessage , 1)) - CHARINDEX('],"enablePowerBIService":',@jsonmessage , 1) + 1) + -- powerbirules
				'}}' -- end
			as nvarchar(4000))
			as NewFirewallSettings
	,		CAST(
				SUBSTRING(@jsonmessage, 1, 15) + -- properties
				SUBSTRING(@jsonmessage, CHARINDEX('"ipV4FirewallSettings":',@jsonmessage , 1), CHARINDEX(']',@jsonmessage , CHARINDEX('"ipV4FirewallSettings":',@jsonmessage , 1)) - CHARINDEX('"ipV4FirewallSettings":',@jsonmessage , 1)) + -- oldfirewallrules
				SUBSTRING(@jsonmessage,CHARINDEX('],"enablePowerBIService":',@jsonmessage , 1), CHARINDEX('}',@jsonmessage , CHARINDEX('],"enablePowerBIService":',@jsonmessage , 1)) - CHARINDEX('],"enablePowerBIService":',@jsonmessage , 1) + 1) + -- powerbirules
				'}}' -- end
			as nvarchar(4000))
			as oldFirewallSettings
END
Now back to the pipeline to merge the json message and the ip address. We will solve this by calling the above Stored Procedure within a Lookup activity.
- Add the Look up activity and give it a descriptive name (we need it in the next step)
- Connect both previous activities to this new activity (in parallel, see screenshot)
- Go to the settings tab and select the (/ create a) Source dataset that connects to the Azure SQL Database that contains the above Stored Procedure
- Select Stored Procedure under Use query
- Select the new Stored Procedure under Name
- Hit the Import parameter button to add three string parameters
- Enter the following expressions
- firewallRuleName - @concat('ADF-',pipeline().DataFactory)
- ipAddress - @activity('Get Current Public IP Address').output.Response
- jsonmessage - @STRING(activity('Get Current AAS settings').output)
The output of this activity will be use in the next activity:
@activity('IpV4FirewallSettings Message').output.firstRow.NewFirewallSettings
@activity('IpV4FirewallSettings Message').output.firstRow.OldFirewallSettings
 |
Lookup Activity calling Stored Procedure
|
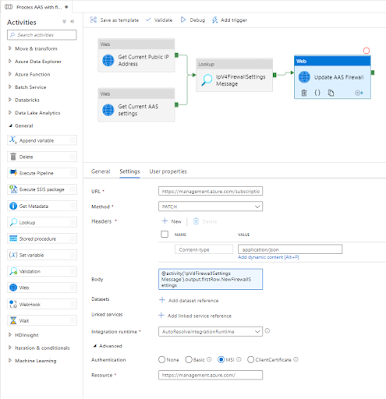
5) Update AAS FirewallIn this step we will update the firewall settings of AAS to allow ADF to process the tabular model. This is done via a Rest API call of the
Update method within a Web activity. This is exactly the same URL as step 3. Copy it
Add an other Web activity to the pipeline and connect it to the last activity (see screenshot).
- Give the activity a descriptive name
- Add the web address from step 3 as URL on the Settings tab
- Next select PATCH as method (instead of GET like in step 3)
- Click on + New after Headers to add a new header
- Use Content-type as Name
- Use application/json as Value
- As body we will use the NewFirewallSettings from the previous step:
@activity('IpV4FirewallSettings Message').output.firstRow.NewFirewallSettings - Under Advanced set Authentication to MSI
- Set Resource to https://management.azure.com/
 |
Update AAS Firewall
|
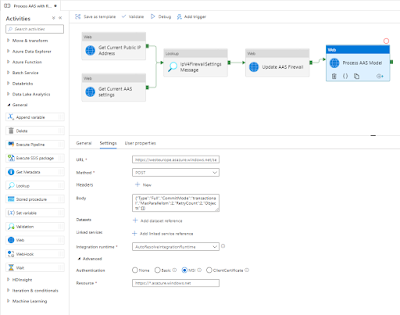
6) Process AAS model
Finally we can do the actual processing of the tabular model. Since we all ready
described this in detail in a previous post you have to take a little trip to that post. Make sure to connect the new Web activity to the last activity in the pipeline (see screenshot).
 |
Process AAS tabular model
|
7) Update AAS Firewall
The last step is to restore the firewall settings so this ADF server will no longer have access to your AAS. The steps are almost identical to step 5 with two differences. Copy and paste that Web activity and connect it to the process activity, but then change the green Success line to a blue completion line. Then it will always restore the firewall settings even if the process fails.
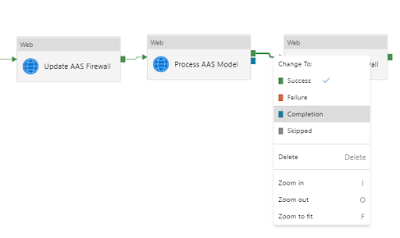 |
Change the dependency condition between the activities
|
Next change is the Body property on the Settings pane. Change it to retrieve the OLD firewall settings:
@activity('IpV4FirewallSettings Message').output.firstRow.OldFirewallSettings
 |
Restore AAS firewall
|
Summary
In this post you saw a (experimental) solution to handle the firewall problem: adding the IP address of a shared service/server to your AAS firewall. This is especially necessary when your service doesn't support VNET (like AAS).
There is still a lot of room for improvements. In particular the merge part in step 4. An other concern is that the activities of one pipeline could be executed by multiple ADF servers (each having there own ip address).
Feel free to experiment with this solution and leave your suggestions for improvements in the comments below. However don't use it in a production environment... or do it at your own risk.
I a feature post we will download the JSON file with Azure IP Address and at those to the firewall.


