Showing posts with label DEVOPS. Show all posts

Saturday 31 December 2022

Cleanup Synapse before deployment

Case
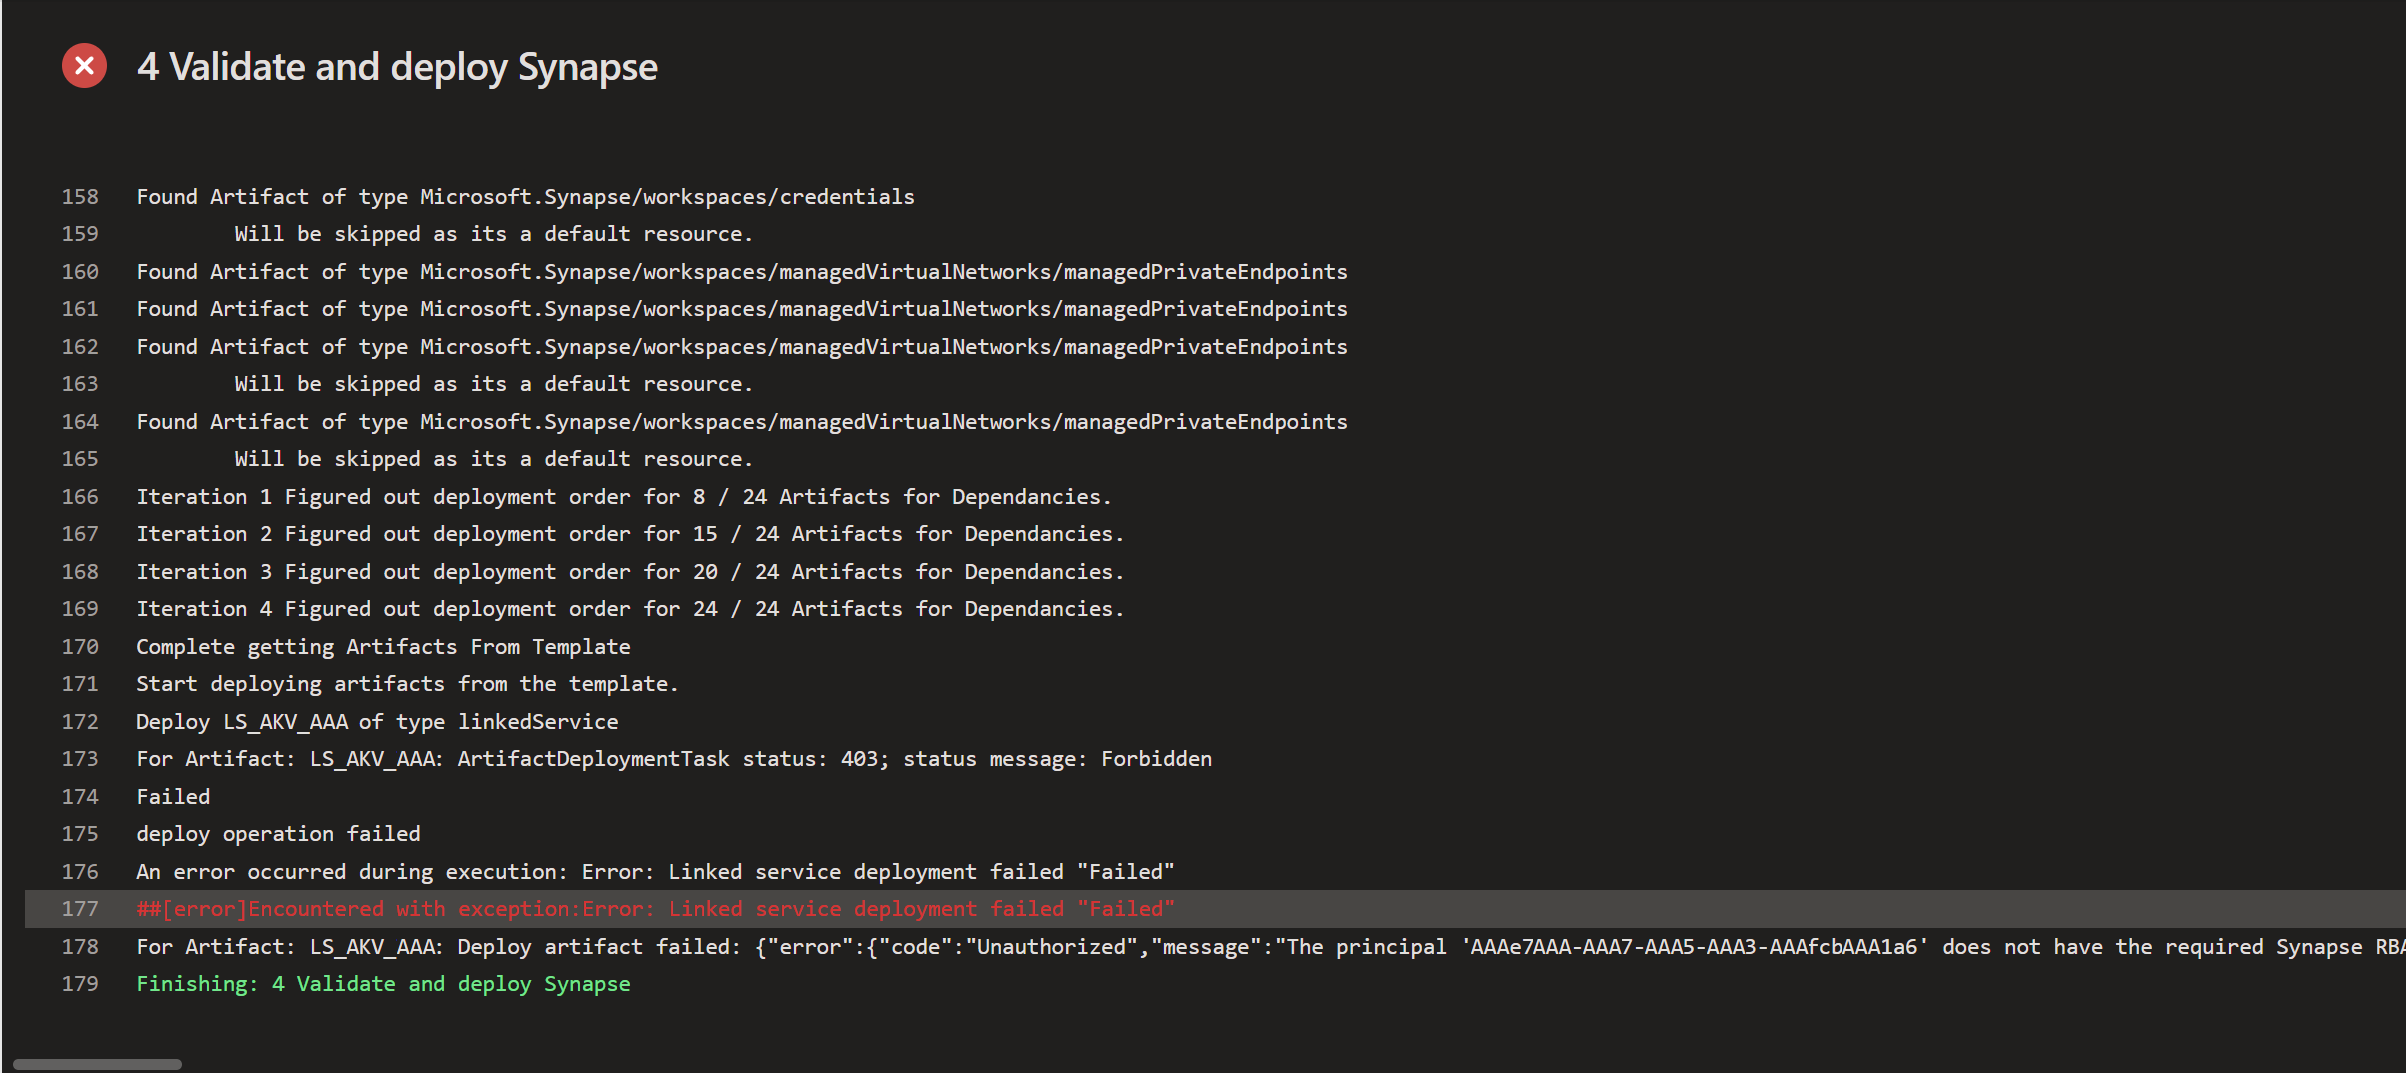
We are using the Synapse workspace deployment add on for deploying Synapse to the next environment, but when I remove a pipeline/dataset/linked service/trigger in development it doesn't get deleted in Test, Acceptance or Production. There is a pre- and post-deployment script for Data Factory by Microsoft, but where is the Synapse version of it?
Clean Synapse Workspace before deployment


Update: use DeleteArtifactsNotInTemplate: true in deployment task to avoid powershell

Solution
The deployment add on just deploys a new version over an existing version. Therefore deleted parts will remain in your workspace. For most parts this is ugly and annoying, but if obsoleet triggers are still executing pipelines it could screwup your ETL proces. 

Below you will find a first version of a Powershell script that first removes all pipelines, datasets, linked services and triggers before deploying a new version of your Synapse workspace from the repository.

Note: Pipelines that are called by other pipelines can't be deleted. So you first need to delete the parent pipeline before you can delete the child pipeline. The scripts skips those child pipelines and continous with the rest. After this first delete iteration a lot of parent pipelines wont exist any more and allow you to remove the child pipelines in a second iteration. This is done in a loop and that loops stops after a100 iterations. So don't create a monstrous tree of pipelines calling each other (and especially don't create loops of pipelines calling each other). The same trick is used for Linked Services. If you have for example a Key Vault Linked Service that is used in an other Linked Service then you first need to delete that second Linked Service before you can delete the Key Vault Linked Service.

param (

   [Parameter (Mandatory = $true, HelpMessage = 'Synapse name')]
   [ValidateNotNullOrEmpty()]
   [string] $WorkspaceName,
   
   [Parameter (Mandatory = $true, HelpMessage = 'Resourcegroup name')]
   [ValidateNotNullOrEmpty()]
   [string] $ResourceGroupName 
)

[string] $WorkspaceDefaultSqlServer = "$($WorkspaceName)-WorkspaceDefaultSqlServer"
[string] $WorkspaceDefaultSqlStorage = "$($WorkspaceName)-WorkspaceDefaultStorage"


#######################################################
# 1) Checking for resource locks and removing them
#######################################################
Write-Output "========================================"
Write-Output "1) Getting resource locks"
# Getting all locks on the Azure Synapse Workspace
$lock = Get-AzResourceLock -ResourceGroupName $ResourceGroupName -ResourceName $WorkspaceName -ResourceType "Microsoft.Synapse/workspaces"

# Looping through all locks to remove them one by one
Write-Output "========================================"
Write-Output "Remove resource locks"
if($null -ne $lock)
{
    $lock | ForEach-Object -process {
        Write-Output "Removing Lock Id: $($lock.LockId)"
        # Remove lock
        Remove-AzResourceLock -LockId $_.LockId -Force
    }
}


#######################################################
# 2) Stopping and removing all triggers
#######################################################
Write-Output "========================================"
Write-Output "2) Remove triggers"
# Getting all triggers from Synapse
$triggers = Get-AzSynapseTrigger -WorkspaceName $WorkspaceName
Write-Output "Found $($triggers.Count) triggers"

# Stopping all triggers before deleting them
$triggers | ForEach-Object -process { 
    Write-Output "Stopping trigger $($_.name)"
    try {
        # Trying to stop each trigger
        Stop-AzSynapseTrigger -WorkspaceName $WorkspaceName -Name $($_.name) -ErrorAction Stop
    }
    catch {
        if ($_.Exception.Message -eq "{}") {
            Write-Output "Trigger stopped"
           # $_.Exception
        }
        else {
            Write-Output "Throw"
            Throw $_
        }
    }
    # Remove trigger
    Remove-AzSynapseTrigger -Name $_.name -WorkspaceName $WorkspaceName -Force
}


#######################################################
# 3) Removing all pipelines
#######################################################
Write-Output "========================================" 
Write-Output "3) Remove pipelines"
# Getting all pipelines from Synapse
$pipelines = Get-AzSynapsePipeline -WorkspaceName $WorkspaceName | Sort-Object -Property id
Write-Output "Found $($pipelines.Count) pipelines"

# Trying to delete all pipelines. If a pipeline is still referenced
# by an other pipeline it will continue to remove other pipelines 
# before trying to remove it again... max 100 times. So don't create
# chains of pipelines that are too long
[int] $depthCount = 0
while ($pipelines.Count -gt 0 -and $depthCount -lt 100)
{
    Write-Output "$($pipelines.Count) pipelines left"
    $pipelines | ForEach-Object -process { 
        Write-Output "Trying to delete pipeline $($_.name)"
        Remove-AzSynapsePipeline -Name $_.name -WorkspaceName $WorkspaceName -Force -ErrorAction SilentlyContinue
    }
    Start-Sleep 2 
    $depthCount += 1
    $pipelines = Get-AzSynapsePipeline -WorkspaceName $WorkspaceName
}
Write-Output "Depthcount: $depthCount"
if ($depthCount -eq 100)
{
    throw "Depthcount is to high!"
}


#######################################################
# 4) Removing all notebooks
#######################################################
Write-Output "========================================"
Write-Output "4) Remove notebooks"
# Getting all notebooks from Synapse
$notebooks = Get-AzSynapseNotebook -WorkspaceName $WorkspaceName
Write-Output "Found $($notebooks.Count) notebooks"

# Loop through all notebooks to delete them
$notebooks | ForEach-Object -process {
    Write-Output "Deleting notebooks $($_.Name)"
    Remove-AzSynapseNotebook -Name $($_.Name) -WorkspaceName $WorkspaceName -Force
}


#######################################################
# 5) Removing all SQL scripts
#######################################################
Write-Output "========================================"
Write-Output "5) Remove SQL scripts"
# Getting all scripts from Synapse
$sqlscripts = Get-AzSynapseSqlScript -WorkspaceName $WorkspaceName
Write-Output "Found $($sqlscripts.count) SQL-scripts"

# Loop through all SQL scripts to delete them
$sqlscripts | ForEach-Object -Process {
    Write-Output "Deleting SQL-script $($_.Name)"
    Remove-AzSynapseSqlScript -Name $($_.Name) -WorkspaceName $WorkspaceName -Force
}


#######################################################
# 6) Removing all datasets
#######################################################
Write-Output "========================================"
Write-Output "6) Remove datasets"
# Getting all datasets from Synapse
$datasets = Get-AzSynapseDataset -WorkspaceName $WorkspaceName
Write-Output "Found $($datasets.Count) datasets"

# Loop through all datasets to delete them
$datasets | ForEach-Object -process { 
    Write-Output "Deleting dataset $($_.name)"
    Remove-AzSynapseDataset -Name $_.name -WorkspaceName $WorkspaceName -Force
}


#######################################################
# 7) Removing all linked services
#######################################################
Write-Output "========================================"
Write-Output "7) Collecting Linked services"
# Getting all linked services from Synapse, except the two default ones
$lservices = Get-AzSynapseLinkedService -WorkspaceName $WorkspaceName | Where-Object {($_.Name -ne $WorkspaceDefaultSqlServer -and  $_.Name -ne $WorkspaceDefaultSqlStorage) } 
Write-Output "Found $($lservices.Count) linked services"

# Trying to delete all linked services. If a linked service is still
# referenced by an other linked service it will continue to remove 
# other linked services before trying to remove it again... 
# max 100 times. Example: KeyVault linked services
$depthCount = 0
while ($lservices.Count -gt 0 -and $depthCount -lt 100)
{
    Write-Output "$($lservices.Count) linked services left"
    $lservices | ForEach-Object -process { 
        Write-Output "Trying to delete linked service $($_.name)"
        Remove-AzSynapseLinkedService -Name $_.name -WorkspaceName $WorkspaceName -Force -ErrorAction Continue
    }

    Start-Sleep 2 
    $depthCount += 1
    $lservices = Get-AzSynapseLinkedService -WorkspaceName $WorkspaceName | Where-Object {($_.Name -ne $WorkspaceDefaultSqlServer -and  $_.Name -ne $WorkspaceDefaultSqlStorage) }
}
Write-Output "Depthcount: $depthCount"
if ($depthCount -eq 100)
{
    throw "Depthcount is to high!"
}
Write-Output "========================================"


You need to store this Powershell file in the repository as ClearSynapse.ps1. In this case we created a CICD folder in the root of the repository and within that folder we created a Powershell subfolder for all our PowerShell files. Then you can call this script in your YAML pipeline just before you do the deployment part. Make sure your service connection (Service Principal) has enough rights within the workspace. For the first post we used the Synapse Artifact Publisher role to minimize access. For running this script your Service Principal needs more: Synapse Administrator.
           ###################################
            # 4 Cleanup Synapse
            ###################################
            - task: AzurePowerShell@5
              displayName: '4 Cleanup Synapse'
              inputs:
                azureSubscription: ${{ parameters.ServiceConnection }}
                scriptType: filePath
                scriptPath: $(Pipeline.Workspace)\s\CICD\Powershell\ClearSynapse.ps1
                scriptArguments:
                  -WorkspaceName ${{ parameters.TargetWorkspaceName }} `
                  -ResourceGroupName ${{ parameters.ResourceGroupName }} `
                azurePowerShellVersion: latestVersion
                pwsh: true
                
           ###################################
            # 5 Validate and Deploy Synapse
            ###################################
            - task: Synapse workspace deployment@2
              displayName: '5 Validate and deploy Synapse'
              inputs:
                operation: validateDeploy
                ArtifactsFolder: '$(Pipeline.Workspace)/SynapseArtifact'
                azureSubscription: ${{ parameters.ServiceConnection }}
                ResourceGroupName: ${{ parameters.ResourceGroupName }}
                TargetWorkspaceName: ${{ parameters.TargetWorkspaceName }}
                OverrideArmParameters: '
                  -LS_AKV_MyKeyVault_properties_typeProperties_baseUrl                  https://${{ parameters.KeyVaultName }}.vault.azure.net/
                  '
Conclusion
In this post you learned how to cleanup Synapse with a little PowerShell script. This scripts works perfectly, but is a litte rough by just deleting all basic parts of your workspace (pipelines, datasets, linked services and triggers). A next / nicer version it will just delete everything that is in the Synapse Workspace but isn't in the repositorty (after the deployment).

Deleting stuff before deploying new stuff also makes is almost mandatory to use at least 3 environments because when your deployment fails you are left with an almost empty Synapse workspace. So an extra enviroment between development and production will prevent most deployment screwups.

Thank you Walter ter Maten for improving the script with the delete iterations.

Sunday 18 December 2022

ADF Snack - Global parameters deployment resets Networking settings

Case
After deployment of Azure Data Factory (ADF) via Azure DevOps pipelines, I noticed that the Network Access settings has been changed from "Private endpoint" to "Public endpoint". How can we prevent this overwrite during deployment?

Azure portal - Networking settings of ADF


Solution
For this we need to make use of the new mechanism to include global parameters in your ARM template, instead of the old mechanism via de GUI ('Manage' - 'Author' - 'Global Parameters'). 

ADF portal - Old mechanism to include global parameters


Another solution that is part of the old mechanism, this PowerShell script, has already been updated and includes now the following code that is necessary to fix this.
Set-AzDataFactoryV2 -InputObject $dataFactory -Force -PublicNetworkAccess $dataFactory.PublicNetworkAccess
1) Include global parameters in ARM template
The first step is to include the global parameters on a different place then in the past. Go to "Manage", then "Source control" and click on "ARM template". Check the box to include the parameters.


ADF portal - New mechanism to include global parameters


2) Edit parameter configuration
Next we need to add some additional code to the ARM template parameter definition file. The location where to include the global parameters has changed. 
"Microsoft.DataFactory/factories/globalparameters": {
     "properties": {
             "*": { 
                 "value": "=" 
             }
     }
},
The file will now look like something like this. You can remove the old global parameter configuration "Microsoft.DataFactory/factories" if you want, but for now I keep this to show the difference.

ADF portal - Result of edit parameter configuration


Click here for more information and the current default parameterization template.

3) Change release pipeline
If you are using YAML to publish the changes, the only thing you have to edit is the overrideParameters property for the following task:
AzureResourceManagerTemplateDeployment@3.

Search the following part of your global parameters code.
dataFactory_properties_globalParameters_
Replace this with the following code.
default_properties_
This part of your code will now look like something like this.
overrideParameters: > 
  -default_properties_GP_AzureSynapseServerName_value $(AzureSqlDedicatedPoolServerName) 
  -default_properties_GP_AzureSynapseDatabaseName_value $(AzureSqlDedicatedPoolName) 
  -default_properties_GP_AzureResourceGroupName_value $(AzureResourceGroupName) 
  -default_properties_GP_AzureSubscriptionId_value $(AzureSubscriptionId) 
  -default_properties_GP_AzureKeyvaultSecretsURL_value $(AzureKeyVaultUrl) 

Conclusion
In this post you learned how to use the new mechanism to include global parameters in your ARM template for Azure Data Factory. Besides resolving the issue where the endpoint settings has been changed after a deployment, it will also be a future proof solution. For now Microsoft continue the support of the old mechanism, but the question (as always) is for how long.

Saturday 12 November 2022

Deploy Azure SQL Databases via a DevOps pipeline

Case
A while ago we did a post about deploying an Azure SQL Database via Azure DevOps using the deployment pipelines. Since that post we mostley used YAML pipelines. So in this post an update on how to accomplish the same with a YAML pipeline.
Deploy Azure SQL DB with DevOps


Solution
The starting point of this post is that you have a Visual Studio database project connected to the DevOps repository.

1) Variable Groups
First we start with some variable groups to parameterize the YAML code. For this example we have one General variable group with variables like the (visual studio) projectname, databasename and service connection (if each environment uses the same service connection). Then there are also variable groups per environment (Development, Test, Acceptance, Production) with variables like the SQL Server name and service connection (if each environment uses a different service connection).
Pipelines > Library > Variable Groups


Whether you need a variable group for DEV depends on how you do your SQL development. Some teams do the development in the central development database and use the compare option in Visual Studio to update the SQL project. In that case you don't want to deploy the project to the DEV database.
Example of variables in variable groups


2) Environments
Second preparation step is the creation of enviroments. This allows you to add approvals and checks for specific environments. You probably want some approvals before you update your production environment. You can reuse these environments for other deployments like ADF, Synapse or Power BI.

Pipelines > Environments


Same note about the DEV environment as in the previous step. If you don't deploy to DEV then you don't need the 'Devploy to DEV' environment.

3) Repos folder structure
Our folder structure in the repos is as follows (if you use a different structure you need to adjust the YAML to it). We have a SQL folder with a subfolder for our Visual Studio database project. The name of the project/folder is stored in the variable group (see step 1). We also have a CICD folder in the root where we store everything that is deployment related. For SQL deployment we only have a subfolder called YAML for the pipelines, but for other deployments we also have a subfolder for PowerShell scripts.
Folder structure of repos


In the YAML folder we have a BuildSQL.yml and this is the main pipeline file that you will be using to add a new pipeline. It calls DeploySQL.yml once for each environment.

4) Build pipeline
Lets explain the YAML of the build pipeline. It first starts by adding the general variable group to the pipeline so that you are able to use those variables from step 1.

Next is the trigger that shows you when the pipeline will be started. In this example it listens to changes in multiple branches, but only when those changes happen in the SQL folder. This part will be different per branche strategy.

Then we have the stages. The first stage is de build stage where the artifact is created and published for later use. In the Job part we have two noteworthy items: workspace clean will first clean your agent before starting. This is handy if you have a self-hosted agent instead of a Microsoft hosted agent. The agent pool that will be used is the second important part. Name is voor self-hosted agents and vmImage is for Microsoft hosted agents.

Then the steps withing the first stage.
  1. Checkout will retrieve the repository content to your agent. We need the visual studio project on the agent to build it.
  2. The treeview step is an optional debug step to show you where the files are on your agent after the checkout. It makes it easier to specify the paths in the next steps. You can remove it or comment it out when your are ready with your pipeline.
  3. The MSBuild step will build your SQL project and create a dacpac file which you need for deployment. This is equals to building your project within Visual Studio. If you have a self-hosted agent you will need to either install Visual Studio or msbuild on your VM.
  4. The Copy step copies the generated dacpac file to a stage folder, but also copies the publish file with settings for publishing your project.
  5. The last step is to publish the copied files as an artifact
The last stages of this YAML file are copies of each other and then slitly changed for the enviroment specific settings. You can add or remove stages if you have more or less environments.

In these stages you first see that the environment specific variable group is added to the pipeline and it shows which agent will be used for the deployment. If your Azure SQL server only uses private endpoints then the self-hosted agent is required because the Microsoft hosted agents won't be able to connect to your server.

The condition part in this example is optional and depends on the branch strategy. Remove that line if you don't use multiple branches for deployment. The last part of these stages is calling the second YAML file and passing values from the specifi variable group as parameters to the second YAML file.

###################################
# General Variables
###################################
variables:
  - group: SQLParamsGen


###################################
# When to create a pipeline run
###################################
trigger:
  branches:
    include:
    - Development
    - Acceptance
    - main
  paths:
    include:
    - SQL/*

stages:
###################################
# Create DacPac Artifcat
###################################
- stage: CreateSQLArtifact
  displayName: Create SQL Artifact (dacpac)

  jobs:
  - job: Job
    displayName: 'Build DacPac'
    workspace:
      clean: all
    pool:
      name: DataPlatform
      # vmImage: 'windows-latest' 
    steps:

    ###################################
    # 1 Retrieve Repository
    ###################################
    - checkout: self
      displayName: '1 Retrieve Repository'
      clean: true

    ###################################
    # 2 Show treeview of agent
    ###################################
    - powershell: |
        Write-Output "Dit is de tree omgeving"
        tree "$(Pipeline.Workspace)" /F
      displayName: '3 Treeview Workspace and ArmTemplateOutput content '

    ###################################
    # 3 Build Visual Studio project
    ###################################
    - task: MSBuild@1
      displayName: '3. Creating Artifact'
      inputs:
        solution: '$(System.DefaultWorkingDirectory)/SQL/$(SqlProjectName)/$(SqlProjectName).sqlproj'
        msbuildArchitecture: x86
        msbuildVersion: latest

    ###################################
    # 4 Stage dacpac and publish
    ###################################
    - task: CopyFiles@2
      displayName: '4. Copy Artifact'
      inputs:
        contents: |
          **\*.dacpac
          **\*.publish.xml
        TargetFolder: '$(build.artifactstagingdirectory)'

    ###################################
    # 5 Publish dacpac and xml artifact
    ###################################
    - task: PublishPipelineArtifact@1
      displayName: '5. Publish Artifact'
      inputs:
        targetPath: '$(Build.ArtifactStagingDirectory)'
        artifact: 'SQL_Dacpac'
        publishLocation: 'pipeline'


###################################
# Deploy Dev environment
###################################
- stage: DeployDev
  displayName: Deploy DEV
  variables:
    - group: SQLParamsDev
  pool:
    name: DataPlatform
    # vmImage: 'windows-latest'
  condition: eq(variables['Build.SourceBranchName'], 'Development')
  jobs:
    - template: DeploySQL.yml
      parameters:
        env: DEV
        ServiceConnection: $(ServiceConnection)
        SqlServerName: $(SqlServerName)
        SqlDatabaseName: $(SqlDatabaseName)
        SqlProjectName: $(SqlProjectName)


###################################
# Deploy Acc environment
###################################
- stage: DeployAcc
  displayName: Deploy ACC
  variables:
    - group: SQLParamsAcc
  pool:
    name: DataPlatform
    # vmImage: 'windows-latest'
  condition: eq(variables['Build.SourceBranchName'], 'Acceptance')
  jobs:
    - template: DeploySQL.yml
      parameters:
        env: ACC
        ServiceConnection: $(ServiceConnection)
        SqlServerName: $(SqlServerName)
        SqlDatabaseName: $(SqlDatabaseName)
        SqlProjectName: $(SqlProjectName)


###################################
# Deploy Prd environment
###################################
- stage: DeployPrd
  displayName: Deploy PRD
  variables:
    - group: SQLParamsPrd
  pool:
    name: DataPlatform
    # vmImage: 'windows-latest'
  condition: eq(variables['Build.SourceBranchName'], 'Main')
  jobs:
    - template: DeploySQL.yml
      parameters:
        env: PRD
        ServiceConnection: $(ServiceConnection)
        SqlServerName: $(SqlServerName)
        SqlDatabaseName: $(SqlDatabaseName)
        SqlProjectName: $(SqlProjectName)
5) Deploy pipeline
The second YAML file does the deployment of the dacpac to your Azure SQL Database. It starts with the YAML parameters. You can specify allowed values or default values for your parameters.

The job part specifies which enviroment you want to use (see step 2) and then the steps of the deployment:
  1. The checkout retrieves to files from the repos to the agent. For this example it is not necessary, but if you perform some extra steps like executing a PowerShell then you need this to get the PowerShell file to your agent.
  2. The treeview step is an optional debug step to show you where the artifact files are on your agent. You can remove it or comment it out when you don't need it anymore.
  3. The SqlAzureDacpacDeployment@1 is the actual deployment step for the dacpac and it also adds the publish profile file. If you don't use a publish profile then remove that line. Note that if you are using a self-hosted agent then you need to install SqlPackage.exe on that VM for this step.
###################################
# Parameters
###################################
parameters:
  - name: env
    displayName: Enviroment
    type: string
    values: 
    - DEV
    - ACC
    - PRD
  - name: ServiceConnection
    displayName: Service Connection
    type: string
  - name: SqlServerName
    displayName: Sql Server Name
    type: string
  - name: SqlDatabaseName
    displayName: Sql Server Name
    type: string
  - name: SqlProjectName
    displayName: Sql Project Name
    type: string


jobs:
  - deployment: deploymentjob${{ parameters.env }}
    displayName: Deployment Job ${{ parameters.env }} 
    environment: Deploy to ${{ parameters.env }}
    strategy:
      runOnce:
        deploy:
          steps:
          ###################################
          # 1 Check out repository to agent
          ###################################
          - checkout: self
            displayName: '1 Retrieve Repository'
            clean: true 
 
          ###################################
          # 2 Show environment and treeview
          ###################################
          - powershell: |
              Write-Output "Deploying ${{ parameters.SqlProjectName }} to DB ${{ parameters.SqlDatabaseName }} and server ${{ parameters.SqlServerName }} in the ${{ parameters.env }} environment"
              tree "$(Pipeline.Workspace)" /F
            displayName: '2 Show environment and treeview Pipeline_Workspace'

          ###################################
          # 3 Deploy DacPac
          ###################################             
          - task: SqlAzureDacpacDeployment@1
            displayName: '3 Deploy DacPac' 
            inputs:
              azureSubscription: '${{ parameters.ServiceConnection }}'
              AuthenticationType: 'servicePrincipal'
              ServerName: '${{ parameters.SqlServerName }}.database.windows.net'
              DatabaseName: '${{ parameters.SqlDatabaseName }}' 
              deployType: 'DacpacTask'
              DeploymentAction: 'Publish'
              DacpacFile: '$(Pipeline.Workspace)/SQL_Dacpac/SQL/${{ parameters.SqlProjectName }}/bin/debug/${{ parameters.SqlProjectName }}.dacpac'
              PublishProfile: '$(Pipeline.Workspace)/SQL_Dacpac/SQL/${{ parameters.SqlProjectName }}/${{ parameters.SqlProjectName }}.publish.xml'
              IpDetectionMethod: 'AutoDetect'


6) Azure DevOps Service Connection
Make sure you have a DevOps Service Connection (type Azure Resource Manager) and also make sure that your Azure SQL Server uses Azure Active Directory authentication (see your server in the Azure Portal and then go to Azure Active Directory in the left menu to check it).
Azure DevOps Project Service Connection


The Service Principal behind this Service Connection should be either a member of the Azure Active Directory group that is specified under Azure Active Directory admin on that page or...
Azure Active Directory authentication with AAD group


... or you can add the Service Principal as an user with a TSQL command
-- Add your Azure AD Service Principal as external to SQL DB
CREATE USER [YourServicePrincipal] FROM EXTERNAL PROVIDER;

-- Add db_owner role to your Service Principal
ALTER ROLE [db_owner] ADD MEMBER [YourServicePrincipal]
If you don't have a Service Principal then it is also possible to use a SQL database user. Please see the documentation of the Azure SQL Database deployment v1 task for that.

7) Testing
Now go to pipelines and add a new YAML pipeline based on an existing YAML file in your repository and select the BuildSQL.yml file. Then either run it manually or change something in your database project in the repos to trigger pipeline.
Run your new SQL Deployment pipeline


Conclusion
In this post you learned how to deploy your Azure SQL Databases with a YAML pipeline in Azure DevOps. Note that if you don't have public endpoints on your Azure SQL Server that you will need a self-hosted agent in your Azure subscription (a Virtual Machine with Devops software) because the Microsoft hosted agents will use public endpoints. This will be described a next post.

Update when you get a Get-SpnAccessToken is obsolete warning during deployment then check this solution.

Monday 7 November 2022

Create Data Lake containers and folders via DevOps

Case
I need a process to create Azure Data Lake containers throughout my DTAP environment of my Azure Data Platform. Manually is not an option because we want to minimize owner and contributor access to the Data Lake of acceptance and production, but Synapse and Data Factory don't have a standard activity to create ADL containers. How to automatically create Azure Data Lake Containers (and folders) ?
Storage Account (datalake) containers


Solution
An option is to use a PowerShell script that is executed by the Custom activity in combination with an Azure Batch service. Or an Azure Automation runbook with the same PowerShell script that is executed by a Web(hook) activity.

However since you probably don't need create new containers during every (ADF/Synapse) pipeline run, we suggest to do this via an Azure Devops Pipeline as part of your CICD proces with the same PowerShell script. You could either create a separte CICD pipeline for it or integrate it in your Synapse or ADF pipeline.

The example below creates containers and optionaly also folders and subfolders within these container. Synapse and Data Factory will create folders with forexample the Copy Data activity

1) Repos folder structure
For this example we use a CICD folder in the repos with subfolders for PowerShell, YAML and Json.
Repos folder structure


2) JSON config
Because we don't want to hardcode the containers and folders we use a JSON file as input for the PowerShell script. This JSON file is stored within the JSON folder of the DevOps Repository. We use the same JSON file for the entire environment, but you can ofcourse create a separate file for each environment if you need for example different containers on production. Our file is called config_storage_account.json

The folder array in this example is optional and when left empty no folders will be created. You can create subfolders within folders by separating them with a forwardslash.
{
"containers":   {
                "dataplatform":["folder1","folder2/subfolder1","folder2/subfolder2"]
                , "SourceX":["Actual","History"]
                , "SourceY":["Actual","History"]
                , "SourceZ":[]
                }
}

3) PowerShell code
The PowerShell script called SetStorageAccounts.ps1 is stored in the PowerShell folder and contains three parameters:
  • ResourceGroupName - The name of the resource group where the storage account is located.
  • StorageAccountName - The name the storage account
  • JsonLocation - The location of the json config file in the repos (see previous step)
It checks the existance of both the config file and the storage account. Then first loop through the containers from the config and within the container loop it loops through the folders of that specific container. For container names and folderpaths it does some small corrections for often made mistakes.

Note that the script will not delete containers and folders (or set authorizations to them). This is of course possible, but make sure to test this very thoroughly and even with testing a human error in configuring the config file is easy to make and could cause lots of data lose!
# This PowerShell will create the containers provided in the JSON file
# It does not delete of update containers and folders or set authorizations
param (
    [Parameter (Mandatory = $true, HelpMessage = 'Resource group name of the storage account.')]
    [ValidateNotNullOrEmpty()]
    [string] $ResourceGroupName,

    [Parameter (Mandatory = $true, HelpMessage = 'Storage account name.')]
    [ValidateNotNullOrEmpty()]
    [string] $StorageAccountName,

    [Parameter (Mandatory = $true, HelpMessage = 'Location of config_storage_account.json on agent.')]
    [ValidateNotNullOrEmpty()]
    [string] $JsonLocation
 )

# Combine path and file name for JSON file. The file name is hardcoded and the
# same for each environment. Create an extra parameters for the filename if
# you need different files/configurations per environment.
$path = Join-Path -Path $JsonLocation -ChildPath "config_storage_account.json"
Write-output "Extracting containernames from $($path)"


# Check existance of file path on the agent
if (Test-Path $path -PathType leaf) {
    
    # Get all container objects from JSON file
    $Config = Get-Content -Raw -Path $path | ConvertFrom-Json

    # Create containers array for looping
    $Config | ForEach-Object { 
        $Containers = $($_.containers) | Get-Member -MemberType NoteProperty | Select-Object -ExpandProperty Name
    }
    
    # Check Storage Account existance and get the context of it
    $StorageCheck = Get-AzStorageAccount -ResourceGroupName $ResourceGroupName -Name $StorageAccountName -ErrorAction SilentlyContinue        
    $context = $StorageCheck.Context

    # If Storage Account found
    if ($StorageCheck) {
        # Storage Account found
        Write-output "Storage account $($StorageAccountName) found"

        # Loop through container array and create containers if the don't exist
        foreach ($container in $containers) {
            # First a little cleanup of the container

            # 1) Change to lowercase
            $container = $container.ToLower()

            # 2) Trim accidental spaces
            $container = $container.Trim()


            # Check if container already exists
            Write-output "Checking existence of container $($container)"
            $ContainerCheck = Get-AzStorageContainer -Context $context -Name $container -ErrorAction SilentlyContinue 

            # If container exists
            if ($ContainerCheck) {
                Write-Output "Container $($container) already exists"
            }
            else {
                Write-Output "Creating container $($container)"
                New-AzStorageContainer -Name $container -Context $context | Out-Null
            }

            # Get container folders from JSON
            Write-Output "Retrieving folders from config"
            $folders = $Config.containers.$container
            Write-Output "Found $($folders.Count) folders in config for container $($container)"

            # Loop through container folders
            foreach ($folder in $folders) {
                # First a little cleanup of the folders

                # 1) Replace backslashes by a forward slash
                $path = $folder.Replace("\","/")

                # 3) Remove unwanted spaces
                $path = $path.Trim()
                $path = $path.Replace("/ ","/")
                $path = $path.Replace(" /","/")

                # 3) Check if path ends with a forward slash
                if (!$path.EndsWith("/")) {
                    $path = $path + "/"
                }
                    
                # Check if folder path exists
                $FolderCheck = Get-AzDataLakeGen2Item -FileSystem $container -Context $context -Path $path  -ErrorAction SilentlyContinue
                if ($FolderCheck) {
                    Write-Output "Path $($folder) exists in container $($container)"
                } else {
                    New-AzDataLakeGen2Item -Context $context -FileSystem $container -Path $path -Directory | Out-Null
                    Write-Output "Path $($folder) created in container $($container)"
                }
            }

        }
    } else {
        # Provided storage account not corrrect
        Write-Output "Storageaccount: $($StorageAccountName) not available, containers not setup."
    }
} else {
    # Path to JSON file incorrect
    Write-output "File $($path) not found, containers not setup."
}
4) YAML file.
If you integrate this in your existing Data Factory or Synapse YAML pipeline then you only need to add one PowerShell step. Make sure you have a checkout step to copy the config and powershell file from the repository to the agent. You may also want to add a (temporary) treeview step to check the paths on your agent. This makes it easier to configure paths within your YAML code.
parameters:
  - name: SerCon
    displayName: Service Connection
    type: string
  - name: Env
    displayName: Environment
    type: string
    values: 
    - DEV
    - ACC
    - PRD
  - name: ResourceGroupName
    displayName:
    type: string
  - name: StorageAccountName
    displayName:
    type: string

jobs:
    - deployment: deploymentjob${{ parameters.Env }}
      displayName: Deployment Job ${{ parameters.Env }} 
      environment: Deploy to ${{ parameters.Env }}

      strategy:
        runOnce:
          deploy:
            steps:
            ###################################
            # 1 Check out repository to agent
            ###################################
            - checkout: self
              displayName: '1 Retrieve Repository'
              clean: true 

            ###################################
            # 3 Show environment and treeview
            ###################################
            - powershell: |
                Write-Output "Deploying Synapse in the ${{ parameters.Env }} environment"
                tree "$(Pipeline.Workspace)" /F
              displayName: '2 Show environment and treeview Pipeline_Workspace'

            ###################################
            # 3 Create containers in datalake
            ###################################
            - task: AzurePowerShell@5
              displayName: '3 Create data lake containers'
              inputs:
                azureSubscription: ${{ parameters.SerCon }}
                scriptType: filePath
                scriptPath: $(Pipeline.Workspace)\s\CICD\PowerShell\SetStorageAccounts.ps1
                scriptArguments:
                  -ResourceGroupName ${{ parameters.ResourceGroupName }} `
                  -StorageAccountName ${{ parameters.StorageAccountName }} `
                  -JsonLocation $(Pipeline.Workspace)\s\CICD\Json\
                azurePowerShellVersion: latestVersion
                pwsh: true

5) The result
Now it's time to run the YAML pipeline and check the Storage Account to see wether the containers and folders are created.
DevOps logs of creating containers and folders


Created data lake folders in container


Conclusion
In this post you learned how to create containers and folders in the Storage Account / Data Lake via a little PowerShell script and a DevOps pipeline, but you can also reuse this PowerShell script in for the mentioned alternative solutions.

Again the note about also deleting containers and folders. Make sure to double check the code, but also the procedures to avoid human errors and potenially loose a lot of data. You might want to setup soft deletes in your storage account to have a fallback scenario for screwups.

Monday 3 October 2022

Deploy Synapse workspaces via DevOps - Pipeline

Case
I want to deploy my development Synapse workspace to the next environment (test, acceptance or production). What is the easiest way to automate this proces via DevOps? And is it possible to ignore the publish button just like in Data Factory.
Release Synapse Workspace via DevOps


Solution
With the new (updated) Synapse add-on for DevOps it is much easier to release Synapse then it was to release Data Factory. And if you use the validateDeploy operation (instead of deploy) then you don't need the workspace_publish branch. It can directly read from the collaboration branch so that you don't have to use the publish button to initiate the CICD proces.

This solution contains of two separate main posts and a couple of side posts.
Addiontal posts

5) Preparation
Make sure to do the preparations described in the previous post. Add two empty files to the CICD\YAML folder (or your own folder setup):
  • Synapse.yml
  • DeploySynapse.yml
Add two YAML files


6) The YAML pipeline
In this example we will create an artifact first and then deploy that artifact to the test/acceptance/production environment of Synapse, but depending on the branch strategy you could skip that step and directly publish from a branch in the repository. The artifact build and artifact publish are separated in two different YAML files.

Synapse.yml

First step is the trigger. When should the pipeline start? In this case if the branch name is equals to 'main' and the change is happening in the 'Synapse' folder. So changes in the 'CICD' folder will not trigger the pipeline.
###################################
# When to create a pipeline run
###################################
trigger:
  branches:
    include:
    - main
  paths:
    include:
    - Synapse/*
The second step is creating the first stage. It will become the first blue, green or red circle in the overview. It also cleans the workspace, which is handy for self-hosted agents. And it mentions the agent pool. In this case a Microsoft-hosted agent.
stages:
###################################
# Create Artifact of Synapse files
###################################
- stage: CreateSynapseArtifact
  displayName: Create Synapse Artifact

  jobs:
  - job: CreateArtifact
    displayName: 'Create Actifact'
    workspace:
      clean: all
    pool:
      vmImage: 'windows-latest' #'ubuntu-latest'
    steps:
The third block (step 1) retrieves the content of the repository to the agent. This allows us to create an artifact of the Synapse files that are stored in the repository.
    ###################################
    # 1 Retrieve Repository
    ###################################
    - checkout: self
      displayName: '1 Retrieve Repository'
      clean: true
The fourth block (step 2) is optional. It just shows a treeview of the agent which is very handy for debugging your YAML pipelines to make sure you are mentioning the right folder or file in any of the tasks. This is explained in detail in a previous post.
    ###################################
    # 2 Show treeview of agent
    ###################################
    - powershell: |
        tree "$(Pipeline.Workspace)" /F
      displayName: '2 Treeview of Pipeline.Workspace'
The fifth block (step 3) is the coping of all Synapse files to an artifact staging folder. Optionaly you could skip this part an publish directly from the Synapse folder.
    ###################################
    # 3 Stage artifact
    ###################################
    - task: CopyFiles@2
      displayName: '3. Copy Artifact'
      inputs:
        contents: |
          **\*.*
        SourceFolder: 'Synapse'
        TargetFolder: '$(build.artifactstagingdirectory)'
The sixth block (step 6) is publising all the files located in the artifact staging folder.
    ###################################
    # 4 Publish artifact
    ###################################
    - task: PublishPipelineArtifact@1
      displayName: '4 Publish template as artifact'
      inputs:
        targetPath: $(Build.ArtifactStagingDirectory)
        artifact: 'SynapseArtifact'
        publishLocation: 'pipeline'
The last block in this YAML file is calling the next YAML file with parameters so that you can reuse this step for all environments (Test/Acceptance/Production). The values are now hardcoded in this example, but you should ofcourse try to use a variable group from the Pipeline Library. This makes it much easier to change those parameter values.

This example contains 4 variables. The first is just to show the enviroment when writing values to the screen (debugging). The ServiceConnection is the name of your ARM Service Connection that you created in the preparation post. The last two are to point to the correct environment of Synapse.
###################################
# Deploy Acceptance environment
###################################
- stage: DeployAcc
  displayName: Deploy ACC
#   variables:
#     - group: SynapseParametersAcc
  pool:
    vmImage: 'windows-latest'
  jobs:
    - template: DeploySynapse.yml
      parameters:
        Environment: ACC
        ServiceConnection: SynapseServiceConnection
        ResourceGroupName: rg_dwh_acc
        TargetWorkspaceName: dwhacc


DeploySynapse.yml

The first code block are the parameters. In this example the 4 string parameters with the values that are provided in the first YAML file.
###################################
# Parameters
###################################
parameters:
  - name: Environment
    displayName: Environment
    type: string
    values:
    - TST
    - ACC
    - PRD
  - name: ServiceConnection
    displayName: Service Connection
    type: string
  - name: ResourceGroupName
    displayName: Resource Group Name
    type: string
  - name: TargetWorkspaceName
    displayName: Target Workspace Name
    type: string

The second block consist of some starter code, but the environment piece is important if you want to add rules like approvals. So make sure to create a environment 'Deploy Synapse to ACC' or choose your own name.
###################################
# Start
###################################
jobs:
    - deployment: deploymentjob${{ parameters.Environment }}
      displayName: Deployment Job ${{ parameters.Environment }} 
      environment: Deploy Synapse to ${{ parameters.Environment }}

      strategy:
        runOnce:
          deploy:
            steps:

The third block (step 1) is about getting the data from the repository. If you use the artifact then you could skip this code because the job will automatically start with a download artifact step. If you want to directly start publising from the collaboration branch or you need to execute for example some extra PowerShell scripts from the repos as well then you need this step.

If you want to use the publish branch then you will find some example code for that as well. This allows you to keep the the YAML files in the collaboration branch instead of the publish branch. You will need to change the operation in the last step to 'deploy' and change some of its properties (not discribed in this post).
            ###################################
            # 1 Check out repository to agent
            ###################################
            # - checkout: 'git://YourProjectName/YourReposName@workspace_publish'
            #   path: workspace_publish
            - checkout: self
              displayName: '1 Retrieve Repository'
              clean: true 
The fourth block (step 2) is again the optional treeview to check the path of folders and files on your agent. Very handy, but once your code works fine then you can comment-out this part.
            ###################################
            # 2 Show environment and treeview
            ###################################
            - powershell: |
                Write-Output "Deploying Synapse in the ${{ parameters.Environment }} environment"
                tree "$(Pipeline.Workspace)" /F
              displayName: '2 Show environment and treeview Pipeline_Workspace'
The fifth and last block (step 3) is the actual deployment of Synapse. The DeleteArtifactsNotInTemplate option is to remove pipelines, datasets, linkedservice, etc. from your test/acceptance/production environment that you removed from the development environment. This is also the place where you can replace parameters and linked service which will be explained in a separate post.
            ###################################
            # 3 validateDeploy
            ###################################
            - task: Synapse workspace deployment@2
              displayName: '3 Deploy Synapse Workspace'
              inputs:
                operation: validateDeploy
                ArtifactsFolder: '$(Pipeline.Workspace)/SynapseArtifact'
                azureSubscription: ${{ parameters.ServiceConnection }} 
                ResourceGroupName: ${{ parameters.ResourceGroupName }} 
                TargetWorkspaceName: ${{ parameters.TargetWorkspaceName }} 
                DeleteArtifactsNotInTemplate: true
                # OverrideArmParameters: '
                # -workspaceName $(syn_wrk_name)
                # -ls_akv_mykeyvault_properties_typeProperties_baseUrl $(syn_mykeyvault)
                # '

Note 1: If you get an error Stderr: error: missing required argument 'factoryId', then please check this post

Note 2: If you get an error: Stderr: 'node' is not recognized as an internal or external command, operable program or batch file, then please check this post

7) The result
Now create a pipeline of an existing YAML file in your reposity and make sure to run the pipeline (manually or triggered) to see the result.
Successfully deployed Synapse


Conclusion
In this second post we described all the steps of the YAML pipeline and succesfully executed the pipeline. In a follow up post we will explain more details about overriding parameters during the deployment. Also see Microsofts own documentation for CICD for Synapse, but at the moment of writing it is not up to date with info of task version 2. 

To see the available operations and related properties of this task you can also use the 'Show assistant' option in the YAML editor in Azure DevOps. An other option is to use the Release Pipeline editor and then hit the View YAML button.
Gui of the task via Show Assistant


View YAML of Release pipeline task


Deploy Synapse workspaces via DevOps - Setup

Case
I want to deploy my development Synapse workspace to the next environment (test, acceptance or production). What is the easiest way to automate this proces via DevOps? And is it possible to ignore the publish button just like in Data Factory.
Release Synapse Workspace via DevOps


Solution
With the new (updated) Synapse add-on for DevOps it is much easier to release Synapse then it was to release Data Factory. And if you use the validateDeploy operation (instead of deploy) then you don't need the workspace_publish branch. It can directly read from the collaboration branch so that you don't have to use the publish button to initiate the CICD proces.

This solution contains of two separate main posts and a couple of side posts.
  1. Setup Synapse and  DevOps in preparation of the pipeline (this post).
  2. Setup the YAML pipeline to do the actual deployment.
Addiontal posts

1) Setup Git repository
Setup your Synapse Workspace to use a Git repository. You can find this in Synapse under the toolbox icon (manage) in the left menu. Beside choosing the right Collaboration branch (that differs per organization and branch strategy), it is also usefull to change the Root folder to for example /Synapse/. This allows you to create a separate folder in the root for your CICD files like YAML and PowerShell scripts.
Git repository setup in Synapse


In your repository it should look something like this where the Synapse files are separated from the CICD files. Make sure to create a CICD folder and a YAML sub-folder to accommodate the pipeline files from the next post.
Synaose in the (DevOps) Repository 


2) Give Service Principal Access
To do the actual deployment of the Synapse Workspace, you want to use a Service Principal. Create one or ask your AAD administrator to provide one if you are not authorized to create one yourself.

We want to give this Service Principal (SP) the minimal rights in the target workspace to do the deployment. For this we will give it the Synapse Artifact Publisher role within Synapse. You can do this in Synapse under the toolbox icon (manage) in the left menu. Then choose Access control and use the +Add button to give the SP the correct role. In the next step we will create a Service Connection in Azure DevOps with this SP. Do this for all target workspaces (tst/acc/prd).
Access control - Make SP Synapse Artifact Publisher


If your Service Principal didn't get the correct authorization then you will get the following error during the deployment in DevOps.
Start deploying artifacts from the template.
Deploy LS_AKV_AAA of type linkedService
For Artifact: LS_AKV_AAA: ArtifactDeploymentTask status: 403; status message: Forbidden
Failed
deploy operation failed
An error occurred during execution: Error: Linked service deployment failed "Failed"
##[error]Encountered with exception:Error: Linked service deployment failed "Failed"
For Artifact: LS_AKV_AAA: Deploy artifact failed: {"error":{"code":"Unauthorized","message":"The principal 'aaaaaaaa-bbbb-cccc-dddd-12345678' does not have the required Synapse RBAC permission to perform this action. Required permission: Action: Microsoft.Synapse/workspaces/linkedServices/write, Scope: workspaces/mySynapseAcc."}}
Unauthorized


3) Setup DevOps Service Connection
The next step is to create a Service Connection in DevOps. In the Project settings of your DevOps project you can find the option Service connections under Pipelines. You need to create a new Service Connection of the type Azure Resource Manager (ARM) for which you need the Service Principal Id (application id), the Service principal key (the secret) and the Tenant Id of your Azure Active Directory. Make sure to give the service connection a useful name. You will need the Service Connection name in the YAML code of the next post.
Add Service Connection


4) Add Synapse workspace deployment Add on
Microsoft made the deploy of a Synapse workspace a little easier then for Data Factory by creating a DevOps add-on for Synapse. You need to add this to your DevOps Organization by clicking the green button with Get it free. If you are not an DevOps Organization administrator then you need to ask someone else to approve the installation. 
Synapse workspace deployment addon


If you already have this add-on then make sure to update it to at least 2.3.0. You can find the add-on in the Organization Setting under General - Extensions.
Check version of extension


Conclusion
In this first post we showed some preparations that are not that difficult, but you will need the right access for it or be able to ask a colleague for it that does have access to the AAD and the DevOps organization. In the next post we will create a YAML pipeline that consists of two YAML files to do the actual deployment.