Case
How can we simplify the process of loading database tables and reduce the time needed to create SSIS packages.
Solution
There are several steps that need to be taken prior to creating such a solution.
These steps are:
- Create the databases 'Repository' and 'Staging' and required schema's
- Create a Meta table called 'Layer' and a table called 'TableList' in the repository database
- Create the Sales tables in the Sales database
- Fill the Meta tables with the required meta data
- Create a BIML script that will create the Extract and Load SSIS package
- Generate the package using BIML Express in Visual Studio 2015 to create the SSIS package
For this solution the following prerequisites need to be met;
- SQL Server will be used as source and destination platform
- The Adventure Works 2014 database will be used as source
- The selected tables from the Adventure Works database are present in the destination database and all required schema’s and specific datatypes, if applicable (we will be using a few tables from the Person schema that do not use custom datatypes)
- Visual Studio 2015 is installed (Community/Professional/Enterprise)
- BIML Express is installed
1) - Create the databases and schema's
In this step the databases 'Repository' and Staging are created and the required schema's.
--Create the databases Repository and Staging and required schema's
CREATE DATABASE [Repository] CONTAINMENT = NONE ON  PRIMARY
( NAME = N'Repository', FILENAME = N'D:\Program Files\Microsoft SQL Server\MSSQL13.MSSQLSERVER\MSSQL\DATA\Repository.mdf' , SIZE = 7168KB , MAXSIZE = UNLIMITED, FILEGROWTH = 1024KB )
 LOG ON
( NAME = N'Repository_log', FILENAME = N'D:\Program Files\Microsoft SQL Server\MSSQL13.MSSQLSERVER\MSSQL\DATA\Repository_log.ldf' , SIZE = 5184KB , MAXSIZE = 2048GB , FILEGROWTH = 10%)
GO
ALTER DATABASE [Repository] SET RECOVERY SIMPLE;
GO
USE Repository
go
CREATE SCHEMA rep
GO
CREATE DATABASE [Staging] CONTAINMENT = NONE ON  PRIMARY
( NAME = N'Staging', FILENAME = N'D:\Program Files\Microsoft SQL Server\MSSQL13.MSSQLSERVER\MSSQL\DATA\Staging.mdf' , SIZE = 7168KB , MAXSIZE = UNLIMITED, FILEGROWTH = 1024KB )
 LOG ON
( NAME = N'Staging_log', FILENAME = N'D:\Program Files\Microsoft SQL Server\MSSQL13.MSSQLSERVER\MSSQL\DATA\Staging_log.ldf' , SIZE = 5184KB , MAXSIZE = 2048GB , FILEGROWTH = 10%)
GO
ALTER DATABASE [Staging] SET RECOVERY SIMPLE;
GO
USE Staging
go
CREATE SCHEMA Sales
GO
2) - Create the Meta tables
During this step we will be creating the meta tables
'Layer' and
'TableList'. The first table will contain the id, name and prefix of the layers present in the Datawarehouse environment. In this blog the only entry present is the Staging area id and name. Normally this table also holds the name of for example the Datawarehouse and Datamart layer or any other layers present in a Business Intelligence environment.
The column
'LayerId' is used in the other table named
'TableList' and is used to make the distinction between the table names present in the respective layer. In this blog there will only be Staging Area tables described.
The table
'TableList' contains the following columns;
- LayerId - The id of the layer the table belongs to
- TableName - The name of the table
- SchemaName - The name of the schema of the table
- TableType - The type of the table (fe. user table)
- LoadOrderNr - The order in which the tables are loaded (or created by other processes)
- WhereClause - Any optional where clause that is used during the load proces (Default this column must be set to '1 = 1')
- ActiveInd - Indicates if the table is active or inactive during the BIML creation proces
- InsertDate - The date when the table entry was inserted in the 'TableList' table
Note: Some of the above columns are not or less applicable to the BIML script in this post, but they are used in other generic scripts used to create and load datawarehouse packages (more about this in future posts)
--Create the meta tables
USE [Repository]
GO
IF OBJECT_ID('[rep].[Layer]', 'U') IS NOT NULL
BEGIN
 DROP TABLE [rep].[Layer]
END
GO
CREATE TABLE [rep].[Layer](
 [LayerId] [smallint] NOT NULL,
 [LayerName] [nvarchar](50) NOT NULL,
 [LayerPrefix] [nvarchar](10) NOT NULL,
) ON [PRIMARY]
GO
IF OBJECT_ID('[rep].[TableList]', 'U') IS NOT NULL
BEGIN
 DROP TABLE [rep].[TableList]
END
GO
CREATE TABLE [rep].[TableList](
 [LayerId] [smallint] NULL,
 [TableName] [nvarchar](100) NULL,
 [SchemaName] [nvarchar](100) NULL,
 [ServerNr] [smallint] NULL,
 [TableType] [nvarchar](100) NULL,
 [LoadOrderNr] [int] NULL,
 [WhereClause] [nvarchar](250) NULL,
 [PrimaryKey] [nvarchar](250) NULL,
 [ActiveInd] [nchar](1) NULL,
 [InsertDate] [datetime] NULL
) ON [PRIMARY]
GO
3) - Create the Sales tables
During this step we will be creating the Sales tables in the target database Staging.
--Create the Sales tables
USE Staging
GO
CREATE TABLE [Sales].[ShoppingCartItem](
 [ShoppingCartItemID] [int] IDENTITY(1,1) NOT NULL,
 [ShoppingCartID] [nvarchar](50) NOT NULL,
 [Quantity] [int] NOT NULL,
 [ProductID] [int] NOT NULL,
 [DateCreated] [datetime] NOT NULL,
 [ModifiedDate] [datetime] NOT NULL,
) ON [PRIMARY]
GO
CREATE TABLE [Sales].[SpecialOffer](
 [SpecialOfferID] [int] IDENTITY(1,1) NOT NULL,
 [Description] [nvarchar](255) NOT NULL,
 [DiscountPct] [smallmoney] NOT NULL,
 [Type] [nvarchar](50) NOT NULL,
 [Category] [nvarchar](50) NOT NULL,
 [StartDate] [datetime] NOT NULL,
 [EndDate] [datetime] NOT NULL,
 [MinQty] [int] NOT NULL,
 [MaxQty] [int] NULL,
 [rowguid] [uniqueidentifier] ROWGUIDCOL  NOT NULL,
 [ModifiedDate] [datetime] NOT NULL,
) ON [PRIMARY]
GO
CREATE TABLE [Sales].[SpecialOfferProduct](
 [SpecialOfferID] [int] NOT NULL,
 [ProductID] [int] NOT NULL,
 [rowguid] [uniqueidentifier] ROWGUIDCOL  NOT NULL,
 [ModifiedDate] [datetime] NOT NULL,
) ON [PRIMARY]
GO
4) - Fill the meta tables with the required meta data
After creating the database and metadata tables, they need to be filled with the meta data that will be used by the BIML script in the next step ('BIML Load_STG_Tables_From_Microsoft.biml').
The script provided below inserts the layer information used in this blog and the table meta information of those tables for which the SSIS load proces will be created.
If you want to test the Where Clause functionality you can replace the value '1 = 1' with '1 = 1 AND ShoppingCartItemID = 2' in the column 'WhereClause' in the table 'TableList' for the tablename 'sales.ShoppingCartItem'. This will place a filter on the table.
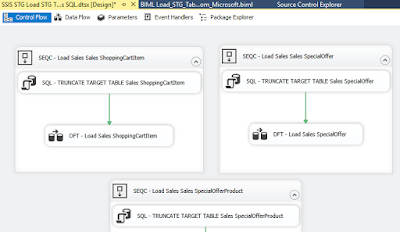
The BIML script will use the meta table information to create one SSIS package with the name 'SSIS STG Load STG Tables SQL.dtsx'
--Insert the meta information in the meta tables
USE [Repository]
GO
TRUNCATE TABLE [rep].[Layer];
TRUNCATE TABLE [rep].[TableList];
INSERT [rep].[Layer] ([LayerId], [LayerName], [LayerPrefix]) VALUES (1, N'staging', N'stg');
INSERT [rep].[TableList] ([LayerId], [TableName], [SchemaName], [TableType], [LoadOrderNr], [WhereClause], [ActiveInd], [InsertDate]) VALUES (1, N'SpecialOffer', N'Sales', N'user_table', 1, N'1 = 1', N'1', CAST(GETDATE() AS DateTime));
INSERT [rep].[TableList] ([LayerId], [TableName], [SchemaName], [TableType], [LoadOrderNr], [WhereClause], [ActiveInd], [InsertDate]) VALUES (1, N'SpecialOfferProduct', N'Sales', N'user_table', 1, N'1 = 1', N'1', CAST(GETDATE() AS DateTime));
INSERT [rep].[TableList] ([LayerId], [TableName], [SchemaName], [TableType], [LoadOrderNr], [WhereClause], [ActiveInd], [InsertDate]) VALUES (1, N'ShoppingCartItem', N'Sales', N'user_table', 1, N'1 = 1', N'1', CAST(GETDATE() AS DateTime));
GO
5) - Create the BIML script
Once the previous steps have been executed it is time to create the BIML script. The BIML script starts with declaring the information needed to create the connection strings to the different database and the server(s) where they recide on. For this example all the databases are SQL Server 2016 databases. It would also be possible to store that information in a meta table but for this post the information is placed inside the BIML script.
The BIML script will create one package with the name 'SSIS STG Load STG Tables SQL'
and for each table in the 'TableList' table a sequence container will be created with two SSIS components. The first component is a SQL Task component that will use a T-SQL command to truncate the target table. The second component is a Data Flow Task containing a Source and Destination component which will load the data from the target to the source table. Alle the sequence components are executed parallel to each other.
--The BIML code that can be placed inside a BIML file.


    <#
        string pRepServerName    = "localhost";
        string pRepDatabaseName  = "Repository";
        string pRepProvider      = "SQLNCLI11.1;Integrated Security=SSPI";
        string pRepSchema        = "rep";

        string pSourceServerName = "localhost";
        string pSourceDBName     = "AdventureWorks2014";
        string pSourceProvider   = "SQLNCLI11.1;Integrated Security=SSPI";
        string pSourceSchema     = "Sales";

        string pTargetServerName = "localhost";
        string pTargetDBName     = "Staging";
        string pTargetProvider   = "SQLNCLI11.1;Integrated Security=SSPI";
        string pTargetSchema     = "Sales";
    #>


    <#
        string pLayer            = "Staging";
     #>

    <#
    string csRepository = String.Format("Data Source={0};Initial Catalog={1};Provider={2};Auto Translate=False;"
          ,pRepServerName, pRepDatabaseName, pRepProvider);

    string csSource = String.Format("Data Source={0};Initial Catalog={1};Provider={2};Auto Translate=False;"
          ,pSourceServerName, pSourceDBName, pSourceProvider);

    string csTarget = String.Format("Data Source={0};Initial Catalog={1};Provider={2};Auto Translate=False;"
          ,pTargetServerName, pTargetDBName, pTargetProvider);
    #>


                <#
                  StringBuilder sMETAGetTableName = new System.Text.StringBuilder();

                  sMETAGetTableName.Append("SELECT ");
                  sMETAGetTableName.Append("    TableName ");
                  sMETAGetTableName.Append("  , SchemaName ");
                  sMETAGetTableName.Append("  , WhereClause ");
                  sMETAGetTableName.Append("FROM ");
                  sMETAGetTableName.Append(pRepSchema);
                  sMETAGetTableName.Append(".TableList AS TAB ");
                  sMETAGetTableName.Append("INNER JOIN ");
                  sMETAGetTableName.Append(pRepSchema);
                  sMETAGetTableName.Append(".Layer AS LYR ");
                  sMETAGetTableName.Append("  ON ( TAB.LayerId = LYR.LayerId) ");
                  sMETAGetTableName.Append("WHERE 1 = 1 ");
                  sMETAGetTableName.Append(" AND TAB.ActiveInd = 1 ");
                  sMETAGetTableName.Append(" AND LYR.LayerName = '");
                  sMETAGetTableName.Append(pLayer);
                  sMETAGetTableName.Append("' ");
                  sMETAGetTableName.Append("ORDER BY ");
                  sMETAGetTableName.Append("   TAB.LoadOrderNr");

                  DataTable tblMETATableNames = ExternalDataAccess.GetDataTable(csRepository, sMETAGetTableName.ToString());
                  foreach (DataRow METATableNameRow in tblMETATableNames.Rows) {
                #>
                 <#=METATableNameRow["TableName"] #>" ConstraintMode="Linear">

                        "
                                    ResultSet="None"
                                    ConnectionName="OLEDB Target">
                            TRUNCATE TABLE <#=pTargetSchema #>.<#=METATableNameRow["TableName"] #>


                        ">

                                "
                                             ConnectionName="OLEDB Source"
                                             ValidateExternalMetadata="false">
                                    SELECT
        CAST(1 AS INTEGER) AS DUMMY_COLUMN
<#                                          StringBuilder sGETSelectColumn = new System.Text.StringBuilder();
                                            sGETSelectColumn.Append("SELECT " );
                                            sGETSelectColumn.Append("     col.name AS column_name " );
                                            sGETSelectColumn.Append("FROM sys.columns AS col " );
                                            sGETSelectColumn.Append("INNER JOIN sys.objects AS obj " );
                                            sGETSelectColumn.Append("    ON(col.object_id = obj.object_id) " );
                                            sGETSelectColumn.Append("INNER JOIN sys.types AS typ " );
                                            sGETSelectColumn.Append("    ON(col.user_type_id = typ.user_type_id)" );
                                            sGETSelectColumn.Append("WHERE   1 = 1 " );
                                            sGETSelectColumn.Append("   AND obj.name = '"+ METATableNameRow[0].ToString() +"'");
                                            DataTable tblSelectColumn = ExternalDataAccess.GetDataTable(csSource, sGETSelectColumn.ToString());
                                            foreach (DataRow SelectColumn in tblSelectColumn.Rows) {
#>
        , [<#=SelectColumn["COLUMN_NAME"] #>]
<# } #>FROM <#=METATableNameRow["SchemaName"] #>.<#=METATableNameRow["TableName"] #>
WHERE <#=METATableNameRow["WhereClause"] #>


                                "
                                                  ConnectionName="OLEDB Target">
                                    " />


                <# } #>


<#@ template language="C#" hostspecific="true"#>
<#@ import namespace="System.Data"#>
<#@ import namespace="System.Data.SqlClient"#>
<#@ import namespace="System.Text"#>
6) - Generate the package using BIML Express
Once the BIML file has been created it is time to generate the SSIS package by using BIML Express in Visual Studio 2015.
The package can be simply generated by right clicking the BIML package and selecting
'Generate SSIS Packages'.
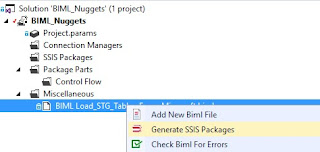 |
| Using BIML Expres to generate the package |
 |
| The package has been generated by BIML |
 |
| Using BIML Expres to generate the package |
Summary
In this post we create the following components;
- Repository database and one schema
- Staging database and one schema
- Two meta tables to be used by the BIML script from this post (and possible future posts)
- Three Staging tables
- A BIML file called 'BIML Load_STG_Tables_From_Microsoft.biml'
- A generated SSIS Package named 'SSIS STG Load STG Tables SQL.dtsx'


