Thursday 8 June 2017

Schedule Upscale/downscale Azure Analysis Services

Case
Azure Analysis Services has a new set of pricing tiers (Dev, B1, B2, S0, S1, S2, S3, S4, S8, S9) this makes it more useful to upscale and downscale to save money in Azure rather then pausing it completely. How do I do that?
Change the Tier of your Azure Analysis Services   


Solution
If you are using AAS for an environment that has fixed quiet hours then you can downgrade or upgrade the used tier with some PowerShell code in Azure Automation Runbooks. This could potentially save you a lot of money. If you are not using the system at all on certain hours then you could even pause (and resume) AAS to .


1) Automation Account
First we need an Azure Automation Account to run the Runbook. If you don't have one or want to create a new one, then search for Automation under Monitoring + Management and give it a suitable name, then select your subscription, resource group and location. For this example I will choose West Europe since I'm from the Netherlands. Also make sure the Create Azure Run as account option is on (we need it for step 3).
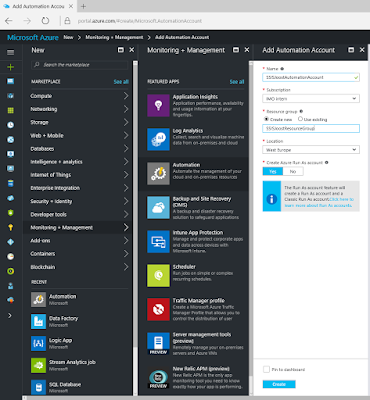
Azure Automation Account


2) Credentials
Next step is to create Credentials to run this runbook with. This works very similar to the Credentials in SQL Server Management Studio. Go to the Azure Automation Account and click on Credentials in the menu. Then click on Add New Credentials. You could just use your own Azure credentials, but the best options is to use a service account with a non-expiring password. Otherwise you need to change this regularly.
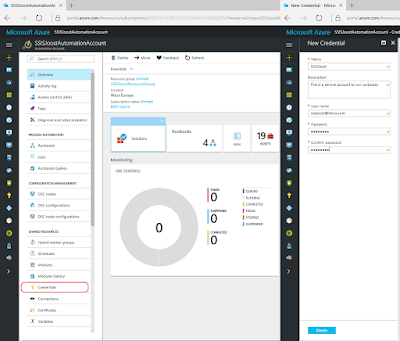
Create new credentials


3) Connections
This step is for your information only and to understand the code. Under Connections you will find a default connection named 'AzureRunAsConnection' that contains information about the Azure environment, like the tendant id and the subscription id. To prevent hardcoded values we will retrieve these fields in the PowerShell code.
Azure Connections


4) Variables
An other option to prevent hardcoded values in your PowerShell code it to use Variables. We will use this option to provide the Resource Group and the name of your Analysis Server. Go to Variables and add a new variable for ResourceGroupName and add the name of the Resource Group that is used by your AAS. Then repeat this for the name of your AAS (not the Server Name value that starts with asazure://) and call it AnalysisServerName.
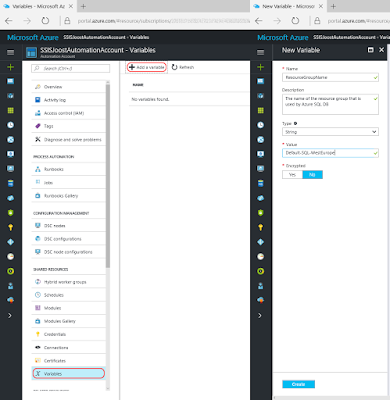
Add variables


5) Modules
The Azure Analysis Services methods (cmdlets) are in a separate PowerShell module which is not included by default. If you do not add this module you will get errors telling you that the method is not recognized.
The term 'Get-AzureRmAnalysisServicesServer' is not recognized
as the name of a cmdlet, function, script file, or operable program.


Go to the Modules page and check whether you see AzureRM.AnalysisServices in the list. If not then use the 'Browse gallery' button to add it, but first add AzureRM.Profile because the Analysis module will ask for it. Adding the modules could take a few minutes!
If you already have AzureRM.AnalysisServices then make sure it is at least version 0.4.0 (jun 8 2017), because the older versions have a little bug in it that doesn't allow you to change the tier.
Add modules


6) Runbooks
Now it is time to add a new Azure Runbook for the PowerShell code. Click on Runbooks and then add a new runbook (There are also four example runbooks of which AzureAutomationTutorialScript could be useful as an example). Give your new Runbook a suitable name and choose PowerShell as type.
Add Azure Runbook


7) Edit Script
After clicking Create in the previous step the editor will we open. When editing an existing Runbook you need to click on the Edit button to edit the code. You can copy and paste the code below to your editor. Study the green comments to understand the code. Also make sure to compare the variable names in the code to the once created in step 4 and change them if necessary.
Edit the PowerShell code


# PowerShell code 
# Don't continue in case of an error
$ErrorActionPreference = "Stop"

# Connect to a connection to get TenantId and SubscriptionId
$Connection = Get-AutomationConnection -Name "AzureRunAsConnection"
$TenantId = $Connection.TenantId
$SubscriptionId = $Connection.SubscriptionId
 
# Get the service principal credentials connected to the automation account. 
$null = $SPCredential = Get-AutomationPSCredential -Name "SSISJoost"
 
# Login to Azure ($null is to prevent output, since Out-Null doesn't work in Azure)
Write-Output "Login to Azure using automation account 'SSISJoost'."
$null = Login-AzureRmAccount -TenantId $TenantId -SubscriptionId $SubscriptionId -Credential $SPCredential
 
# Select the correct subscription
Write-Output "Selecting subscription '$($SubscriptionId)'."
$null = Select-AzureRmSubscription -SubscriptionID $SubscriptionId
 
# Get variable values
$ResourceGroupName = Get-AutomationVariable -Name 'ResourceGroupName'
$AnalysisServerName = Get-AutomationVariable -Name 'AnalysisServerName'

# Get old status (for testing/logging purpose only)
$OldAsSetting = Get-AzureRmAnalysisServicesServer -ResourceGroupName $ResourceGroupName -Name $AnalysisServerName

# changing tier
Write-Output "Upgrade $($AnalysisServerName) to S1. Current tier: $($OldAsSetting.Sku.Name)" 
Set-AzureRmAnalysisServicesServer -ResourceGroupName $ResourceGroupName -Name $AnalysisServerName -Sku "S1"
Write-Output "Done"

# Get new status (for testing/logging purpose only)
$NewAsSetting = Get-AzureRmAnalysisServicesServer -ResourceGroupName $ResourceGroupName -Name $AnalysisServerName
Write-Output "New tier: $($NewAsSetting.Sku.Name)"

Note 1: This is a very basic script. No error handling has been added. Check the AzureAutomationTutorialScript for an example. Finetune it for you own needs.
Note 2: There are often two versions of an method like Get-AzureRmAnalysisServicesServer and Get-AzureAnalysisServicesServer. Always use the one with "Rm" in it (Resource Managed), because that one is for the new Azure portal. Without Rm is for the old/classic Azure portal.
Note 3: Because Azure Automation doesn't support Out-Null I used an other trick with the $null =. However the Write-Outputs are for testing purposes only. Nobody sees them when they are scheduled.
Note 4: You can upscale from basic (Bx) to standard (Sx), but you cannot downscale from standard to basic!

7) Testing
You can use the Test Pane menu option in the editor to test your PowerShell scripts. When clicking on Run it will first Queue the script before Starting it. Running takes a couple of minutes.
Testing the script in the Test Pane


8) Publish
When your script is ready, it is time to publish it. Above the editor click on the Publish button. Confirm overriding any previously published versions.
Publish the Runbook


9) Schedule
And now that we have a working and published Azure Runbook, we need to schedule it. Click on Schedule to create a new schedule for your runbook. For the scale down script I created a schedule that runs every working day on 9:00PM (21:00) to scale down the machine. The scale up script could for example be scheduled on working days at 7:00AM. Now you need to hit the refresh button in the Analysis Services overview in Azure to see if it really works. It takes a few minutes to run, so don't worry too soon.
Add Schedule


Summary
In this post you saw how you can scale up/down your Azure Analysis Services instance to save some money in Azure during the quiet hours. The code and screenshot only shows a scale up from S0 to S1, but you could make a separate scale down script or parameterize the tier. An other option is to use a fancy if-construction that uses the current tier and/or time to decide whether you need to up scale or down scale.

Click here for more information about all Azure Analysis Services cmdlets that are included in the AzureRM.AnalysisServices module.


Thursday 1 June 2017

Schedule Start of Azure Virtual Machine

Case
There is an option to automatically shutdown your Azure Virtual Machine on a certain time, but where is the option to start it automatically?
Auto-shutdown Auzre VM


Solution
At the time of writing there is no option in the menu to automatically start your Azure Virtual Machine. However with some PowerShell script in for example an Azure Automation Runbook you can start your machine with less than 10 lines of code (excluding comments and write-hosts).

Update January 5 2020: updated script with AZ modules


1) Create Automation Account
First we need an Azure Automation Account to run the Runbook with PowerShell code. If you don't have one or want to create a new one, then search for Automation under Monitoring + Management and give it a suitable name, then select your subscription, resource group and location. For this example I will choose West Europe since I'm from the Netherlands. Also make sure the Create Azure Run as account option is on (we need it for step 3).
Add Automation Account


2) Credentials
Next step is to create Credentials to run this runbook with. This works very similar to the Credentials in SQL Server Management Studio. Go to the Azure Automation Account and click on Credentials in the menu. Then click on Add New Credentials. You could just use your own Azure credentials, but the best options is to use a service account with a non-expiring password. Otherwise you need to change this regularly.
Create new credentials


3) Connections
This step is for your information only and to understand the code. Under Connections you will find a default connection named 'AzureRunAsConnection' that contains information about the Azure environment, like the tendant id and the subscription id. To prevent hardcoded connection details we will retrieve these fields in the PowerShell code.
Azure Connections


4) Variables
An other option to prevent hardcoded values in your PowerShell code it to use Variables. We will use this option to provide the Resource Group name and the name of your Virtual Machine. Go to Variables and add a new variable for ResourceGroupName and add the name of the Resource Group that is used by your Virtual Machine as value. Then repeat this for the name of your Virtual Machine and call it VirtualMachineName.
Add variables


5) Runbooks
Now it is time to add a new Azure Runbook for the PowerShell code. Click on Runbooks and then add a new runbook (There are already four example runbooks of which AzureAutomationTutorialScript could be useful as an example). Give your new Runbook a suitable name and choose PowerShell as type.
Add Azure Runbook


6) Edit Script
After clicking Create in the previous step the editor will be opened. When editing an existing Runbook you need to click on the Edit button to edit the code. You can copy and paste the code below to your editor. Study the green comments to understand the code. Also make sure to compare the variable names in the code to the once created in step 4 and change them if necessary.
Edit the PowerShell code


# PowerShell code
# Connect to a connection to get TenantId and SubscriptionId
$Connection = Get-AutomationConnection -Name "AzureRunAsConnection"
$TenantId = $Connection.TenantId
$SubscriptionId = $Connection.SubscriptionId
  
# Get the service principal credentials connected to the automation account. 
$null = $SPCredential = Get-AutomationPSCredential -Name "SSISJoost"
  
# Login to Azure ($null is to prevent output, since Out-Null doesn't work in Azure)
Write-Output "Login to Azure using automation account 'SSISJoost'."
$null = Login-AzureRmAccount -TenantId $TenantId -SubscriptionId $SubscriptionId -Credential $SPCredential
  
# Select the correct subscription
Write-Output "Selecting subscription '$($SubscriptionId)'."
$null = Select-AzureRmSubscription -SubscriptionID $SubscriptionId

# Get variable values
$ResourceGroupName = Get-AutomationVariable -Name 'ResourceGroupName'
$VirtualMachineName = Get-AutomationVariable -Name 'VirtualMachineName'

Write-Output "Starting Virtual Machine" 
$null = Start-AzureRmVM -ResourceGroupName $ResourceGroupName -Name $VirtualMachineName
Write-Output "Done"

Note 1: This is a very basic script. No error handling has been added. Check the AzureAutomationTutorialScript for an example. Finetune it for you own needs.
Note 2: Because Azure Automation doesn't support Out-Null I used an other trick with the $null =. However the Write-Outputs are for testing purposes only. Nobody sees them when they are scheduled.
Note 3: When starting multiple Virtual Machines at once then make sure to start them in parallel instead of sequential to reduce the runtime of your runbook.

7) Testing
You can use the Test Pane menu option in the editor to test your PowerShell scripts. When clicking on Run it will first Queue the script before Starting it. Running takes a couple of minutes.
Testing the script in the Test Pane


8) Publish
When your script is ready, it is time to publish it. Above the editor click on the Publish button. Confirm overriding any previously published versions.
Publish the Runbook


9) Schedule
And now that we have a working and published Azure Runbook, we need to schedule it. Click on Schedule to create a new schedule for your runbook. For this start up script I created a schedule that runs every working day on 7:00AM (07:00). Now you need to hit the refresh button in the Virtual Machine overview in Azure to see if it really works. It takes a few minutes to run, so don't worry too soon.
Add Schedule


Summary
In this post you saw how you can start an Azure Virtual Machine with PowerShell because the menu only supports auto-shutdown. With just a few lines of code and a schedule you can accomplish an auto-startup.
With a webhook you could also call this runbook with PowerShell script from other applications. For example the Microsoft Flow App on your mobile.

Sunday 21 May 2017

Azure - Setting Up Azure Analysis Service (AAS)

Case
I want my BI Semantic Layer in the Cloud. How can I use Azure for this?

Azure Analysis Services (AAS) as your BI Semantic Layer


Solution
On-premises we, as Microsoft BI specialists, use SQL Server Analysis Server (SSAS) for this, but we now have an Analysis Service in Azure. This is called Azure Analysis Services (AAS). Just like SSAS, you can choose between multiple data sources (both on-premises and Cloud) and use all the known tools for presenting your data, like SQL Server Reporting Services (SSRS) and Power BI.

In this case, I will use a SQL Server on-premises. On this local server we have a database called World Wide Importers. This is the new sample database of Microsoft. It replaces the 'good old' AdventureWorks. Because we are building an Analysis Cube, I choose the database WorldWideImportersDW. This is the full sample database for OLAP (OnLine Analytical Processing). You can download this database and more here.

1) Create an Azure Analysis Service server
Go to your Azure portal and search for Analysis Services. Give your server a suitable name and choose a resource group or create a new one. For now, we are setting up a Developer server (D1). This version is very suitable for development and demo scenarios. More pricing details and feature differences between the tiers (Developer, Basic and Standard) here. Fill in the Administrator, in this case my own credentials of my company account (part of Azure AD).

We also create a new Storage account. We choose Locally-redundant storage (LRS). More information about the different storage options can be found here.

Azure - Create the Azure Analysis Server


2) Create an Analysis Services Tabular Project
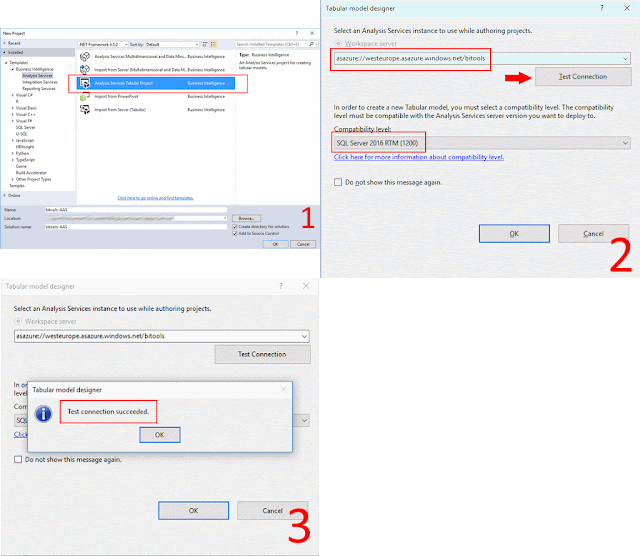
Open in Visual Studio a new Analysis Services Tabular Project. Now fill your Azure Analysis Service (AAS) server that you have created earlier in combination with Compatibility level SQL Server 2016 RTM (1200). This one is supported by AAS. More information about compatibility levels for Analysis Services Tabular models here. Finally click on Test Connection and sign in with your credentials (which also has access to the World Wide Importers database). Now we can build our Tabular model.

Visual Studio - Create Tabular project

In this case we build a small model for testing purposes.We import the fact table Order and the associated dimensions: City, Customer, Date, Employee and Stock Item. We give the tables appropriate names.

Visual Studio - Build the model


'On-Premises data gateway'
Make sure you have installed the 'On-Premise Gateway'. Click here for more information.

2) Deploy the Tabular model
Now we that have created the model, we can deploy this to the AAS server. This works exactly the same as when you build and deploy a Tabular model for an on-premises Analysis Server. So right click on your Tabular project and deploy.

Visual Studio - Deploy the model


Result
Let's see if we can find the model. To do this, connect to the AAS server in SQL Server Management Studio (SSMS). Fill in the server (asazure://westeurope.asazure.windows.net/bitools) and choose Active Directory Password Authentication. For now we use the same credentials as the Analysis Services admin (which you must fill in when creating the AAS server). Once connected we can find our dimension and fact tables under 'bitools AAS', great!

SSMS - Connect to the model


Note:
Off course you can manage your AAS server in the portal and give, for example, other users access to the server. This will be part of a future post.

Summary
For this blog we have set up a small Tabular model in the Cloud. It is not difficult (it works the same as developing an on-premise Tabular model), but you need to install a gateway for on-premises data and the big difference is now that your AAS (Azure Analysis Service) server is hosted in Azure. Good to know is that you can also turn on/off the AAS with PowerShell. Click here for more information.

Future AAS posts will show how to connect to AAS with Excel and Power BI or how to add additional users.

Monday 15 May 2017

Azure - On-premises data gateways

Case
If you want to use on-premises data in Azure or Power BI you need to install a so called gateway. A quick search resulted in four possible gateway downloads! Which one do you need? It's so confusing!

Microsoft Gateways for Azure and Power BI


Solution
There are two different gateways but with several names, versions and purposes:
  • Data Management Gateway
    This gateway is used for Azure Data Factory and Azure Machine Learning, but it was also used for Power BI. However, Power BI now uses the On-premises data gateway! I think / hope that this gateway will be deprecated and replaced by the On-premises data gateway in the near future.
    Download (32 and 64bit): https://www.microsoft.com/en-us/download/details.aspx?id=39717
  • On-premises data gateway
    This gateway comes in three flavors, but you can only install one per server.

Use source for multiple online services
Since you can only install one gateway per server, the On-premises data gateway has some challenges if you want to use your on-premises source for multiple online services like Power BI and AAS or for two AAS servers. In that case you install the first gateway on the source server itself and a second gateway on a separate on-premises server that can reach the first source server. A bit expensive to a have a server running for a data gateway only, but for now this is the only solution.
One source and two online services: two servers with their own gateway


Note: details per gateway will be posted in separate posts (AAS)

Friday 28 April 2017

Azure Snack - AAS and On-Premise Data

Case
You are building a Tabular model in combination with Azure Analysis Server (AAS) and you want to use an on-premise SQL database as source, but you are getting the following error:

Visual Studio - Error while importing the data


Error message:
Failed to save modifications to the server. Error returned: 'On-Premise Gateway is required to access the data source and the gateway is not installed for the server bitools.

How do you fix this error?

Solution
As the error message indicates, we need a gateway to use data from an on-premise data source. This On-Premise Gateway can be downloaded here. In this case we install the gateway for our AAS server. Important to know is that you are installing a gateway for a specific AAS server. For example, if you have an Azure subscription with two servers that connect to on-premises data sources, the gateway must be installed on two separate computers in your (organization) network.

Run the setup, choose a installation folder/path and install the gateway. After installation, you must configure the gateway for your AAS server. Sign in to Azure and fill in your server name. Now you are ready to go!

Azure - Install on-premises data gateway


Note:
Perhaps you saw that I had to update my gateway, this is because I have installed earlier a gateway for Power BI. These gateways are the same, but for AAS it is configured differently. More information about this gateway here.

Result
Go back to your Tabular model and try to import the data again. It works!

Visual Studio - Importing the data succedeed


Note:
If it doesn't work the first time, restart Visual Studio and open your solution again. The connection to the AAS server may be lost after inactivity.

Common Errors
A common installation error of the gateway is the following:

The server you have provided does not exist or you are not an administrator of the server. 

{"code":"NotFound","subCode":0,"message":"Server 'ssastest' is not found.","timeStamp":"2017-05-15T10:07:28.1324395Z","httpStatusCode":404,"details":[{"code":"RootActivityId","message":"b49c33e2-7e45-4e67-98f0-ab86faf21c12"},{"code":"Param1","message":"ssastest"}]} 

Or the following error:

The server you have provided does not exist or you are not an administrator of the server. 

{"code":"Unauthorized","subCode":0,"message":"Either server 'asazure://westeurope.asazure.windows.net/ssastest' does not exist or user is not the administrator of 'asazure://westeurope.asazure.windows.net/ssastest'","timeStamp":"2017-05-15T09:57:48.7294661Z","httpStatusCode":400,"details":[{"code":"RootActivityId","message":"a029ee64-56b7-4f85-96da-bb2f78c8eba6"},{"code":"Param1","message":"asazure://westeurope.asazure.windows.net/ssastest"}]} 

Based on this, we have two types of errors: the AAS server is not found or you have no access to the server. See the screenshots below for more information (possible fixes).

On-premise gateway - AAS server not found


On-premise gateway - No access to AAS server

Thursday 27 April 2017

Schedule Pause/Resume of Azure Analysis Services

Case
Azure Analysis Services (AAS) is a little bit too expensive to just let it run continuously if you are not using it all the time. How can I pause and resume it automatically according a fixed schedule to save some money in Azure?
Pause and Resume Azure Analysis Services


Solution
If you are are using AAS for testing purposes or nobody is using the production environment outside the office hours then you can pause it with some PowerShell code in Azure Automation Runbooks. This could potentially save you a lot of money. If pausing is too rigorous for you and you are not already using the lowest tier then you could also schedule a downscale and upscale.

Update Dec 31 2019: new script with Az module

1) Automation Account
First we need an Azure Automation Account to run the Runbook. If you don't have one or want to create a new one, then search for Automation under Monitoring + Management and give it a suitable name, then select your subscription, resource group and location. For this example I will choose West Europe since I'm from the Netherlands.
Azure Automation Account


2) Credentials
Next step is to create Credentials to run this runbook with. This works very similar to the Credentials in SQL Server Management Studio. Go to the Azure Automation Account and click on Credentials in the menu. Then click on Add New Credentials. You could just use your own Azure credentials, but the best options is to use a service account with a non-expiring password. Otherwise you need to change this regularly.
Create new credentials


3) Connections
This step is for your information only and to understand the code. Under Connections you will find a default connection named 'AzureRunAsConnection' that contains information about the Azure environment, like the tendant id and the subscription id. To prevent hardcoded connection details we will retrieve these fields in the PowerShell code.
Azure Connections


4) Variables
An other option to prevent hardcoded values in your PowerShell code it to use Variables. We will use this option to provide the Resource Group and the name of your Analysis Server. Go to Variables and add a new variable for ResourceGroupName and add the name of the Resource Group that is used by your AAS. Then repeat this for the name of your AAS (not the Server Name value that starts with asazure://) and call it AnalysisServerName.
Add variables


5) Modules
The Azure Analysis Services methods (cmdlets) are in a separate PowerShell module which is not included by default. If you do not add this module you will get errors telling you that the method is not recognized.
The term 'Get-AzureRmAnalysisServicesServer' is not recognized
as the name of a cmdlet, function, script file, or operable program.


Go to the Modules page and check whether you see AzureRM.AnalysisServices in the list. If not then use the 'Browse gallery' button to add it, but first add AzureRM.Profile because the Analysis module will ask for it. Adding the modules could take a few minutes!
Add modules


Click here for more information about all Azure Analysis Services cmdlets that are included in the AzureRM.AnalysisServices module.

6) Runbooks

Now it is time to add a new Azure Runbook for the PowerShell code. Click on Runbooks and then add a new runbook (There are also four example runbooks of which AzureAutomationTutorialScript could be useful as an example). Give your new Runbook a suitable name and choose PowerShell as type.
Add Azure Runbook


7) Edit Script
After clicking Create in the previous step the editor will we open. When editing an existing Runbook you need to click on the Edit button to edit the code. You can copy and paste the code below to your editor. Study the green comments to understand the code. Also make sure to compare the variable names in the code to the once created in step 4 and change them if necessary.
Edit the PowerShell code


# PowerShell code
# Connect to a connection to get TenantId and SubscriptionId
$Connection = Get-AutomationConnection -Name "AzureRunAsConnection"
$TenantId = $Connection.TenantId
$SubscriptionId = $Connection.SubscriptionId
 
# Get the service principal credentials connected to the automation account. 
$null = $SPCredential = Get-AutomationPSCredential -Name "SSISJoost"
 
# Login to Azure ($null is to prevent output, since Out-Null doesn't work in Azure)
Write-Output "Login to Azure using automation account 'SSISJoost'."
$null = Login-AzureRmAccount -TenantId $TenantId -SubscriptionId $SubscriptionId -Credential $SPCredential
 
# Select the correct subscription
Write-Output "Selecting subscription '$($SubscriptionId)'."
$null = Select-AzureRmSubscription -SubscriptionID $SubscriptionId
 
# Get variable values
$ResourceGroupName = Get-AutomationVariable -Name 'ResourceGroupName'
$AnalysisServerName = Get-AutomationVariable -Name 'AnalysisServerName'

# Get old status (for testing/logging purpose only)
$OldAsSetting = Get-AzureRmAnalysisServicesServer -ResourceGroupName $ResourceGroupName -Name $AnalysisServerName
$OldStatus = $OldAsSetting.ProvisioningState 

Write-Output "Resuming $($AnalysisServerName). Current status: $($OldStatus)" 
$null = Resume-AzureRmAnalysisServicesServer -ResourceGroupName $ResourceGroupName -Name $AnalysisServerName

#Write-Output "Pausing $($AnalysisServerName). Current status: $($OldStatus)" 
#$null = Suspend-AzureRmAnalysisServicesServer -ResourceGroupName $ResourceGroupName -Name $AnalysisServerName

# Show done when finished (for testing/logging purpose only)
Write-Output "Done"

Note 1: This is a very basic script. No error handling has been added. Check the AzureAutomationTutorialScript for an example. Finetune it for you own needs.
Note 2: There are often two versions of an method like Get-AzureRmSqlDatabase and Get-AzureSqlDatabase. Always use the one with "Rm" in it (Resource Managed), because that one is for the new Azure portal. Without Rm is for the old/classic Azure portal.
Note 3: Because Azure Automation doesn't support Out-Null I used an other trick with the $null =. However the Write-Outputs are for testing purposes only. Nobody sees them when they are scheduled.
Note 4: The code with the Resume is commented out with a hashtag. Either use the two suspend rows or the two pause rows.

7) Testing
You can use the Test Pane menu option in the editor to test your PowerShell scripts. When clicking on Run it will first Queue the script before Starting it. Running takes a couple of minutes.
Testing the script in the Test Pane


8) Publish
When your script is ready, it is time to publish it. Above the editor click on the Publish button. Confirm overriding any previously published versions.
Publish the Runbook


9) Schedule
And now that we have a working and published Azure Runbook, we need to schedule it. Click on Schedule to create a new schedule for your runbook. For this pause script I created a schedule that runs every working day on 9:00PM (21:00). The resume script could for example be scheduled on working days at 7:00AM. Now you need to hit the refresh button in the Analysis Services overview in Azure to see if it really works. It takes a few minutes to run, so don't worry too soon.
Add Schedule


Summary
In this post you saw how you can pause and resume your Azure Analysis Services instance to save some money in Azure during the quiet hours. The screenshots only show the pause script, but the resume script is commented out. For pause and resume you have a couple of options. You could create one script with a parameter that indicates a pause or resume. An other option is to use a fancy if-construction that uses the current status and/or time to decide whether you need to pause or to resume. Or just create two separate scripts for pause and resume.


Monday 24 April 2017

Use BIML to create SSIS packages from csv files

Case
The Case is about importing flat files (CSV’s) without the necessity of metadata.  Because BIML always check’s if the tables are accessible before creating the packages. The first step is to create the tables with BIML and the Second step is creating the SSIS packages to transport the data.

1. Creating tables in the database
2. Packages to fill this database

Because of the size of the solution I’ve created two solution, one for creating the tables and secondly creating the SSSI packages. you can click on the link to go to the other solution (later this month I’will deploy to second script).
In this solution, we create a BIML that is going to create the tables and all the columns are defined as strings

Solution - Creating SSIS packages
we have created the tables in the database, now we can start creating the SSIS package that extract the data from the CSV and transport them into the database.
Our SSIS packages contain a table truncation and a dataflow task with a simple transport from source to destination. We also create a masterpackage which execute the SSIS packages.
The CSV file we are going to use for this solution looks like this

CSV file


1) Determine the colums
Normally (if we look to the example above) we can use this code to determine the columns:

</Columns>
                <Column Name="AgeId" Delimiter=","></Column>
                <Column Name="AgeFrom" Delimiter=","></Column>
                <Column Name="AgeTo" Delimiter=","></Column>
                <Column Name="AgeCategoryEmployee" Delimiter=","></Column>
                <Column Name="AgeCategoryClient" Delimiter="CRLF"></Column>
 <Colums>
 
Note that the last colums uses the CRLF delimiter (CR = Carriage Return and LF = Line Feed)
Now we want BIML to do this for us, so we add a loop that loops through the first row of the textfile  and when the loop is at the end of the row, it uses the CRLF delimiter
The code should look like this:
<Columns>
            <# { # >
                
                StreamReader myFile = new StreamReader(filePath);
                myColumns = myFile.ReadLine().Split(',');
                 myFile.Close();
                
                // to determine the colum delimeter 
                int columnCount = 0;
                string columnDelimiter = ",";

                foreach (string myColumn in myColumns) 
                {
                    columnCount++;
                    if (columnCount == myColumns.Length)
                    {
                        columnDelimiter = "CRLF";
                    }
                    {
                        columnDelimiter = ",";
                    }
                #>
                <Column Name="&lt#=myColumn#>" Delimiter="&lt#=columnDelimiter#>">&lt/Column>
                 } #>
</Columns>


2) Creating the ssis package
The SSIS package we are going to create looks like this:
SISS package


The complete BIML code for creating this packages is:

<Biml xmlns="http://schemas.varigence.com/biml.xsd">
    <#
    string Applicatie = "Manual";
    string Prefix = "Man";
    
    string fileName;
    string path = @"D:\Drop\Man";
    string[] myFiles = Directory.GetFiles(path, "*.csv");
    
    string[] myColumns;
    #>
    <FileFormats>
    <#
    foreach (string filePath in myFiles)
    {

    #>
    <FlatFileFormat Name="FlatFileFormat<#=Path.GetFileNameWithoutExtension(filePath)#>" RowDelimiter="CRLF" ColumnNamesInFirstDataRow="true" IsUnicode="false">
        <Columns>
            <# 
                
                StreamReader myFile = new StreamReader(filePath);
                myColumns = myFile.ReadLine().Split(',');
                 myFile.Close();
                
                // to determine the column delimeter 
                int columnCount = 0;
                string columnDelimiter = ",";

                 foreach (string myColumn in myColumns) 
                {
                    columnCount++;
                    if (columnCount == myColumns.Length)
                    {
                        columnDelimiter = "CRLF";
                    }
                    {
                        columnDelimiter = ",";
                    }
                #>
                <Column Name="<#=myColumn#>" Delimiter="<#=columnDelimiter#>"></Column>
                <# } #>
            </Columns>
        </FlatFileFormat>
            <#}#>
    </FileFormats>
    <Connections>
            <#
            foreach (string filePath in myFiles)
            {
            
            #>
            <FlatFileConnection Name="FF_CSV - <#=Path.GetFileNameWithoutExtension(filePath)#>" FilePath="<#=filePath#>" FileFormat="FlatFileFormat<#=Path.GetFileNameWithoutExtension(filePath)#>">
                
            </FlatFileConnection>
            <# } #>
            <OleDbConnection 
                Name="STG_<#=Applicatie#>" 
                ConnectionString="Data Source=APPL43;Initial Catalog=dummy_STG;Provider=SQLNCLI11.1;Integrated Security=SSPI;Auto Translate=False;">
            </OleDbConnection>
    </Connections> 
        <Packages>

    <#       // Loop trough the files
            int TableCount = 0;
            foreach (string filePath in myFiles)
            { 
                TableCount++;
                fileName = Path.GetFileNameWithoutExtension(filePath);
                #>
                <Package Name="stg_<#=Prefix#>_<#=TableCount.ToString()#>_<#=fileName#>" ConstraintMode="Linear" AutoCreateConfigurationsType="None" ProtectionLevel="DontSaveSensitive">
                    <Variables>
                        <Variable Name="CountStage" DataType="Int32" Namespace="User">0</Variable>
                    </Variables>               
                    <Tasks>
                        <ExecuteSQL ConnectionName="STG_<#=Applicatie#>" Name="SQL - Truncate <#=fileName#>">
                            <DirectInput>TRUNCATE TABLE dbo.<#=Prefix#>_<#=fileName#></DirectInput>
                        </ExecuteSQL>
                        
                        <Dataflow Name="DFT - Transport CSV_<#=fileName#>">
                            <Transformations>
                                <FlatFileSource Name="SRC_FF - <#=fileName#> " ConnectionName="FF_CSV - <#=Path.GetFileNameWithoutExtension(filePath)#>">
                                </FlatFileSource>
                                
                                <OleDbDestination ConnectionName="STG_<#=Applicatie#>" Name="OLE_DST - <#=fileName#>" >
                                <ExternalTableOutput Table="dbo.<#=Prefix#>_<#=fileName#>"/>
                                </OleDbDestination>
                            </Transformations>
                        </Dataflow>
                    </Tasks>
                </Package>
    <#    }    #>

                <!-- Create Master Package -->
                <Package Name="stg_<#=Prefix#>_0_Master" ConstraintMode="Parallel" AutoCreateConfigurationsType="None" ProtectionLevel="DontSaveSensitive">
                    <Tasks>
                    <#  int TableCount2 = 0;
                        foreach (string filePath in myFiles)
                        { 
                                TableCount2++;
                                fileName = Path.GetFileNameWithoutExtension(filePath); #>
                
                            <ExecutePackage Name="stg_<#=Prefix#>_<#=TableCount2.ToString()#>_<#=fileName#>">
                                <ExternalProjectPackage  Package="stg_<#=Prefix#>_<#=TableCount2.ToString()#>_<#=fileName#>.dtsx" />
                            </ExecutePackage>
                        <#
                        }
                        #>    
                    </Tasks>
                </Package>

    </Packages>
</Biml>

<!--Includes/Imports for C#-->
<#@ template language="C#" hostspecific="true"#>
<#@ import namespace="System.Data"#>
<#@ import namespace="System.IO"#>


We call this “3_Generate_Man_SSIS.bml”
If we run this BIML script this will be the end result

End result


Summary
In the first blogspot, we explained how to create the tables, we need these tables which transport the actual data.
It’s important to first create the tables in the database and then create the SSIS packages.
Of course, this is a simple example for filling the staging area, feel free to add more component, like a row count transformation etc.

This whole solution is built with BIML Express.