Thursday 1 March 2018

Add email notification in Azure Data Factory V2

Case
I am running SSIS packages in Azure Data Factory (ADF V2), but I want to get an email notification when my package execution fails. It seems that ADF V2 doesn't have a built-in email notification option. How can I be notified without checking the built-in pipeline monitor in ADF?
Email notification on failure


Solution
For this solution we will be using a Logic App to send an email and trigger it, if an error occurs in ADF. The starting point of this blog post is a working pipeline that executes an SSIS package using a stored procedure.
Data Factory loves Logic App


So, the solution exists of two parts: Logic App (email) and ADF (error handling). The communication between these two Azure parts is done with a JSON message via an HTTP request (post). The JSON message contains the name of the Data Factory and the pipeline that failed, an error message and an email address. You could of course hardcode the email address in Logic Apps, but now you can reuse the Logic App for various pipelines or data factories and notify different people.
{
    "properties": {
        "DataFactoryName": {
            "type": "string"
        },
        "PipelineName": {
            "type": "string"
        },
        "ErrorMessage": {
            "type": "string"
        },
        "EmailTo": {
            "type": "string"
        }
    },
    "type": "object"
}


a) Logic App
We first start with creating the Logic App. We need it before creating the error handler in ADF.

a1) Create new Logic App
Click on Create a resource and locate Logic App under Enterprise Integration. Pick a descriptive name like "ADF-Notifications" and then choose the Subscription, Resource Group and Location. For the Resource Group and this Logic app we use West Europe since we are from the Netherlands.
Create new Logic App


a2) HTTP Trigger
When editing the Logic App we first need to pick a trigger. It is the event that starts this Logic App. Pick the HTTP trigger When a HTTP request is received and then click on edit to specify the parameters. Paste the JSON message from above in the textbox. In the next step we can use these parameters to setup the email.
Add HTTP trigger


a3) Send an email
Add a new step and choose Add an action. Search for "Send an email" and then scroll down to Office 365 Outlook - Send an email. The first time that you use this action you need to login with your Office 365 account. Now you can setup the email with fixed texts mixed with parameters from the JSON message from the previous step. When you are satisfied with the email setup, click on Save in the upper left corner.
Add action to Send an email


a4) Copy URL from HTTP trigger
The Logic App is ready. Click on the HTTP trigger and copy the URL. We need this in ADF to trigger the Logic App.
Copy the URL for ADF


b) Data Factory
Next we will add a new activity in the existing ADF pipeline to trigger the new Logic App.

b1) Add Parameter
To specify the email address of the recipient we will use a pipeline parameter. Go to your existing pipeline (do not select any of the activities in it) and go to the Parameters page. Click on New and add a new String parameter called EmailTo. Add the email address of the recipient in the default value field. You can override the default value when editing the trigger (after save).
Add pipeline parameter


b2) Add Web activity
Next collapse the General activities and drag a Web activity to the canvas. Make sure to give it a suitable name like Error Notification. Add an Activity Dependency (Similar to the Precedence Constraints in SSIS) between the Stored Procedure activity and the Web activity. When right clicking it you can change it to Failure.
Add Web activity


b3) Web activity settings
Select the newly added Web activity and go to the Settings page. In the URL field you must paste the URL from step a4 and as method you need to select Post.
Next step is to add an new header with a JSON message. The header is called Content-Type and its expression is application/json. As body you need to add the following JSON message, but make sure to change the name of Stored Procedure activity. Ours is called Execute Package. The first two items are retrieving the Data Factory name and Pipeline name. The last one is getting the value of the parameter created in step b1.
{
    "DataFactoryName":
        "@{pipeline().DataFactory}",
    "PipelineName":
        "@{pipeline().Pipeline}",
    "ErrorMessage":
        "@{activity('Execute Package').error.message}",
    "EmailTo":
        "@{pipeline().parameters.EmailTo}"
}
.
Add URL and json to Web activity


b4) Testing
Now it is time to test the pipeline. Make sure something is failing in the package. For example by changing a servername or password in the SSIS environment. Or you could just pause your Integration Runtime and run the trigger. Now wait for the email to arrive.
Email notification received


The solution has one downside! Because you are handling the error with an Activity Dependency the entire pipeline succeeds despite of the failing SSIS stored procedure. Check the image below. The last 4 jobs did fail, but show the Status 'Succeeded'. Though there is an error message.
Failed or Succeeded?


b5) Add fail
If you want the correct status when the SSIS stored procedure fails then copy and paste the existing Stored Procedure activity, rename it to for example 'Fail' and replace SQL code with the code below. Then connect the Web activity to this new activity.
--T-SQL Code
Declare @err_msg NVARCHAR(150)
SET @err_msg=N'Error occurred, email was sent'
RAISERROR(@err_msg,15,1)
Add fail


Now we have a Failed status for a failing pipeline. Please leave a comment when you have a better or easier solution for this.
Status Failed


Summary
In this post we showed you how to use a Logic App to send you an email notification in case of a failing pipeline in Azure Data Factory. This saves you a daily login to the Azure portal to check the pipelines monitor. Feel free to adjust the JSON message to your own needs. You could also add an additional notification for successful jobs.

Update dec 1: instead of Office 365 you can now also use SendGrid

Friday 23 February 2018

AAS Snack: process Azure Analysis Services with SSIS

Case
I'm running SSIS and SSAS in Azure. How do I process my tabular model when my ETL has finished? Can I use SSIS to process Azure Analysis Services?
Process Azure Analysis Services


Solution
One option is to process the Azure Analysis Services (AAS) model is with Azure Automation and a PowerShell Runbook. However the good old Analysis Services Processing Task will also work for AAS and lets you process the model right after the ETL has finished. This post explains how to configure it.

1)  Get AAS Server name
First go to your AAS in the Azure portal and copy the server name from the AAS dashboard. It should look like:
asazure://[region].asazure.windows.net/[Name of Analysis Services Server].
You can also find the models available for processing.
Azure Analysis Services


2) Analysis Services Processing Task
Go to your SSIS project in Visual Studio. Open your SSIS package and add the Analysis Services Processing Task to the Control Flow and give it a descriptive name. Then edit it and optionally add a description.
Add Analysis Services Process Task


3) New Connection Manager
Go to the Processing Settings page and click on New to add a new Analysis Services Connection Manager. In the textbox for Server or file name you need to enter/paste the server name from step 1. Then enter the email address and password from the user that can process the model. Select the model you want to process and test your connection. Finally press OK (three times) to return to your task editor.
Add new Connection Manager


4) Object to process
After adding the connection it is time to add one or more objects from your tabular model to process. Press the Add button and select all required objects. For this example the entire model. Then click OK to close the window and change the Process Options, for example to Full Process. Now you are ready to close the Task editor and test it.
Add Object(s) to process


5) Testing
Now it is time to test the package by executing it. If successful, you can finish the package by renaming the connection manager and adding package parameters to supply the URL, e-mail address and password.
Executing


Summary
This post showed you how to process an AAS model with a standard SSIS task. More information about deploying to and executing in ADF can be found here.

Wednesday 14 February 2018

Cognitive functions U-SQL: text sentiment

Case
U-SQL has cognitive capabilities to analyse a text on sentiment. How does that work? Do I need Azure Cognitive-services?
U-SQL Cognitive Capabilities


Solution
Good news is that you only need Azure Data Lake (Analytics and Store) with a U-SQL job. Downside is that U-SQL does not yet have the full functionality of Azure Cognitive Services, but all the basics are available. This blog post describes the text sentiment analysis, but there is a second text analysis capability for Key phrases extraction which will be handled in an future post.

Please: see our blog post about Image Tagging with U-SQL in Data Lake if you have not yet installed the Cognitive Functions for U-SQL that we will be using for this post.

Starting point
The starting point of this blog post is an Azure Data Lake Analytics (ADLA) that is connected to an Azure Data Lake Store (ADLS) with some texts to analyse. For this example we used a transscript of Obama's Victory speech from 2008, but you could for example also use a transcript of Trump's Davos speech from a few weeks ago. The text file will be stored in an ADLS folder called TextSentiment.

Text sentiment
The text sentiment analysis will return two columns for each row with text. The first column is the sentiment classification: Positive, Negative or Neutral. The second column is a score between negative 1 and positive 1. Where a negative number close to -1 means it is very sure that the text is negative and vice versa where a positive number close to 1 means that it is very sure that the text is positive. This also allows you to take an average on the entire text file to get an overall score.

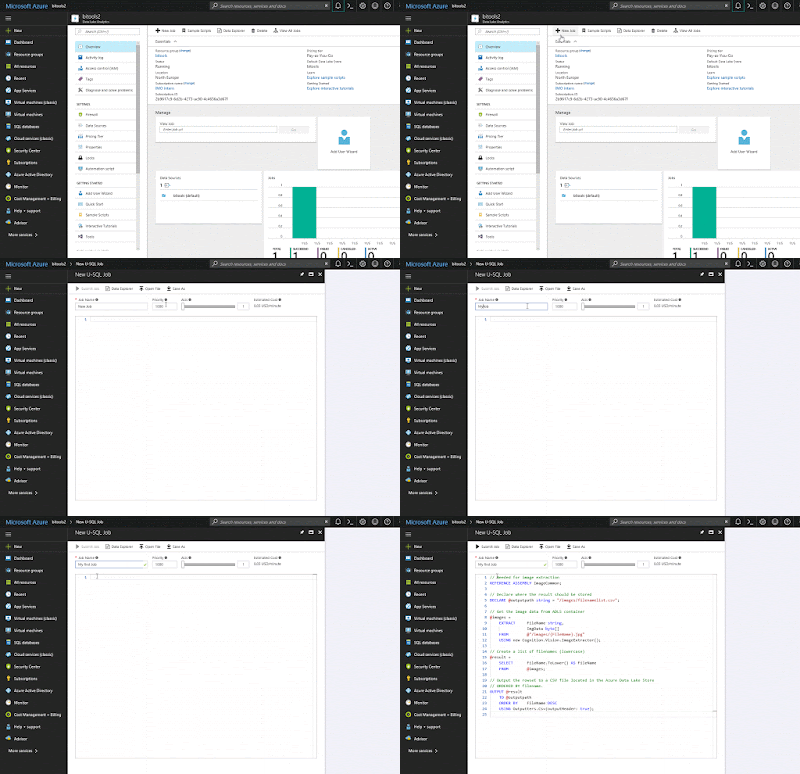
1) Create new job
On the ADLA overview page click on +New Job and then give it a suitable name before we start coding. A descriptive name allows you to find your script/job in the overview of all jobs.
Create new U-SQL job


2) Referencing assemblies
The cognitive scripts in U-SQL always start with adding references. For text sentiment we need to add a reference to the assembly "TextSentiment".
// Needed for text sentiment
REFERENCE ASSEMBLY TextSentiment;

3) Extract text file
Next step is to extract the text file with the transcript from the ADLS container and store them in a rowset variable called @speech. Each row in the transcript text file contains one paragraph of text. Therefor the we will use Extractors.Text() and only one string column. We replaced the default delimiter with something that doesn't occur in the text (|-pipeline) and if it does the silent option will ignore it and continue without throwing errors.

The extraction script looks a bit like a T-SQL SELECT statement, but because we are getting unstructured data it starts with EXTRACT instead of SELECT and we need to specify the data type for each column we extract (Schema on Read). The FROM does not get the data from a table, but from a file in the ADLS container called "TextSentiment".
// Get the transcript file from the ADLS container
@speech =
    EXTRACT Text string
    FROM @"/TextSentiment/ObamasVictorySpeechTranscript.txt"
    USING Extractors.Text(silent: true, delimiter: '|');


4) Transform data
The method that analyses the text for sentiment takes one readonly input column and three output columns: the original text, classification and confidence. The confidence column can be turned off/on with the Boolean parameter (see code). The name (or datatype) of the output columns cannot be changed.
//Analyse the text and return classification and confidence
@sentiment =
    PROCESS @speech
    PRODUCE Text,
            Sentiment string,
            Conf double
    READONLY Text
    USING new Cognition.Text.SentimentAnalyzer(true); // True adds the confidence column

5) Output data
Now we can output the data to a file in an ADLS container. In the first output we will see a score per line and in a second output we will aggregate the confidence column to get an overal score.
// Output sentiment per line
OUTPUT @sentiment
TO "/TextSentiment/SentimentAnalyzerObama.txt"
USING Outputters.Csv(outputHeader: true);

// Aggregate the Confidence to get an overall score
// Note: it doesn't take into account the length of
// each row. You can find the length with Text.Length
@average =
    SELECT AVG(Conf) AS OverallSentimentScore
    FROM @sentiment;

// Output overall score sentiment 
OUTPUT @average
TO "/TextSentiment/SentimentAnalyzerObamaOverall.txt"
USING Outputters.Csv(outputHeader: true);
Download the complete script here.

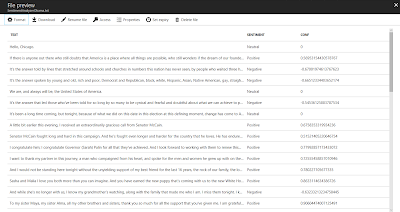
The result
Now the script is ready to run. Click on the submit button and wait for the job to finish. This could take a few moments! Then browse to the ADLS folder and preview the file to see the result.
The result with the sentiment and score per paragraph


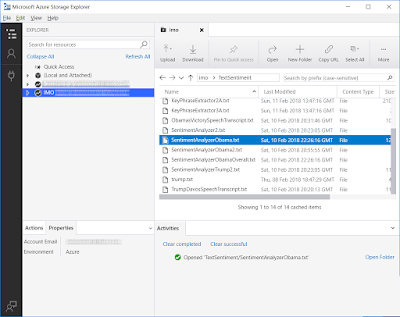
An other new options to view the result with the Azure Storage Explorer. This new Microsoft tool allows you to browse to your storage accounts and data lake stores to download the result of your U-SQL query.
Azure Storage Explorer


Summary
In this post you saw how to analyse texts for sentiment. Analyzing media like Twitter or Facebook or emails to/from your helpdesk is probably more interesting then speeches from presidents of the United States. Some might say that the overall score with the AVG is perhaps a bit arbitrary because it shows the confidence, but combine it with the text length and it will give some good insights on the entire text.

As said before the text sentiment in Azure Cognitive Services - Text Analytics API has some additional options like support of multiple languages and language detection, but we will show that in a future post.

Thursday 25 January 2018

Power BI - Bookmarking feature update (December 2017)

Case
In an earlier post we explained and showed you how to use the new bookmarking feature (October 2017 update) through an example combining a chart and related information of this chart. Besides that, you can also use bookmarks to switch between two charts in the same area in your report page. Unfortunately, this had its limitations: passing filters and multiple toggles. What has changed in the bookmarking functionality that makes it more user-friendly to use?

Bookmark updates December 2017


Old situation
Shortly after the release in October, we implemented bookmarks at our customer. We used two different charts in the same area in a report page to let our users look at the data from two perspectives, without making a new page or report. This is one of the great benefits of using bookmarking.

Unfortunately we quickly realize that this is a nice added functionality, but still has its limitations. In this post we will show you two examples: the passing of selected filters to another bookmark and multiple toggle buttons in one page.

Example 1: passing of selected filters
The selected filter in one bookmark doesn't work on the other bookmark when you switch from chart. If you select year 2016 in the first bookmark (with the first chart) and clicking on the button for the other bookmark (the second chart), the second chart will show all the data instead of only 2016.

Old - Filters not applying other bookmarks


Example 2: multiple toggle buttons
Multiple buttons in one report page to switch between charts doesn't work. When you have two toggle buttons (left and right area) where you want to switch charts: clicking toggle button number two on the right also effects the button (and the chart) on the left.

Old - Multiple toggle buttons doesn't work


Solution
As mentioned before, there are some updates related to the bookmark feature. These will solve the two examples in the old situation we described earlier. With this update, they also give you the ability to create a bookmark with a cross-highlighting state of your report. Before, cross-highlighting was not included as part of a bookmark and you could only save the entire state of a report (without selected filters, selected bar in a chart etc.). Now everything that is in your report can be saved as a part of a bookmark.

For now we will focus on solving the problems in the two examples described earlier about filtering and multiple toggle buttons in one report page.

Create the Report (images)
First, make sure you have the latest Power BI Desktop version. If you are using Power BI Desktop from the Microsoft Store, it updates automatically. Otherwise you can download the latest version of Power BI Desktop here.

The starting point in both reports is the same report from an earlier post. In example 1 we created a new chart on the same spot in the left corner of the chart 'Total Sales and Profit per Month'. We added a toggle button above the chart where you can switch between those two charts. In example 2 on a new report page we also added a new chart on in the right upper corner of the chart 'Total Sales and Profit per State'. We also use a toggle button here. Now we have have two toggle buttons on the same report page.

We created the toggle buttons by our own using Google images and then customized them with Paint.NET. For the text before the buttons, we used the custom visual 'Long Text Viewer'. You can download it here (it is not available in the store).

Result example 1
With this update you now have three categories of types of stuff to save in a bookmark: data (slicers, filters, cross-highlighting etc.), display (hiding visual, spotlight etc.) and current page (which page is related to the bookmark). You can turn these categories on and off by the settings of a bookmark.

New - Turn items on and off


To fix the problem from example 1, you have to uncheck the data category for both bookmarks (charts) which are involved with the toggle button. Now it only effects the buttons and the charts.

New - Selected filters effects other bookmark


Result example 2
Besides those new three categories, there is another option available: Selected Visuals (default is All Visuals). You will find this option below the categories.

New - Selected visuals

To fix the problem from example 2, we use this Selected Visuals. As said before, by default it will bookmark the entire page, but now you can select the visuals (charts, buttons etc.) that you want to include in the bookmark. First, we select all the visuals related to the left toggle button (black and off). You need to repeat this for the left toggle button, but now for all the visuals when this button is on (grey). Repeat this for the toggle button on the right and by the end there are four bookmarks. Do not forget to configure 'Link' in each bookmark for making both buttons work. Finally, select Selected Visuals for all those four bookmarks. To be clear: it seems simple, but it is meticulous work!

Below you will find the making of this solution.


NOTE:
By creating a bookmark with Selected Visuals, note the following:
  • Make sure you do not have a bookmark selected when creating a new one. Otherwise it will overwrite this bookmark with the new selected visuals. You can only deselect the bookmark by making an image visible/hidden.
  • After creating the bookmark with selected visuals, you cannot see which visuals are related to this bookmark. They are no longer marked in gray. 
  • You cannot give the visuals a name. In case of multiple toggle buttons you have at least four times a visual called 'image'. By place them in order you can distinguish them.  
You can download the entire Power BI report with all the examples here.

Conclusion
In this post you saw how the new updates related to the bookmark feature gives you more flexibility to creating bookmarks. Not all the technical changes are difficult (check or uncheck), but this is a huge update that will eliminates uncertainties and confusion among our users.

Unfortunately, there are still some updates needed to make it more user friendly to build/maintain the bookmarks. For example the opportunity to give the visuals a name or show which visuals are related to a bookmark (in case of selected visuals).

If you want more information about creating bookmarks in the first place (the basic), click here.

Monday 1 January 2018

Pause everything on your Azure playground - Tags

Case
To prevent unnecessary high bills because I forgot to turn off services, I want to pause everything in my Azure 'playground' subscription. However I want to give my co-workers more control to decide which machines and services they don't want to pause each night. Your current solution works with a centralized exception list that needs to be maintained by someone. Is there an alternative solution?
Pause everything v2


Solution
You should of course make some agreements about being careful with pricey services, but you can support that with a 'simple' technical solution: run a PowerShell script in Azure Automation Runbook that pauses all often used services each night. In this version of the script, exceptions are handled with tags that people can add to their own server or service. Here is how you can add a tag to for example Azure Analysis Services.
Add tags to your service or server


For this example we will pause the following Azure parts:
  • Azure Virtual Machines (not classics)
  • Azure SQL Data Warehouses
  • Azure Analysis Services
This is not a complete list, but once you understand these three, it should be relatively easy to add more services. Still to hard? Add a comment to suggest more services.

1) Automation Account
First we need an Azure Automation Account to run the Runbook with PowerShell code. If you don't have one or want to create a new one, then search for Automation under Monitoring + Management and give it a suitable name like 'maintenance', then select your subscription, resource group and location. For this example I will choose West Europe since I'm from the Netherlands. Keep 'Create Azure Run As account' on Yes. We need it in the code. See step 3 for more details.
Azure Automation Account


2) Credentials
Next step is to create Credentials to run this runbook with. This works very similar to the Credentials in SQL Server Management Studio. Go to the Azure Automation Account and click on Credentials in the menu. Then click on Add New Credentials. You could just use your own Azure credentials, but the best options is to use a service account with a non-expiring password. Otherwise you need to change this regularly.
Create new credentials


3) Connections
This step is for your information only and to understand the code. Under Connections you will find a default connection named 'AzureRunAsConnection' that contains information about the Azure environment, like the tendant id and the subscription id. To prevent hardcoded connection details we will retrieve these fields in the PowerShell code.
Azure Connections


4) Modules
The Azure Analysis Services methods (cmdlets) are in a separate PowerShell module which is not included by default. If you do not add this module you will get errors telling you that the method is not recognized. See below for more details.
The term 'Get-AzureRmAnalysisServicesServer' is not recognized
as the name of a cmdlet, function, script file, or operable program.


Go to the Modules page and check whether you see AzureRM.AnalysisServices in the list. If not then use the 'Browse gallery' button to add it, but first add AzureRM.Profile because the Analysis module will ask for it. Adding the modules could take a few minutes!
Add modules


5) Runbooks
Now it is time to add a new Azure Runbook for the PowerShell code. Click on Runbooks and then add a new runbook (There are also several example runbooks of which AzureAutomationTutorialScript could be useful as an example). Give your new Runbook a suitable name like 'PauseEverything' and choose PowerShell as type.
Add Azure Runbook


6) Edit Script
After clicking Create in the previous step the editor will be opened. When editing an existing Runbook you need to click on the Edit button to edit the code. You can copy and paste the code below to your editor. Study the green comments to understand the code. Notice that this version doesn't use Runbook variables.
Edit the PowerShell code


# PowerShell code
# Connect to a connection to get TenantId and SubscriptionId
$Connection = Get-AutomationConnection -Name "AzureRunAsConnection"
$TenantId = $Connection.TenantId
$SubscriptionId = $Connection.SubscriptionId
  
# Get the service principal credentials connected to the automation account. 
$null = $SPCredential = Get-AutomationPSCredential -Name "Administrator"

# Login to Azure ($null is to prevent output, since Out-Null doesn't work in Azure)
Write-Output "Login to Azure using automation account 'Administrator'."
$null = Login-AzureRmAccount -TenantId $TenantId -SubscriptionId $SubscriptionId -Credential $SPCredential
  
# Select the correct subscription
Write-Output "Selecting subscription '$($SubscriptionId)'."
$null = Select-AzureRmSubscription -SubscriptionID $SubscriptionId


################################
# Pause AnalysisServicesServers
################################
Write-Output "Checking Analysis Services Servers"

# Get list of all AnalysisServicesServers that are turned on (ProvisioningState = Succeeded)
# but skip AnalysisServicesServers that have an Environment tag with the value Production
$AnalysisServicesServers = Get-AzureRmAnalysisServicesServer | 
Where-Object {$_.ProvisioningState -eq "Succeeded" -and $_.Tag['Environment'] -ne "Production"}

# Loop through all AnalysisServicesServers to pause them
foreach ($AnalysisServicesServer in $AnalysisServicesServers)
{
    Write-Output "- Pausing Analysis Services Server $($AnalysisServicesServer.Name)"
    $null = Suspend-AzureRmAnalysisServicesServer -Name $AnalysisServicesServer.Name
}


################################
# Pause Virtual Machines
################################
Write-Output "Checking Virtual Machines"

# Get list of all Azure Virtual Machines that are not deallocated (PowerState <> VM deallocated)
# Filtering on tags is not supported for Azure Virtual Machines
$VirtualMachines = Get-AzureRmVM -Status |
Where-Object {$_.PowerState -ne "VM deallocated"} #-and $_.Tag['Environment'] -ne "Production"}

# Loop through all Virtual Machines to pause them
foreach ($VirtualMachine in $VirtualMachines)
{
    # Get-AzureRmVM does not show tags therefor
    # filtering in Where-Object does not work.
    # Workaround: if statement within loop
    if ($VirtualMachine.Tags['Environment'] -ne "Production")
    {
        Write-Output "- Deallocating Virtual Machine $($VirtualMachine.Name) "
        $null = Stop-AzureRmVM -ResourceGroupName $VirtualMachine.ResourceGroupName -Name $VirtualMachine.Name -Force 
    }
}
# Note: Classic Virtual machines are excluded with this script because they don't support Tags.
 

################################
# Pause SQL Data Warehouses
################################
Write-Output "Checking SQL Data Warehouses"

# Get list of all Azure SQL Servers
$SqlServers = Get-AzureRmSqlServer

# Loop through all SQL Servers to check if they host a DWH
foreach ($SqlServer in $SqlServers)
{
    # Get list of all SQL Data Warehouses (Edition=DataWarehouse) that are turned on (Status = Online)
    # but skip SQL Data Warehouses that have an Environment tag with the value Production
    $SqlDatabases = Get-AzureRmSqlDatabase -ServerName $SqlServer.ServerName -ResourceGroupName $SqlServer.ResourceGroupName |
    Where-Object {$_.Edition -eq 'DataWarehouse' -and $_.Status -eq 'Online' -and $_.Tag['Environment'] -ne "Production"} 

    # Loop through all SQL Data Warehouses to pause them
    foreach ($SqlDatabase in $SqlDatabases)
    {
        Write-Output "- Pausing SQL Data Warehouse $($SqlDatabase.DatabaseName)"
        $null = Suspend-AzureRmSqlDatabase -DatabaseName $SqlDatabase.DatabaseName -ServerName $SqlServer.ServerName -ResourceGroupName $SqlDatabase.ResourceGroupName
    }
}


Write-Output "Done"

Note 1: This is a very basic script. No error handling has been added. Check the AzureAutomationTutorialScript for an example. Finetune it for you own needs.
Note 2: There are often two versions of an method like Get-AzureRmSqlDatabase and Get-AzureSqlDatabase. Always use the one with "Rm" in it (Resource Managed), because that one is for the new Azure portal. Without Rm is for the old/classic Azure portal.
Note 3: Because Azure Automation doesn't support Out-Null I used an other trick with the $null =. However the Write-Outputs are for testing purposes only. Nobody sees them when they are scheduled.
Note 4: The code for Data Warehouses first loops through the SQL Servers and then through all databases on that server filtering on edition 'DataWarehouse'.
Note 5: The method to get Virtual Machines (Get-AzureRmVM) doesn't show tags. Therefor we cannot use the Where-Object filter to filter out certain tags. Workaround: if-statement within foreach loop.

7) Testing
You can use the Test Pane menu option in the editor to test your PowerShell scripts. When clicking on Run it will first Queue the script before Starting it. If nothing needs to be paused the script runs in about a minute, but pausing or deallocating items takes several minutes.
Testing the script in the Test Pane


8) Publish
When your script is ready, it is time to publish it. Above the editor click on the Publish button. Confirm overriding any previously published versions.
Publish the Runbook


9) Schedule
And now that we have a working and published Azure Runbook, we need to schedule it. Click on Schedule to create a new schedule for your runbook. For this pause everything script I created a schedule that runs every day on 2:00AM (02:00). This gives late working colleagues more than enough time to play with all the Azure stuff before there service will be paused.
Add Schedule


Summary
In this post you saw how you can pause all expensive services in an Azure playground environment. If a co-worker don't wants to pause his/her service then he/she can skip that by adding a tag to the specific server or service. As mentioned before: this is not a complete list. Feel free to suggest more services, that can be paused, in the comments.