Saturday 30 June 2018

Power Apps Snack: Add confirmation to delete button

Case
I generated an app with Microsoft PowerApps, but the delete button is missing a confirmation and deletes records a bit too easy. Is there an option to ask something like "are you sure?".
Need some delete confirmation


Solution
There is no out of the box option, but you could change the delete button action a little bit. In this example we will add two more hidden buttons (Confirm and Cancel). The Delete button will unhide these buttons. The Confirm will then do the actual delete and the Cancel will hide the buttons again.

1) Create variable
The first step is to create a Boolean variable for this screen that will be used to show or hide buttons. In the screens pane on the left side click on the screen with the Delete button. Then add the following expression in the OnVisible property: UpdateContext({isVisible: false}). Now you have a variable called isVisible.
Add screen variable with value 'false'


2) Add Confirmation and Cancel icons
Add two icons to your screen via the Insert ribbon. One for the Confirmation action and one for the delete. Also add a label above it with a text like "Are you sure?".
Add icons and label


3) Move delete code
Now Cut and Paste the OnSelect code from the Delete button to the Confirm button and change the Delete button code to UpdateContext({isVisible: true}). This will change the variable value from false to true.
Switch delete code


Add the following 'reverse' code to the OnSelect of the Cancel button: UpdateContext({isVisible: false}). This will change the variable value back from true to false.

4) Hide buttons and label
Since we don't want to show the icons when you haven't clicked on the delete button, we need to change the Visibily property of the two icons and the label. We will replace the default value 'true' to the isVisible variable.
Change Visibility


The intermediate result is a delete button with a confirmation.
Delete with confirmation


5) Disable other buttons
To finish it off we can disable the other buttons so that the user has to confirm or cancel the delete. To accomplish this we need to adjust an expression in the DisplayMode property of the Delete and Edit button. You need to add: && !isVisible to the if contruction. To make it a little more visable that the buttons are disabled you could change their disabled font color to grey.
Final adjustments


The result


Summary
In this post you learned how to add a confirmation visual to a delete button and learned how to add and use variables to change properties of items on your screen (because you cannot use code like: btnCancel.Visible = true).

The (value of the) variable is only usable on this screen. Other screens cannot use it. In a next post we will show you how to pass values from one screen to another screen.

Note that Microsoft PowerApps isn't part of Azure, but part of Office 365. However this tool could be very useful in Business Intelligence / Data Warehouse projects to replace manually created Excel / CSV source files with for example forecast data or simple lists that don't come from a source system. Users often 'accidentally' damage such files for example by adding or deleting columns. With PowerApps you can prevent that. An other great way to use Power Apps is within Power BI as an input form, but more about that in a next blog.


Monday 4 June 2018

Execute Logic Apps in Azure Data Factory (V2)

Case
In an earlier post, we showed you how to use Azure Logic Apps for extracting email attachments without programming skills. The attachments contain the source files. Because this step is part of an Data Warehouse solution, it would be nice to run this together with the ETL process that needs these source files. How can we archive this?

Azure Data Factory V2 - Execute Azure Logic App


Solution
In the first few years of Azure, it was not possible to run your Data Warehouse process entirely in the Cloud. Of course, you could store the data in Azure SQL Database or Azure SQL Data Warehouse (see here for the differences between these two), but when you are using SQL Server Integration Services (SSIS) you still had to run this on-premise or create a custom Virtual Machine. Until recently. This post explains how you can execute SQL Server Integration Services (SSIS) packages in Azure, using Azure Data Factory (ADF) V2.

Besides running SSIS packages in ADF V2, you can also execute other Azure services in here. For example: Azure Databricks, Azure Data Lake Analytics (U-SQL scripts) and HDInsight (services like Hadoop, Spark, Hive etc.).

This post shows you how to execute an Azure Logic App inside ADF V2.

1) Add and configure activity
Create a new pipeline or edit an existing one. Select "General" and choose the Web activity. Give it a suitable name and go to Settings. Fill in the URL, corresponding to the one inside the HTTP trigger in the Azure Logic App, you created earlier:

Azure Logic App - URL in HTTP Trigger


Select the "POST" API Method. Now add a Header and enter the following:
  • KEY: Content-Type
  • VALUE: application/json
When you are finished, click Publish All.

Azure Data Factory V2 - Configure Web Activity


NOTE:
Nowadays the Body is also mandatory, enter the following: @concat('{','}')

2) Run pipeline
After you have published your pipeline, go to Trigger and select Trigger (Now). You can also run the pipeline without publishing it: using Debug. In this mode you will see the result of the pipeline run in the bottom at Output.

NOTE:
If you do not publish your pipeline, you are getting the following error when you are trying to use Trigger (Now):

Pipeline Error - Use Trigger (now) without publishing


NOTE 2:
If you do not publish your pipeline, you are getting the following warning when you want to access the monitor screen:

Pipeline Warning - Go to Monitor without publishing


3) Result
Once you have triggered the pipeline, go to Monitor on the left in the menu. Default it will open the Pipeline Runs overview, but you can also select the Integration Runtimes or Trigger Runs overview at the top.

You can also watch the Runs history of the Logic App:


View Result - Logic App run history


Summary
This post explains how you can manage other ETL, next to SSIS, in your Data Warehouse using one orchestrator. In this case we execute an Azure Logic App using Azure Data Factory (V2).

Click here to see how you can also execute a SSIS package using Azure Logic Apps.

Thursday 31 May 2018

Snack: Executing SSIS packages in Azure Logic App

Case
Can I use a Logic App to execute an SSIS package located in the Azure Integration Runtime environment (ADF V2)? Logic App has several triggers that could be interesting as a start moment to execute an SSIS package. For example when a new file is added in a Blob Storage Container, a DropBox, a OneDrive or an (S)FTP folder. How do I do that?
Logic App


Solution
If you want to trigger something to start an SSIS package instead of scheduling it in ADF, then Logic App could be very handy. Of course you can accomplish the same in SSIS with some custom code or perhaps a Third Party component, but Logic App is much easier and probably cheaper as well.

For this example we will start an existing package when a new file is added to a certain Azure Blob Storage container. The Blob Storage Container and the SSIS package in the Integration Runtime environment already exist.

1) Logic App
Create a new Logic App by clicking on the + sign (Create new resource) on the azure portal. It is located under Integration. Give it a descriptive name like "ExecuteSsisWhenBlobFileIsCreated". After the creation of the Logic App choose the Blank Logic App as template to start.
Create new Logic App


2) Azure Blob Storage trigger
For this example we will be using a trigger on a Azure Blob Storage container: "When a blob is added or modified (properties only) (Preview)". Search for Blob and you will find the right trigger. Create a connection to the right Azure Blob Storage (if you already have created one within the same resource group then that one will be reused). Select the correct container and set the interval to your own needs.
Logic App Blob Storage Trigger


3) SQL Server Execute Query
The next step is to create SQL code that executes our package(s). You can easily create the SQL for this in SSMS. Go to your package in the Catalog. Right click it and choose Execute... Now set all options like Logging Level, Environment and 32/64bit. After setting all options hit the Script button instead of the Ok button. This is the code you want to use. You can finetune it with some code to check whether the package finished successfully.
Generating code in SSMS


The code below was generated and finetuned. Copy the code below (or use your own code) to use it in the next step.
-- Variables for execution and error message
DECLARE @execution_id bigint, @err_msg NVARCHAR(150)

-- Create execution and fill @execution_id variable
EXEC [SSISDB].[catalog].[create_execution] @package_name=N'Package.dtsx', @execution_id=@execution_id OUTPUT, @folder_name=N'SSISJoost', @project_name=N'MyAzureProject', @use32bitruntime=False, @reference_id=Null, @useanyworker=True, @runinscaleout=True

-- Set logging level: 0=None, 1=Basic, 2=Performance, 3=Verbose 
EXEC [SSISDB].[catalog].[set_execution_parameter_value] @execution_id,  @object_type=50, @parameter_name=N'LOGGING_LEVEL', @parameter_value=1 

-- Set synchonized option 0=A-SYNCHRONIZED, 1=SYNCHRONIZED 
-- A-SYNCHRONIZED: don't wait for the result
EXEC [SSISDB].[catalog].[set_execution_parameter_value] @execution_id,  @object_type=50, @parameter_name=N'SYNCHRONIZED',  @parameter_value=1 

-- Execute the package with parameters from above
EXEC [SSISDB].[catalog].[start_execution] @execution_id, @retry_count=0

-- Check if the package executed succesfully (only for SYNCHRONIZED execution)
IF(SELECT [status] FROM [SSISDB].[catalog].[executions] WHERE execution_id=@execution_id)<>7
BEGIN
 SET @err_msg=N'Your package execution did not succeed for execution ID: ' + CAST(@execution_id AS NVARCHAR(20))
 RAISERROR(@err_msg,15,1)
END


Now back to the Logic App. Add a new action called SQL Server Execute Query (not stored procedure) and create a connection to the SSISDB where your packages are located. Paste your code to execute your package in the query field of this new action.
Action SQL Server Execute Query


Note: When creating your SSISDB in ADF, make sure the option 'Allow Azure services to access' is turned on.

4) Testing
Save your Logic App and add a new file to the selected Blob Storage Container. Then watch the Runs history of the Logic App and the Execution Report in the Integration Services Catalog to view the result.

Summary
This post explains how to execute an SSIS package with a trigger in Logic App instead of scheduling it in Azure Data Factory. If you are using the Stored Procedure Activity in ADF to execute SSIS packages then you can reuse this code. In a next post we will see an alternative for Logic App.

Note: steps to turn your Integration Runtime off or on can be added with an Azure Automation action.

Friday 27 April 2018

Runbook with ADF: Method not found

Case
A little over two weeks ago we created a new Azure Automation account with a PowerShell runbook to pause and resume the ADF Integration Runtime, but got a strange error when running the script:
Method not found


Get-AzureRmDataFactoryV2IntegrationRuntime: Method not found: 'Newtonsoft.Json.Serialization.IAtrributeProvider Newtonsoft.Json.Serialization.JsonProperty.get_Attribute()'.

Of course the script did work before so what had changed since the last time?

Solution
One of the steps to get the pause and resume script working, is to add assemblies for Azure Data Factory (AzureRM.DataFactoryV2) and Azure Profile (AzureRM.profile). Both where updated on April 10. The ADF assembly from 0.5.2 to 0.5.3 and Profile from 4.5.0 to 4.6.0.

Apparently there is a bug: The updated AzureRM.profile assembly requires a newer version of Newtonsoft.Json which is not yet available on Azure Automation. This means the script will work on your local machine, but not yet in Azure Automation. Microsoft is working on an update.

Meanwhile you can use the following temporally workaround: use the previous version of both assemblies. First remove the two new assemblies from your Azure Automation account and then go to AzureRM.profile. Scroll down to the Version History list and click in the previous version. Then hit the Deploy to Azure Automation button.
Deploy to Azure Automation


You will be redirected to the Azure portal where you must select the Automation account to deploy the previous version of the assembly. Select the correct Automation account and click on the OK button.
Select Automation account


Repeat this for AzureRM.DataFactoryV2 and then you are good to go.

Summary
There is a bug on which Microsoft is already working. In the meantime just downgrade to the previous versions or wait for an update.

Saturday 31 March 2018

Use Logic Apps for extracting Email Attachments

Case
Sometimes it happens that source files are delivered via email. In that case you could extract these files with for example a Script Task in SQL Server Integration Services (SSIS) or a PowerShell Script, but this requires some serious programming in C#, VB.net or PowerShell . Are there other and easier ways to get email attachments without programming skills?

Azure Logic Apps - Codeless and serverless


Solution
As we slowly move from on-premises Data Warehouses (DWH) to Azure, we could use other Azure parts to solve this: Azure Logic Apps. With this, you can build automatic workflows without writing code in C# or other programming languages. For example, extract social media data like Twitter tweets or using it for Azure Data Factory V2 notifications. For a lot of BI specialist writing code can be a threshold, so this service offers a way out. We will store these email attachments in Blob Storage. After that, you can load these files into your DWH using SSIS for example.

Starting point of this post is an existing storage account and blob container.

1) Create new Logic App
Go to your Azure portal and type in "Logic Apps" in the search bar Search resources, services and docs. Locate Logic App under Services and click on Add. Give it a suitable name like "ExtractEmailAttachments" and then choose the Subscription, Resource Group and Location. For the Resource Group and this Logic app we use West Europe since we are from the Netherlands.

Azure Portal - Create Logic App


2) Add trigger
When editing the Logic App, we first need to pick a trigger. It is the event that starts this Logic App. In this case, using Azure Data Factory, we pick the HTTP trigger When a HTTP request is received


Logic Apps Designer - Add HTTP trigger


NOTE:
When you open the Logic App for the first time, you can choose several (common) triggers. You can also choose existing Logic Apps templates for known applications or purposes to use it as an example or starting point. 

3) Get emails
Next step is to retrieve the emails. Click on New step and Add an action. Choose the Connector "Office 365 Outlook", search for "Get email" and select Office 365 Outlook - Get emails. The first time that you use this action, you need to login with your Office 365 account. Now you setup this action by choosing the Outlook folder, select only unread messages including the attachments and what subject the email contains (like in the Outlook client). Click on Save in the upper left corner when you are finished.

Logic Apps Designer - Add action Get Emails
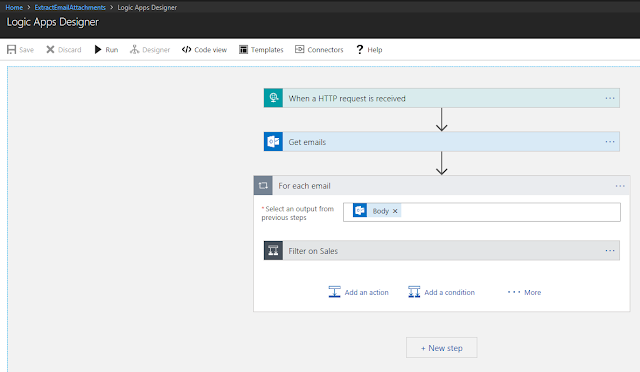


4) Filter emails
In this scenario we are receiving various source files per email each day, but we first want to retrieve attachments from emails with a specific subject and store those in a separate blob storage container. For other email subjects we can add more conditions and save all those files in there own blob storage containers. That's why we are looping through the inbox (or another Outlook folder) and filter per subject. Add a new step and choose Add a condition to filter on a specific source file. Now automatically the for each will appear, because we are receiving multiple emails in the previous step. Give the condition a suitable name, because you have to add more conditions to separate the different source files (we only show one condition in this post).

Logic Apps Designer - Add condition


5) Store data in blobs
Now that we have filtered the emails per subject, we must store the attachment (which contains the data) itself. Add an action on the 'if true' side and choose "Azure Blob Storage". Inside this category, choose Azure Blob Storage - Create blob. The first time that you use this action, you need to create a connection. Choose the storage account and give the connection a suitable name. Now you can setup this action by defining the Folder path, Blob name and Blob content. As said earlier, we are retrieving new source files every day. That's why the blob name will contain the day of load. This is the expression:
concat('DWH01_Sales_',
formatDatetime(utcNow(),'yyyy'), '-', formatDatetime(utcNow(),'MM'), '-',
formatDatetime(utcNow(),'dd'),'.csv')

Logic Apps Designer - Create blob


NOTE:
There is no separate action to create a new folder in the Blob Storage container, but it will be created automatically when you save the first file in the container.

6) Send email when succeeded
Every time the data is stored into a new blob, we will confirm this by sending an email. In this case, we will send the email to the same account as step 2 (Get Emails). You can of course send it to developers or administrators in your organization as well. In that case you must create a new connection by clicking change connection, because now this action will automatically use the same Office 365 connection as before. Insert a new step and select "Office 365 Outlook" and choose the action Office 365 Outlook - Send an email. We create the following Body:

Dear User,

The run of DWH01_Sales has completed successfully for March 31, 2018.

Kind regards,
Azure Logic Apps

Therefore we need to use the following expression:
concat('The run of DWH01_Sales has completed successfully for '
, formatDatetime(utcNow(),'MMMMM'), ' ', formatDatetime(utcNow(),'dd'), ', '
, formatDatetime(utcNow(),'yyyy'), '.')

Fill in the Subject and select "To" to send the email To the account used in the Office 365 connection.
Logic Apps Designer - Send email


7) Mark email as read
After we have sent the succeed email, we want to mark the processed emails (Daily Schedule) as read. Insert a new step and select "Office 365 Outlook" and choose the action Office 365 Outlook - Mark as read. Click on Message Id  and choose "Message Id", based on step 2 (Get Emails). You have to click on "See more" to make it appear in the list.

Logic Apps Designer - Mark as read


8) Move email to archive
Finally, we will move the emails to an archive folder. We created separate mail folders in Outlook for each subject/source file. Insert a new step and select "Office 365 Outlook" and choose the action Office 365 Outlook - Send an email. Choose the Message Id  and select the specific sub Folder in archive.


Logic Apps Designer - Move email


Result
Now let's see if it all works. Make sure you have sent the email "DWH01_Sales DAILY SCHEDULE" and it is unread. Click in the Logic Apps Designer on Run. Now wait for the succeeded email...it works!


Result - Received succeeded email


The source file is also stored into a new blob. See below the result in Azure Storage Explorer.

Result - File stored as new blob


Summary
In this post we showed you how to build a Logic App to ingest email attachments as source files. All without programming skills and easily to maintain easily as part from an ETL process.

Click here to see how to execute this Logic App with Azure Data Factory V2 as part of an DWH solution in Azure.

This is why we started the Logic App with an HTTP trigger that can be called from other applications. If you do not want to integrate the Logic App and use it as a separate solution, then you should start with a different trigger. For example a Recurrence trigger or When a new email arrives