Sunday, 13 February 2022

ADF Snack - Empty file when creating new folder

Case
I'm adding files to a Data Lake container via ADF, but when creating a new folder I'm also getting an empty file with the same name as the folder. How do I avoid the creation of these unwanted empty files?
Unwantend empty files with same name as folders


Solution
You are probably using an Azure Storage Account V2 (general purpose v2) without the hierarchical namespace setting enabled. You can check that on the Overview page of the Storage Account.
Hierarchical namespace disabled


To solve this you need to enable that setting in your storage account. You can do that bij clicking on 'Disabled' behind Hierarchical namespace on the Overview page of the Storage Account. However there are some options that don't work with the hierarchical namespace like 'point-in-time restore for containers', 'versioning for blobs', 'blob change feed' and 'version-level immutability support''. When you enable the hierarchical namespace setting you will get a warning about this so that you can disable those settings. After Step 2 Validate account you can donwload a json file all the stuff you need to fix first.
Upgrading your storage account


Make sure to consult other users / Data Contributors of that Data Lake before changing those settings or at a last resort you could just create a new separate Storage Account if you are not sure about the settings. An other option could be to create a Python or PowerShell script to clean up the empty files.

Conclusion
In this post your learned how to fix an annoying needless empty file 'bug' for each directory. This is especially handy when you have those flexible pipelines that store your files in neat folder structures per year/month/day. It is just one setting, but it could have consequences for other settings. Thanks to colleague Derek Groen for finding the right setting.


Saturday, 12 February 2022

ADF Snack - Give ADF access to Data Lake via MSI

Case
I don't want to use the Access Keys to access my Data Lake with Azure Data Factory. Is there a better alternative?

Don't use the Access Keys


Solution
There are various options to authorize access to your Storage Account, but using Managed Service Identity (MSI) is probably the easiest and safest. This is because you don't need to use any secrets like passwords or keys that could end up in the wrong hands. This means you give a specific ADF access to your Storage Account via its Managed Service Identity (MSI). Each deployed ADF can be found in the Azure Actice Directory and you can assign a role like Storage Blob Data Contributor or Storage Blob Data Reader to that ADF and give for example access to an entire Storage Account or a specific container.

For this example we have an existing Azure Storage Account (general purpose v2) and an existing Azure Data Factory. We will give ADF write access to the entire storage account. Networking (nsg, VNETs, subnets, etc.) is out of scope for this example.

1) Access Control (IAM)
First step is to configure authorize your Data Factory within the stored account. This is where we will give ADF the role Storage Blob Data Contributor. This will allow ADF to read, write and delete Azure Storage containers and blobs. There is also an optional conditions step where you can add additional rules. 
  • Go to the Azure Portal and then to the Storage Account where ADF needs access to
  • In the left menu click on Access Control (IAM)
  • Click on +Add and choose Add role assignment
  • Select the required role (Storage Blob Data Contributor for this example) and click Next
  • Now first check the Managed identity radio button and then click on +Select members 
  • In the Managed Identity field on the right side select Data Factory and then search for your ADF by name. One or more factories will appear in a list.
  • Click on your ADF and then on the Select button.
  • A description is optional, but it could be handy later on.
  • Now click on Next and optionally add one or more conditions. In the example we wont be adding conditions.
  • Next click on Review + assign to finish
Give ADF access to Data Lake


2) Test ADF Linked Service
Now go to Data Factory and create a new Linked Service to your Data Lake. Make sure the Authenication Method is Managed Idenity. After that you need to select your Data Lake and hit the Test Connection button.
Create Linked Service to test connection


If you get a 'forbidden' error like below then:
  • Check whether you selected the right ADF under step 1 and the correct Storage Account under step 2.
  • Make sure you checked Managed Identity under step 1 (and not 'User, group or service principal')
  • Test the network settings for example by creating a linked service with the Account Key.
24200 - ADLS Gen2 operation failed for: Storage operation
'' on container 'testconnection' get failed with
'Operation returned an invalid status code 'Forbidden''.
Possible root causes: (1). It's possible because the
service principal or managed identity don't have enough
permission to access the data. (2). It's possible because
some IP address ranges of Azure Data Factory are not
allowed by your Azure Storage firewall settings. Azure
Data Factory IP ranges please refer https://docs.micro..
Account: 'abcdefg'. ErrorCode:
'AuthorizationPermissionMismatch'. Message: 'This request
is not authorized to perform this operation using this
permission.'. RequestId: '19e44b-601f-0029-4e30-000000'.
TimeStamp: 'Sat, 12 Feb 2022 16:52:22 GMT'.. Operation
returned an invalid status code 'Forbidden' Activity
ID: 94880d51-g593-418a-8q16-e7dab5c013f3.


Conclusion
In this blog post you learned how to give ADF access to your Storage Account via its Managed Service Identity. This is probably the easiest and safest way to authorize ADF. You could use the same trick to for example give ADF access to your Azure SQL Database.

Monday, 31 January 2022

Release Power BI via Azure DevOps extension

Case
This month Microsoft released a new DevOps extenstion for Power BI: Power BI automation tools. How can you use this?
Power BI automation tools in DevOps


Solution
The DevOps support for releasing Power BI reports, datasets and datafows was almost non existing. You can release those assets with Azure DevOps, but you need a lot of Rest APIs and even more PowerShell code. There are a few third party / open source addons, but adding those to DevOps is not always permitted by companies. An other issue is that most of them are very basic and not sufficient for all requirements.

Now Microsoft finally released its own Power BI extenstion for DevOps that shoud convince most companies to install this add on to Azure DevOps. To use this new extension go to the Marketplace and click on the Get it free button. If you have sufficient rights in DevOps then you can select the project to add this extension to. Note that it is still in Public Preview.

There is one more downside for those without a PBI Premium license. It uses the Power BI Deployment Pipelines which is a Premium feature. For those unlucky ones there is still the Rest API/PowerShell solution.

Hopefully this new extension will combine the Power of DevOps, which is often already used by companies, with the release features of Power BI. In this new series of posts we will show both solutions and compare them.

Sunday, 5 December 2021

Delta Lake support in Azure Synapse Analytics

Case
Delta Lake is already widely used in Azure Data Bricks, but now it is also available in Synapse Analytics. How can I use it there to store history and do 'time travel' in my historical data?
Synapse now supports Delta Lake


Solution
Delta Lake is now so called General Available (GA) in Synapse Analytics, but at the time of writing Microsoft is still implementing new Delta Lake features in Synapse. 

This example uses a Synapse Pipeline with a Copy Data Activity to ingest data from the source and then calls a Python Delta Lake script (other languages are possible) via the Notebook activity.


Prerequisites
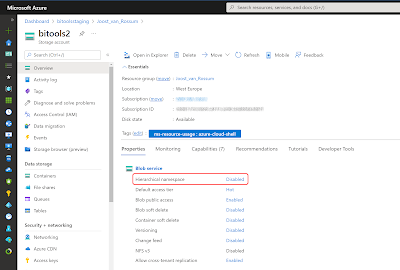
You need to make sure that you (for debugging) and the Managed Service Identity (MSI) of your Synapse Analytics workspace have access to the Azure Data Lake with the Role Storage Blob Data Contributor.
  • In the Azure Portal go to the Storage Account used by the Synapse Analytics workspace
  • In the left menu click on Access Control (IAM)
  • Click on + Add and choose Add role assignment
  • Search for Storage Blob Data Contributor, select the role and click on Next
  • Click on + Select members and find your Synapse workspace and find yourself and click Select
  • Optionally add an description about the why. Then click on Review + assign (twice)
At time of writing our Apache Spark Pool uses version 3.1 with Delta Lake 1.0. If you are using an older version (2.4) of Spark then you get Delta Lake version 0.6 which is slightly different. If newer versions appear then just try the newest Spark Pool.
Apache Spark pool Additional Settings


1) Code cell 1: parameters
The first code cell is for the parameters that can be overridden by parameters from the Notebook activity in the pipeline. For more details see our post about notebook parameters. For debugging within the notebook we used real values.
# path of the data lake container
data_lake_container = 'abfss://yourbronzecontainer@yourdatalake.dfs.core.windows.net'

# The ingestion folder where your parquet file are located
ingest_folder = 'parquetstage'

# The bronze folder where your Delta Tables will be stored
bronze_folder = 'bronze'

# The name of the table
table_name = 'residences'

# The wildcard filter used within the bronze folder to find files
source_wildcard = 'residences*.parquet'

# A comma separated string of one or more key columns (for the merge)
key_columns_str = 'Id'
Parameters


2) Code cell 2: import modules and functions
The second code cell is for importing all required/useful modules. For this basic example we two import s:
  • DeltaTable.delta.tables for handling delta tables
  • notebookutils for file system utilities (removing delta table folder)
# Import modules
from delta.tables import DeltaTable
from notebookutils import mssparkutils
Imports


3) Code cell 3: filling delta lake
Now the actual code for filling the delta lake tables with parquet files from the data lake. Note: code is very basic. It checks whether the Delta Lake table already exists. If not it creates the Delta Lake table and if it already exists it merges the new data into the existing table. If you have transactional data then you could also do an append instead of a merge.

# Convert comma separated string with keys to array
key_columns = key_columns_str.split(',')  
 
# Convert array with keys to where-clause for merge statement
conditions_list = [f"existing.{key}=updates.{key}" for key in key_columns]
 
# Determine path of source files from ingest layer
source_path = os.path.join(data_lake_container_bronze, ingest_folder, source_wildcard)
 
# Determine path of Delta Lake Table 
delta_table_path = os.path.join(data_lake_container_bronze, bronze_folder, table_name)

# Read file(s) in spark data frame
sdf = spark.read.format('parquet').option("recursiveFileLookup", "true").load(source_path)
 
# Check if the Delta Table exists
if (DeltaTable.isDeltaTable(spark, delta_table_path)):
    print('Existing delta table')
    # Read the existing Delta Table
    delta_table = DeltaTable.forPath(spark, delta_table_path)
 
    # Merge new data into existing table
    delta_table.alias("existing").merge(
        source = sdf.alias("updates"),
        condition = " AND ".join(conditions_list)
         
    ).whenMatchedUpdateAll(
    ).whenNotMatchedInsertAll(
    ).execute()
 
    # For transactions you could do an append instead of a merge
    # sdf.write.format('delta').mode('append').save(delta_table_path)
 
else:
    print('New delta table')
    # Create new delta table with new data
    sdf.write.format('delta').save(delta_table_path)
Adding file to Delta Lake


4) Viewing the Delta Table in notebook
If you run the notebook with the code of the first three steps a couple of times with changed/extra/less records then history will be build in the delta table. For debugging purposes you can add an extra code cell to view the data and the various versions of the data.

To check the current version of the data you can use the following code:
display(spark.read.format('delta').load(delta_table_path))
Get current version of data


And with this code you can investigage the history versions of the data. In this case there are two versions:
# Get all versions
delta_table = DeltaTable.forPath(spark, delta_table_path)
display(delta_table.history())
Get versions of data


To retrieve one specific version you could use something like this (where the 0 is the version from the above picture):
# Get one specific version
display(spark.read.format("delta").option("versionAsOf", "0").load(delta_table_path))
Get specific version of data


You can also use a datetime to retrieve data from the Delta Lake by using timestampAsOf instead of versionAsOf:
# Get one specific version with timestamp filter
display(spark.read.format("delta").option("timestampAsOf", "2021-12-05 19:07:00.000").load(delta_table_path))
Get specific version of data with datetime filter


To remove the entire Delta Lake table (and all history) you could use something like:
# Delete Delta Table (folder)
mssparkutils.fs.rm(delta_table_path, recurse=True)
Delete Delta Table


4) Viewing the Delta Table in Serverless SQL Pool
At the moment of writing you can query the Detla Lake in a Serverless SQL Pool, but you cannot yet use the 'time-travel' feature. Please upvote this feature here.

The first option is to use an OPENROWSET query within a SQL Script in your Synapse Workspace:
-- Query the Delta Lake
SELECT TOP 10 *
FROM OPENROWSET(
    BULK 'abfss://yourcontainer@yourdatalake.dfs.core.windows.net/deltalake/places/',
    FORMAT = 'delta') as rows
ORDER BY Id;
Query the Delta Lake via an OPENROWSET query


A second option is using Polybase by creating an External Table on the Delta Lake. This does requery you to create a database within the Serverless SQL Pool because you can't do that on the master database.
-- Query the Delta Lake

-- Create database because it wont work on the master database
CREATE DATABASE MyDwh;

-- Create External Data Source
CREATE EXTERNAL DATA SOURCE DeltaLakeStorage
WITH ( location = 'abfss://yourcontainer@yourdatalake.dfs.core.windows.net/deltalake/' );

-- Create External File Format
CREATE EXTERNAL FILE FORMAT DeltaLakeFormat
WITH ( FORMAT_TYPE = DELTA );

-- Create External Table
CREATE EXTERNAL TABLE Residence (
     Id int,
     Residence VARCHAR(50)
) WITH (
        LOCATION = 'places', --> the root folder containing the Delta Lake files
        data_source = DeltaLakeStorage,
        FILE_FORMAT = DeltaLakeFormat
);

-- Get Data from your Delta Lake Table
SELECT          TOP 10 * 
FROM            Residence
ORDER BY        Id


Conclusion
In this post you learned how to create and query a Delta Lake within your Synapse Analytics Workspace. The main advantage is of course that you now don't need Azure Data Bricks if you are already using Synapse. Making your Data Platform architecture just slightly more clearer and easier. 

A disadvantage, at the moment of writing, is the lack of time-traveling withing the Serverless SQL Pool environment. This means you're now forced to use notebooks to create your Data Warehouse when the latest version of your data is just not enough. So please upvote this feature here. There are some more limitations and know issues in the current version, but we think at least some of them will be solved in feature updates.

Thanks to colleague Jeroen Meidam for helping!


Wednesday, 1 December 2021

ADF: Looping through pipelines and execute them

Case
I want to loop through my ADF pipelines and then execute them in a foreach loop, but the pipeline property of the Execute Pipeline activity doesn't support dynamic content. Is this possible?
Execute Pipeline


Solution
The standard Execute Pipeline activity is pretty much useless for this specific case, but with another activity it is possible. However don't use this workaround to execute a whole bunch of similar pipelines like we used to do in the SSIS era. In that case it is just better to invest your time in creating a more flexible/configurable pipeline that can handle multiple tables or files.

Now the workaround:
Looping and executing pipelines


It uses a Web activity to get all pipelines via a Rest API. Then there is a Filter to get only a selection of all those pipelines. After that the Foreach loop with another Web activity in it will execute the pipelines via a Rest API call.

1) Access control (IAM)
This solution uses Rest APIs from Azure Data Factory. This means we need to give this ADF access to its own resources so that is can call those Rest APIs.
  • Go to your ADF in the Azure Portal
  • Click on the ellipsis button (three dots) to copy the ADF name
  • Click on Access control (IAM) in the left menu
  • Click on +Add and choose Add role assignment
  • Select the role with just enough access (less is more). Data Factory Contributor is perfect for this example
  • Then select members. In the search window you can paste your ADF name. Click on your ADF and then push the Select button
  • Now review and assign the role to your ADF
Give your ADF access to its own resources


2) Web activity - Get all pipelines
We need a collection of pipelines for the Foreach loop. The Rest API list-by-factory retrieves all pipelines from a single Data Factory. You need to prepare the Rest API url by replacing all parts between the curly braces with the info of your own ADF (also remove the curly braces):

https://management.azure.com/subscriptions/{subscriptionId}/resourceGroups/{resourceGroupName}/providers/Microsoft.DataFactory/factories/{factoryName}/pipelines?api-version=2018-06-01

Tip: If you copy the URL of the ADF overview page in the Azure portal then you have all the information you need.
  • Add the Web activity to your pipeline and give it a suitable name (you need it in the next activity)
  • On the Settings tab enter the adjusted URL from above in the URL field
  • Select GET as method
  • Set Authenication to Managed Identity
  • Use https://management.azure.com/ in the Resource field
Web activity - Get all pipelines


3) Filter pipelines
Now we have all pipelines available in our collection, but we need to add a filter to only get the required pipelines. The easiest way to do this is by putting them all in a specific folder or giving them all the same prefix. If you're using a folder then you can use the first expression. It first checks whether the pipeline contains a property named 'folder' because pipelines in the root will not have this property. Then it checks whether that property is filled with the value 'demo' (the name of our folder).
@and(
   contains(item().properties, 'folder'),
   equals(item().properties.folder.name,'demo')
)
If you want to use the prefix then the expression is less complex with only a startswith expression: @startswith(item().name, 'Sub_')

  • Add the Filter activity to the pipeline and give it a suitable name. We need it in the Foreach. Connect it to the Web activity.
  • For Items add the following expression @activity('Get All Pipelines').output.value (enter your own activity name)
  • For Condition add one of the above expressions
Filter activity


4) Foreach loop
The foreach loop is very straightforward. Use the filter activity in the items field with an expression like this @activity('Filter on folder demo').output.value (replace the activity name).
Foreach activity


5) Web activity - Execute pipeline
Within the foreach loop we need to add an other Web activity. This one will call the create-run Rest API which will execute an ADF pipeline. Just like in step 2 we need to adjust the example URL from the documentation:

https://management.azure.com/subscriptions/{subscriptionId}/resourceGroups/{resourceGroupName}/providers/Microsoft.DataFactory/factories/{factoryName}/pipelines/{pipelineName}/createRun?api-version=2018-06-01

However we need to make it change every iteration of the Foreach because the pipeline name is part of the URL. You could create a expression where you only change that pipeline name and leave the rest hardcoded, but besides the pipeline name that collection of pipelines also contains a ID property that contains 90% of the URL we need. If you debug the pipeline and check the output of the first Web activity or the Filter activity you can check their output. The ID property is filled with something like:

/subscriptions/7q618f21-ad62-4e1d-9019-4a23beda7777/resourceGroups/RG_ADF_DEV/providers/Microsoft.DataFactory/factories/DataFactory2-DEV/pipelines/Sub_pipeline1

We only need to add something in front of it and behind of it and then you have the correct URL:
@concat('https://management.azure.com',
replace(item().id, ' ', '%20'),
'/createRun?api-version=2018-06-01'
)
The replace is to replace spaces, which are not allowed in a URL, by %20. So if a pipeline name contains a space then it will be replaced.
  • Add the Web activity to the Foreach and give it a suitable name 
  • On the Settings tab enter the expression above as URL by first clicking on the 'Add dynamic content' link below the field
  • Select POST as method
  • Now we don't need a Body for the Rest API but the Web activity requires it when the method is POST. Enter a dummy JSON message like: {dummy:"dummy"}
  • Set Authenication to Managed Identity
  • Use https://management.azure.com/ in the Resource field
The Web activity calls the pipelines asynchronous (execute and don't wait for an answer). If you want a synchronous call and perhaps get some feedback if the pipeline fails then you need to replace the Web activity by a Webhook activity.

6) The result
Now run the pipeline and check the result. Make sure to check the monitor. Then you will see one big disadvantage. Each execution will become a separate run with each its own Run ID. This means it will be a little bit more work to connect these in your logging, but it is possible because the output of the Web activity will return the Run ID.
ADF Monitor


Conclusion
In this post you learned how to execute pipelines in a loop via the Web activity and Rest APIs. Because each pipeline will get its own Run ID the logging needs some extra attention. You can also use the Web activity contruction to execute pipelines from an other Data Factory.

Unfortunately you cannot use this same trick for Data Flows because at te moment there is no Rest API to execute a pipeline (only in debug mode).