Showing posts with label SQL_DW. Show all posts

Sunday 2 February 2020

Schedule Up/Downscale Azure SQL Database (API)

Case
I want to up- and downscale my Azure SQL Database within my ADF pipeline. You recently showed how do this with Powershell code in an Automation Runbook, but that is too much coding for me. You also showed how to do this with some simple TSQL code, but that requires a lot of database permissions for the ETL user. Is there a codeless solution in Azure Data Factory which doesn't require permissions within my Azure SQL Database?
Change the Tier of your SQL Azure DB


Solution
Yes: Rest API! And don't worry there is no coding required. For this example we will use the Web activity to call the Rest API of SQL Server. This doesn't require any coding or permissions within the database itself. However you need ofcourse some permissions to change the database Pricing Tier. For this we will be using managed identities for Azure resources: we will give the Azure Data Factory permissions to the Azure SQL Server.

For this example we assume you already have an ADF with a pipeline for your ETL which we will extend with an upscale and a downscale.
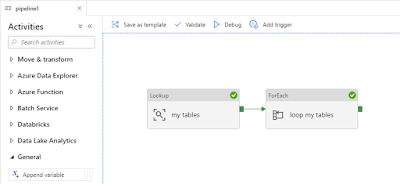
Stage multiple tables in a foreach loop


1) Assign permissions to ADF
The permissions will be granted to the Azure SQL Server and not to a specific database. To change the database Pricing Tier with ADF, we need a role that can only change the database settings, but nothing security related: Contributer, SQL DB Contributer or SQL Server Contributer.
  • Go to the Azure SQL Server of the database that you want to up- or downscale with ADF
  • In the left menu click on Access control (IAM)
  • Click on Add, Add role assignment
  • In the 'Role' drop down select 'SQL DB Contributer'
  • In the 'Assign access to' drop down select Data Factory
  • Search for your Data Factory, select it and click on Save
Note: if you forget this step you will get an error while executing the pipeline in ADF
Not enough permissions


{
    "errorCode": "2108",
    "message": "{\"error\":{\"code\":\"AuthorizationFailed\",\"message\":\"The client 'xxxxxx-xxxx-xxxx-xxxx-xxxxxxxxxxxx' with object id 'xxxxxx-xxxx-xxxx-xxxx-xxxxxxxxxxxx' does not have authorization to perform action 'Microsoft.Sql/servers/databases/write' over scope '/subscriptions/xxxxxx-xxxx-xxxx-xxxx-xxxxxxxxxxxx/resourceGroups/Joost_van_Rossum/providers/Microsoft.Sql/servers/bitools2/databases/Stage' or the scope is invalid. If access was recently granted, please refresh your credentials.\"}}",
    "failureType": "UserError",
    "target": "Upscale Stage DB",
    "details": []
}

2) Get URL Rest API
Now it is almost time to edit your ADF pipeline. The first step will be adding a Web activity to call the Rest API, but before we can do that we need to determine the URL of this API which you can find here. Check the api version because it changes regularly.

https://management.azure.com/subscriptions/{subscriptionId}/resourceGroups/{resourceGroupName}/providers/Microsoft.Sql/servers/{serverName}/databases/{databaseName}?api-version=2021-02-01-preview

Within this URL you need to replace all parts that start and end with a curly bracket: {subscriptionId}, {resourceGroupName}, {serverName} and {databaseName} (including the brackets themselves). Don't use a URL (bitools2.database.windows.net) for the database server name, but use only the name:

https://management.azure.com/subscriptions/xxxxxx-xxxx-xxxx-xxxx-xxxxxxxxxxxx/resourceGroups/Joost_van_Rossum/providers/Microsoft.Sql/servers/bitools2/databases/Stage?api-version=2021-02-01-preview

3) JSON message for Rest API
The Rest API expects a JSON message with the pricing tier for which you can find the details here under SKU. For some reason the location is required in these messages. Here are two example which you need to adjust for your requirements:
{"sku":{"name":"S1","tier":"Standard"}, "location": "West Europe"}
or
{"sku":{"name":"Basic","tier":"Basic"}, "location": "West Europe"}

3) Upscale DB
Go to your existing ADF pipeline to add an upscale (and downscale) activity
  • Add a Web activity in front of the existing Lookup activity
  • Give it a descriptive name: Upscale Stage DB
  • Go to the Settings tab of the Web activity
  • For URL enter the URL you created in step 2
  • For Method choose PUT
  • Add a new Header called 'Content-Type' with the value 'application/json'
  • Copy the JSON message that you create in step 3 to the Body
  • Collapse Advanced at the bottum
  • Choose MSI (old name for Managed Instance) as authentication
  • Enter 'https://management.azure.com/' in the Resource field. This is the URL for Managed Identity
Add Web activity to call Rest API


4) Downscale DB
Repeat the previous step, but now add the downscale activity at the end
  • Add a second Web activity, but now after your ETL activity (foreach in this example)
  • Give it a descriptive name: Downscale Stage DB
  • Go to the Settings tab of the Web activity
  • For URL enter the URL you created in step 2
  • For Method choose PUT
  • Add a new Header called 'Content-Type' with the value 'application/json'
  • Copy the JSON message that you create in step 3 to the Body
  • Collapse Advanced at the bottum
  • Choose MSI (old name for Managed Instance) as authentication
  • Enter 'https://management.azure.com/' in the Resource field
Adding an upscale and downscale via Rest API


Conclusion
In this post you learned how to give a resource (ADF) access to an other resource (SQL Server) via Managed Identities. Then we showed you how to call a Rest API in an ADF pipline Web activity for which we didn't have to write any code at all. From all the different options we showed you to Up- and Downscale an Azure SQL Database this is probably the easiest and safest method especially when you want to incorporate in your ETL process. An other positive thing is that the Rest API call is synchronous which means it doesn't start the ETL before the database has been upscaled. So no extra wait activities required.
Saturday 1 February 2020

Schedule Up/Downscale Azure SQL Database (TSQL)

Case
You recently showed how to up- or downscale my Azure SQL Database with Powershell code in an Automation Runbook, but is there a way to do this without Powershell?
Change the Tier of your SQL Azure DB


Solution
Changing the database Pricing Tier can also be done with some TSQL script. First we will show you how to do this in Sql Server Mangement Studio (SSMS) and then how you could also do this in Azure Data Factory (ADF).

A) SSMS
To change the Pricing Tier in SSMS you first need to connect SSMS to your Azure SQL Database and make sure to select the right database (not master) in your query window.

A1) Retrieve pricing tier
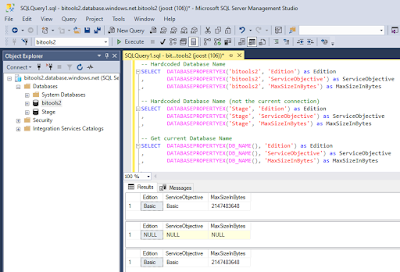
First a query to retrieve the Pricing Tier (Edition, Server Objective and Max Size). This can be done with a hardcode name or by using DB_NAME() within the DATABASEPROPERTYEX() command. However since you cannot retrieve the data from database X when connected to database Y (it will return NULL) the second options is the easiest.
-- Hardcoded Database Name
SELECT DATABASEPROPERTYEX('bitools2', 'Edition') as Edition
,  DATABASEPROPERTYEX('bitools2', 'ServiceObjective') as ServiceObjective
,  DATABASEPROPERTYEX('bitools2', 'MaxSizeInBytes') as MaxSizeInBytes

-- Get current Database Name
SELECT DATABASEPROPERTYEX(DB_NAME(), 'Edition') as Edition
,  DATABASEPROPERTYEX(DB_NAME(), 'ServiceObjective') as ServiceObjective
,  DATABASEPROPERTYEX(DB_NAME(), 'MaxSizeInBytes') as MaxSizeInBytes

Retrieve Database Pricing Tier


A2) Change pricing tier
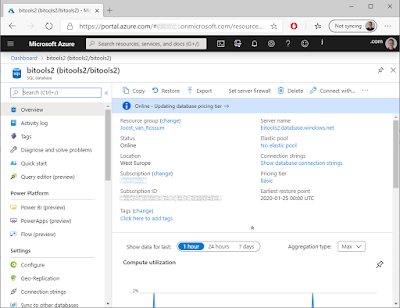
The next step is to change the Pricing Tier with an ALTER DATABASE command in SSMS. If you go to the portal right after executing the ALTER statement you will see a message Updating database pricing tier. When executing the command in SSMS it immediately shows that it is completed, however it takes a few moments to actually finish the command.
-- Change Princing Tier to Basic (only when size < 2GB)
ALTER DATABASE [bitools2] MODIFY (EDITION ='Basic');

-- Change Pricing Tier to Standard S1 with size set to 250GB
ALTER DATABASE [bitools2] MODIFY (EDITION ='Standard', SERVICE_OBJECTIVE = 'S1', MAXSIZE = 250 GB);

-- Change Pricing Tier to Standard S1 (withoud mentioning edition and size)
ALTER DATABASE [bitools2] MODIFY (SERVICE_OBJECTIVE = 'S1');

-- Change Pricing Tier to lowest Standard (S0)
ALTER DATABASE [bitools2] MODIFY (EDITION ='Standard');

Pricing Tier changes after execution the alter script


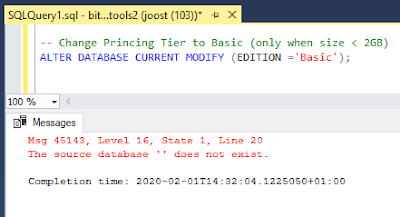
Note: According to the documentation you could also use CURRENT (instead of the database name) to alter the current database. However that failed on my laptop (SSMS 18.4). Please write your suggestions in the comments.
The source database '' does not exist.


B) Azure Data Factory
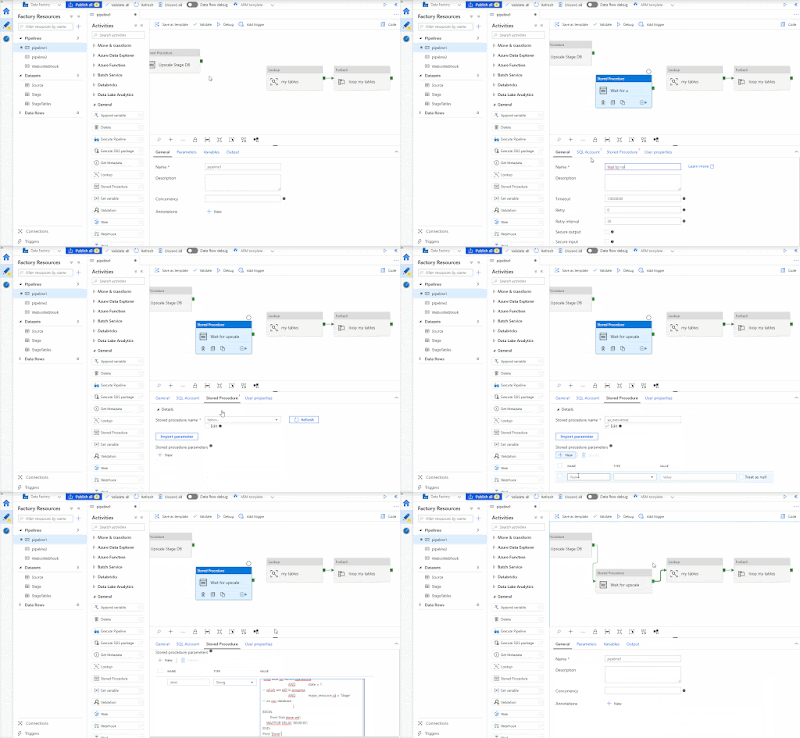
You could also execute this script in ADF to upscale your Azure SQL Database before the ETL (or ELT) starts and then downscale it afterwards. For this example we will add these ADF activities in our existing stage pipeline from a previous blog post to upscale the sink database (our stage database).
Stage multiple tables in a foreach loop


B1) Upscale DB
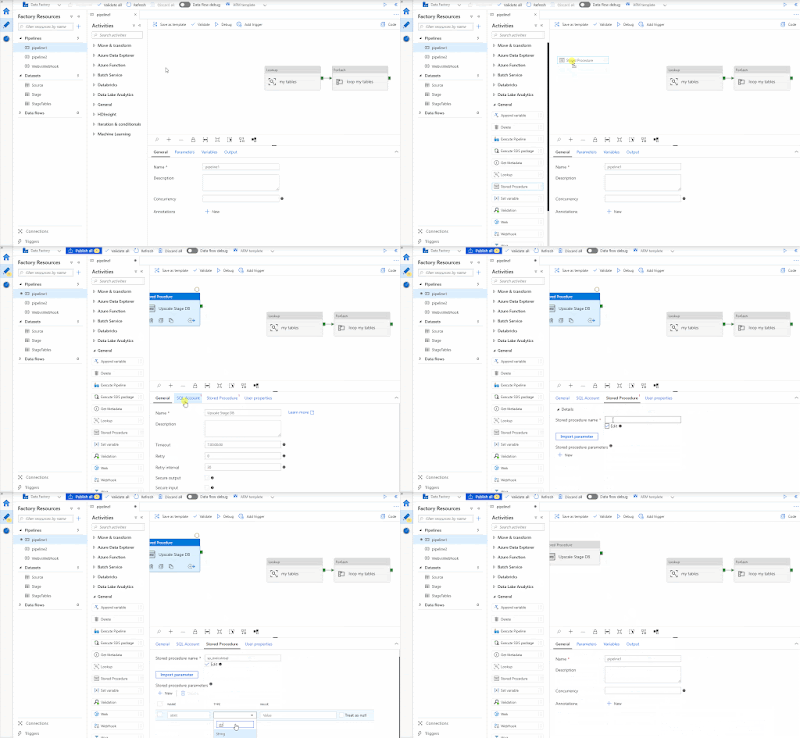
First we will add a Stored Procedure activity which executes the ALTER script from above to upscale the stage database.
  • Add the stored procedure activity in front of the existing Lookup activity
  • Give it a descriptive name: Upscale Stage DB
  • Make sure to use the same Linked service connection as your sink (Stage database)
  • Use 'sp_execute' for the Stored Procedure name
  • Add a new string parameter named 'stmt' and add the ALTER query as value (change DB name)
-- Change Pricing Tier to Standard S1 with size set to 250GB
ALTER DATABASE [Stage] MODIFY (EDITION ='Standard', SERVICE_OBJECTIVE = 'S1', MAXSIZE = 250 GB);

Upscale DB in ADF


B2) Wait for upscale to be finished
Now you want to wait until the database has been upscaled before you start the ETL because during the upscale some queries will be cancelled. For this we will execute a query on the MASTER database (because queries will be cancelled on the Stage DB). This query will check whether the view sys.dm_operation_status still has an active ALTER query on our Stage DB.
  • Add a Stored Procedure Activity between the Upscale and the Lookup
  • Give it a descriptive name: Wait for upscale
  • Use a connection to the master database as Linked Service
  • Use 'sp_execute' for the Stored Procedure name
  • Add a new string parameter named 'stmt' and add the query below as value (change DB name)
  • Connect all activities in the pipeline: Upscale => Wait => Lookup
-- Wait until pricing tier has changed (retry ever 30 second)
WHILE EXISTS (
    SELECT  * 
    FROM    sys.dm_operation_status
    WHERE   operation = 'ALTER DATABASE' -- Only look for ALTER operations
    AND     state = 1                    -- which are still in progress
    AND     major_resource_id = 'Stage'  -- on our database
    )
BEGIN
    WAITFOR DELAY '00:00:30';
END;
Bijschrift toevoegen


B3) Downscale DB
After the foreach loop is done we can add an other Stored Procedure activity to downscale the Stage database.
  • Add the stored procedure activity after the existing ForEach activity
  • Give it a descriptive name: Downscale Stage DB
  • Make sure to use the same Linked service connection as your sink (Stage database)
  • Use 'sp_execute' for the Stored Procedure name
  • Add a new string parameter named 'stmt' and add the ALTER query as value (change DB name)
  • Connect the ForEach activity to the Downscale Acticity
-- Change Princing Tier to Basic (only when size < 2GB)
ALTER DATABASE [Stage] MODIFY (EDITION ='Basic');
Upscale, Wait, ETL and Downscale


Note: A big downside of using this method in Azure Data Factory is that you need a lot of permissions on your database. Which in most cases you don't want do give to your ETL account. In a next blog post we will show you an other alternative: Rest API.

Conclusion

In this post you learned how to change the database Pricing Tier with some simple TSQL script instead of a Powershell. Probably most suitable during development to temporarily upscale your DB to make the queries faster. But it could also be very useful to integrate the scaling in your ETL (or ELT) proces to minimize the time for a more expensive/faster database. In a next blog post we will introduce you to the Rest API which is very suitable for ADF.


Friday 31 January 2020

Schedule Up/Downscale Azure SQL Database (Az)

Case
To save some money on my Azure bill, I want to downscale the vCore or the number of DTUs for my Azure SQL Databases when we don't need a high performance and then upscale them again when for example the ETL starts. How do you arrange that in Azure?
Change the Tier of your SQL Azure DB


Solution
A few years ago we showed you how to do this with some PowerShell code in an Azure Automation Runbook with the AzureRM modules. However these old modules will be be out of support by the end of 2020. So now it is time to change those scripts.

The script works for both Database Transaction Units (DTU) and Virtuals Cores (vCore). DTU uses a Service Tier (Basic, Standard and Premium) and then the actual Performance Level (B, S0 to S12, P1 to P15) which indicates the number of used DTUs. More DTUs means more performance and of course more costs.

The newer vCore model is now recommended by Microsoft. It is a bit more flexible and transparent: it actually shows you the processor, memory and IOPS. But the lowest vCore price is much more expensive than the lowest DTU price. So for development and testing purposes you probably still want to use DTU. The vCore model also uses a Service Tier (GeneralPurpose, BusinessCritical) and then number of vCores combined with the processor (e.x. GP_Gen4_1 or GP_Gen5_2).

Use the Microsoft documentation to compare both models, but a little comparison. S3 with 100 DTUs is about the same as General Purpose with 1 vCore. P1 with 125 DTUs is about the same as Premium with 1 vCore.

1) Create Automation Account
First we need to create an Automation Account. If you already have one with the Run As Account enabled then you can skip this step.
  • Go to the Azure portal and create a new resource
  • Search for automation
  • Select Automation Account
  • Choose a useful name for the Automation Account
  • Select your Subscription, Resource Group and the Region
  • For this example we will use the Azure Run As account. So make sure to enable it and then click on the Create button.
Create Azure Automation Account


2) Add Module Az.Sql
Before we start writing some code we need to add a PowerShell module called Az.Sql. This module contains methods we need in our code to upscale or downscale the Azure SQL database, but first we need to add Az.Accounts because Az.Sql depends on it.

If you forget this step you will get error messages while running your code that state that some of your commands are not recognized:
Get-AzSqlDatabase : The term 'Get-AzSqlDatabase' is not recognized as the name of a cmdlet, function, script 
file, or operable program. Check the spelling of the name, or if a path was included, verify that the path is correct 
and try again.
  • Go to the newly created Azure Automation Account
  • Go to Modules in the left menu
  • Click on the Browse Gallery button
  • Search for Az.Accounts
  • Click on Az.Accounts in the result and import this module
  • Also search for Az.Sql (but wait until Az.Accounts is actually imported)
  • Click on Az.Sql in the result and import this module
Adding a new module to your Automation Account


Note: if you are using an existing Automation Account then you probably already added Az.Accounts.

3) Create Runbook
Now we are ready to create a runbook in the Azure Automation Account and start writing some PowerShell code.
  • Go back to the overview page of your newly created Azure Automation Account
  • Click on Runbooks in the left menu
  • Click on the + Create a runbook button to create a new Runbook
  • Enter a descriptive name for the Runbook like UpDownScaleDb
  • Select PowerShell as Runbook type
  • Optionally add a description and click on the Create button
Create a Runbook


4) Edit Runbook code
Next edit the new Runbook if it wasn't already opened by the previous step. Copy the code below and paste it in the editor. Then study the code and its comments to understand the code that can upscale and downscale your Azure SQL DB. It exists of five parts:
  1. Parameters
  2. Log in to Azure
  3. Get current pricing tier
  4. Upscale or downscale
  5. Logging
Parameters
To up or downscale the script needs five parameters. The first three parameters 'ResourceGroupName', ServerName'' and 'DatabaseName' are to indicate for which database the DTU or vCore needs to be changed. The fourth and fifth parameters 'Edition' and 'PricingTier' are used to up or downscale your DB. There are a couple of parameter validations which you could extend to make your script even more monkey proof.
Note: if you want to call this script via Azure Data Factory (ADF), then you need to change the parameter part. You can find all the details to do that in our blog posts about Runbook parameters and ADF and using the Webhook activity in ADF. If this is your first time creating a runbook then first try the standard script and then adjust it to your needs.

Log in to Azure
This is a standard piece of code that you will see in all of our examples. Please read our blog post about the Azure Run as Account for more detailed information.

Get current pricing tier
This piece of code tests whether it can find the database and gets its current pricing tier. It stores the current pricing tier and uses it later on for an extra check when upscaling or downscaling the DB.

Upscale or downscale
This is the actual code for changing the database pricing tier. There is an extra check to compare the current pricing tier with the new pricing tier. It now throws an error when they are equal. You could change that to write an warning instead of an error.
Note: you could also send emails to notify you of any errors

Logging
The last piece of code is for logging purposes. It shows you that it successfully changed pricing tier of the DB (or DWH) and how long it took to accomplish that.

# PowerShell code
########################################################
# Parameters
########################################################
[CmdletBinding()]
param(
    [Parameter(Mandatory=$True,Position=0)]
    [ValidateLength(1,100)]
    [string]$ResourceGroupName,

    [Parameter(Mandatory=$True,Position=1)]
    [ValidateLength(1,100)]
    [string]$ServerName,

    [Parameter(Mandatory=$True,Position=2)]
    [ValidateLength(1,100)]
    [string]$DatabaseName,

    [Parameter(Mandatory=$False,Position=3)]
    [ValidateLength(1,100)]
    [string]$Edition,
    
    [Parameter(Mandatory=$False,Position=4)]
    [ValidateLength(1,100)]
    [string]$PricingTier
)

# Keep track of time
$StartDate=(GET-DATE)


########################################################
# Log in to Azure with AZ (standard code)
########################################################
Write-Verbose -Message 'Connecting to Azure'
 
# Name of the Azure Run As connection
$ConnectionName = 'AzureRunAsConnection'
try
{
    # Get the connection properties
    $ServicePrincipalConnection = Get-AutomationConnection -Name $ConnectionName       
  
    'Log in to Azure...'
    $null = Connect-AzAccount `
        -ServicePrincipal `
        -TenantId $ServicePrincipalConnection.TenantId `
        -ApplicationId $ServicePrincipalConnection.ApplicationId `
        -CertificateThumbprint $ServicePrincipalConnection.CertificateThumbprint 
}
catch 
{
    if (!$ServicePrincipalConnection)
    {
        # You forgot to turn on 'Create Azure Run As account' 
        $ErrorMessage = "Connection $ConnectionName not found."
        throw $ErrorMessage
    }
    else
    {
        # Something else went wrong
        Write-Error -Message $_.Exception.Message
        throw $_.Exception
    }
}
########################################################


########################################################
# Getting the database for testing and logging purposes
########################################################
$MyAzureSqlDatabase = Get-AzSqlDatabase -ResourceGroupName $ResourceGroupName -ServerName $ServerName -DatabaseName $DatabaseName
if (!$MyAzureSqlDatabase)
{
    Write-Error "$($ServerName)\$($DatabaseName) not found in $($ResourceGroupName)"
    return
}
else
{
    Write-Output "Current pricing tier of $($ServerName)\$($DatabaseName): $($MyAzureSqlDatabase.Edition) - $($MyAzureSqlDatabase.CurrentServiceObjectiveName)"
}


########################################################
# Set Pricing Tier Database
########################################################
# Check for incompatible actions
if ($MyAzureSqlDatabase.Edition -eq $Edition -And $MyAzureSqlDatabase.CurrentServiceObjectiveName -eq $PricingTier)
{
    Write-Error "Cannot change pricing tier of $($ServerName)\$($DatabaseName) because the new pricing tier is equal to current pricing tier"
    return
}
else
{
    Write-Output "Changing pricing tier to $($Edition) - $($PricingTier)"
    $null = Set-AzSqlDatabase -DatabaseName $DatabaseName -ServerName $ServerName -ResourceGroupName $ResourceGroupName -Edition $Edition -RequestedServiceObjectiveName $PricingTier
}


########################################################
# Show when finished
########################################################
$Duration = NEW-TIMESPAN –Start $StartDate –End (GET-DATE)
Write-Output "Done in $([int]$Duration.TotalMinutes) minute(s) and $([int]$Duration.Seconds) second(s)"

Note: once your database grows to a certain size you can not downscale it to certain levels because there is a max database size for certain pricing tiers. For example if your DB is larger than 250 GB then you can note downscale it below S3. There are size checks that you could add to avoid errors.

5) Testing
Testing the functionality of your code can be done in the runbook editor. Click on the Test pane button above your script. After that you need to fill in the five parameters and hit the Start button to execute the script.
Testing a Powershell script


6) Scheduling Runbook
To schedule your runbook in Azure Automation you first need to publish it via the Runbook editor. After it has been published you can add a schedule to this runbook.
  • Edit the script in the runbook editor
  • Click on publish (the editor will close and you will be redirected to the overview page)
  • In the overview page click on Link to schedule
  • In the Schedule menu you can select an existing schedule or create a new one
  • In the Parameter menu you can provide the value for the five parameters
Add schedule to a runbook


Note: If you have multiple Azure SQL Database that you all want to up or downscale on the same time then you have a slight problem because you cannot reuse a schedule for the same runbook multiple times with different parameters (please upvote or add a comment). Workarounds:
  1. create multiple identical schedules (ugly but works)
  2. do everything in one big script (less flexible but works)
Log of runbook executions

Details of single execution


Summary
In this blog post you learned how to schedule an up- or scale of your Azure SQL DB (or DWH) to save money in case you don't need a high performace 24 hours a day. Scheduling is done in Azure Automation, but with some minor changes you can also do that via an ADF pipeline.

The Powershell scripting gives you the most flexibility for example to add additional tests and notifications, but for those who don't like scripting: in a next blog post we will show you how to accomplish this with TSQL code only. You can either use that for an on-the-fly up- or downscale or use it in a Store Procedure Activity in Azure Data Factory.

Monday 1 January 2018

Pause everything on your Azure playground - Tags

Case
To prevent unnecessary high bills because I forgot to turn off services, I want to pause everything in my Azure 'playground' subscription. However I want to give my co-workers more control to decide which machines and services they don't want to pause each night. Your current solution works with a centralized exception list that needs to be maintained by someone. Is there an alternative solution?
Pause everything v2


Solution
You should of course make some agreements about being careful with pricey services, but you can support that with a 'simple' technical solution: run a PowerShell script in Azure Automation Runbook that pauses all often used services each night. In this version of the script, exceptions are handled with tags that people can add to their own server or service. Here is how you can add a tag to for example Azure Analysis Services.
Add tags to your service or server


For this example we will pause the following Azure parts:
  • Azure Virtual Machines (not classics)
  • Azure SQL Data Warehouses
  • Azure Analysis Services
This is not a complete list, but once you understand these three, it should be relatively easy to add more services. Still to hard? Add a comment to suggest more services.

1) Automation Account
First we need an Azure Automation Account to run the Runbook with PowerShell code. If you don't have one or want to create a new one, then search for Automation under Monitoring + Management and give it a suitable name like 'maintenance', then select your subscription, resource group and location. For this example I will choose West Europe since I'm from the Netherlands. Keep 'Create Azure Run As account' on Yes. We need it in the code. See step 3 for more details.
Azure Automation Account


2) Credentials
Next step is to create Credentials to run this runbook with. This works very similar to the Credentials in SQL Server Management Studio. Go to the Azure Automation Account and click on Credentials in the menu. Then click on Add New Credentials. You could just use your own Azure credentials, but the best options is to use a service account with a non-expiring password. Otherwise you need to change this regularly.
Create new credentials


3) Connections
This step is for your information only and to understand the code. Under Connections you will find a default connection named 'AzureRunAsConnection' that contains information about the Azure environment, like the tendant id and the subscription id. To prevent hardcoded connection details we will retrieve these fields in the PowerShell code.
Azure Connections


4) Modules
The Azure Analysis Services methods (cmdlets) are in a separate PowerShell module which is not included by default. If you do not add this module you will get errors telling you that the method is not recognized. See below for more details.
The term 'Get-AzureRmAnalysisServicesServer' is not recognized
as the name of a cmdlet, function, script file, or operable program.


Go to the Modules page and check whether you see AzureRM.AnalysisServices in the list. If not then use the 'Browse gallery' button to add it, but first add AzureRM.Profile because the Analysis module will ask for it. Adding the modules could take a few minutes!
Add modules


5) Runbooks
Now it is time to add a new Azure Runbook for the PowerShell code. Click on Runbooks and then add a new runbook (There are also several example runbooks of which AzureAutomationTutorialScript could be useful as an example). Give your new Runbook a suitable name like 'PauseEverything' and choose PowerShell as type.
Add Azure Runbook


6) Edit Script
After clicking Create in the previous step the editor will be opened. When editing an existing Runbook you need to click on the Edit button to edit the code. You can copy and paste the code below to your editor. Study the green comments to understand the code. Notice that this version doesn't use Runbook variables.
Edit the PowerShell code


# PowerShell code
# Connect to a connection to get TenantId and SubscriptionId
$Connection = Get-AutomationConnection -Name "AzureRunAsConnection"
$TenantId = $Connection.TenantId
$SubscriptionId = $Connection.SubscriptionId
  
# Get the service principal credentials connected to the automation account. 
$null = $SPCredential = Get-AutomationPSCredential -Name "Administrator"

# Login to Azure ($null is to prevent output, since Out-Null doesn't work in Azure)
Write-Output "Login to Azure using automation account 'Administrator'."
$null = Login-AzureRmAccount -TenantId $TenantId -SubscriptionId $SubscriptionId -Credential $SPCredential
  
# Select the correct subscription
Write-Output "Selecting subscription '$($SubscriptionId)'."
$null = Select-AzureRmSubscription -SubscriptionID $SubscriptionId


################################
# Pause AnalysisServicesServers
################################
Write-Output "Checking Analysis Services Servers"

# Get list of all AnalysisServicesServers that are turned on (ProvisioningState = Succeeded)
# but skip AnalysisServicesServers that have an Environment tag with the value Production
$AnalysisServicesServers = Get-AzureRmAnalysisServicesServer | 
Where-Object {$_.ProvisioningState -eq "Succeeded" -and $_.Tag['Environment'] -ne "Production"}

# Loop through all AnalysisServicesServers to pause them
foreach ($AnalysisServicesServer in $AnalysisServicesServers)
{
    Write-Output "- Pausing Analysis Services Server $($AnalysisServicesServer.Name)"
    $null = Suspend-AzureRmAnalysisServicesServer -Name $AnalysisServicesServer.Name
}


################################
# Pause Virtual Machines
################################
Write-Output "Checking Virtual Machines"

# Get list of all Azure Virtual Machines that are not deallocated (PowerState <> VM deallocated)
# Filtering on tags is not supported for Azure Virtual Machines
$VirtualMachines = Get-AzureRmVM -Status |
Where-Object {$_.PowerState -ne "VM deallocated"} #-and $_.Tag['Environment'] -ne "Production"}

# Loop through all Virtual Machines to pause them
foreach ($VirtualMachine in $VirtualMachines)
{
    # Get-AzureRmVM does not show tags therefor
    # filtering in Where-Object does not work.
    # Workaround: if statement within loop
    if ($VirtualMachine.Tags['Environment'] -ne "Production")
    {
        Write-Output "- Deallocating Virtual Machine $($VirtualMachine.Name) "
        $null = Stop-AzureRmVM -ResourceGroupName $VirtualMachine.ResourceGroupName -Name $VirtualMachine.Name -Force 
    }
}
# Note: Classic Virtual machines are excluded with this script because they don't support Tags.
 

################################
# Pause SQL Data Warehouses
################################
Write-Output "Checking SQL Data Warehouses"

# Get list of all Azure SQL Servers
$SqlServers = Get-AzureRmSqlServer

# Loop through all SQL Servers to check if they host a DWH
foreach ($SqlServer in $SqlServers)
{
    # Get list of all SQL Data Warehouses (Edition=DataWarehouse) that are turned on (Status = Online)
    # but skip SQL Data Warehouses that have an Environment tag with the value Production
    $SqlDatabases = Get-AzureRmSqlDatabase -ServerName $SqlServer.ServerName -ResourceGroupName $SqlServer.ResourceGroupName |
    Where-Object {$_.Edition -eq 'DataWarehouse' -and $_.Status -eq 'Online' -and $_.Tag['Environment'] -ne "Production"} 

    # Loop through all SQL Data Warehouses to pause them
    foreach ($SqlDatabase in $SqlDatabases)
    {
        Write-Output "- Pausing SQL Data Warehouse $($SqlDatabase.DatabaseName)"
        $null = Suspend-AzureRmSqlDatabase -DatabaseName $SqlDatabase.DatabaseName -ServerName $SqlServer.ServerName -ResourceGroupName $SqlDatabase.ResourceGroupName
    }
}


Write-Output "Done"

Note 1: This is a very basic script. No error handling has been added. Check the AzureAutomationTutorialScript for an example. Finetune it for you own needs.
Note 2: There are often two versions of an method like Get-AzureRmSqlDatabase and Get-AzureSqlDatabase. Always use the one with "Rm" in it (Resource Managed), because that one is for the new Azure portal. Without Rm is for the old/classic Azure portal.
Note 3: Because Azure Automation doesn't support Out-Null I used an other trick with the $null =. However the Write-Outputs are for testing purposes only. Nobody sees them when they are scheduled.
Note 4: The code for Data Warehouses first loops through the SQL Servers and then through all databases on that server filtering on edition 'DataWarehouse'.
Note 5: The method to get Virtual Machines (Get-AzureRmVM) doesn't show tags. Therefor we cannot use the Where-Object filter to filter out certain tags. Workaround: if-statement within foreach loop.

7) Testing
You can use the Test Pane menu option in the editor to test your PowerShell scripts. When clicking on Run it will first Queue the script before Starting it. If nothing needs to be paused the script runs in about a minute, but pausing or deallocating items takes several minutes.
Testing the script in the Test Pane


8) Publish
When your script is ready, it is time to publish it. Above the editor click on the Publish button. Confirm overriding any previously published versions.
Publish the Runbook


9) Schedule
And now that we have a working and published Azure Runbook, we need to schedule it. Click on Schedule to create a new schedule for your runbook. For this pause everything script I created a schedule that runs every day on 2:00AM (02:00). This gives late working colleagues more than enough time to play with all the Azure stuff before there service will be paused.
Add Schedule


Summary
In this post you saw how you can pause all expensive services in an Azure playground environment. If a co-worker don't wants to pause his/her service then he/she can skip that by adding a tag to the specific server or service. As mentioned before: this is not a complete list. Feel free to suggest more services, that can be paused, in the comments.


Saturday 30 December 2017

Pause everything on your Azure playground

Case
A lot of IT companies have Azure subscriptions that are not primarily for customers, but are more playgrounds to create or try out stuff for clients. A lot of times you try out stuff like Azure Data Warehouse or Azure Analysis Services, services where you are not paying for usage but you are paying because the services are turned on.

When you are playing around with those services and forget to turn them off afterwards, it could get little costly especially when you have dozens of colleagues also trying out all the cool Azure stuff. How do you prevent those unnecessary high bills because of forgotten services?
Pause everything


Solution
You should of course make some agreements about being careful with pricey services, but you can support that with a 'simple' technical solution: run a PowerShell script in Azure Automation Runbook that pauses all often used services each night. An exception list takes care of specific machines or servers that should not be paused. For this example we will pause the following Azure parts:
  • Azure Virtual Machines (not classics)
  • Azure SQL Data Warehouses
  • Azure Analysis Services
This is not a complete list, but once you understand these three, it should be relatively easy to add more services. Still to hard? Add a comment to suggest more services.

1) Automation Account
First we need an Azure Automation Account to run the Runbook with PowerShell code. If you don't have one or want to create a new one, then search for Automation under Monitoring + Management and give it a suitable name like 'maintenance', then select your subscription, resource group and location. For this example I will choose West Europe since I'm from the Netherlands. Keep 'Create Azure Run As account' on Yes. We need it in the code. See step 3 for more details.
Azure Automation Account


2) Credentials
Next step is to create Credentials to run this runbook with. This works very similar to the Credentials in SQL Server Management Studio. Go to the Azure Automation Account and click on Credentials in the menu. Then click on Add New Credentials. You could just use your own Azure credentials, but the best options is to use a service account with a non-expiring password. Otherwise you need to change this regularly.
Create new credentials


3) Connections
This step is for your information only and to understand the code. Under Connections you will find a default connection named 'AzureRunAsConnection' that contains information about the Azure environment, like the tendant id and the subscription id. To prevent hardcoded connection details we will retrieve these fields in the PowerShell code.
Azure Connections


4) Variables
For the exception lists we will be using string variables to prevent hardcode machine and service names in de code. Go to Variables and add three new string variables: one for each type of machine or service we need to pause:
  • ExceptionListVM
  • ExceptionListDWH
  • ExceptionListAAS
Fill them with a semicolon separated list of names or, if you do not have any exception, with a semicolon (;) only.
Add string variables


5) Modules
The Azure Analysis Services methods (cmdlets) are in a separate PowerShell module which is not included by default. If you do not add this module you will get errors telling you that the method is not recognized. See below for more details.
The term 'Get-AzureRmAnalysisServicesServer' is not recognized
as the name of a cmdlet, function, script file, or operable program.


Go to the Modules page and check whether you see AzureRM.AnalysisServices in the list. If not then use the 'Browse gallery' button to add it, but first add AzureRM.Profile because the Analysis module will ask for it. Adding the modules could take a few minutes!
Add modules


6) Runbooks
Now it is time to add a new Azure Runbook for the PowerShell code. Click on Runbooks and then add a new runbook (There are also several example runbooks of which AzureAutomationTutorialScript could be useful as an example). Give your new Runbook a suitable name like 'PauseEverything' and choose PowerShell as type.
Add Azure Runbook


7) Edit Script
After clicking Create in the previous step the editor will be opened. When editing an existing Runbook you need to click on the Edit button to edit the code. You can copy and paste the code below to your editor. Study the green comments to understand the code. Also make sure to compare the variable names in the code to the once created in step 4 and change them if necessary.
Edit the PowerShell code


# PowerShell code
# Connect to a connection to get TenantId and SubscriptionId
$Connection = Get-AutomationConnection -Name "AzureRunAsConnection"
$TenantId = $Connection.TenantId
$SubscriptionId = $Connection.SubscriptionId
  
# Get the service principal credentials connected to the automation account. 
$null = $SPCredential = Get-AutomationPSCredential -Name "Administrator"

# Login to Azure ($null is to prevent output, since Out-Null doesn't work in Azure)
Write-Output "Login to Azure using automation account 'Administrator'."
$null = Login-AzureRmAccount -TenantId $TenantId -SubscriptionId $SubscriptionId -Credential $SPCredential
  
# Select the correct subscription
Write-Output "Selecting subscription '$($SubscriptionId)'."
$null = Select-AzureRmSubscription -SubscriptionID $SubscriptionId
  
# Get variable values and split them into arrays
$ExceptionListAAS = (Get-AutomationVariable -Name 'ExceptionListAAS') -split ";"
$ExceptionListVM = (Get-AutomationVariable -Name 'ExceptionListVM') -split ";"
$ExceptionListDWH = (Get-AutomationVariable -Name 'ExceptionListDWH') -split ";"


################################
# Pause AnalysisServicesServers
################################
Write-Output "Checking Analysis Services Servers"
# Get list of all AnalysisServicesServers that are turned on (ProvisioningState = Succeeded)
$AnalysisServicesServers = Get-AzureRmAnalysisServicesServer |
Where-Object {$_.ProvisioningState -eq "Succeeded" -and $ExceptionListAAS -notcontains $_.Name}
# Loop through all AnalysisServicesServers to pause them
foreach ($AnalysisServicesServer in $AnalysisServicesServers)
{
    Write-Output "- Pausing Analysis Services Server $($AnalysisServicesServer.Name)"
    $null = Suspend-AzureRmAnalysisServicesServer -Name $AnalysisServicesServer.Name
}


################################
# Pause Virtual Machines
################################
Write-Output "Checking Virtual Machines"
# Get list of all Azure Virtual Machines that are not deallocated (PowerState <> VM deallocated)
$VirtualMachines = Get-AzureRmVM -Status |
Where-Object {$_.PowerState -ne "VM deallocated" -and $ExceptionListVM -notcontains $_.Name}
# Loop through all Virtual Machines to pause them
foreach ($VirtualMachine in $VirtualMachines)
{
    Write-Output "- Deallocating Virtual Machine $($VirtualMachine.Name) "
    $null = Stop-AzureRmVM -ResourceGroupName $VirtualMachine.ResourceGroupName -Name $VirtualMachine.Name -Force 
}
# Note: Classic Virtual machines are excluded with this script (use Get-AzureVM and Stop-AzureVM)


################################
# Pause SQL Data Warehouses
################################
Write-Output "Checking SQL Data Warehouses"
# Get list of all Azure SQL Servers
$SqlServers = Get-AzureRmSqlServer
# Loop through all SQL Servers to check if they host a DWH
foreach ($SqlServer in $SqlServers)
{
    # Get list of all SQL Data Warehouses (Edition=DataWarehouse) that are turned on (Status = Online)
    $SqlDatabases = Get-AzureRmSqlDatabase -ServerName $SqlServer.ServerName -ResourceGroupName $SqlServer.ResourceGroupName |
    Where-Object {$_.Edition -eq 'DataWarehouse' -and $_.Status -eq 'Online' -and $ExceptionListDWH -notcontains $_.DatabaseName} 
    # Loop through all SQL Data Warehouses to pause them
    foreach ($SqlDatabase in $SqlDatabases)
    {
        Write-Output "- Pausing SQL Data Warehouse $($SqlDatabase.DatabaseName)"
        $null = Suspend-AzureRmSqlDatabase -DatabaseName $SqlDatabase.DatabaseName -ServerName $SqlServer.ServerName -ResourceGroupName $SqlDatabase.ResourceGroupName
    }
}

Write-Output "Done"

Note 1: This is a very basic script. No error handling has been added. Check the AzureAutomationTutorialScript for an example. Finetune it for you own needs.
Note 2: There are often two versions of an method like Get-AzureRmSqlDatabase and Get-AzureSqlDatabase. Always use the one with "Rm" in it (Resource Managed), because that one is for the new Azure portal. Without Rm is for the old/classic Azure portal.
Note 3: Because Azure Automation doesn't support Out-Null I used an other trick with the $null =. However the Write-Outputs are for testing purposes only. Nobody sees them when they are scheduled.
Note 4: The code for Data Warehouses first loops through the SQL Servers and then through all databases on that server filtering on edition 'DataWarehouse'.

7) Testing
You can use the Test Pane menu option in the editor to test your PowerShell scripts. When clicking on Run it will first Queue the script before Starting it. If nothing needs to be paused the script runs in about a minute, but pausing or deallocating items takes several minutes.
Testing the script in the Test Pane


8) Publish
When your script is ready, it is time to publish it. Above the editor click on the Publish button. Confirm overriding any previously published versions.
Publish the Runbook


9) Schedule
And now that we have a working and published Azure Runbook, we need to schedule it. Click on Schedule to create a new schedule for your runbook. For this pause everything script I created a schedule that runs every day on 2:00AM (02:00). This gives late working colleagues more than enough time to play with all the Azure stuff before there service will be paused.
Add Schedule


Summary
In this post you saw how you can pause all expensive services in an playground environment. If a colleague don't wants to pause his/her service then we can use the variables to skip the particular service. As mentioned before: this is not a complete list. Feel free to suggest more services, that can be paused, in the comments.

This script requires someone to maintain the exception list variables. I have created an alternative script that uses tags instead of centralized Runbook variables. This allows you to add a certain tag to your service to avoid the pause which gives colleagues more control.


Update: code for classic Virtual Machines (for separate Runbook)
# PowerShell code
# Connect to a connection to get TenantId and SubscriptionId
$Connection = Get-AutomationConnection -Name "AzureRunAsConnection"
$TenantId = $Connection.TenantId
$SubscriptionId = $Connection.SubscriptionId
  
# Get the service principal credentials connected to the automation account. 
$null = $SPCredential = Get-AutomationPSCredential -Name "Administrator"

# Login to Azure ($null is to prevent output, since Out-Null doesn't work in Azure)
Write-Output "Login to Azure using automation account 'Administrator'."
$null = Add-AzureAccount -Credential $SPCredential -TenantId $TenantId

# Select the correct subscription (method without Rm)
Write-Output "Selecting subscription '$($SubscriptionId)'."
$null = Select-AzureSubscription -SubscriptionID $SubscriptionId

# Get variable values and split them into arrays
$ExceptionListVM = (Get-AutomationVariable -Name 'ExceptionListVM') -split ";"


#################################
# Pause Classic Virtual Machines
#################################
Write-Output "Checking Classic Virtual Machines"

# Get list of all Azure Virtual Machines that are not deallocated (Status <> StoppedDeallocated)
$VirtualMachines = Get-AzureVM  |
Where-Object {$_.Status -ne "StoppedDeallocated" -and $ExceptionListVM -notcontains $_.Name}

# Loop through all Virtual Machines to pause them
foreach ($VirtualMachine in $VirtualMachines)
{
    Write-Output "- Deallocating Classic Virtual Machine $($VirtualMachine.Name) ($($VirtualMachine.ServiceName))"
    $null = Stop-AzureVM -ServiceName $VirtualMachine.ServiceName -Name $VirtualMachine.Name -Force 
}


Write-Output "Done"
Note 1: Login method name is slightly different
Note 2: Other methods use the version without Rm in the name: Stop-AzureRmVM => Stop-AzureVM