Showing posts with label SQL_DB. Show all posts

Friday 31 January 2020

Schedule Up/Downscale Azure SQL Database (Az)

Case
To save some money on my Azure bill, I want to downscale the vCore or the number of DTUs for my Azure SQL Databases when we don't need a high performance and then upscale them again when for example the ETL starts. How do you arrange that in Azure?
Change the Tier of your SQL Azure DB


Solution
A few years ago we showed you how to do this with some PowerShell code in an Azure Automation Runbook with the AzureRM modules. However these old modules will be be out of support by the end of 2020. So now it is time to change those scripts.

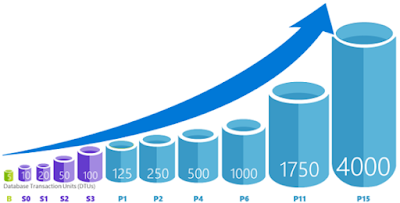
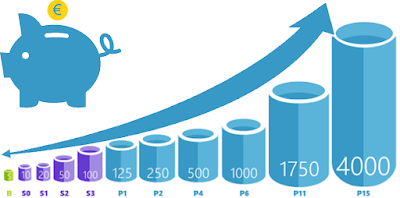
The script works for both Database Transaction Units (DTU) and Virtuals Cores (vCore). DTU uses a Service Tier (Basic, Standard and Premium) and then the actual Performance Level (B, S0 to S12, P1 to P15) which indicates the number of used DTUs. More DTUs means more performance and of course more costs.

The newer vCore model is now recommended by Microsoft. It is a bit more flexible and transparent: it actually shows you the processor, memory and IOPS. But the lowest vCore price is much more expensive than the lowest DTU price. So for development and testing purposes you probably still want to use DTU. The vCore model also uses a Service Tier (GeneralPurpose, BusinessCritical) and then number of vCores combined with the processor (e.x. GP_Gen4_1 or GP_Gen5_2).

Use the Microsoft documentation to compare both models, but a little comparison. S3 with 100 DTUs is about the same as General Purpose with 1 vCore. P1 with 125 DTUs is about the same as Premium with 1 vCore.

1) Create Automation Account
First we need to create an Automation Account. If you already have one with the Run As Account enabled then you can skip this step.
  • Go to the Azure portal and create a new resource
  • Search for automation
  • Select Automation Account
  • Choose a useful name for the Automation Account
  • Select your Subscription, Resource Group and the Region
  • For this example we will use the Azure Run As account. So make sure to enable it and then click on the Create button.
Create Azure Automation Account


2) Add Module Az.Sql
Before we start writing some code we need to add a PowerShell module called Az.Sql. This module contains methods we need in our code to upscale or downscale the Azure SQL database, but first we need to add Az.Accounts because Az.Sql depends on it.

If you forget this step you will get error messages while running your code that state that some of your commands are not recognized:
Get-AzSqlDatabase : The term 'Get-AzSqlDatabase' is not recognized as the name of a cmdlet, function, script 
file, or operable program. Check the spelling of the name, or if a path was included, verify that the path is correct 
and try again.
  • Go to the newly created Azure Automation Account
  • Go to Modules in the left menu
  • Click on the Browse Gallery button
  • Search for Az.Accounts
  • Click on Az.Accounts in the result and import this module
  • Also search for Az.Sql (but wait until Az.Accounts is actually imported)
  • Click on Az.Sql in the result and import this module
Adding a new module to your Automation Account


Note: if you are using an existing Automation Account then you probably already added Az.Accounts.

3) Create Runbook
Now we are ready to create a runbook in the Azure Automation Account and start writing some PowerShell code.
  • Go back to the overview page of your newly created Azure Automation Account
  • Click on Runbooks in the left menu
  • Click on the + Create a runbook button to create a new Runbook
  • Enter a descriptive name for the Runbook like UpDownScaleDb
  • Select PowerShell as Runbook type
  • Optionally add a description and click on the Create button
Create a Runbook


4) Edit Runbook code
Next edit the new Runbook if it wasn't already opened by the previous step. Copy the code below and paste it in the editor. Then study the code and its comments to understand the code that can upscale and downscale your Azure SQL DB. It exists of five parts:
  1. Parameters
  2. Log in to Azure
  3. Get current pricing tier
  4. Upscale or downscale
  5. Logging
Parameters
To up or downscale the script needs five parameters. The first three parameters 'ResourceGroupName', ServerName'' and 'DatabaseName' are to indicate for which database the DTU or vCore needs to be changed. The fourth and fifth parameters 'Edition' and 'PricingTier' are used to up or downscale your DB. There are a couple of parameter validations which you could extend to make your script even more monkey proof.
Note: if you want to call this script via Azure Data Factory (ADF), then you need to change the parameter part. You can find all the details to do that in our blog posts about Runbook parameters and ADF and using the Webhook activity in ADF. If this is your first time creating a runbook then first try the standard script and then adjust it to your needs.

Log in to Azure
This is a standard piece of code that you will see in all of our examples. Please read our blog post about the Azure Run as Account for more detailed information.

Get current pricing tier
This piece of code tests whether it can find the database and gets its current pricing tier. It stores the current pricing tier and uses it later on for an extra check when upscaling or downscaling the DB.

Upscale or downscale
This is the actual code for changing the database pricing tier. There is an extra check to compare the current pricing tier with the new pricing tier. It now throws an error when they are equal. You could change that to write an warning instead of an error.
Note: you could also send emails to notify you of any errors

Logging
The last piece of code is for logging purposes. It shows you that it successfully changed pricing tier of the DB (or DWH) and how long it took to accomplish that.

# PowerShell code
########################################################
# Parameters
########################################################
[CmdletBinding()]
param(
    [Parameter(Mandatory=$True,Position=0)]
    [ValidateLength(1,100)]
    [string]$ResourceGroupName,

    [Parameter(Mandatory=$True,Position=1)]
    [ValidateLength(1,100)]
    [string]$ServerName,

    [Parameter(Mandatory=$True,Position=2)]
    [ValidateLength(1,100)]
    [string]$DatabaseName,

    [Parameter(Mandatory=$False,Position=3)]
    [ValidateLength(1,100)]
    [string]$Edition,
    
    [Parameter(Mandatory=$False,Position=4)]
    [ValidateLength(1,100)]
    [string]$PricingTier
)

# Keep track of time
$StartDate=(GET-DATE)


########################################################
# Log in to Azure with AZ (standard code)
########################################################
Write-Verbose -Message 'Connecting to Azure'
 
# Name of the Azure Run As connection
$ConnectionName = 'AzureRunAsConnection'
try
{
    # Get the connection properties
    $ServicePrincipalConnection = Get-AutomationConnection -Name $ConnectionName       
  
    'Log in to Azure...'
    $null = Connect-AzAccount `
        -ServicePrincipal `
        -TenantId $ServicePrincipalConnection.TenantId `
        -ApplicationId $ServicePrincipalConnection.ApplicationId `
        -CertificateThumbprint $ServicePrincipalConnection.CertificateThumbprint 
}
catch 
{
    if (!$ServicePrincipalConnection)
    {
        # You forgot to turn on 'Create Azure Run As account' 
        $ErrorMessage = "Connection $ConnectionName not found."
        throw $ErrorMessage
    }
    else
    {
        # Something else went wrong
        Write-Error -Message $_.Exception.Message
        throw $_.Exception
    }
}
########################################################


########################################################
# Getting the database for testing and logging purposes
########################################################
$MyAzureSqlDatabase = Get-AzSqlDatabase -ResourceGroupName $ResourceGroupName -ServerName $ServerName -DatabaseName $DatabaseName
if (!$MyAzureSqlDatabase)
{
    Write-Error "$($ServerName)\$($DatabaseName) not found in $($ResourceGroupName)"
    return
}
else
{
    Write-Output "Current pricing tier of $($ServerName)\$($DatabaseName): $($MyAzureSqlDatabase.Edition) - $($MyAzureSqlDatabase.CurrentServiceObjectiveName)"
}


########################################################
# Set Pricing Tier Database
########################################################
# Check for incompatible actions
if ($MyAzureSqlDatabase.Edition -eq $Edition -And $MyAzureSqlDatabase.CurrentServiceObjectiveName -eq $PricingTier)
{
    Write-Error "Cannot change pricing tier of $($ServerName)\$($DatabaseName) because the new pricing tier is equal to current pricing tier"
    return
}
else
{
    Write-Output "Changing pricing tier to $($Edition) - $($PricingTier)"
    $null = Set-AzSqlDatabase -DatabaseName $DatabaseName -ServerName $ServerName -ResourceGroupName $ResourceGroupName -Edition $Edition -RequestedServiceObjectiveName $PricingTier
}


########################################################
# Show when finished
########################################################
$Duration = NEW-TIMESPAN –Start $StartDate –End (GET-DATE)
Write-Output "Done in $([int]$Duration.TotalMinutes) minute(s) and $([int]$Duration.Seconds) second(s)"

Note: once your database grows to a certain size you can not downscale it to certain levels because there is a max database size for certain pricing tiers. For example if your DB is larger than 250 GB then you can note downscale it below S3. There are size checks that you could add to avoid errors.

5) Testing
Testing the functionality of your code can be done in the runbook editor. Click on the Test pane button above your script. After that you need to fill in the five parameters and hit the Start button to execute the script.
Testing a Powershell script


6) Scheduling Runbook
To schedule your runbook in Azure Automation you first need to publish it via the Runbook editor. After it has been published you can add a schedule to this runbook.
  • Edit the script in the runbook editor
  • Click on publish (the editor will close and you will be redirected to the overview page)
  • In the overview page click on Link to schedule
  • In the Schedule menu you can select an existing schedule or create a new one
  • In the Parameter menu you can provide the value for the five parameters
Add schedule to a runbook


Note: If you have multiple Azure SQL Database that you all want to up or downscale on the same time then you have a slight problem because you cannot reuse a schedule for the same runbook multiple times with different parameters (please upvote or add a comment). Workarounds:
  1. create multiple identical schedules (ugly but works)
  2. do everything in one big script (less flexible but works)
Log of runbook executions

Details of single execution


Summary
In this blog post you learned how to schedule an up- or scale of your Azure SQL DB (or DWH) to save money in case you don't need a high performace 24 hours a day. Scheduling is done in Azure Automation, but with some minor changes you can also do that via an ADF pipeline.

The Powershell scripting gives you the most flexibility for example to add additional tests and notifications, but for those who don't like scripting: in a next blog post we will show you how to accomplish this with TSQL code only. You can either use that for an on-the-fly up- or downscale or use it in a Store Procedure Activity in Azure Data Factory.

Thursday 31 October 2019

Databases in DevOps - Build Pipeline

Case
Before we can deploy our database project through the DTAP environment we need to build it to check whether the merged code of all developers still works. The result of the build is a dacpac file which can be used for the deployment. But what is a dacpac file and how do we create it in Azure DevOps?
Build Pipeline


Solution
First, Dacpac stands for Data Application Component Package. It is a single file containing a database model that is equal to the database project in Visual Studio. It contains all the information to create a database. You can rename it from .dacpac to .zip to see the content of the file.


1) Create empty build pipeline
There are several pipeline templates that you can use, but for this example we will start with an empty build pipeline.
  • Go to Pipelines (Builds) in the left menu
  • Click on New to create a New Build Pipeline
  • Use the classic editor link on the bottom
  • Select Azure Repos Git as the source
  • Then select the Team project, Repository and the default branch
  • Next choose an Empty job
Create empty Build Pipeline


Now give the new Build pipeline a useful name. Next is choosing the Agent pool. For this example we will use the default Microsoft hosted pool: Azure Pipelines. The agent for this pipeline will be 'vs2017-win2016'.

2) Add trigger
To 'Enable continuous integration' for the database project we will need to add a trigger. For this example we will use a Branch filter on 'Master' and a Path filter on the path of this database project in GIT. This trigger will automatically start the build of the database project when someone changes code in the master branch for this particularly project (if done right via a pull request from a feature branch to the master branch).
  • Go to the Triggers tab
  • Enable continuous integration by checking the checkbox
  • First set the branch filter to: Include and master (or the branch you want to use)
  • Click on + Add below Path filters
  • Set the path filter to: include and the path of your project in Git: DB/HST/HST_BB/*
Add trigger


3) Builds tasks: Build solution
Now we need to add tasks to the Agent job generated in step 1. The first task is MSBuild which will build the Visual Studio database project. Once succeeded, this will generate a dacpac file which will be used by the next tasks
  • Click on Agent job 1 and optionally change its name
  • Click on the + icon to add a task the Agent job
  • Search for msbuild in the seachbox
  • Select MSBuild (Build with MSBuild) and click Add
  • The only property you need to set is the filepath of the sqlproj file in GIT: DB/HST/HST_BB/HST_BB.sqlproj
Add MSBuild task


4) Builds tasks: Copy dacpac and publish files
With this task we will copy the result of the build task (a dacpac file) to the Artifact Staging Directory. We need to specify which file we want to copy and to which folder. For the target folder we will use a predefined variable pointing to the right folder. For the files we will use a wildcard filter. Note that we not only publish the dacpac file, but also the Publish profile xml file.

  • Click on Agent job 1 (or the new name you provided in the previous step)
  • Click on the + icon to add a second task the Agent job
  • Search for 'copy files' in the seachbox
  • Select Copy files (Copy files from .... folder paths) and click Add
  • In the contents field add two rows:
    • **\*.dacpac
    • **\*.publish.xml
  • As target folder add: $(Build.ArtifactStagingDirectory)
Copy dacpac to Artifact Staging folder


5) Builds tasks: Publish build artifact
The last step of the build pipeline is to publish all files in the Artifact Staging Directory and give them an Artifact Name. This Artifact Name will be used in the Release pipeline which we will explain in a subsequent post.
  • Click on Agent job 1 (or the new name)
  • Click on the + icon to add a second task the Agent job
  • Search for 'Publish build artifact' in the searchbox
  • Select Publish build artifact (Publish build .... file share) and click Add
  • Give the artifact a new name (instead of drop)
Publish the artifacts


Note: in this case the artifact is a dacpac file, but it could also be ispac for SSIS or a assembly for C#.

6) Test the pipeline
Now it's time to test your build pipeline by committing some changes to your master branch via Visual Studio (or to create a pull request to pull changes to your master branch). This will trigger an automatic build. If you don't want to make any changes at this moment, you could just click on (Save &) Queue in devops to do a build manually.
Dry run your build pipeline


Summary
In this post you saw how to build your database project automatically when someone changes something in the master branch (like a pull request). You don't have to check the result manually if you setup notifications in DevOps. Then you will receive an email when something succeeds of fails.


Bisides master branches you could also build other branches like feature or personal branches by using different filters. Or you could schedule your build to build each night. After setting up this basic example explorer and try out all the other options from the build pipeline. In a followup post we will show you how to deploy this built artifact through your DTAP environment using Continuous Deployment.

Thursday 12 September 2019

Databases in DevOps - Pre-Deployment scripts

Case
I'm using database projects combined with Azure DevOps CI CD and I want to deploy data through my DTAP enviroment for some reference tables. Another reason could be that you want to do some data preparations before deploying all database changes. How do I do that in Visual Studio Database projects?
Adding Pre- and Post-Deployment scripts


Solution
This is where Pre-Deployment and Post-Deployment scripts could help you out. It's all in the name, but a Pre-Deployment script will be execute before deploying the database project and a Post-Deployment script will be executed after that deployment. These are all just regular .sql files containing T-SQL code.

For example a Pre-Deployment script can be used to secure data in a temporary table before a table change. A Post-Deployment script can be used to copy the data back to the appropriate tables and then clean up the temporary table afterwards.

Deploying data through the DTAP environments is nothing more then creating a delete statement and some subsequent insert queries. If the reference table already exits you could use a Pre-Deployment script or else you should use a Post-Deployment script.

1) Creating a deployment script
To keep our database project clean we will first create a folder called 'Scripts' to store the Pre-Deployment and Post-Deployment scripts. If you have a lot of scripts you could also create two separate folders.

To add scripts to your project, right click new folder in your the project and choose: Add, New Item..., User Scripts and then Pre-Deployment Script or Post-Deployment Script. Then give the file a suitable name.
Adding Pre- or Post-Deployment scripts


Note: see the file property of the deployment file that is called Build Action. This is where you determine the purpose and execution moment of a regular '.sql' file. However you can have only one Pre-Deployment and one Post-Deployment file in a project. There is a workaround below if you need multiple files.

2) Adding code
Now you can add your T-SQL code, but make sure it is repeatable (in case of a crash or when deploying multiple times). So if you want create a temporary table, make sure it doesn't already exits by adding a drop if-exists construction before the create statement.

Below a script that pushes data through the DTAP environment for a reference table.
/*
Post-Deployment Script Template       
--------------------------------------------------------------------------------------
 This file contains SQL statements that will be appended to the build script.  
 Use SQLCMD syntax to include a file in the post-deployment script.   
 Example:      :r .\myfile.sql        
 Use SQLCMD syntax to reference a variable in the post-deployment script.  
 Example:      :setvar TableName MyTable       
               SELECT * FROM [$(TableName)]     
--------------------------------------------------------------------------------------
*/

DELETE FROM [ref].[myTable]
GO
INSERT [ref].[myTable] ([Column1], [Column2], [Column3]) VALUES ('bla 1', 'bla 2', 'bla 3')
GO
INSERT [ref].[myTable] ([Column1], [Column2], [Column3]) VALUES ('bla a', 'bla b', 'bla c')
GO

If you have a big deployment script and you want to divide the code over multiple files then you have to create one 'master' script to call the other 'child' scripts because you can only have one Pre-Deployment and one Post-Deployment script in a database project. For this example we added multiple child scripts in the same folder as the parent script and called those by adding ":r .\" in front of the file names.
/*
Post-Deployment Script Template       
--------------------------------------------------------------------------------------
 This file contains SQL statements that will be appended to the build script.  
 Use SQLCMD syntax to include a file in the post-deployment script.   
 Example:      :r .\myfile.sql        
 Use SQLCMD syntax to reference a variable in the post-deployment script.  
 Example:      :setvar TableName MyTable       
               SELECT * FROM [$(TableName)] 
      
There can be only one post-deployment script per database! (One script to rule them all...)
--------------------------------------------------------------------------------------
*/

:r .\PostDeploymentFile1.sql
:r .\PostDeploymentFile2.sql
:r .\PostDeploymentFile3.sql

Conslusion
In this post you learned how to add some scripts before and after the general deployment of the database project. A good way to either add some reference data or to do some cleanup before you deploy your changes. Next take look at the publishing profile file for you SQL DB project.


Saturday 31 August 2019

Databases in DevOps - Introduction

Case
I want my Data Warehouse databases in Azure DevOps just like my ETL projects and use Contunious Integration (CI) and Continuous Deliver (CD) for multiple environments. How do you do that?
SQL Database in DevOps


Solution
If you read a couple of forums and blogs about this subject then you will probably notice that 'all roads lead to Rome'. In this blog series we will explain our approach, but feel free to deviate.

Just for the record. With Continuous Integration (CI) we mean merging the code of all developers and building the project to check whether everything still works. Continuous Deliver will orchestrate the  deployment of the package created by CI through out the DTAP environment in an automated manner to reduce costs, but speed up the release proces.

For this example we work with four environments each with its own Azure SQL database: Development, Test, Acceptance and Production. The Development database is a shared database where all developers do there coding.

The database changes since the last compare will be pushed to a Visual Studio Database project. Which on its turn will be committed to Git. After that the project will be build in DevOps and then deployed through all environments.
DTAP environments


Note: This approach with a single shared development database only works for smaller teams or when the database work can be separated to avoid conflicts. The alternative is to give each developer their own local development database. This will take a little more syncing and merging effort though.

1) Visual Studio Database project
First, you either need Visual Studio 2017 or 2019. You have three options:
  1. SSDT standalone installer. This is Visual Studio 2017 with only the BI and DB project templates.
  2. Visual Studio 2017 (Community Edition is free). During installation locate Data storage and processing and select SQL Server Data Tools. Finding a download without an MSDN license is a bit tricky since 2019 is the current version
  3. Visual Studio 2019 (Community Edition is free). During installation locate Data storage and processing and select SQL Server Data Tools.

Data Storage and processing - SQL Server Data Tools


After installing you will find the SQL Server Database Project under SQL Server when you create a new project.
Create new Database Project


2) Import or Schema compare
Now that we have an empty database project we need to add the database items from our development database to this new project. You can either do an import of the database or do a Schema Compare between the database and the project.

When importing a new database you only have couple of options like not importing referenced logins or the folder structure. I would suggest not to import any logins because the are probably different on all environments. As folder structure I recommend Schema\Object Type because I think this is the clearest structure. Note that you can do an import only once.
Import Database


The second option is to do a schema compare which gives you much more options for tuning the synchronization. The best feature is that you can repeat this any time you like to update the Visual Studio Project.

Right click the project and choose Schema Compare... Then make sure the source database is on the left side and the Visual Studio project on the right side. Click on the options/settings icon to tune the comparison. In this case we will ignore users and role memberships.

Now press the compare button and review all changes especially when you work in a team. Then you probably only want your changes. Uncheck changes that are not yours or not ready to go to the next environment. By clicking on a change you can see the actual differences. Last step is to press the Update button and move all selected changes to the Visual Studio project. Before committing any changes to Git you should built your project to check if everything works.
Sql Schema Compare


Note: When working with multiple developers in a single development database you will probably encounter a couple of database changes which where not made by you. This is the point where you have to be selective on which changes you want to push to the database project.

Tip: When you have a lot of 'garbage' in your development database you could do a clean up by switching the source and target in the Sql Schema Compare and then push the update button. This will throw everything away that is not in your database project. It is probably a good idea to first create a backup.

3) Add Schema Compare to project
A great feature of the Sql Schema Compare file is that you can save it to your PC and then add it to your database project. The next time you only have to open it and click on the compare button.
Add Compare file to db project


4) Dacpac to create or update
If you built the database project in Visual Studio or DevOps it will generate a .dacpac file which can be used to create or update the next database in our DTAP environment. By default it can only update tables when they get bigger (extra columns or larger datatypes). This is to prevent loss of data. In a next post we will explain how to overcome this with Publish profiles or Pre-Deployment script.

Conclusion
In this introduction post you learned how to create a database project in Visual Studio and how to synchronize a database and a database project. In the next posts we will create a Build pipeline in DevOps to validate your committed database changes and after that we will create a Release pipeline to release your committed database changes through the DTAP environment.

A downside of database projects in Visual Studio is that it can become very slow if you have like thousands and thousands of database objects. For those very large databases (not in size, but in structure) you could also take a look at commercial database tools like those of redgate or SentryOne. However the majority of Data Warehouse databases will probably easily fit in Visual Studio Database projects.


Sunday 30 July 2017

Azure SQL Database vs Azure SQL Data Warehouse

Case
As we slowly move from on-premises data warehouses with Microsoft SQL Server to cloud data warehouses in Microsoft Azure, we need to know more about the various options in Azure. You probably already used an Azure SQL Database, but Microsoft also introduced Azure SQL Data Warehouse. What are the differences between these two databases?
Azure SQL DB vs Azure SQL DW


Solution
Back in 2013, Microsoft introduced Azure SQL Database which has its origin in the on-premises Microsoft SQL Server. In 2015 (however public availability was in July 2016) Microsoft added SQL Data Warehouse to the Azure cloud portfolio which has its origin in the on-premises Microsoft Analytics Platform System (APS). This was a Parallel Data Warehouse (PDW) combined with Massively Parallel Processing (MPP) technology and included standard hardware. It is the 'big brother' of SQL Server, but with a slightly different purpose.

In this post we will briefly describe the differences between these two Microsoft Azure Services, but first Microsofts own definitions:
  • Azure SQL Database is a relational database-as-a service using the Microsoft SQL Server Engine (more);
  • Azure SQL Data Warehouse is a massively parallel processing (MPP) cloud-based, scale-out, relational database capable of processing massive volumes of data (more);

Differences
1) Purpose: OLAP vs OLTP
Although both Azure SQL DB and Azure SQL DW are cloud based systems for hosting data, their purpose is different. The biggest difference is that SQL DB is specifically for Online Transaction Processing (OLTP). This means operational data with a lot of short transactions like INSERT, UPDATE and DELETE by multiple people and/or processes. The data is most often highly normalized stored in many tables.

On the other hand SQL DW is specifically for Online Analytical Processing (OLAP) for data warehouses. This means consolidation data with a lower volume, but more complex queries. The data is most often stored de-normalized with fewer tables using a star or snowflake schema.

2) Achitecture
In order to make the differences more clear a quick preview of the architecture of Azure SQL Data Warehouse, where you see a whole collection of Azure SQL Databases and separated storage. The maximum number of compute notes at the moment is 60.
    Architecture SQL DW: Decouples (Blob) storage from compute (SQL DB)


    3) Storage size
    The current size limit of an Azure SQL Database is 4TB, but it has been getting bigger over the past few years and will probably end up around 10TB in the near future. On the other hand we have the Azure SQL Data Warehouse which has no storage limit at all (only the limit of your wallet), because the storage is separated from the compute.

    3) Pricing
    The pricing is also quite different. Where Azure SQL DB starts with €4,20 a month, Azure SQL DW starts around €900,- a month excluding the cost of storage which is included in SQL DB. The storage costs for Azure SQL DW are around €125,- per TB per month. And the maximum costs of a single SQL DB is around €13500,- where SQL DW ends around a massive €57000,- (excl. storage). But when you take a look at the architecture above, it should be no surprise that SQL DW is more expensive than SQL DB, because it consists of multiple SQL DBs.

    However, SQL DW has one big trick up its sleeve that SQL DB hasn't: you can pause it completely and then you only pay for storage. If you start your SQL DW with your ETL job and pause it right after you processed your Azure Analysis Services then you only need it a small percentage of the month.

    Note: prices are from July 2017

    4) DTU vs DWU
    SQL DB has 15 different pricing tiers which specify the number of Database Transaction Units  (DTU) and the storage size/type:
    - Basic
    - Standard (S0, S1, S2, S3)
    - Premium (P1, P2, P3, P4, P6, P11, P15)
    - Premium RS (PRS1, PRS2, PRS4, PRS6)
    Basic has only 5 DTUs and the highest number of DTUs is, at the time of writing, 4000.
    The term DTU is a bit vague. It is a mysterious combination of RAM, CPU and read-write rates, but basically if you want to double the performance of your current database you just need to double the number of DTU's for your database.

    SQL DW has 12 different pricing tiers and uses Data Warehouse Units (DWU) to specify the performance level.
    - DWU100, 200, 300, 400, 500, 600, 1000, 1200, 1500, 2000, 3000, 6000
    The term DWU is a little less vague, because if you divide that number by 100 you have the number of compute nodes available for that pricing tier. On the other hand the exact combination of CPU, memory and IOPS per compute note is unknown.

    Because both services have a different purpose it is a bit strange to compare the hardware, but according to this MSDN blog post 1 DWU is approximately 7,5 DTU.

    But there is also some similarity: for both services you can use the same script to change the pricing tier on the fly to either give the performance a real boost when needed or the save money in the quiet hours.

    5) Concurrent Connection
    Although SQL DW is a collection of SQL Databases the maximum number of concurrent connections is much lower than with SQL DB. SQL DW has a maximum of 1024 active connections where SQL DB can handle 6400 concurrent logins and 30000 concurrent sessions. This means that in the exceptional case where you have over a thousand active users for your dashboard you probably should consider SQL DB to host the data instead of SQL DW.
    For more details see the SQL DB Recource Limitations and SQL DW Recource Limitations.

    6) Concurrent Queries
    Besides the maximum connections, the number of concurrent queries is also much lower. SQL DW can execute a maximum of 32 queries at one moment where SQL DB can have 6400 concurrent workers (requests). This is where you see the differences between OLTP and OLAP.
    For more details see the SQL DB Recource Limitations and SQL DW Recource Limitations.

    7) PolyBase
    Azure SQL Data Warehouse supports PolyBase. This technology allows you to access data outside the database with regular Transact SQL. It can for example use a file in an Azure Blob Storage container as a (external) table. Other options are importing and exporting data from Hadoop or Azure Data Lake Store. Although SQL Server 2016 also supports PolyBase, Azure SQL Database does not (yet?) support it.

    8) Query language differences
    Although SQL DW uses SQL DB in the background there are a few minor differences when quering or creating tables:
    - SQL DW cannot use cross databases queries. So all your data should be in the same database.
    - SQL DW can use IDENTITY, but only for INT or BIGINT. Moreover the IDENTITY column cannot be used as part of the distribution key.
    - Also see this SQL DW list of unsupported table features.

    9) Replication
    SQL DB supports active geo-replication. This enables you to configure up to four readable secondary databases in the same or different location. SQL DW does not support active geo-replication, only Azure Storage replication. However this is not a live, readable, synchronized copy of your database! It's more like a backup.

    10) In Memory OLTP tables
    SQL DB supports in-memory OLTP. SQL DW is OLAP and does not support it.

    11) Always encrypted
    SQL DB supports Always Encrypted to protect sensitive data. SQL DW does not support it.

    Conclusion
    Although Azure SQL DB looks much cheaper on a monthly basis, this doesn't mean you should always choose SQL DB by default. One big advantage is that you can pause SQL DW. For example a stage database is only used during the ETL process. Why should you always have this database up an running? Or why should your datamart stay online 24*7 if your end users only use Analysis Services to browse the data.

    On the other hand the original purpose of both services is different (OLTP vs OLAP), but this doesn't mean you should always use Azure SQL DW for your data warehouses. Depending on several factors like data size, complexity, required up-time and budget, Azure SQL DB could also host your data warehouse. You could even mix them in your project. For example Stage and Historical/Persistent stage in Azure SQL DW and your Datamart in Azure SQL DB.


    Please leave a comment if you know more significant differences that are worth mentioning.

    Tuesday 11 April 2017

    Schedule Upscale/downscale Azure SQL DB(/DWH)

    Case
    I want to downgrade the Tier of my Azure SQL DB automatically after working hours and upgrade it in the morning right before working hours to minimize the Azure costs. How do I do that in Azure?
    Change the Tier of your SQL Azure DB


    Solution
    You could solve this with a scripting language like PowerShell and run that PowerShell script each morning and evening with SQL Server Agent or Windows Scheduler, but for this solution I will use Azure Runbook with its scheduler. So the entire solution runs in Azure.


    1) Automation Account
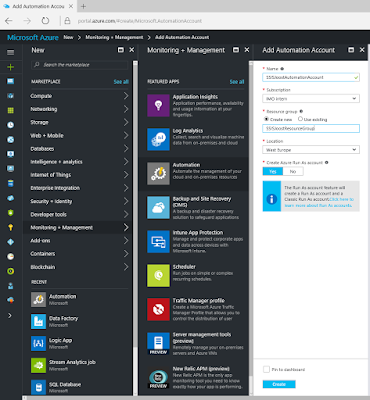
    First we need an Azure Automation Account to run the Runbook. If you don't have one or want to create a new one, then search for Automation under Monitoring + Management and give it a suitable name, then select your subscription, resource group and location. For this example I will choose West Europe since I'm from the Netherlands.
    Azure Automation Account


    2) Credentials
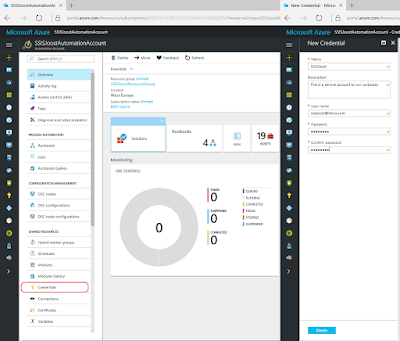
    Next step is to create Credentials to run this runbook with. This works very similar to the Credentials in SQL Server Management Studio. Go to the Azure Automation Account and click on Credentials in the menu. Then click on Add New Credentials. You could just use your own Azure credentials, but the best options is to use a service account with a non-expiring password. Otherwise you need to change this regularly.
    Create new credentials


    3) Connections
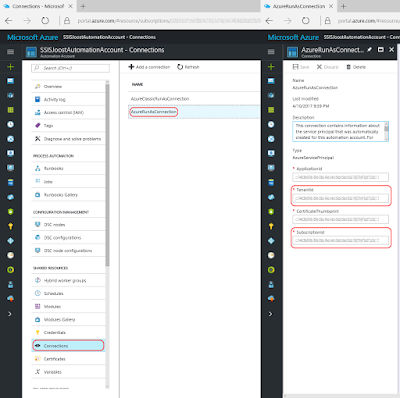
    This step is for your information only and to understand the code. Under Connections you will find a default connection named 'AzureRunAsConnection' that contains information about the Azure environment, like the tendant id and the subscription id. To prevent hardcoded connection details we will retrieve these two fields in the PowerShell code.
    Azure Connections


    4) Variables
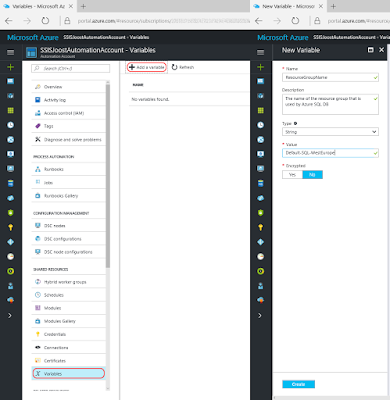
    An other option to prevent hardcoded values in your PowerShell code it to use Variables. We will use this option to provide the Resource Group, SQL Server Name and Database Name. Go to Variables and add a new variable for ResourceGroupName and add the name of the Resource Group that is used by your Azure DB. Then repeat this for ServerName (name only without .database.windows.net) and DatabaseName (the name of your database).
    Add variables


    5) Runbooks
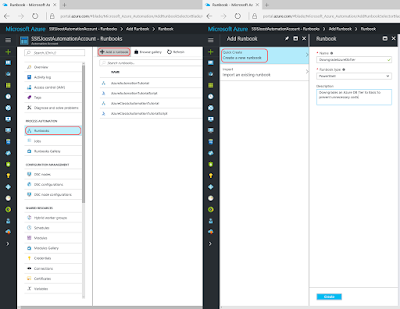
    Now it is time to add a new Azure Runbook for the PowerShell code. Click on Runbooks and then add a new runbook (There are also four example runbooks of which AzureAutomationTutorialScript could be useful as example). Give your new Runbook a suitable name and choose PowerShell as type.
    Add Azure Runbook


    6) Edit Script
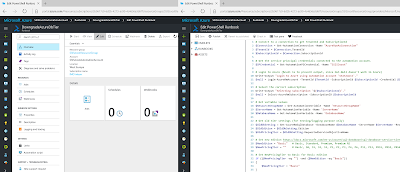
    After clicking Create in the previous step the editor will we open. When editing an existing Runbook you need to click on Edit to edit the code. You can copy and paste the code below to your editor.
    Edit the PowerShell code


    # PowerShell code
    # Connect to a connection to get TenantId and SubscriptionId
    $Connection = Get-AutomationConnection -Name "AzureRunAsConnection"
    $TenantId = $Connection.TenantId
    $SubscriptionId = $Connection.SubscriptionId
    
    # Get the service principal credentials connected to the automation account. 
    $SPCredential = Get-AutomationPSCredential -Name "SSISJoost"
    
    # Login to Azure ($null is to prevent output, since Out-Null doesn't work in Azure)
    Write-Output "Login to Azure using automation account 'SSISJoost'." 
    $null = Login-AzureRmAccount -TenantId $TenantId -SubscriptionId $SubscriptionId -Credential $SPCredential
    
    # Select the correct subscription
    Write-Output "Selecting subscription '$($SubscriptionId)'."
    $null = Select-AzureRmSubscription -SubscriptionID $SubscriptionId
    
    # Get variable values
    $ResourceGroupName = Get-AutomationVariable -Name 'ResourceGroupName' 
    $ServerName = Get-AutomationVariable -Name 'ServerName' 
    $DatabaseName = Get-AutomationVariable -Name 'DatabaseName'
    
    # Get old tier settings (for testing/logging purpose only)
    $OldDbSetting = Get-AzureRmSqlDatabase -DatabaseName $DatabaseName -ServerName $ServerName -ResourceGroupName $ResourceGroupName
    $OldEdition = $OldDbSetting.Edition
    $OldPricingTier = $OldDbSetting.CurrentServiceObjectiveName
    
    # Set new edition https://docs.microsoft.com/en-us/azure/sql-database/sql-database-service-tiers
    $NewEdition = "Basic"   # Basic, Standard, Premium, Premium RS
    $NewPricingTier = ""    # Basic, S0, S1, S2, S3, P1, P2, P3, P4, P6, P11, P13, PRS1, PRS2, PRS4, PRS6
    
    # Set NewPricingTier to Basic for Basic edition
    if (($NewPricingTier -eq "") -and ($NewEdition -eq "Basic"))
    {
        $NewPricingTier = "Basic"  
    }
    
    # Write old and new edition to screen (for testing/logging purpose only)
    Write-Output "Changing Database Tier from $($OldEdition) ($($OldPricingTier)) to $($NewEdition) ($($NewPricingTier)) "
    
    # Set new tier
    $null = Set-AzureRmSqlDatabase -DatabaseName $DatabaseName -ServerName $ServerName -ResourceGroupName $ResourceGroupName -Edition $NewEdition -RequestedServiceObjectiveName $NewPricingTier
    
    # Show done when finished (for testing/logging purpose only
    Write-Output "Done"
    

    Note 1: This is a very basic script. No error handling has been added. Check the AzureAutomationTutorialScript for an example. Finetune it for you own needs.
    Note 2: There are often two versions of an method like Set-AzureRmSqlDatabase and Set-AzureSqlDatabase. Always use the one with "Rm" in it (Resource Managed), because that one is for the new Azure portal. Without Rm is for the old/classic Azure portal.
    Note 3: Because Azure Automation doesn't support Out-Null I used an other trick with the $null =. However the Write-Outputs are for testing purposes only. Nobody sees them when they are scheduled.
    Note 4: This also works for Azure Data Warehouses. Just use other Tiers like DWU400.

    7) Testing
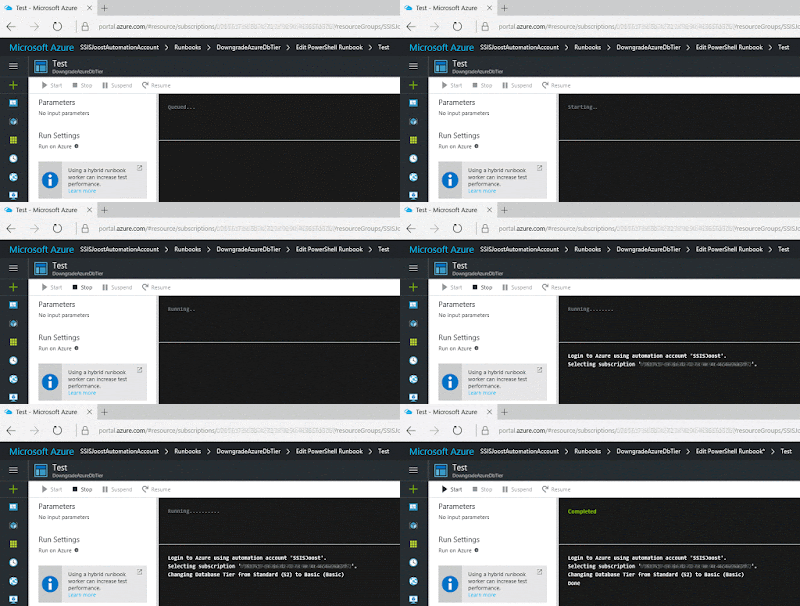
    You can use the Test Pane menu option in the editor to test your PowerShell scripts. When clicking on Run it will first Queue the script before Starting it. Running takes about two minutes.
    Testing the script in the Test Pane


    8) Publish
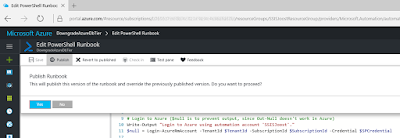
    When your script is ready, it is time to publish it. Above the editor click on the Publish button. Confirm overriding any previously published versions.
    Publish the Runbook


    9) Schedule
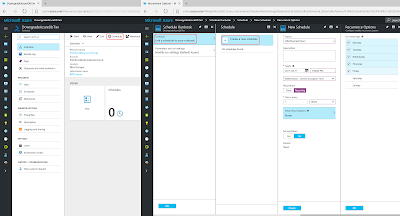
    And now that we have a working and published Azure Runbook, we need to schedule it. Click on Schedule to create a new schedule for your runbook. For this downgrade script I created a schedule that runs every working day on 7:00PM (19:00). The upgrade script could for example be scheduled on working days at 7:00AM. Now you need to hit the refresh button in the SQL Databases overview in Azure to see if it really works. It takes a few minutes to run, so don't worry too soon.
    Add Schedule


    Summary
    In this post you saw how you can upgrade and downgrade your Azure SQL Databases to save some money in Azure during the quiet hours. The screenshots only show the downgrade script. For the upgrade version you have a couple of options. You could create one script with a parameter that indicates an upgrade or downgrade. An other option is to use a fancy if-construction that uses the current tier and/or time to decide whether you need an upgrade or downgrade. Or just create two separate scripts for upgrade and downgrade.


    Thursday 5 January 2017

    Azure Snack - Grant Access to your Azure SQL DB

    Case
    You want to give an user permission to connect to your database in Azure through SQL Server Management Studio. How do you do this?

    Solution
    In SQL Server Management Studio (SSMS) with an on-premise database you can do a lot with a GUI, like creating an user and giving this user the right permissions. In this case we use SQL Server Authentication. With a database in Azure you have to write code in Transact-SQL for this, instead of using GUI. Of course you can also use T-SQL in combination with an on-premise database, but for the convenience I use a GUI. Unfortunately, this GUI is not supported in an Azure database. Just like 'IntelliSense' for example.

    When you connect to your database server and you want to create a new login, you will see two different windows: a GUI within an on-premise database and a new query window in an Azure database. We will continue with query's, which needs to be run in a particular order.

    SSMS - SQL Server on-premise versus Azure SQL Server


    1) Create new login
    First we need to create a new login to grant access to the database server. Therefore you have to be administrator on the database server. Click on the Security folder and then on Logins to create a 'New Login...'.


    Then we edit the generated query to this:

    CREATE LOGIN [RobertSmith] 
    WITH PASSWORD = 'Abcdefg123!' 
    GO
    

    Note:
    The password must include letters, numbers, symbols and have a minimum length.

    2) Create user 
    When we have created the login, we can link this login to a specific database (user). Click on the Security folder in the specific database and then on Users to create a 'New User...'. The engine also generates a code at this point.


    We change the generated query to:

    USE [sensory]
    GO
    
    CREATE USER [RobertSmith]
    FOR LOGIN [RobertSmith]
    WITH DEFAULT_SCHEMA = [dbo]
    GO
    

    3) Permissions
    Once the user has been created, you can further specify the authorization . For example, read access to one of more schemas. This can be done by the following query:

    USE [sensory]
    GO
    
    GRANT select ON SCHEMA :: [analyse] TO [RobertSmith] 
    GO
    

    Now the user can login with SQL Authentication with the created credentials. Important is to select the right database, otherwise SSMS will automatically make connection to the master database. In this case we gave permissions to a specific database, so the attempt will fail.

    SSMS - Select the database before connecting to server


    Conclusion
    This isn't very difficult to understand for anybody with some experience within SSMS, but this is not a daily action and in that scenario there is a chance that you do not have the query's ready. Anyway, for now you have to do it with T-SQL in Azure, but perhaps in the future also with an GUI.

    Thursday 29 September 2016

    IoT Adventure: 5b - Stream Analytics for Azure SQL Database

    Case
    Your sensors are connected with an IoT Hub and is generating data. In our previous post we send the real-time data to an Power BI dashboard. What are the other possibilities in Azure with this data?

    Solution
    In our previous post we distinguish two streams for our data: Cold path and Hot path. In this case we store the data in a Azure SQL Database, which is a form of the Cold path. See here for the full list of Azure SQL Databases (size and prices) where you can choose from. The reason to store the data may be, for example, to analyze the data or to prepare a dataset as input for your Machine Learning experiment/model. Just like the Hot path, we are setting up a (separate) Stream Analytics Job for this. You can have multiple Outputs in one Job, for example real-time Power BI and SQL Database, but when you want to edit the query for the data to the database, you must stop the Job and also your real-time data is not sent. Before we create the job, we first set up the Azure SQL Server and after that the SQL Azure Database. The reason for this is that we want to select the database by the Output of the Stream Analytics Job and therefore we need to create it first (along with the server).

    Cold path with Stream Analytics


    1) Create the Azure SQL Server
    Go to the Azure portal and click on 'More services' on the bottom of the menu (left-hand side of the screen) and search for SQL server. When you have opened it, click on 'Add' to create a new Stream Analytics Job. Perhaps you noticed that in our previous post instead of 'Browse' now 'More service' stands. The portal is still in development so there are regular updates.

    Azure Portal - Create SQL Server


    Now you can fill in your Server name (the name cannot contain spaces). Next we create a SQL Server login and this is our Server admin. You can also use Azure Active Directory (user or group) for this. Click here for more information. The Subscription is filled automatically. After this we choose a Resource group. For the convenience we choose the Resource group we have created earlier by setting up the IoT Hub, but you can also create a general Resource group so the server can be used for purposes other than IoT. Otherwise the server has the same lifecycles, permissions and policies as the IoT Resource group. Our Location is the Netherlands, so we choose West-Europe.

    Azure Portal - Create SQL Server (continuation)


    Tip:
    When the deployment of the server succeeded, the server must appear in the list of SQL Servers. If not, you must click on the 'Refresh' button at the top under SQL Servers.

    2) Create the Azure SQL Database
    Next we create the database. In your Azure portal click on 'More services' and search for SQL Database. When you have opened it, click on 'Add' to create a new database.

    Azure Portal - Create SQL database


    Choose a name for your database. The Subscription is filled automatically and next we choose for the same Resource group as earlier by setting up the SQL Server. Select 'Blank database' (new database) and choose the SQL Server that you have created earlier. If you don't choose a server, Azure creates automatically one. That is the reason why we set up the server first, because maybe you want to create one server (with a general name) and to attach here multiple databases. Otherwise you have a separate server for every database. That can also be a conscious choice off course, but that is not what we want in this case. At last we choose the 'Basic' database, but here you can choose the size that fits your needs. The Collation is default.

    Azure Portal - Create SQL database (continuation)


    Tip:
    If you decide to add in Management Studio (once you have connected) a new database, be aware of the fact that Azure creates default the S3 (Standard) version of a database. Therefore, you should always create a new database in the Azure portal, so that you can choose the right size and price.

    3) Connect to SQL Server and create a table
    Once the database is created, you can connect to the SQL Server in Management Studio. In this case our Server name is 'bitools.database.windows.net,1433'. As you can see the name includes the default port of 1433 (this is the only port on which the service is available). Next you choose 'SQL Server Authentication' and fill in the login and password that you have created earlier by setting up the SQL Server. The first time you must Sign In with your Azure account. This is also the case when you have not made connection to the server for a while. At last you must add your client IP for access to the server. Your IP is now added to the firewall.

    SQL Server Management Studio - Connect to Azure


    Before we create the Stream Analytics Job, we must do one last thing and that is create a table where we can store the sensor data. I have created the following table in the database:

    CREATE TABLE [dbo].[sensorData](
     [SensorName] [nvarchar](max) NULL,
     [MeasurementCount] [bigint] NULL,
     [MeasurementTime] [datetime] NULL,
     [Temperature] [float] NULL,
     [Humidity] [float] NULL,
     [Pressure] [float] NULL,
     [Altitude] [float] NULL,
     [Decibel] [float] NULL,
     [DoorOpen] [bigint] NULL,
     [Motion] [bigint] NULL,
     [Vibration] [bigint] NULL,
     [Illumination] [float] NULL
    )

    As you can see I choose for float as datatype, because the standard data types in Azure are floats. This means that input datatypes such as decimal and numeric are converted to floats.

    Tip:
    You can manage the firewall in the Azure portal. Go in the portal to your server, click on it and under settings you will find 'Firewall'. Here you can add Client IP's to allow connection to the server. Note that this can only be done by an user who have the role of 'Owner'. In this case I created the server so I'm automatically owner of the server.


    4) Create the Stream Analytics Job
    In your Azure portal click on 'New'. Type in 'Stream Analytics Job' and click on it. Next you click on the result, in this case only Stream Analytics Job. After that, you can click on the 'Create' button.

    Azure Portal - Create Stream Analytics Job (extensive)


    Tip:
    In our previous post we create a new Stream Analytics Job on a faster and different way. This way is extensive and gives some general information about, in this case, a Stream Analytics Job. So if you want more information about a feature in Azure before you create it, this is a useful way. 

    Now you can fill in your Job name (the name cannot contain spaces) and the Subscription is filled automatically. Next choose a Resource group. These groups are made by setting up the IoT Hub. Click here for more information and how you create it. When you have created this, it appears in the list of 'use existing' and you can choose this one. Our Location is the Netherlands, so we choose West-Europe. At last you can pin your Job right away to your dashboard, with the checkbox at the bottom. You may have noticed at the first screenshot that I have already pin the previous Stream Analytics Job to my dashboard.

    Azure Portal - Create Stream Analytics Job (continuation)


    5) Define the Input
    Once the Job is created, you must add a new Input. Because I have pinned the Job (screenshot 6 of 'Create the Stream Analytics Job'), you can select it from the dashboard. The default Source Type is 'Data stream', because  the sensor data is an ongoing stream and is derived from the IoT Hub. Optionally, you can add 'Reference data' as type. This data is like static metadata next to your sensor data, it gives your sensor data more meaning. Here you can find more information about this kind of data. The Source is 'IoT hub' and then the IoT Hub that you have created automatically appears. If you have more then one IoT Hub, you can choose one from the drop-down list. The next thing is to choose the right Consumer group. These groups are made by setting up the IoT Hub. Click here for more information and how you create it. In this case we want to store the sensor data in a Azure database, so you choose 'azuredb'. Finally you choose 'JSON' as Event serialization format. Click here for more information and how you create such a JSON message.
    1. Click on the job
    2. Click on 'Inputs'
    3. Click on 'Add'
    4. Fill in a name, select 'Data stream' as Source Type  and select your IoT Hub as Source
    5. Select 'azuredb' as Consumer group and choose 'JSON' as Event serialization format
    Azure Portal - Define Input


    6) Define the Output
    After the Input, you create the Output. When you have given the Output a suitable name, you choose 'SQL database' in Sink. Then select your Database that you have created, in our case 'IoT_Sensor'. After that the Server name, that you have created too, is filled in automatically. Next you must connect to the database with the SQL Server login you made earlier. Now you can choose a table, in our case 'sensorData'
    1. Click on the job and click on 'Outputs'
    2. Click on 'Add'
    3. Fill in a name and select 'SQL database' as Sink
    4. Select your Azure Database that you have created
    5. Log in with the SQL login Username and Password
    6. Choose the created Table
    Azure Portal - Define Output


    7) Define the Query
    Now the Output is defined, you can build up the query. Compared to our previous post you see that there are already some updates have been made. For example, on the left you see your Input and Output. The query needs always an Input and an Output, so that's why we have created the Output first. It is good to know that the language is SQL, but there are certain differences with a normal SQL query. In addition, the standard data types are floats. 
    Besides a FROM clause, there is an INTO clause. For the FROM you will use your defined Input and the Output is used for the INTO. Additionally, there are various new windowing functions available. This will be discussed in another blog. You will find more details about the Stream Analytics Query Language here. For now we use a simple query without those functions. 

    The query:

    SELECT   CAST(sensorName as nvarchar(max)) as SensorName
    ,        CAST(1 as bigint) as MeasurementCount
    ,        CAST(measurementTime as datetime) as MeasurementTime
    ,        Temperature
    ,        Humidity
    ,        Pressure
    ,        Altitude
    ,        Decibel
    ,        CAST(doorOpen as bigint) as DoorOpen
    ,        CAST(motion as bigint) as Motion
    ,        CAST(vibration as bigint) as Vibration
    ,        Illumination
    INTO   [saj-bitools-DB-Output] 
    FROM   [saj-bitools-DB-Input]
    

    Unfortunately, the testing of the query is not supported in the new Azure Portal. They are working on it.

    Azure Portal - Define Query


    7) Start the Job
    At last you must start the Stream Analytics Job. You can choose between ad-hoc (now) or a scheduled day and time (custom).

    Azure Portal - Start the Stream Analytics Job


    Result
    We have started the Stream Analytics Job and now we want to see the result. Go back to your SQL Server Management Studio and connect to the Azure Database. When you look at the table, you must see the results. In our case we have sent 100 messages to our database. The messages are sent every 10 seconds.

    SQL Server Management Studio - Table results


    Conclusion
    The steps are logical, but the sequence of the execution is very important. Also be careful about which database you buy, because there are big differences between the prices.