Thursday 29 September 2016

IoT Adventure: 5b - Stream Analytics for Azure SQL Database

Case
Your sensors are connected with an IoT Hub and is generating data. In our previous post we send the real-time data to an Power BI dashboard. What are the other possibilities in Azure with this data?

Solution
In our previous post we distinguish two streams for our data: Cold path and Hot path. In this case we store the data in a Azure SQL Database, which is a form of the Cold path. See here for the full list of Azure SQL Databases (size and prices) where you can choose from. The reason to store the data may be, for example, to analyze the data or to prepare a dataset as input for your Machine Learning experiment/model. Just like the Hot path, we are setting up a (separate) Stream Analytics Job for this. You can have multiple Outputs in one Job, for example real-time Power BI and SQL Database, but when you want to edit the query for the data to the database, you must stop the Job and also your real-time data is not sent. Before we create the job, we first set up the Azure SQL Server and after that the SQL Azure Database. The reason for this is that we want to select the database by the Output of the Stream Analytics Job and therefore we need to create it first (along with the server).

Cold path with Stream Analytics


1) Create the Azure SQL Server
Go to the Azure portal and click on 'More services' on the bottom of the menu (left-hand side of the screen) and search for SQL server. When you have opened it, click on 'Add' to create a new Stream Analytics Job. Perhaps you noticed that in our previous post instead of 'Browse' now 'More service' stands. The portal is still in development so there are regular updates.

Azure Portal - Create SQL Server


Now you can fill in your Server name (the name cannot contain spaces). Next we create a SQL Server login and this is our Server admin. You can also use Azure Active Directory (user or group) for this. Click here for more information. The Subscription is filled automatically. After this we choose a Resource group. For the convenience we choose the Resource group we have created earlier by setting up the IoT Hub, but you can also create a general Resource group so the server can be used for purposes other than IoT. Otherwise the server has the same lifecycles, permissions and policies as the IoT Resource group. Our Location is the Netherlands, so we choose West-Europe.

Azure Portal - Create SQL Server (continuation)


Tip:
When the deployment of the server succeeded, the server must appear in the list of SQL Servers. If not, you must click on the 'Refresh' button at the top under SQL Servers.

2) Create the Azure SQL Database
Next we create the database. In your Azure portal click on 'More services' and search for SQL Database. When you have opened it, click on 'Add' to create a new database.

Azure Portal - Create SQL database


Choose a name for your database. The Subscription is filled automatically and next we choose for the same Resource group as earlier by setting up the SQL Server. Select 'Blank database' (new database) and choose the SQL Server that you have created earlier. If you don't choose a server, Azure creates automatically one. That is the reason why we set up the server first, because maybe you want to create one server (with a general name) and to attach here multiple databases. Otherwise you have a separate server for every database. That can also be a conscious choice off course, but that is not what we want in this case. At last we choose the 'Basic' database, but here you can choose the size that fits your needs. The Collation is default.

Azure Portal - Create SQL database (continuation)


Tip:
If you decide to add in Management Studio (once you have connected) a new database, be aware of the fact that Azure creates default the S3 (Standard) version of a database. Therefore, you should always create a new database in the Azure portal, so that you can choose the right size and price.

3) Connect to SQL Server and create a table
Once the database is created, you can connect to the SQL Server in Management Studio. In this case our Server name is 'bitools.database.windows.net,1433'. As you can see the name includes the default port of 1433 (this is the only port on which the service is available). Next you choose 'SQL Server Authentication' and fill in the login and password that you have created earlier by setting up the SQL Server. The first time you must Sign In with your Azure account. This is also the case when you have not made connection to the server for a while. At last you must add your client IP for access to the server. Your IP is now added to the firewall.

SQL Server Management Studio - Connect to Azure


Before we create the Stream Analytics Job, we must do one last thing and that is create a table where we can store the sensor data. I have created the following table in the database:

CREATE TABLE [dbo].[sensorData](
 [SensorName] [nvarchar](max) NULL,
 [MeasurementCount] [bigint] NULL,
 [MeasurementTime] [datetime] NULL,
 [Temperature] [float] NULL,
 [Humidity] [float] NULL,
 [Pressure] [float] NULL,
 [Altitude] [float] NULL,
 [Decibel] [float] NULL,
 [DoorOpen] [bigint] NULL,
 [Motion] [bigint] NULL,
 [Vibration] [bigint] NULL,
 [Illumination] [float] NULL
)

As you can see I choose for float as datatype, because the standard data types in Azure are floats. This means that input datatypes such as decimal and numeric are converted to floats.

Tip:
You can manage the firewall in the Azure portal. Go in the portal to your server, click on it and under settings you will find 'Firewall'. Here you can add Client IP's to allow connection to the server. Note that this can only be done by an user who have the role of 'Owner'. In this case I created the server so I'm automatically owner of the server.


4) Create the Stream Analytics Job
In your Azure portal click on 'New'. Type in 'Stream Analytics Job' and click on it. Next you click on the result, in this case only Stream Analytics Job. After that, you can click on the 'Create' button.

Azure Portal - Create Stream Analytics Job (extensive)


Tip:
In our previous post we create a new Stream Analytics Job on a faster and different way. This way is extensive and gives some general information about, in this case, a Stream Analytics Job. So if you want more information about a feature in Azure before you create it, this is a useful way. 

Now you can fill in your Job name (the name cannot contain spaces) and the Subscription is filled automatically. Next choose a Resource group. These groups are made by setting up the IoT Hub. Click here for more information and how you create it. When you have created this, it appears in the list of 'use existing' and you can choose this one. Our Location is the Netherlands, so we choose West-Europe. At last you can pin your Job right away to your dashboard, with the checkbox at the bottom. You may have noticed at the first screenshot that I have already pin the previous Stream Analytics Job to my dashboard.

Azure Portal - Create Stream Analytics Job (continuation)


5) Define the Input
Once the Job is created, you must add a new Input. Because I have pinned the Job (screenshot 6 of 'Create the Stream Analytics Job'), you can select it from the dashboard. The default Source Type is 'Data stream', because  the sensor data is an ongoing stream and is derived from the IoT Hub. Optionally, you can add 'Reference data' as type. This data is like static metadata next to your sensor data, it gives your sensor data more meaning. Here you can find more information about this kind of data. The Source is 'IoT hub' and then the IoT Hub that you have created automatically appears. If you have more then one IoT Hub, you can choose one from the drop-down list. The next thing is to choose the right Consumer group. These groups are made by setting up the IoT Hub. Click here for more information and how you create it. In this case we want to store the sensor data in a Azure database, so you choose 'azuredb'. Finally you choose 'JSON' as Event serialization format. Click here for more information and how you create such a JSON message.
  1. Click on the job
  2. Click on 'Inputs'
  3. Click on 'Add'
  4. Fill in a name, select 'Data stream' as Source Type  and select your IoT Hub as Source
  5. Select 'azuredb' as Consumer group and choose 'JSON' as Event serialization format
Azure Portal - Define Input


6) Define the Output
After the Input, you create the Output. When you have given the Output a suitable name, you choose 'SQL database' in Sink. Then select your Database that you have created, in our case 'IoT_Sensor'. After that the Server name, that you have created too, is filled in automatically. Next you must connect to the database with the SQL Server login you made earlier. Now you can choose a table, in our case 'sensorData'
  1. Click on the job and click on 'Outputs'
  2. Click on 'Add'
  3. Fill in a name and select 'SQL database' as Sink
  4. Select your Azure Database that you have created
  5. Log in with the SQL login Username and Password
  6. Choose the created Table
Azure Portal - Define Output


7) Define the Query
Now the Output is defined, you can build up the query. Compared to our previous post you see that there are already some updates have been made. For example, on the left you see your Input and Output. The query needs always an Input and an Output, so that's why we have created the Output first. It is good to know that the language is SQL, but there are certain differences with a normal SQL query. In addition, the standard data types are floats. 
Besides a FROM clause, there is an INTO clause. For the FROM you will use your defined Input and the Output is used for the INTO. Additionally, there are various new windowing functions available. This will be discussed in another blog. You will find more details about the Stream Analytics Query Language here. For now we use a simple query without those functions. 

The query:

SELECT   CAST(sensorName as nvarchar(max)) as SensorName
,        CAST(1 as bigint) as MeasurementCount
,        CAST(measurementTime as datetime) as MeasurementTime
,        Temperature
,        Humidity
,        Pressure
,        Altitude
,        Decibel
,        CAST(doorOpen as bigint) as DoorOpen
,        CAST(motion as bigint) as Motion
,        CAST(vibration as bigint) as Vibration
,        Illumination
INTO   [saj-bitools-DB-Output] 
FROM   [saj-bitools-DB-Input]

Unfortunately, the testing of the query is not supported in the new Azure Portal. They are working on it.

Azure Portal - Define Query


7) Start the Job
At last you must start the Stream Analytics Job. You can choose between ad-hoc (now) or a scheduled day and time (custom).

Azure Portal - Start the Stream Analytics Job


Result
We have started the Stream Analytics Job and now we want to see the result. Go back to your SQL Server Management Studio and connect to the Azure Database. When you look at the table, you must see the results. In our case we have sent 100 messages to our database. The messages are sent every 10 seconds.

SQL Server Management Studio - Table results


Conclusion
The steps are logical, but the sequence of the execution is very important. Also be careful about which database you buy, because there are big differences between the prices. 

Wednesday 3 August 2016

IoT Adventure: 5a - Stream Analytics Job for Power BI

Case
Your sensors are connected with an IoT Hub and is generating data. What are the possibilities with this data and more important, how does this works in Azure?

Solution
In Azure, we can use Stream Analytics to do this. We distinguish two streams for our data:
  • Cold path
  • Hot path
Possibilities with Stream Analytics


There is also the possibility for Machine Learning. You can use this for both Cold path and Hot path. We are skipping this for now. This will be discussed in another blog.

Cold path
The Cold path means that the data will be stored for further processing, before presenting it to the end users. Examples of a Cold path are loading the data into a Azure Data Lake or an Azure SQL Database. For the latter, you have to create first the Azure SQL Database. You also have to organize the authentication, make some custom tables where the data can be stored in and finally make the Stream Analytics Job. Setting up all this will be explained in another blog. 

Hot path
The other path is the Hot path and this means that the data is real-time and will be displayed into Power BI. First you have to create a Stream Analytics Job and then do the configuration.


1) Create the Stream Analytics Job
You can make the Job in both old portal and the new portal. We prefer to make as much as possible in the new portal, because this will be the standard in the future.

Go to 'Browse' on the bottom of the menu (left-hand side of the screen) and search for Stream Analytics jobs. When you have opened it, click on 'Add' to create a new Stream Analytics Job. 

Azure Portal - Create Stream Analytics Job


Tip: 
As you can see, on the left in the Azure menu I have some standard resources. When you click on a blank star (favorite) button, it will append on the left in your menu (see screenshot 2). You can also select 'All recourses' in the menu. This contains a list of all features and here you can add any feature, also a Stream Analytics Job.

Now you can fill in your Job name (the name cannot contain spaces) and the Subscription is filled automatically. Next choose a Resource group. These groups are made by setting up the IoT Hub. Click here for more information and how you create it. When you have created this, it appears in the list of 'use existing' and you can choose this one. Our Location is the Netherlands, so we choose West-Europe. At last you can pin your Job right away to your dashboard, with the checkbox at the bottom. You may have noticed at the first screenshot that I have already pin some some Jobs to my dashboard

Azure Portal - Create Stream Analytics Job (continuation)


Once the Job is created, it will appears in the list of Stream Analytics Jobs with the status 'Created'.

2) Define the Input
Once the Job is created, you must add a new Input. The default Source Type is 'Data stream', because  the sensor data is an ongoing stream and is derived from the IoT Hub. Optionally, you can add 'Reference data' as type. This data is like static metadata next to your sensor data, it gives your sensor data more meaning. Here you can find more information about this kind of data. The Source is 'IoT hub' and then the IoT Hub that you have created automatically appears. If you have more then one IoT Hub, you can choose one from the drop-down list. The next thing is to choose the right Consumer group. These groups are made by setting up the IoT Hub. Click here for more information and how you create it. In our case we want to present the sensor data in a Power BI dashboard, so you choose 'powerbi'. Finally you choose 'JSON' as Event serialization format. Click here for more information and how you create such a JSON message.
  1. Click on the job
  2. Click on 'Inputs'
  3. Click on 'Add'
  4. Fill in a name, select 'Data stream' as Source Type  and select your IoT Hub as Source
  5. Select 'powerbi' as Consumer group and choose 'JSON' as Event serialization format
Azure Portal - Define Input


3) Define the Output
After the Input, you create the Output. When you have given the Output a suitable name, you choose 'Power BI' in Sink. Then you should authorize with your Power BI account. In most cases, this will be the same as your Azure account. Please note that this only can be done with an organization account. When you are successfully logged in, you must choose a Group Workspace. The default is 'My Workspace'. The downside of 'My Workspace' is that when you want to share your Power BI dashboard with other persons and such persons enable to edit this dashboard, this doesn't work in a local workspace. You must choose a workspace where several people are part of, for example a SharePoint group. Everybody in this group can see and edit Power BI dashboard(s) in this workspace. In our example is this the 'IoT' group.
  1. Click on the job and click on 'Outputs'
  2. Click on 'Add'
  3. Fill in a name and select 'Power BI' as Sink
  4. Authorize with your Azure account
  5. Select your Group Workspace
  6. Fill in a Dataset name and Table name
Azure Portal - Define Output


4) Define the Query
Now the Output is defined, you can build up the query. Because the query needs always an Input and an Output, we created the Output first. It is good to know that the language is SQL, but there are certain differences with a normal SQL query. In addition, the standard data types are floats. 
Besides a FROM clause, there is an INTO clause. For the FROM you will use your defined Input and the Output is used for the INTO. Additionally, there are various new windowing functions available. We use one of them. You will find more details about the Stream Analytics Query Language here. For now we use the Tumbling Window function and the Timestamp function. 

Tumbling Window function
With the Tumbling Window function you can define your own time intervals, that will not overlap each other. Our data is send per second to our IoT Hub, but here we make an interval of one minute. Based on that we use several aggregate functions, that will calculate the data for one minute. See this post for more details.

Timestamp By function
The other function is the Timestamp. A query in Stream Analytics contains nearly always a datetime field, because the data is send at a specific time. This field is passed to 'TIMESTAMP BY' function. This ensures that the data is coming in at the time when it is created, instead of the time when the data has been sent. Perhaps the transfer of the data is delayed and causes the data in a different order by entry. 

The query:

SELECT   sensorName
,        Max(measurementTime) as measurementTime
,        CAST(1 as bigint) as measurementCount
,        Avg(decibel) as decibel
,        Sum(doorOpen) as doorOpen
,        Avg(humidity) as humidity
,        Avg(illumination) as illumination
,        Sum(motion) as motion
,        Avg(pressure) as pressure
,        Avg(temperature) as temperature
,        Sum(vibration) as vibration
INTO   [saj-bitools-Output] 
FROM   [saj-bitools-Input] TIMESTAMP by measurementTime 
GROUP BY  sensorName
,         TumblingWindow(minute, 1)

Unfortunately, the testing of the query is not supported in the new Azure Portal. They are working on it.

Azure Portal - Define Query


5) Start the Job
At last you must start the Stream Analytics Job. You can choose between ad-hoc (now) or a scheduled day and time (custom).


Azure Portal - Start the Stream Analytics Job


Power BI
We have started the Stream Analytics Job and now we want to present the data in Power BI. Log in here with your Power BI account. Select on the top left your Group Workspace. This is the same group that you have chosen earlier when defining the Output. When you have selected the right workspace, the dataset (defined in the Output) appears automatically. Select the dataset en now you can build a report. In 10-15 minutes we have created a simple report. It contains the amount of input events, averages of the measurements and a timeline with these measurements.

When you click the refresh button, the data will be refreshed. Next you can pin the live page to a dashboard. If the pin doesn't work the first time by adding at to a new dashboard, just pin the report again to the existing dashboard (you created previously). Now you have your first Power BI dashboard with live sensor data.
  1. Click on 'Power BI'
  2. Click on the menu
  3. Select your Group Workspace
  4. The dataset appears automatically
  5. Click on the dataset
  6. Make the report and click on 'Pin Live Page'
  7. Pin the report to a new dashboard en give it a suitable name
  8. Select the dashboard and you will see your report
Create the Power BI dashboard


Power BI example


Note
In another blog we will show you how to send your sensor data to an Azure SQL Database. Because you have these different options for your output, we choose to create a separate job for our livestream sensor data to Power BI. You can create multiple Inputs, Query's and Outputs in one job. The disadvantage is that you want to edit a single query (for example the livestream query), you must stop the entire job. This means that other Outputs (like Azure database) are stopped too and do not receive any data anymore through this job. 

Conclusion
A lot of steps to do before you can make a Power BI dashboard. If you can build once, you can pretty quickly put together other dashboards.

Sunday 24 July 2016

IoT Adventure: 4 - Sending sensor data to IoT Hub

Case
I want to send sensor data from my .NET application to Azure. How do I do that?

Solution
To send sensor data from our .NET application we will use JSON messages and send them to the Azure IoT Hub. After that, other Azure parts like Stream Analytics can 'subscribe' to the IoT Hub to actually do something with the sensor data. But that will be described in a next blogpost.
The first step is to setup an IoT Hub to receive messages. The second step is to adjust our .NET application to send those messages.

1) Create Resource Group
To create an IoT Hub we first need a Resource Group to store the data from the IoT Hub. You can skip this step by creating a Resource Group within the IoT Hub form or if you already have one in your subscription.
Go to New, Management and then Resource Group. The most important option is the Resource group location. You can't combine Azure items from different resource groups. Because we live in the Netherlands, West Europe is the most obvious location to choose for us. That way the data stays in the Netherlands.
Azure Portal - Adding Resource Group


2) IoT Hub
Now the actual IoT Hub. Go to New, Internet of Things and then IoT Hub. For this example we are using the F1 scale tier which is free of charge, but has a limit of 8000 messages a day. So sending each second isn't possible, but once a minute is no problem. The size of the messages is limited as well to 0,5kb for F1 and 4kb for the other editions.
Azure Portal - Adding IoT Hub


3) Consumer groups
We need to create consumer groups. We will create one for the hot path called 'PowerBi' and one for the cold path called 'AzureDB'. Stream Analytics will use these consumer groups to run the queries. Using multiple consumer groups makes it possible for several consumer applications to read data from this IoT Hub independently. If you would use only one consumer group then one consumer application will retain the lease and the others will loose the connection.
Go to the newly created IoT Hub. Click on 'All Settings', 'Messaging' and then scroll down to the consumer groups. Add two groups: PowerBi and AzureDB and click on save.
Azure Portal - Adding Consumer Groups


4) IoT Hub Connection String
Next step is to create the Connection String which we need in our code to send JSON messages to this IoT Hub. First click on the Key icon on the IoT Hub dashboard. Then in the Shared access policies window click on 'iothubowner'. Now copy the 'Connection string - primary key' for the next step.
Azure Portal - Connection string - primary key


5) Device Explorer - Connection String
With the Device Explorer tool we are going to convert the connection string from the previous step to something we can use in our code.
  • Start up Device Explorer (see prerequisites) and paste the connection string on the Configuration tab under IoT Hub Connection String and click on Update.
  • Next go to the Management tab and click on Create. Enter the unique name (or id) of your device and click on the Create button. A new line will be added in the Device Grid.
  • Right click it and choose 'Copy connection string for selected device'. This is the string we need in our code.


6) Adjust .NET code
Go to your .NET project and use this connection string to send messages to the IoT Hub. If you are using our project then here is what you need to change:
Our Sensory project


Conclusion
Not a very exciting and visible step, but very necessary for your IoT project. Moneywise the chosen Tier is very important, but the Consumer Groups are also very essential if you have multiple consuming applications. Also read Azure Event Hub vs IoT Hub to check the differences between those two hubs.

Sunday 17 July 2016

IoT Adventure: 3 - Create Visual Studio Project for sensors

Case
I have installed all the prerequisites, now I want to start a new Visual Studio Project. Which project do I choose and which assemblies do I need to reference for a IoT project?

Solution
Below you find the basic code you need to send sensor data to the Azure IoT Hub. The specific sensor code differs per sensor and will be posted in separate posts. Make sure to first install all prerequisites.

1) Blank App (Universal Windows)
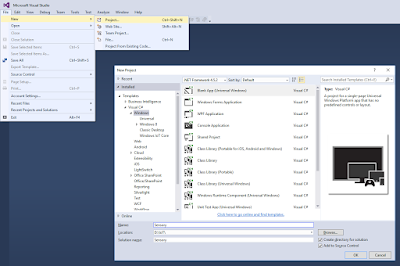
Open Visual Studio 2015 and create a new project. We will be using C# as language. Under C#, Windows you will find the 'Blank App (Universal Windows)' project. Supply a ProjectName and Solution Name (also notice the checkbox for Source Control). Our project (and solution) is called Sensory.
Blank App (Universal Windows)


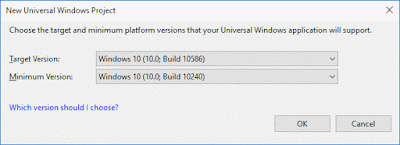
When you create such project it will ask which version of Windows you want to use. Click on the help link if you're not sure.
Windows version


2) Source Control
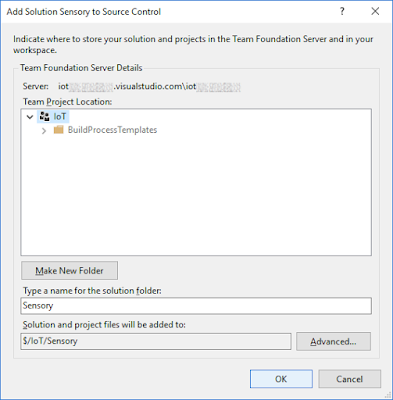
The next window will be about source control because of the checkbox in the previous step. We will be using Team Foundation Server (TFS) for source control. This is recommended especially when you work in a team. You can either use your local TFS machine or use TFS online at visualstudio.com. It's also possible to use third party source control software.
TFS online


3) Reference to Windows IoT Extensions for the UWP
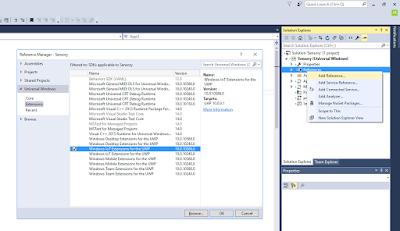
A new blank project has been loaded. First we need a reference for IoT Extensions. Go to the Solution Explorer and right click on references and choose "Add Reference...". Then under Universal Windows / Extensions, locate "Windows IoT Extensions for the UWP". Sometimes you will find multiple versions. Make sure to choose the right one. We need version 10.0.10586.0.
Windows IoT Extensions for the UWP


4) Add NuGet Packages for Azure
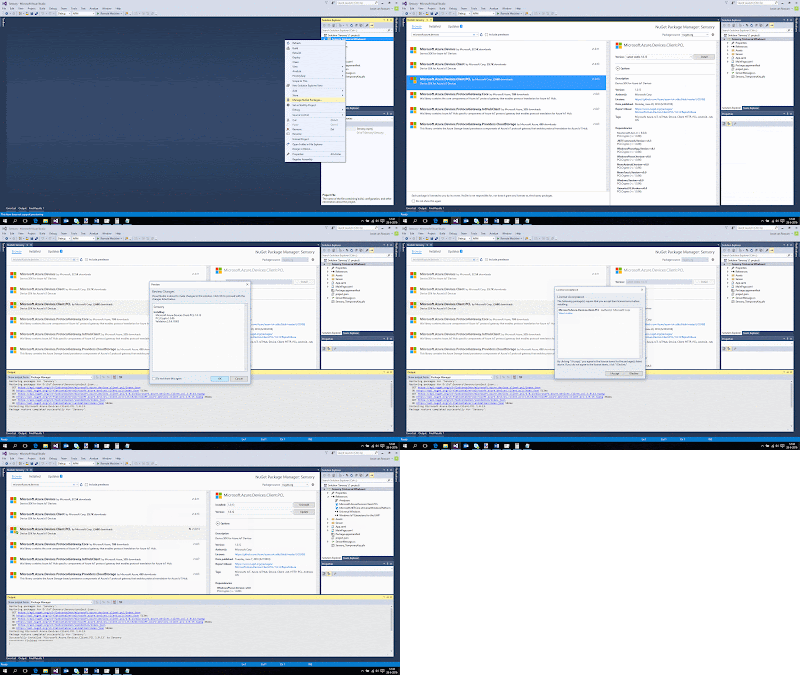
Because we want to connect to Azure, we need to add a NuGet for Microsoft.Azure.Devices.Client.PCL. Right click the project (not the solution) and choose "Manage NuGet Packages". Then go to Browse and search for "Microsoft.Azure.Devices.Client.PCL" and click on the Install button. When you're ready, a new reference appears in the Solution Explorer.
Add NuGet for Azure


5) SensorMessage Class
For this project we have created a Sensor Message class to store the sensor values from one meassuring moment. Each x seconds/minutes we meassure for example the temperature and the illumination in a room. We store this in a SensorMessage object and then we are able to create a JSON message with these values and send this message to the Azure IoT Hub.

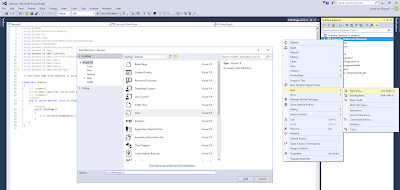
Right click the project and choose 'Add', 'New Item...' and in the new window choose Class. Give it the name SensorMessage. Copy and past the code below to the new class. If you used a different project name then change the namespace from Sensory to your namespace name.
Add new class file


//C# Code
using System;
using System.IO;
using System.Runtime.Serialization;
using System.Runtime.Serialization.Json;
using System.Text;

namespace Sensory
{
    [DataContract]
    public class SensorMessage
    {
        #region Properties with get and/or set
        [DataMember]
        private string sensorName;
        public string SensorName
        {
            get { return sensorName; }
        }

        [DataMember]
        private DateTime measurementTime;
        public DateTime MeasurementTime
        {
            get { return measurementTime; } 
        }

        [DataMember]
        private decimal temperature;
        public decimal Temperature
        {
            get { return temperature; } 
            set { temperature = value; }
        }

        [DataMember]
        private decimal humidity;
        public decimal Humidity
        {
            get { return humidity; }
            set { humidity = value; }
        }

        [DataMember]
        private decimal pressure;
        public decimal Pressure
        {
            get { return pressure; }
            set { pressure = value; }
        }

        [DataMember]
        private decimal altitude;
        public decimal Altitude
        {
            get { return altitude; }
            set { altitude = value; }
        }

        [DataMember]
        private decimal decibel;
        public decimal Decibel
        {
            get { return decibel; }
            set { decibel = value; }
        }

        [DataMember]
        private int doorOpen;
        public int DoorOpen
        {
            get { return doorOpen; }
            set { doorOpen = value; }
        }

        [DataMember]
        private int motion;
        public int Motion
        {
            get { return motion; }
            set { motion = value; }
        }

        [DataMember]
        private int vibration;
        public int Vibration
        {
            get { return vibration; }
            set { vibration = value; }
        }

        [DataMember]
        private decimal illumination;
        public decimal Illumination
        {
            get { return illumination; }
            set { illumination = value; }
        }
        #endregion

        #region Constructor method
        /// 
        /// Creates SensorMessage object with default values
        /// Code should look something like:
        /// SensorMessage sensorMessage = new SensorMessage("mySensor");
        /// 
        /// The name or unique code of your sensor
        public SensorMessage(string SensorName)
        {
            sensorName = SensorName;
            // measurementTime = DateTime.Now;
            // Fix for timezone / offset troubles
            // after serializing to JSON. Without
            // this it shows UTC time with offset
            measurementTime = DateTime.UtcNow.AddHours(TimeZone.CurrentTimeZone.GetUtcOffset(DateTime.Now).Hours);
            temperature = 0;
            humidity = 0;
            pressure = 0;
            altitude = 0;
            decibel = 0;
            doorOpen = 0;
            motion = 0;
            vibration = 0;
            illumination = 0;
        }
        #endregion

        #region ToJson method
        /// 
        /// Extension method to convert object to JSON format
        /// It uses all properties with [DataMember] above it
        /// 
        /// 
        public string ToJson()
        {
            DataContractJsonSerializer ser = new DataContractJsonSerializer(typeof(SensorMessage));
            MemoryStream ms = new MemoryStream();
            ser.WriteObject(ms, this);
            string json = Encoding.UTF8.GetString(ms.ToArray(), 0, (int)ms.Length);

            return json;
        }
        #endregion
    }
}


5b) ToJson
The ToJson method in this class automatically returns a JSON message with all class properties that have [DataMember] above it. Also make sure to add [DataContract] above the class. It will generate the following message that can be read by the event Hub:
{"altitude":2.94,"decibel":7.43,"doorOpen":0,"humidity":93.97,"illumination":85.00, "measurementTime":"\/Date(1468490582115)\/","motion":0,"pressure":98.46, "sensorName":"Joost","temperature":89.49,"vibration":1}

Tip: try to keep the message as small as possible by using small columnnames or codes instead of large text values.

6) Main code
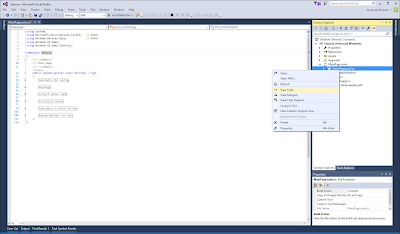
Locate the MainPage.xaml(.cs) file in the Solution Explorer and open the code behind it (the C# code). We have added some usings and methods which you need to add to your file. After that you can customize the code to your sensors/situation. In the following posts we will show you the sensor specific code for each sensor we will use in our IoT project.
MainPage.xaml.cs


//C# Code
using System;
using Microsoft.Azure.Devices.Client;   // Added
using Windows.Devices.Gpio;             // Added
using Windows.UI.Xaml;
using Windows.UI.Xaml.Controls;

namespace Sensory
{
    /// 
    /// Main page
    /// 
    public sealed partial class MainPage : Page
    {
        #region Constants for config
        // GPIO PIN CONFIG
        const int PIN_DOORSENSOR = 4;

        // Azure IoT Hub connection string
        // Will be explained in next blogpost
        const string azureConnectionString = "HostName=xxxxxx.azure-devices.net;DeviceId=XXXXXXXX;SharedAccessKey=y1ANJwjTueyzCEBEAliy7MkOQHW5dOWiu6w79HcfvVc=";
        #endregion

        #region MainPage
        /// 
        /// Method that execute on startup
        /// 
        public MainPage()
        {
            this.InitializeComponent();

            // Initialize sensors
            InititializeDoorSensor();

            // Add timer event to collect and send
            // data each x seconds or minutes
            DispatcherTimer sensorTimer;
            sensorTimer = new DispatcherTimer();
            sensorTimer.Interval = TimeSpan.FromSeconds(60);
            sensorTimer.Tick += GetSensorData_Tick;
            sensorTimer.Start();
        }
        #endregion

        #region Collect sensor data
        // Method that is execute each x seconds
        // and collects the data from the sensors.
        // For this example it generates random data
        private void GetSensorData_Tick(object sender, object e)
        {
            // Create sensorMessage object and fill all
            // meassi=urements (with random data for now)
            SensorMessage sensorMessage = new SensorMessage("mySensor");
            sensorMessage.Illumination = randomDecimal();
            sensorMessage.Temperature = randomDecimal();
            sensorMessage.Humidity = randomDecimal();
            sensorMessage.Pressure = randomDecimal();
            sensorMessage.Altitude = randomDecimal();
            sensorMessage.Decibel = randomDecimal();
            sensorMessage.DoorOpen = randomInt(0.5);
            sensorMessage.Motion = randomInt(0.3);
            sensorMessage.Vibration = randomInt(0.1);

            // Send the data to the Azure IoT Hub
            SendMessage(sensorMessage.ToJson());
        }
        #endregion

        #region Initialize sensor
        // GPIO objects
        private GpioPin doorSensorPin;
        // Setup doorsensor
        private void InititializeDoorSensor()
        {
            // add sensor code
        }
        #endregion

        #region Send data to Azure IoT Hub
        // Object for sending data to azure
        private DeviceClient deviceClient = DeviceClient.CreateFromConnectionString(azureConnectionString);
        /// 
        /// Sends JSON message to Azure IoT Hub
        /// 
        /// The JSON message
        public async void SendMessage(string message)
        {
            // Send message to an IoT Hub using IoT Hub SDK 
            try
            {
                var content = new Microsoft.Azure.Devices.Client.Message(System.Text.Encoding.UTF8.GetBytes(message));
                await deviceClient.SendEventAsync(content);

#if DEBUG   // DEBUG INFO
                System.Diagnostics.Debug.WriteLine("Message Sent: {0}", message, null);
#endif
            }
            catch (Exception e)
            {
#if DEBUG   // DEBUG INFO
                System.Diagnostics.Debug.WriteLine("Exception when sending message:" + e.Message);
#endif
            }
        }
        #endregion

        #region Random Methods for test
        private int randomInt(double chance)
        {
            // Make sure each call returns a random number
            Thread.Sleep(1);

            Random test = new Random(DateTime.Now.Millisecond);

            if (test.NextDouble() >= chance)
            {
                return 1;
            }
            else
            {
                return 0;
            }
        }

        private decimal randomDecimal()
        {
            // Make sure each call returns a random number
            Thread.Sleep(1);

            Random test = new Random(DateTime.Now.Millisecond);
            return Math.Round(Convert.ToDecimal(test.NextDouble() * 100), 2);
        }
        #endregion
    }
}

6b) Random
The two random methods are temporary methods that return random data to test the application without the sensor specific code. This allows us to continue in parallel with the Azure IoT Hub, Stream Analytics and PowerBI.

7) Active Solution Platform
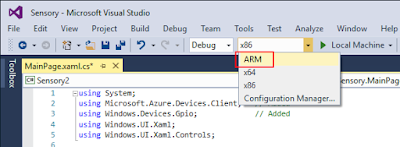
For building this project we need to switch to ARM (Acorn RISC Machine) instead of x86/x64. This is the processor architecture used on machines like the Raspberry Pi.
Switching Solution Platform to ARM


8) Deploying to Raspberry Pi
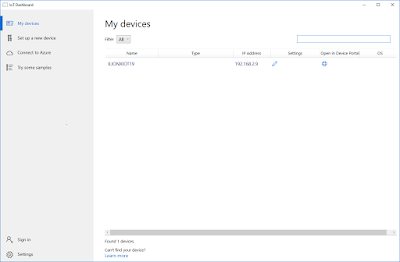
When your project is ready you can deploy it to your Raspberry Pi for debugging and testing. First you have to get the IP address of the Raspberry Pi device. The Windows 10 IoT Core Dashboard application is a good way to find your device(s). You will get the best result using a wired connection. When using WiFi the list below will sometimes stay empty.
Windows 10 IoT Core Dashboard


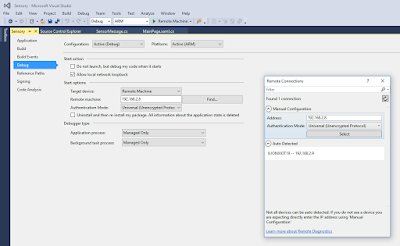
You can also use Visual Studio to find the device. Go to the properties of your project. Then go to the Debug page and click on the Find button. On this page you can select the name or IP address from your device for deploying your code.
Find your IoT device


Now you can use the green start button to deploy and debug your code on the remote device, but the first time you first need to select 'Remote Machine'. The first deployment could take a couple of minutes!
Start debugging


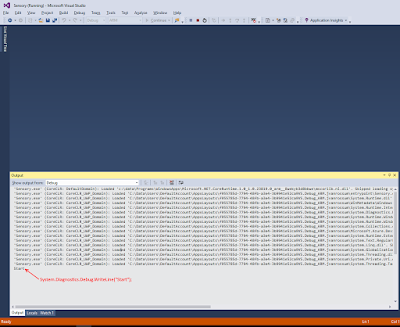
Now watch the output window in Visual Studio to see if your program is working. It's good to add a lot of Debug.WriteLine rows in de beginning to see whether everything works.
Debug output


Conclusion
A lot of work to start with, but if the basic works you can start customizing the code for your sensors. You will need some patience because finding your Raspberry Pi sometimes need a couple of attemps (wired is more ofted successful) and the first deployment takes a couple of minutes. Don't worry if it takes 3 minutes.
In the next  few blogposts we will show the specific sensor code and show you how to create the Azure IoT Hub connection string.

Saturday 9 July 2016

IoT Adventure: 2 - Preparing development machine

Case
We have connected multiple sensors (Door/window, Noise, Motion, Temperature, Humidity, Pressure, Altitude, Light and Vibration) to our Raspberry Pi and now we want to read those sensor values. But which software do we need and are there any prerequisites before we can start?

Solution
There are multiple programming languages and tools you can use to read your sensors, like .NET and Python. We will use C# and Visual Studio 2015 in our project, but before we can start we have to prepare our development environment.

1) Windows 10 Developer Mode
We are using a Windows 10 installation in Developer Mode. You can activate that mode by going to the settings windows of your computer. Go to 'Update & security' and then to 'For developers'. There you can choose 'Developer mode'.
Turning on Developer Mode in Windows 10


2) Visual Studio 2015
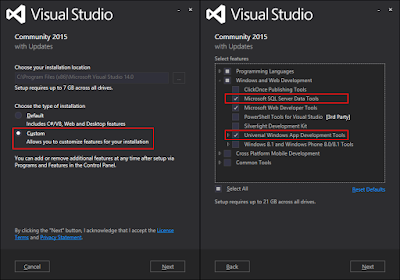
Install Visual Studio 2015 (Community, Professional or Enterprise) and make sure that you atleast use Visual Studio Update 3. Also make sure to install 'Universal Windows App Development Tools' and 'SQL Server Data Tools (SSDT)'. You can skip SSDT if you have already installed that. After installation, check your Visual Studio Version number in the Help menu. It should be at least 14.0.25208.00
Universal Windows App Development Tools & SSDT


3) Windows IoT Core Project Templates
Next item to install are the project templates for Windows IoT Core Applications. The download is a .vsix file. Just double click it to execute it. You can also find it in Visual Studio in the tools menu under Extensions and Updates.
Windows IoT Core Project Templates


4) Windows Azure SDK
Install Windows Azure SDK version 2.9. We need this SDK to connect to the Azure IoT Hub to send the sensor data to Azure.
Azure SDK
Azure SDK


5) Windows IoT Core Dashboard
Install the Windows IoT Core Dashboard. This is a useful tool to find and connect your IoT devices.
Windows 10 IoT Core Dashboard


6) Azure IoT Hub Device Explorer
Install Azure Iot Hub Device Explorer [SetupDeviceExplorer.msi]. We need this tool to make a connection to the IoT hub.
Device Explorer


Conclusion
There are a lot of tools and addons to install before you can start programming. Downloading and installing all items could easily take two hours. But a good preparation saves you time later on. In the next blogpost we will explain how to create a Visual Studio project that can read the sensor data and send it to the Azure IoT hub.