Showing posts with label SQL_DW. Show all posts

Monday 20 November 2017

CTAS - The fastest way to load data on a MPP system

Case

What is the fastest way to using Extract Load Transform (ELT) on a Massively Parallel Processing (MPP) system like on a Azure SQL Datawarehouse.

CTAS: The way to go!


Solution

When Extracting, Loading and Transforming data on a MPP system like Azure SQL Data Warehouse there are several ways to do just that. Currently Create Table As Select (CTAS) is by far the fastest.

Whats is a MPP system?
MPP stands for Massively Parallel Processing and is a database system that uses a control node to distribute the data across several seperate Compute Nodes. This makes it possible to load very large amounts of data in a fast way. All this is done automatically and for the end-user it appears to be one database. When you use traditional ETL software like SSIS to extract, load and transform data you make use of the memory that is allocated to the SSIS system and thus take the data out of the database, which is far less efficient.

How a MPP looks like under the hood


1) What is CTAS?
CTAS stands for Create Table As Select. As the name suggests the operation creates a new table using a select statement and is super fast. CTAS is fast because the data stays on the MPP and thus makes use of all the capabilities of a MPP system.

2) How to use CTAS
When you create a CTAS statement, you can choose to set two options, namely;
  • Distribution options - Setting this option is mandatory
  • Table options - Setting this option is optional. When not supplied a Clustered ColumnStore Index is used.

Distribution options

When you create the CTAS command you can choose between HASH, ROUND ROBIN or Replicate as distribution option.

HASH is used to divide the data in equal sized sections and distribute them to the nodes using a distribution column. When doing this you try to evenly distribute the data on the available nodes. Choosing the correct distribution key here is paramount otherwise you can get skew on the distribution between the nodes. To put it simply; when you have 4 nodes and the data is not distributed evenly then it hurts the data retrieval speed. For example you want to use this option when creating Fact tables that are large (or very large Dimension tables). You can check for skew using the command DBCC PDW_SHOWSPACEUSED
--Creating a table using CTAS and Hash
CREATE TABLE dbo.CTASHash
WITH
(
DISTRIBUTION = HASH(FactCallCenterID)
)
AS
SELECT 
   FactCallCenterID
 , DateKey
 , WageType
 , Calls
 , AutomaticResponses
 , Orders
 , IssuesRaised
 , AverageTimePerIssue
 , ServiceGrade
FROM dbo.FactCallCenter

ROUND ROBIN is used when you dont want to choose a distribution column but are fine when the data is distributed randomly across the nodes. This is also the default option when you do not define a distribution option. This option is used for example for Staging tables. It is advised to always explicitly define the ROUND ROBIN in the CTAS statement.
--Creating a table using CTAS and Round Robin
CREATE TABLE dbo.CTASRobin
WITH
(
 DISTRIBUTION = ROUND_ROBIN
)
AS
SELECT 
   AccountKey
 , ParentAccountKey
 , AccountCodeAlternateKey
 , ParentAccountCodeAlternateKey
 , ValueType
 , CustomMemberOptions
FROM dbo.DimAccount

REPLICATE is used to put the data on every node available so it can be used for quick access. This is useful when creating regular sized Dimensions. When the data is available on each and every node then it safes on moving the data between nodes when using joins. The full table will be available on all nodes.
--Creating a table using CTAS and Replicate
CREATE TABLE dbo.CTASReplicate
WITH
(
 DISTRIBUTION = REPLICATE
)
AS
SELECT 
   ScenarioKey
 , ScenarioName
FROM dbo.DimScenario
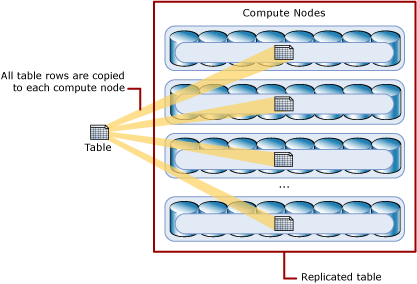
Replicated table

Table options

Besides choosing the distribution option, you can optionally also use the following table options;

CLUSTERED COLUMNSTORE INDEX is a table option that is one of the most efficient ways to store data in Azure DWH. It improves data compression and query performance for data warehousing workloads and outperform Clustered Index and Heap tables. That makes them the best choice for large tables. Using a Clustered Columnstore Index is considered to be the best choice when you are unsure which table option you should best use. It is also the default table option when you only use one of the distribution options.
--Creating a table using CTAS and Clustered Columnstore Index
CREATE TABLE dbo.CTASRobinCluster
WITH
(
   DISTRIBUTION = ROUND_ROBIN
 , CLUSTERED COLUMNSTORE INDEX
)
AS
SELECT 
   AccountKey
 , ParentAccountKey
 , AccountCodeAlternateKey
 , ParentAccountCodeAlternateKey
 , ValueType
 , CustomMemberOptions
FROM dbo.DimAccount

HEAP is a table option that is usefull when temporarily loading data on Azure DWH and is the fastest way to load your data into a table. It is not advisable to use a heap table when the data in the table is frequently grouped together. That is because the data must be sorted before it can be grouped.
--Creating a table using CTAS and Heap
CREATE TABLE dbo.CTASRobinHEAP
WITH
(
   DISTRIBUTION = ROUND_ROBIN
 , HEAP)
AS
SELECT 
   AccountKey
 , ParentAccountKey
 , AccountCodeAlternateKey
 , ParentAccountCodeAlternateKey
 , ValueType
 , CustomMemberOptions
FROM dbo.DimAccount

CLUSTERED INDEX is a table option that you use when you want to sort and store the data rows in the table based on a specific column. The disadvantage of using a Clusted Index table is that only queries that use the defined Clustered Index column benefit from the index. This can be somewhat fixed by using additional Nonclustered indices, but that would increase use of space and processing time.
--Creating a table using CTAS and Clustered Index
CREATE TABLE dbo.CTASRobinClusteredIndex
WITH
(
 DISTRIBUTION = ROUND_ROBIN,
 CLUSTERED INDEX (AccountKey)
)
AS
SELECT 
   AccountKey
 , ParentAccountKey
 , AccountCodeAlternateKey
 , ParentAccountCodeAlternateKey
 , ValueType
 , CustomMemberOptions
FROM dbo.DimAccount

PARTITION is the table option that you use when you want to determine how the rows are grouped within each distribution. To use it you need to choose a partition column name. This column can be of any data type. You use partitioning to improve query performance and data maintenance and it avoids transaction logging. Using partitioning during the load proces can also substantially improve performance.
--Creating a table using CTAS and Partition
CREATE TABLE dbo.CTASRobinPartition
WITH
(
 DISTRIBUTION = HASH(ProductKey),
 CLUSTERED COLUMNSTORE INDEX,
 PARTITION
    (
        OrderDateKey RANGE RIGHT FOR VALUES
        (
        20000101,20010101,20020101,20030101,20040101,20050101,20060101,20070101,20080101,20090101,
        20100101,20110101,20120101,20130101,20140101,20150101,20160101,20170101,20180101,20190101,
        20200101,20210101,20220101,20230101,20240101,20250101,20260101,20270101,20280101,20290101
        )
    )
)
AS
SELECT 
 ProductKey
 ,OrderDateKey
 ,DueDateKey
 ,ShipDateKey
 ,SalesAmount
 ,TaxAmt
FROM dbo.FactInternetSales

3) Advantages of CTAS
With CTAS you are able to create and recreate tables using a specific distribution type and its very fast. If you have created HEAP tables and want to see if a different distribution type is a better option, then you can simply recreate the table using CTAS with the desired Distribution option. Simply create a copy of the table with a different name, drop the old table and rename the copy table to the original table name.
--Creating a table using CTAS and Partition
CREATE TABLE dbo.CTASRenameTemp
WITH
(
 DISTRIBUTION = ROUND_ROBIN
)
AS
SELECT 
 *
FROM dbo.DimAccount;

DROP TABLE dbo.CTASRename;

RENAME OBJECT dbo.CTASRenameTempTO CTASRename;

3) CTAS tips
When you create a copy a table using CTAS and do not manipulate any of the columns, all the settings of the columns are left intact. For example the datatype and nullability. When you (re)create a column in the table then you explicitly have to cast the table and optionally use the ISNULL() function to set the nullability of the column. For the latter if you do not use the ISNULL() function then the column automatically is created allowing NULL. In below example the first column allows NULL's and the second doesnt.
--CTAS Tips
CREATE TABLE dbo.CTASCasting
WITH
(
 DISTRIBUTION = ROUND_ROBIN
)
AS
SELECT 
   CAST(ValueType AS VARCHAR(100)) AS ValueTypeNull
 , ISNULL(CAST(ValueType AS VARCHAR(100)),'Do not allow NULL') AS ValueTypeNotNull
FROM dbo.DimAccount;

Summary

With CTAS you can quickly create and recreate tables without having to build complex ETL processes. It is fast, flexible and easy to use and it gives you the option to build different styles of tables that are best used in different scenario's like fast loading or fast data retrieving. And if you want to test the table with other options then you simply recreate it with the data.

Monday 23 October 2017

Use PolyBase to read Data Lake in Azure SQL DW

Case
I have a file in an Azure Data Lake Store (ADLS) folder which I want to use in my Azure SQL Data Warehouse. In a previous blog post you used PolyBase to get the data from an Azure Blob Storage container via its access keys. How can I use PolyBase to get the data from ADLS and push the content of that file to Azure SQL DW?
Azure SQL Data Warehouse - PolyBase on ADLS


Solution
In the previous blog post we showed how to read that file from an Azure Blob Storage container via its access keys using PolyBase. However ADLS does not work with those keys, but uses the Azure Active Directory to provide access. To get authorization via Azure Active Directory we need to register a 'Web app / API'  application in Azure Active Directory that does the authorization for us. That sounds very difficult and the documentation on MSDN is not very helpful, but in the end it was quite easy.

a) Starting point
The starting point of this blog post is a file in an ADLS folder called 'mySubFolder'. The file was created in a previous blog post about U-SQL that can quickly process large amounts of data files in Azure Data Lake Analytics (ADLA). The name of our ADLS is 'bitools'.
Starting point: CSV file in ADLS
The content of the CSV file


a1) App registrations
Go to the Azure portal and search for Azure Active Directory in the search box located in the header. This will bring you to the Azure Active Directory from your subscription. Then click on App registrations in the menu. It will show a list of all existing registrations. Next step is to click on New application registration to create a new registration for our data lake.
New application registration


a2) New application registration
Enter a new descriptive name like 'Data Lake bitools' so you will know where it is used for. Choose 'Web app / API' as Application type and then you need to enter a URL. Since we are not using the Sign-on URL property (we use the Azure sign-on), you can just enter any url like 'https://microsoft-bitools.blogspot.com'. When complete click on the Create button.
New application registration


a3) Edit application registration - Application ID
Now search your newly created Application registration to get its Application ID. Copy that to a notepad (we need it later on). You can also edit additional properties like giving it a custom logo to make it more recognizable if you have an extensive list of app registrations.
Copy Application ID


a4) Edit application registration - Keys
Continue editing and click on Keys in the menu to create a new access key. Give it a suitable name and expirationperiod. After clicking Save make sure to copy the generated key to the same notepad as before since you can only get it once! If you lose it you have to delete and recreate it.
Create new key


a5) Active Directory ID
Now go back to your Azure Active Directory to copy the Directory ID. You can find it when you click on Properties in the menu. Copy this ID to the same notepad that now should contain three values (ApplicationID, generated key and DirectoryID).
Get Directory ID


a6) Setting access root folder
Go to your ADLS and click on Data Explorer. You are now in the root of your ADLS. Click on Access and then on Add to assign new permissions. Search for your Registered Application called 'bitools'. Then select it and click on the Select button. In the root folder we only need Execute permissions. 'Add to' should stay on 'This folder' and 'Add as' should stay on 'An access permission entry'. Click on the Ok button to confirm.
Setting permissions on root folder


If you forget to give Execute permissions to the root folder you will get an error when adding an external table later on:
EXTERNAL TABLE access failed due to internal error: 'Java exception raised on call to HdfsBridge_IsDirExist. Java exception message:
GETFILESTATUS failed with error 0x83090aa2 (Forbidden. ACL verification failed. Either the resource does not exist or the user is not authorized to perform the requested operation.).
[dbd91a77-1b0a-4f11-9710-d7c1b6b05268][2017-10-21T12:26:47.7748687-07:00]: Error [GETFILESTATUS failed with error 0x83090aa2 (Forbidden. ACL verification failed. Either the resource does not exist or the user is not authorized to perform the requested operation.).
[dbd91a77-1b0a-4f11-9710-d7c1b6b05268][2017-10-21T12:26:47.7748687-07:00]] occurred while accessing external file.'


a7) Setting access sub folder
Now we have to repeat this for our subfolder called 'mySubFolder'. Click on the folder and you should see the source file. Click on Access and then on Add to assign new permissions. Search for your Registered Application called 'bitools'. Then select it and click on the Select button. In this sub folder we need Read and Execute permissions. 'Add to' should be changed to on 'This folder and all children' and 'Add as' should stay on 'An access permission entry'. Click on the Ok button to confirm.
Setting permissions on sub folder


An alternative could be to give the bitools app read and execute rights on the root including all children. That saves you one step, but is less secure if you use your Data Lake for multiple purposes.


b) SSMS
Now its time to start with the actual PolyBase code, but before we start make sure your Azure SQL Data Warehouse is started and use SQL Server Management Studio (SSMS) to connect to your Data Warehouse. Notice that the icon of a SQL DW is different than SQL DB.
Icon SQL DW vs SQL DB


b1) Master key
In the next step we will use a credential that points to the registered application. To encrypt that credential, we first need to create a master key in our Azure SQL Data Warehouse, but only if you do not already have one. You can check that in the table sys.symmetric_keys. If a row exists where the symmetric_key_id column is 101 (or the name column is '##MS_DatabaseMasterKey##') then you already have a master key. Else we need to create one. For Azure SQL Data Warehouse a masterkey password is optional. For this example we will not use the password.
--Master key
IF NOT EXISTS (SELECT * FROM sys.symmetric_keys WHERE symmetric_key_id = 101)
BEGIN
    PRINT 'Creating Master Key'
    CREATE MASTER KEY;
END
ELSE
BEGIN
    PRINT 'Master Key already exists'
END 

b2) Credentials
Next step is to create a credential which will be used to access the subfolder in ADLS. For this you need the ID's and key from the notepad. The IDENTITY has the following format:
[ApplicationID]@https://login.windows.net/[DirectoryID]/oauth2/token
Replace ApplicationID (including the square brackets) with the ID from step a3 and DirectoryID (including the square brackets) with the ID from a5. The SECRET should be filled with the key from step a4. After setting the correct ID's and key, execute the following code:
--Credential
CREATE DATABASE SCOPED CREDENTIAL bitools_user
WITH
    IDENTITY = 'aaf0ab52-560e-40b1-b4df-caac1f0e5376@https://login.windows.net/3xxxxxxx-xxxx-xxxx-xxxx-xxxxxxxxxxxb/oauth2/token',
    SECRET = '6LUnE4shZ4p1jUhj7/fkLH03yfbSxi2WRWre9c0yVTs=';
;

Tip:
Give the credential a descriptive name so that you know where it is used for. You can find all credentials in the table sys.database_credentials:
--Find all credential
SELECT * FROM sys.database_credentials

b3) External data source
With the credential from the previous step we will create an External data source that points to the ADLS folder where your file is located. Execute the code below where:
  • TYPE = HADOOP (because PolyBase uses the Hadoop APIs to access the container)
  • LOCATION = the connection string to ADLS (replace 'bitools' with the name of your own ADLS name).
  • CREDENTIAL = the name of the credentials created in the previous step.
--Create External Data Source
CREATE EXTERNAL DATA SOURCE AzureDataLakeStore
WITH (
TYPE = HADOOP,
LOCATION = 'adl://bitools.azuredatalakestore.net',
CREDENTIAL = bitools_user
);

Tip:
Give the external source a descriptive name so that you know where it is used for. You can find all external data sources in the table sys.external_data_sources:
--Find all external sources
SELECT * FROM sys.external_data_sources

Notice that the filename or subfolder is not mentioned in the External Data Source. This is done in the External Table. This allows you to use multiple files from the same folder as External Tables.


b4) External File format
Now we need to describe the format used in the source file. In our case we have a comma delimited file. You can also use this file format to supply the date format, compression type or encoding.
--Create External Data Source
CREATE EXTERNAL FILE FORMAT TextFile
WITH (
    FORMAT_TYPE = DelimitedText,
    FORMAT_OPTIONS (FIELD_TERMINATOR = ',')
);

Tip:
Give the format a descriptive name so that you know where it is used for. You can find all external file formats in the table sys.external_file_formats:
--Find all external file formats
SELECT * FROM sys.external_file_formats

b5) External Table
The last step before we can start quering, is creating the external table. In this create table script you need to specify all columns, datatypes and the filename that you want to read. The filename starts with a forward slash. You also need the datasource from step 3 and the file format from step 4.
--Create External table
CREATE EXTERNAL TABLE dbo.sensordata (
    [Date] DateTime2(7) NOT NULL,
    [temp] INT NOT NULL,
    [hmdt] INT NOT NULL,
    [location] nvarchar(50) NOT NULL
)
WITH (
    LOCATION='/mySubFolder/bitools_sample_data_AveragePerDayPerBuilding.csv',
    DATA_SOURCE=AzureDataLakeStore, -- from step 3
    FILE_FORMAT=TextFile            -- from step 4
);
Note:
PolyBase does not like columnname headers. It will handle it like a regular data row an throw an error when the datatype doesn't match. There is a little workaround for this with REJECT_TYPE and REJECT_VALUE. However this only works when the datatype of the header is different than the datatypes of the actual rows. Else you have to filter the header row in a subsequent step.
--Create External table with header
CREATE EXTERNAL TABLE dbo.sensordata5 (
    [Date] DateTime2(7) NOT NULL,
    [temp] INT NOT NULL,
    [hmdt] INT NOT NULL,
    [location] nvarchar(50) NOT NULL
)
WITH (
    LOCATION='/mySubFolder/bitools_sample_data_AveragePerDayPerBuilding.csv',
    DATA_SOURCE=AzureDataLakeStore,
    FILE_FORMAT=TextFile,
    REJECT_TYPE = VALUE, -- Reject rows with wrong datatypes
    REJECT_VALUE = 1     -- Allow 1 failure (the header)
);
You can find all external tables in the table sys.external_tables.
--Find all external tables
SELECT * FROM sys.external_tables
However you can also find the External Table (/the External Data Source/the External File Format) in the Object Explorer of SSMS.
SSMS Object Explorer


b6) Query external table
Now you can query the external table like any other regular table. However the table is read-only so you can not delete, update or insert records. If you update the source file then the data in this external table also changes instantly because the file is used to get the data.
--Testing
SELECT count(*) FROM dbo.sensordata;
SELECT * FROM dbo.sensordata;
Quering an external table


b7) What is next?
Most likely you will be using a CTAS query (Create Table As Select) to copy and transform the data to an other table since this is the fasted/preferred way in SQL DW. In a subsequent post we will explain more about CTAS, but here is how a CTAS query looks like.
--CTAS
CREATE TABLE [dbo].[Buildings]
WITH
(
    DISTRIBUTION = ROUND_ROBIN
,   CLUSTERED COLUMNSTORE INDEX
)
AS
SELECT  [location]
,       [date]
,       [temp]
,       [hmdt]
FROM    [dbo].[sensordata]
;

In some cases you could also use an SELECT INTO query as an alternative for CTAS.

Summary
In this post you saw how easy it was to read a file from the Azure Data Lake Store and use it as a table in Azure SQL Data Warehouse. Although it did required some extra steps compared to PolyBase on an Azure Blob Storage. Jhon Masschelein (B|L|T) has a very helpful post about this matter.

In an other post we will explain the basic usage of the CTAS query which is the preferred way to handle large sets of data in Azure SQL DW and in its on-premises precursor APS (a.k.a. PDW).

Sunday 20 August 2017

Use PolyBase to read Blob Storage in Azure SQL DW

Case
I have a file in an Azure Blob Storage container which I want to use in my Azure SQL Data Warehouse. How can I push the content of that file to Azure SQL DW?
One of the options: PolyBase


Solution
You could of course use an ETL product or Azure Data Factory, but you can also use PolyBase technology in Azure SQL DW and use that file as an external table. The data stays in the Azure Blob Storage file, but you can query the data like a regular table.

Starting position
Starting position is a file in an Azure Blob Storage container. This file was created with U-SQL in an other post to quickly process large amounts of files in Azure.
The content of the CSV file


Before we start, make sure your Azure SQL Data Warehouse is started and use SQL Server Management Studio (SSMS) to connect to your Data Warehouse. Notice that the icon of a SQL DW is different than SQL DB.
Icon SQL DW vs SQL DB


1) Master key
In the next step we will use a credential that points to the Azure Blob Storage. To encrypt that credential, we first need to create a master key in our Azure SQL Data Warehouse, but only if you do not already have one. You can check that in the table sys.symmetric_keys. If a row exists where the symmetric_key_id column is 101 (or the name column is '##MS_DatabaseMasterKey##') then you already have a master key. Else we need to create one. For Azure SQL Data Warehouse a password for that master key is optional. For this example we will not use the password.
--Master key
IF NOT EXISTS (SELECT * FROM sys.symmetric_keys WHERE symmetric_key_id = 101)
BEGIN
    PRINT 'Creating Master Key'
    CREATE MASTER KEY;
END
ELSE
BEGIN
    PRINT 'Master Key already exists'
END 

2) Credentials
Next step is to create a credential which will be used to access the Azure Blob Storage. Go to the Azure portal and find the Storage Account that contains your blob file. Then go to the Access keys page and copy the key1 (or key2).
Access keys


Then execute the following code where IDENTITY contains a random string and SECRET contains the copied key from your Azure Storage account.
--Credential
CREATE DATABASE SCOPED CREDENTIAL AzureStorageCredential
WITH
    IDENTITY = 'user',
    SECRET = 'JGadV/tAt1npuNwkiH9HnI/wosi8YS********=='
;

Tip: give the credential a descriptive name so that you know where it is used for. You can find all credentials in the table sys.database_credentials:
--Find all credential
SELECT * FROM sys.database_credentials

3) External data source
With the credential from the previous step we will create an External data source that points to the Azure Blob Storage container where your file is located. Execute the code below where:
  • TYPE = HADOOP (because PolyBase uses the Hadoop APIs to access the container)
  • LOCATION = the connection string to the container (replace [ContainerName] with the name of the container and [StorageAccountName] with the name of your storage account).
  • CREDENTIAL = the name of the credentials created in the previous step.
--Create External Data Source
CREATE EXTERNAL DATA SOURCE AzureStorage
WITH (
    TYPE = HADOOP,
    LOCATION = 'wasbs://[ContainerName]@[StorageAccountName].blob.core.windows.net',
    CREDENTIAL = AzureStorageCredential
);

Tip: give the external source a descriptive name so that you know where it is used for. You can find all external data sources in the table sys.external_data_sources:
--Find all external sources
SELECT * FROM sys.external_data_sources

Notice that the filename is not mentioned in the External Data Source. This is done in the External Table. This allows you to use multiple files from the same container as External Tables.
Filename not in External Data Source


4) External File format
Now we need to describe the format used in the source file. In our case we have a comma delimited file. You can also use this file format to supply the date format, compression type or encoding.
--Create External Data Source
CREATE EXTERNAL FILE FORMAT TextFile
WITH (
    FORMAT_TYPE = DelimitedText,
    FORMAT_OPTIONS (FIELD_TERMINATOR = ',')
);

Tip: give the format a descriptive name so that you know where it is used for. You can find all external file formats in the table sys.external_file_formats:
--Find all external file formats
SELECT * FROM sys.external_file_formats

5) External Table
The last step before we can start quering, is creating the external table. In this create table script you need to specify all columns, datatypes and the filename that you want to read. The filename starts with a forward slash. You also need the datasource from step 3 and the file format from step 4.
--Create External table
CREATE EXTERNAL TABLE dbo.sensordata (
    [Date] DateTime2(7) NOT NULL,
    [temp] INT NOT NULL,
    [hmdt] INT NOT NULL,
    [location] nvarchar(50) NOT NULL
)
WITH (
    LOCATION='/bitools_sample_data_AveragePerDayPerBuilding.csv',
    DATA_SOURCE=AzureStorage, -- from step 3
    FILE_FORMAT=TextFile      -- from step 4
);
Note: PolyBase does not like columnname headers. It will handle it like a regular data row and throw an error when the datatype doesn't match. There is a little workaround for this with REJECT_TYPE and REJECT_VALUE. However this only works when the datatype of the header is different than the datatypes of the actual rows. Else you have to filter the header row in a subsequent step.
--Create External table with header
CREATE EXTERNAL TABLE dbo.sensordata5 (
    [Date] DateTime2(7) NOT NULL,
    [temp] INT NOT NULL,
    [hmdt] INT NOT NULL,
    [location] nvarchar(50) NOT NULL
)
WITH (
    LOCATION='/bitools_sample_data_AveragePerDayPerBuilding.csv',
    DATA_SOURCE=AzureStorage,
    FILE_FORMAT=TextFile,
    REJECT_TYPE = VALUE, -- Reject rows with wrong datatypes
    REJECT_VALUE = 1     -- Allow 1 failure (the header)
);
You can find all external tables in the table sys.external_tables.
--Find all external tables
SELECT * FROM sys.external_tables
However you can also find the External Table (/the External Data Source/the External File Format) in the Object Explorer of SSMS.
SSMS Object Explorer


6) Query external table
Now you can query the external table like any other regular table. However the table is read-only so you can not delete, update or insert records. If you update the source file then the data in this external table also changes instantly because the file is used to get the data.
--Testing
SELECT count(*) FROM dbo.sensordata;
SELECT * FROM dbo.sensordata;
Quering an external table


7) What is next?
Most likely you will be using a CTAS query (Create Table As Select) to copy and transform the data to an other table since this is the fasted/preferred way in SQL DW. In a subsequent post we will explain more about CTAS, but here is how a CTAS query looks like.
--CTAS
CREATE TABLE [dbo].[Buildings]
WITH
(
    DISTRIBUTION = ROUND_ROBIN
,   CLUSTERED COLUMNSTORE INDEX
)
AS
SELECT  [location]
,       [date]
,       [temp]
,       [hmdt]
FROM    [dbo].[sensordata]
;

In some cases you could also use an SELECT INTO query as an alternative for CTAS.

Summary
In this post you saw how easy it was to read a file from the Azure Blob Storage and use it as a table in Azure SQL Data Warehouse. The big advantage of PolyBase is that you only have one copy of the data because the data stays in the file. In a next post we will see how to read the same file from the Azure Data Lake Store which does not use the Access keys.
In an other post we will explain the basic usage of the CTAS query which is the preferred way to handle large sets of data in Azure SQL DW and in its on-premises precursor APS (a.k.a. PDW).

Sunday 30 July 2017

Azure SQL Database vs Azure SQL Data Warehouse

Case
As we slowly move from on-premises data warehouses with Microsoft SQL Server to cloud data warehouses in Microsoft Azure, we need to know more about the various options in Azure. You probably already used an Azure SQL Database, but Microsoft also introduced Azure SQL Data Warehouse. What are the differences between these two databases?
Azure SQL DB vs Azure SQL DW


Solution
Back in 2013, Microsoft introduced Azure SQL Database which has its origin in the on-premises Microsoft SQL Server. In 2015 (however public availability was in July 2016) Microsoft added SQL Data Warehouse to the Azure cloud portfolio which has its origin in the on-premises Microsoft Analytics Platform System (APS). This was a Parallel Data Warehouse (PDW) combined with Massively Parallel Processing (MPP) technology and included standard hardware. It is the 'big brother' of SQL Server, but with a slightly different purpose.

In this post we will briefly describe the differences between these two Microsoft Azure Services, but first Microsofts own definitions:
  • Azure SQL Database is a relational database-as-a service using the Microsoft SQL Server Engine (more);
  • Azure SQL Data Warehouse is a massively parallel processing (MPP) cloud-based, scale-out, relational database capable of processing massive volumes of data (more);

Differences
1) Purpose: OLAP vs OLTP
Although both Azure SQL DB and Azure SQL DW are cloud based systems for hosting data, their purpose is different. The biggest difference is that SQL DB is specifically for Online Transaction Processing (OLTP). This means operational data with a lot of short transactions like INSERT, UPDATE and DELETE by multiple people and/or processes. The data is most often highly normalized stored in many tables.

On the other hand SQL DW is specifically for Online Analytical Processing (OLAP) for data warehouses. This means consolidation data with a lower volume, but more complex queries. The data is most often stored de-normalized with fewer tables using a star or snowflake schema.

2) Achitecture
In order to make the differences more clear a quick preview of the architecture of Azure SQL Data Warehouse, where you see a whole collection of Azure SQL Databases and separated storage. The maximum number of compute notes at the moment is 60.
    Architecture SQL DW: Decouples (Blob) storage from compute (SQL DB)


    3) Storage size
    The current size limit of an Azure SQL Database is 4TB, but it has been getting bigger over the past few years and will probably end up around 10TB in the near future. On the other hand we have the Azure SQL Data Warehouse which has no storage limit at all (only the limit of your wallet), because the storage is separated from the compute.

    3) Pricing
    The pricing is also quite different. Where Azure SQL DB starts with €4,20 a month, Azure SQL DW starts around €900,- a month excluding the cost of storage which is included in SQL DB. The storage costs for Azure SQL DW are around €125,- per TB per month. And the maximum costs of a single SQL DB is around €13500,- where SQL DW ends around a massive €57000,- (excl. storage). But when you take a look at the architecture above, it should be no surprise that SQL DW is more expensive than SQL DB, because it consists of multiple SQL DBs.

    However, SQL DW has one big trick up its sleeve that SQL DB hasn't: you can pause it completely and then you only pay for storage. If you start your SQL DW with your ETL job and pause it right after you processed your Azure Analysis Services then you only need it a small percentage of the month.

    Note: prices are from July 2017

    4) DTU vs DWU
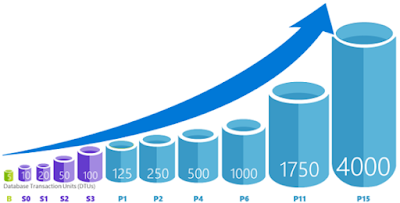
    SQL DB has 15 different pricing tiers which specify the number of Database Transaction Units  (DTU) and the storage size/type:
    - Basic
    - Standard (S0, S1, S2, S3)
    - Premium (P1, P2, P3, P4, P6, P11, P15)
    - Premium RS (PRS1, PRS2, PRS4, PRS6)
    Basic has only 5 DTUs and the highest number of DTUs is, at the time of writing, 4000.
    The term DTU is a bit vague. It is a mysterious combination of RAM, CPU and read-write rates, but basically if you want to double the performance of your current database you just need to double the number of DTU's for your database.

    SQL DW has 12 different pricing tiers and uses Data Warehouse Units (DWU) to specify the performance level.
    - DWU100, 200, 300, 400, 500, 600, 1000, 1200, 1500, 2000, 3000, 6000
    The term DWU is a little less vague, because if you divide that number by 100 you have the number of compute nodes available for that pricing tier. On the other hand the exact combination of CPU, memory and IOPS per compute note is unknown.

    Because both services have a different purpose it is a bit strange to compare the hardware, but according to this MSDN blog post 1 DWU is approximately 7,5 DTU.

    But there is also some similarity: for both services you can use the same script to change the pricing tier on the fly to either give the performance a real boost when needed or the save money in the quiet hours.

    5) Concurrent Connection
    Although SQL DW is a collection of SQL Databases the maximum number of concurrent connections is much lower than with SQL DB. SQL DW has a maximum of 1024 active connections where SQL DB can handle 6400 concurrent logins and 30000 concurrent sessions. This means that in the exceptional case where you have over a thousand active users for your dashboard you probably should consider SQL DB to host the data instead of SQL DW.
    For more details see the SQL DB Recource Limitations and SQL DW Recource Limitations.

    6) Concurrent Queries
    Besides the maximum connections, the number of concurrent queries is also much lower. SQL DW can execute a maximum of 32 queries at one moment where SQL DB can have 6400 concurrent workers (requests). This is where you see the differences between OLTP and OLAP.
    For more details see the SQL DB Recource Limitations and SQL DW Recource Limitations.

    7) PolyBase
    Azure SQL Data Warehouse supports PolyBase. This technology allows you to access data outside the database with regular Transact SQL. It can for example use a file in an Azure Blob Storage container as a (external) table. Other options are importing and exporting data from Hadoop or Azure Data Lake Store. Although SQL Server 2016 also supports PolyBase, Azure SQL Database does not (yet?) support it.

    8) Query language differences
    Although SQL DW uses SQL DB in the background there are a few minor differences when quering or creating tables:
    - SQL DW cannot use cross databases queries. So all your data should be in the same database.
    - SQL DW can use IDENTITY, but only for INT or BIGINT. Moreover the IDENTITY column cannot be used as part of the distribution key.
    - Also see this SQL DW list of unsupported table features.

    9) Replication
    SQL DB supports active geo-replication. This enables you to configure up to four readable secondary databases in the same or different location. SQL DW does not support active geo-replication, only Azure Storage replication. However this is not a live, readable, synchronized copy of your database! It's more like a backup.

    10) In Memory OLTP tables
    SQL DB supports in-memory OLTP. SQL DW is OLAP and does not support it.

    11) Always encrypted
    SQL DB supports Always Encrypted to protect sensitive data. SQL DW does not support it.

    Conclusion
    Although Azure SQL DB looks much cheaper on a monthly basis, this doesn't mean you should always choose SQL DB by default. One big advantage is that you can pause SQL DW. For example a stage database is only used during the ETL process. Why should you always have this database up an running? Or why should your datamart stay online 24*7 if your end users only use Analysis Services to browse the data.

    On the other hand the original purpose of both services is different (OLTP vs OLAP), but this doesn't mean you should always use Azure SQL DW for your data warehouses. Depending on several factors like data size, complexity, required up-time and budget, Azure SQL DB could also host your data warehouse. You could even mix them in your project. For example Stage and Historical/Persistent stage in Azure SQL DW and your Datamart in Azure SQL DB.


    Please leave a comment if you know more significant differences that are worth mentioning.

    Monday 17 April 2017

    Schedule Pause/Resume of Azure Data Warehouse

    Case
    I only want to use my Azure Data Warehouse for a couple of hours per day. I want to automatically pause and resume my Azure DWH to minimize the Azure costs. How do I do that in Azure?
    Pause and Resume Azure Data Warehouse


    Solution
    You could solve this with a scripting language like PowerShell and run that PowerShell script each morning and evening with SQL Server Agent or Windows Scheduler, but for this solution I will use Azure Runbook with its scheduler. So the entire solution runs in Azure.

    * Update Oct 2 2020: scripts with AZ modules *


    1) Automation Account
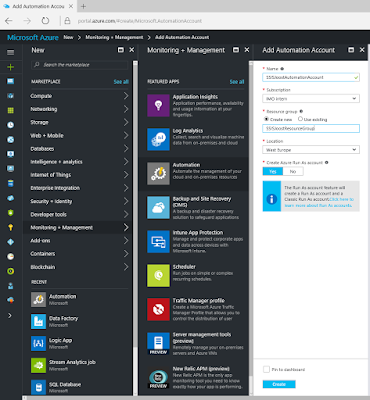
    First we need an Azure Automation Account to run the Runbook. If you don't have one or want to create a new one, then search for Automation under Monitoring + Management and give it a suitable name, then select your subscription, resource group and location. For this example I will choose West Europe since I'm from the Netherlands.
    Azure Automation Account


    2) Credentials
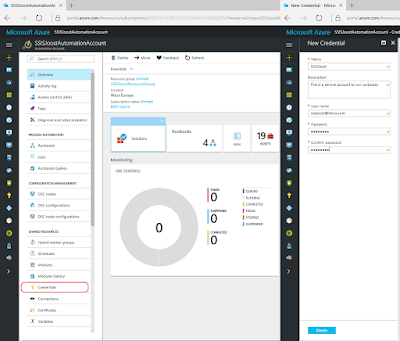
    Next step is to create Credentials to run this runbook with. This works very similar to the Credentials in SQL Server Management Studio. Go to the Azure Automation Account and click on Credentials in the menu. Then click on Add New Credentials. You could just use your own Azure credentials, but the best options is to use a service account with a non-expiring password. Otherwise you need to change this regularly.
    Create new credentials


    3) Connections
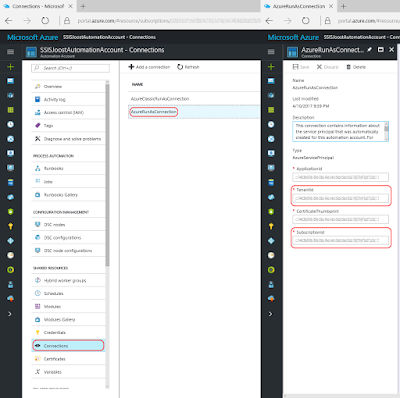
    This step is for your information only and to understand the code. Under Connections you will find a default connection named 'AzureRunAsConnection' that contains information about the Azure environment, like the tendant id and the subscription id. To prevent hardcoded connection details we will retrieve these fields in the PowerShell code.
    Azure Connections


    4) Variables
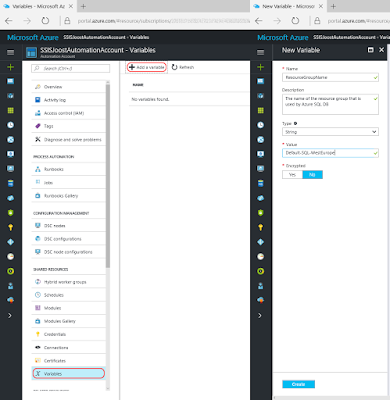
    An other option to prevent hardcoded values in your PowerShell code it to use Variables. We will use this option to provide the Resource Group, SQL Server Name and Database Name. Go to Variables and add a new variable for ResourceGroupName and add the name of the Resource Group that is used by your Azure DB. Then repeat this for ServerName (name only without .database.windows.net) and DatabaseName (the name of your Azure DWH database).
    Add variables


    5) Runbooks
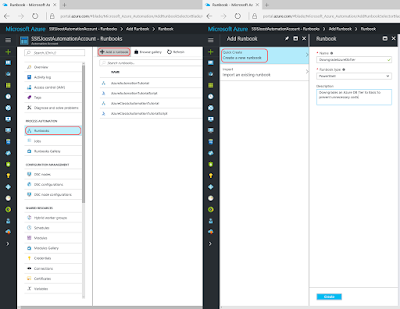
    Now it is time to add a new Azure Runbook for the PowerShell code. Click on Runbooks and then add a new runbook (There are also four example runbooks of which AzureAutomationTutorialScript could be useful as an example). Give your new Runbook a suitable name and choose PowerShell as type.
    Add Azure Runbook


    6) Edit Script
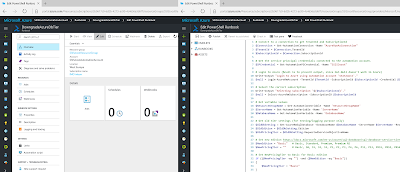
    After clicking Create in the previous step the editor will we open. When editing an existing Runbook you need to click on Edit to edit the code. You can copy and paste the code below to your editor. Study the green comments to understand the code.
    Edit the PowerShell code


    # PowerShell code
    # Don't continue in case of an error
    $ErrorActionPreference = "Stop"
    
    # Connect to a connection to get TenantId and SubscriptionId
    $Connection = Get-AutomationConnection -Name "AzureRunAsConnection"
    $TenantId = $Connection.TenantId
    $SubscriptionId = $Connection.SubscriptionId
    
    # Get the service principal credentials connected to the automation account. 
    $SPCredential = Get-AutomationPSCredential -Name "SSISJoost"
    
    # Login to Azure ($null is to prevent output, since Out-Null doesn't work in Azure)
    Write-Output "Login to Azure using automation account 'SSISJoost'."
    $null = Login-AzureRmAccount -TenantId $TenantId -SubscriptionId $SubscriptionId -Credential $SPCredential
    
    # Select the correct subscription
    Write-Output "Selecting subscription '$($SubscriptionId)'."
    $null = Select-AzureRmSubscription -SubscriptionID $SubscriptionId
    
    # Get variable values
    $ResourceGroupName = Get-AutomationVariable -Name 'ResourceGroupName'
    $ServerName = Get-AutomationVariable -Name 'ServerName'
    $DatabaseName = Get-AutomationVariable -Name 'DatabaseName'
    
    # Get old status (for testing/logging purpose only)
    $OldDbSetting = Get-AzureRmSqlDatabase -DatabaseName $DatabaseName -ServerName $ServerName -ResourceGroupName $ResourceGroupName
    $OldStatus = $OldDbSetting.Status
    
    #Write-Output "Resuming $($DatabaseName). Current status: $($OldStatus)" 
    #$null = Resume-AzureRmSqlDatabase -DatabaseName $DatabaseName -ServerName $ServerName -ResourceGroupName $ResourceGroupName
    
    Write-Output "Resuming $($DatabaseName). Current status: $($OldStatus)" 
    $null = Suspend-AzureRmSqlDatabase -DatabaseName $DatabaseName -ServerName $ServerName -ResourceGroupName $ResourceGroupName
    
    # Show done when finished (for testing/logging purpose only)
    Write-Output "Done"
    

    Note 1: This is a very basic script. No error handling has been added. Check the AzureAutomationTutorialScript for an example. Finetune it for you own needs.
    Note 2: There are often two versions of an method like Get-AzureRmSqlDatabase and Get-AzureSqlDatabase. Always use the one with "Rm" in it (Resource Managed), because that one is for the new Azure portal. Without Rm is for the old/classic Azure portal.
    Note 3: Because Azure Automation doesn't support Out-Null I used an other trick with the $null =. However the Write-Outputs are for testing purposes only. Nobody sees them when they are scheduled.
    Note 4: The code the Resume is commented out with a hashtag. Either use the two suspend rows or the two pause rows.

    7) Testing
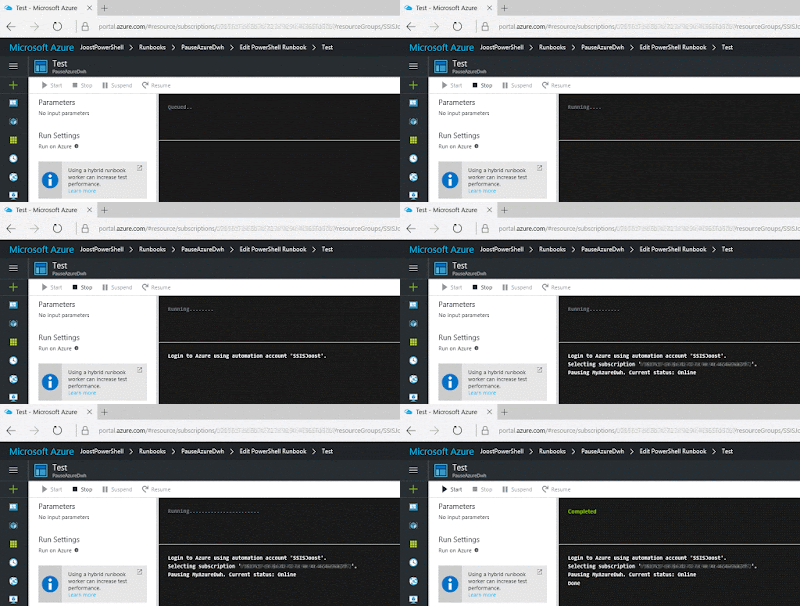
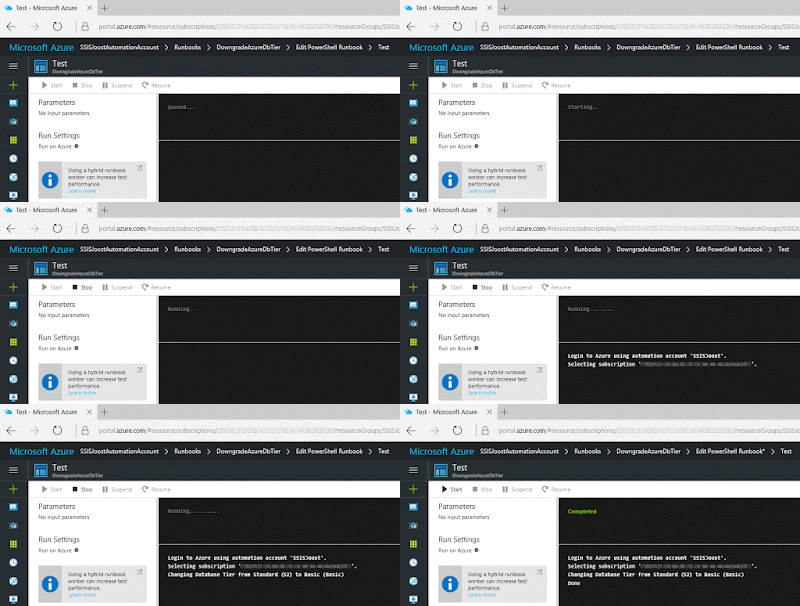
    You can use the Test Pane menu option in the editor to test your PowerShell scripts. When clicking on Run it will first Queue the script before Starting it. Running takes several minutes (a bit longer then changing the tier).
    Testing the script in the Test Pane


    8) Publish
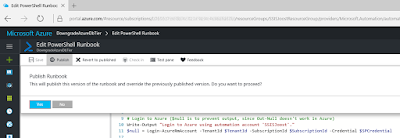
    When your script is ready, it is time to publish it. Above the editor click on the Publish button. Confirm overriding any previously published versions.
    Publish the Runbook


    9) Schedule
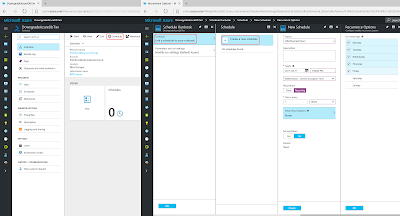
    And now that we have a working and published Azure Runbook, we need to schedule it. Click on Schedule to create a new schedule for your runbook. For this pause script I created a schedule that runs every working day on 9:00PM (21:00). The resume script could for example be scheduled on working days at 7:00AM. Now you need to hit the refresh button in the SQL Databases overview in Azure to see if it really works. It takes a few minutes to run, so don't worry too soon.
    Add Schedule


    Summary
    In this post you saw how you can pause and resume your Azure Data Warehouse to save some money in Azure during the quiet hours. The screenshots only show the pause script, but the resume script is commented out. For pause and resume you have a couple of options. You could create one script with a parameter that indicates a pause or resume. An other option is to use a fancy if-construction that uses the current status and/or time to decide whether you need to pause or to resume. Or just create two separate scripts for pause and resume.


    Tuesday 11 April 2017

    Schedule Upscale/downscale Azure SQL DB(/DWH)

    Case
    I want to downgrade the Tier of my Azure SQL DB automatically after working hours and upgrade it in the morning right before working hours to minimize the Azure costs. How do I do that in Azure?
    Change the Tier of your SQL Azure DB


    Solution
    You could solve this with a scripting language like PowerShell and run that PowerShell script each morning and evening with SQL Server Agent or Windows Scheduler, but for this solution I will use Azure Runbook with its scheduler. So the entire solution runs in Azure.


    1) Automation Account
    First we need an Azure Automation Account to run the Runbook. If you don't have one or want to create a new one, then search for Automation under Monitoring + Management and give it a suitable name, then select your subscription, resource group and location. For this example I will choose West Europe since I'm from the Netherlands.
    Azure Automation Account


    2) Credentials
    Next step is to create Credentials to run this runbook with. This works very similar to the Credentials in SQL Server Management Studio. Go to the Azure Automation Account and click on Credentials in the menu. Then click on Add New Credentials. You could just use your own Azure credentials, but the best options is to use a service account with a non-expiring password. Otherwise you need to change this regularly.
    Create new credentials


    3) Connections
    This step is for your information only and to understand the code. Under Connections you will find a default connection named 'AzureRunAsConnection' that contains information about the Azure environment, like the tendant id and the subscription id. To prevent hardcoded connection details we will retrieve these two fields in the PowerShell code.
    Azure Connections


    4) Variables
    An other option to prevent hardcoded values in your PowerShell code it to use Variables. We will use this option to provide the Resource Group, SQL Server Name and Database Name. Go to Variables and add a new variable for ResourceGroupName and add the name of the Resource Group that is used by your Azure DB. Then repeat this for ServerName (name only without .database.windows.net) and DatabaseName (the name of your database).
    Add variables


    5) Runbooks
    Now it is time to add a new Azure Runbook for the PowerShell code. Click on Runbooks and then add a new runbook (There are also four example runbooks of which AzureAutomationTutorialScript could be useful as example). Give your new Runbook a suitable name and choose PowerShell as type.
    Add Azure Runbook


    6) Edit Script
    After clicking Create in the previous step the editor will we open. When editing an existing Runbook you need to click on Edit to edit the code. You can copy and paste the code below to your editor.
    Edit the PowerShell code


    # PowerShell code
    # Connect to a connection to get TenantId and SubscriptionId
    $Connection = Get-AutomationConnection -Name "AzureRunAsConnection"
    $TenantId = $Connection.TenantId
    $SubscriptionId = $Connection.SubscriptionId
    
    # Get the service principal credentials connected to the automation account. 
    $SPCredential = Get-AutomationPSCredential -Name "SSISJoost"
    
    # Login to Azure ($null is to prevent output, since Out-Null doesn't work in Azure)
    Write-Output "Login to Azure using automation account 'SSISJoost'." 
    $null = Login-AzureRmAccount -TenantId $TenantId -SubscriptionId $SubscriptionId -Credential $SPCredential
    
    # Select the correct subscription
    Write-Output "Selecting subscription '$($SubscriptionId)'."
    $null = Select-AzureRmSubscription -SubscriptionID $SubscriptionId
    
    # Get variable values
    $ResourceGroupName = Get-AutomationVariable -Name 'ResourceGroupName' 
    $ServerName = Get-AutomationVariable -Name 'ServerName' 
    $DatabaseName = Get-AutomationVariable -Name 'DatabaseName'
    
    # Get old tier settings (for testing/logging purpose only)
    $OldDbSetting = Get-AzureRmSqlDatabase -DatabaseName $DatabaseName -ServerName $ServerName -ResourceGroupName $ResourceGroupName
    $OldEdition = $OldDbSetting.Edition
    $OldPricingTier = $OldDbSetting.CurrentServiceObjectiveName
    
    # Set new edition https://docs.microsoft.com/en-us/azure/sql-database/sql-database-service-tiers
    $NewEdition = "Basic"   # Basic, Standard, Premium, Premium RS
    $NewPricingTier = ""    # Basic, S0, S1, S2, S3, P1, P2, P3, P4, P6, P11, P13, PRS1, PRS2, PRS4, PRS6
    
    # Set NewPricingTier to Basic for Basic edition
    if (($NewPricingTier -eq "") -and ($NewEdition -eq "Basic"))
    {
        $NewPricingTier = "Basic"  
    }
    
    # Write old and new edition to screen (for testing/logging purpose only)
    Write-Output "Changing Database Tier from $($OldEdition) ($($OldPricingTier)) to $($NewEdition) ($($NewPricingTier)) "
    
    # Set new tier
    $null = Set-AzureRmSqlDatabase -DatabaseName $DatabaseName -ServerName $ServerName -ResourceGroupName $ResourceGroupName -Edition $NewEdition -RequestedServiceObjectiveName $NewPricingTier
    
    # Show done when finished (for testing/logging purpose only
    Write-Output "Done"
    

    Note 1: This is a very basic script. No error handling has been added. Check the AzureAutomationTutorialScript for an example. Finetune it for you own needs.
    Note 2: There are often two versions of an method like Set-AzureRmSqlDatabase and Set-AzureSqlDatabase. Always use the one with "Rm" in it (Resource Managed), because that one is for the new Azure portal. Without Rm is for the old/classic Azure portal.
    Note 3: Because Azure Automation doesn't support Out-Null I used an other trick with the $null =. However the Write-Outputs are for testing purposes only. Nobody sees them when they are scheduled.
    Note 4: This also works for Azure Data Warehouses. Just use other Tiers like DWU400.

    7) Testing
    You can use the Test Pane menu option in the editor to test your PowerShell scripts. When clicking on Run it will first Queue the script before Starting it. Running takes about two minutes.
    Testing the script in the Test Pane


    8) Publish
    When your script is ready, it is time to publish it. Above the editor click on the Publish button. Confirm overriding any previously published versions.
    Publish the Runbook


    9) Schedule
    And now that we have a working and published Azure Runbook, we need to schedule it. Click on Schedule to create a new schedule for your runbook. For this downgrade script I created a schedule that runs every working day on 7:00PM (19:00). The upgrade script could for example be scheduled on working days at 7:00AM. Now you need to hit the refresh button in the SQL Databases overview in Azure to see if it really works. It takes a few minutes to run, so don't worry too soon.
    Add Schedule


    Summary
    In this post you saw how you can upgrade and downgrade your Azure SQL Databases to save some money in Azure during the quiet hours. The screenshots only show the downgrade script. For the upgrade version you have a couple of options. You could create one script with a parameter that indicates an upgrade or downgrade. An other option is to use a fancy if-construction that uses the current tier and/or time to decide whether you need an upgrade or downgrade. Or just create two separate scripts for upgrade and downgrade.