Saturday, 7 December 2024

Synapse snack: mount storage container in notebook

Case
I want to mount a Storage Account container in my notebook to write some files to it. Preferably without storage account keys.
Mount Storage Account in notebook


Solution
You can use the Synapse Spark Utils to mount a storage account container within a notebook. It requires having a Linked Service that points to your Storage Account which is not using a Self Hosted Integration Runtime.

For this we use the default Linked Services which ends with [workspacename]-WorkspaceDefaultStorage. By default this Linked Service is using the System-assinged managed identity to authenicate to the Storage Account connected to Synapse.

Since we might be using this in a DTAP environment we don't want to hardcode the Linked Service name. Instead we will retrieve the Synapse workspace name with code and concat "-WorkspaceDefaultStorage" to it.
Default Workspace Linked Service


Now when you want to debug your code in Synapse Studio it's best to also make sure your sparkpool is also running as managed idenity otherwise it will use your personal account. Also make sure that role Storage Blob Data Contributor is assigned.

Now the python code. There is a lot displaying in the code to show what is happening, but there are no checks and no error handling in the code. You might want to add that when going to production to make your code more robust and get easier error messages. 
# Import necessary modules
from notebookutils import mssparkutils  # Utilities for Synapse notebooks
import re  # Module for regular expressions
import os  # Module for interacting with the operating system

# Parameters
container_name = "mycontainer"  # Name of the storage container
display("Container: " + container_name)

# Retrieve Synapse Workspace Name to get the Linked Service
workspace_name = mssparkutils.env.getWorkspaceName()
display("Synapse Workspace: " + workspace_name)

# Determine the default Linked Service name using the Workspace Name
linked_service_name = f"{workspace_name}-WorkspaceDefaultStorage"
display("Default Linked Service: " + linked_service_name)

# Retrieve the full connection string from the Linked Service to retrieve storage account
connection_string = mssparkutils.credentials.getFullConnectionString(linked_service_name)
display("Connection String: " + connection_string)

# Extract storage account name from the connection string using regex
# Expected format: url=https://{storage_account_name}.dfs.core.windows.net
storage_account_pattern = r'//([^\.]+)\.'
storage_account_name = re.search(storage_account_pattern, connection_string).group(1)
display("Storage Account: " + storage_account_name)

# Mount the Storage Account container via the Linked Service
m = mssparkutils.fs.mount(
    f"abfss://{container_name}@{storage_account_name}.dfs.core.windows.net",
    "/mymount",
    {"linkedService": linked_service_name}
)

# Get the local path of the mounted container folder
# Example path format: '/synfs/notebook/{job_id}/{mount_name}'
root_folder = mssparkutils.fs.getMountPath("/mymount")
display("Root Folder: " + root_folder)

# Create a file path for a new dummy file within the mounted folder
# Note that the subfolder should exists or add code to create it.
file_name = os.path.join(root_folder, "myfolder/dummy_file.txt")
display("Creating File: " + file_name)

# Content to be written to the new dummy file
file_content = "This is an example file created and saved using Python."

# Open the file in write mode and write the content to it
with open(file_name, 'w') as file:
    file.write(file_content)
display("File created")

# Clean up mount 
um = mssparkutils.fs.unmount("/mymount") 

Now you will see the file appear in your storage account.
dummy file created in storage account


Conclusion
In this post we showed you how to use the managed idenity from a Linked Service to create a mount to the storage account container within a notebook. With this you can easily create or edit files in your Storage account when the pipeline doesn't provide the options you need.

Note: this code uses 'regular' Python and not PySpark which in some cases is unavoidable. However this also means that in Synapse this code is only running on the headnode. So all child nodes of your cluster are being totally useless and costing you money. For short processes that doesn't hurt that much, but for longer running jobs you should also consider alternatives like Azure Function Apps

Thanks to Jan Remko Yntema


Tuesday, 29 October 2024

Synapse - Execute pipeline after deployment

Case
I want to execute a Synapse pipeline right after the deployment via Azure DevOps. How do you accomplish that?
Execute pipeline after deployment


Solution
We can use a PowerShell task and then use that to execute a Create Pipeline Run Rest API. This will be an asynchronous execution (shoot and forget). If you also want to know the result of the pipeline then you have to create an additional WHILE or UNTIL loop and use the Get Pipeline Run Rest API. Note that you will then keep your DevOps agent busy while waiting.

1) Create Synapse pipeline
First create a pipeline in Synapse and name it for example pl_Master_Deployment. In this pipeline you can add all the activities for tasks that you want to do right after the deployment. For testing purposes you can add a simple wait activity.

2) Add PowerShell script
To execute the Synapse pipeline we will use a PowerShell script and a Rest API call to Pipeline - Create Pipeline Run. This Rest API will only start the pipeline but it doesn't wait for it to finish. So it's an asynchronously call. The PowerShell script is stored in the repository as a PowerShell file called SynapseExecutePipeline.ps1 and we will call it via the YAML file using an AzurePowerShell@5 task.

The script has only two parameters. First the Synapse WorkspaceName so you can use it to execute piplines in all environments of your DTAP. The second is the name of the pipeline.

If your pipeline name contains a space or an other 'forbidden' character then the EscapeDataString method will make sure it fits in a URL.

<#
    .SYNOPSIS
    This script executes a Synapse pipeline during the CICD process asynchronously. This means it doesn't wait for it to succeed (or fail).
    .PARAMETER WorkspaceName
    Name of the Synapse Workspace where you want to execute a pipeline.
    .PARAMETER PipelineName
    The name of the synapse pipeline that you want to execute.
    .EXAMPLE
    SynapseExecutePipeline.ps1 -SynapseExecutePipeline MySynapse `
                               -PipelineName MyPipeline
#>
Param(
   [Parameter(Mandatory=$true,
   HelpMessage="Name of your Synapse workspace.")]
   [ValidateNotNullOrEmpty()]
   [Alias("SynapseWorkspaceName")]
   [string]
   $WorkspaceName,

   [Parameter(Mandatory=$true,
   HelpMessage="Name of the pipeline that you want to execute")]
   [ValidateNotNullOrEmpty()]
   [Alias("SynapsePipelineName")]
   [string]
   $PipelineName
)

# Make sure that characters like spaces are encode for the URL
$EncodePipelineName = [System.Uri]::EscapeDataString("$($PipelineName)")

# Determine the URI of the REST API
$RestApiURL = "https://$($WorkspaceName).dev.azuresynapse.net/pipelines/$($EncodePipelineName)/createRun?api-version=2020-12-01"

Write-Host "Executing $($PipelineName) asynchronously in the Synapse workspace $($WorkspaceName)."
Write-Host "Rest API uri $($RestApiURL)"

# Create a dummy json because POST needs one. However not needed at the moment because there are no parameters
# Adjust script en json if you need paramters: https://learn.microsoft.com/en-us/rest/api/synapse/data-plane/pipeline/create-pipeline-run?view=rest-synapse-data-plane-2020-12-01&tabs=HTTP
$payload = @{dummy="dummy"} | ConvertTo-Json -Depth 3
$Result = Invoke-AzRestMethod -Method POST -Uri $RestApiURL -Payload $payload
if ($Result.StatusCode -lt 300)
{
   Write-Host "Asynchronous call of $($PipelineName) is done"
}
else
{
   Write-Error "##vso[task.logissue type=error]Something went very wrong. Pipeline not found or no access?"
   exit 1
}
3) Add YAML task
In your deployment YAML we need to add an additional task. Put it somewhere after the Synapse workspace deployment@2 task or after the toggle-triggers-dev@2 task that will enable your triggers.

For the Azure Subscription parameter you can reuse the same Azure DevOps Service Connection as in your Synapse deployment task. If your Service Principal only got the role Synapse Artifact Publisher, then you need to give it an addtional role that also allows you to execute pipelines. For example Synapse Credential User or Synapse Administrator.

The WorkspaceName parameter can also reuse the value of the Synapse deployment task, but the PipelineName is hardcoded in this example. However you could ofcourse create a variable and/or parameter for this to make it easier to adjust.
            ###################################
            # Validate and Deploy Synapse
            ###################################
            - task: Synapse workspace deployment@2
              displayName: 'Validate and Deploy Synapse'
              inputs:
                operation: validateDeploy
                ArtifactsFolder: '$(Pipeline.Workspace)/SynapseArtifact'
                azureSubscription: ${{ parameters.ServiceConnection }}
                ResourceGroupName: ${{ parameters.Synapse_ResourceGroupName }}
                TargetWorkspaceName: ${{ parameters.Synapse_WorkspaceName }}
                DeleteArtifactsNotInTemplate: true
                DeployManagedPrivateEndpoints: true
                OverrideArmParameters: '
				  -LS_AKV_Secrets_properties_typeProperties_baseUrl				https://${{ parameters.KeyVault_Name }}.vault.azure.net/
				  -LS_ADLS_Datalake_properties_typeProperties_url				https://${{ parameters.Datalake_Name }}.dfs.core.windows.net/
				  -LS_ASQL_Metadata_connectionString							${{ parameters.Metadata_Connectionstring }}
                  '
###################################
# Execute Synapse pipeline
###################################
- task: AzurePowerShell@5
  displayName:  'Execute Synapse pipeline'
  inputs:
	azureSubscription: ${{ parameters.ServiceConnection }}
	scriptType: filePath
	scriptPath: $(Pipeline.Workspace)\s\CICD\PowerShell\SynapseExecutePipeline.ps1
	scriptArguments:
	  -WorkspaceName ${{ parameters.Synapse_WorkspaceName }} `
	  -PipelineName "pl_Master_Deployment"
	azurePowerShellVersion: latestVersion
	pwsh: true
Conclusion
In this short example we showed how to execute a Synapse pipeline right after deployment. You can use it for example to do some cleanup or setup in your datalake or lake database. Or use it to run your ETL for testing purposes.

And instead of running the pipeline immediately you could also create a (onetime) trigger and schedule it for the next evening which could be useful if you have multiple deployments during the day to the same environment.

Tuesday, 1 October 2024

Synapse - Invalid notebook reference

Case
During the deployment of Synapse I'm getting an invalid referene error for my notebooks. They are referencing Spark pools that only exists in the Development workspace.


The document creation or update failed because of invalid reference 'SparkPoolJoost' 
An error occurred during execution: Error: Failed to fetch the deployment status 
{"code":"400","message":"CreateOrUpdateNotebook failed: [statusCode from ADF:BadRequest, 
ErrorMessage: {\"code\":\"BadRequest\",\"message\":\"The document creation or update failed because of invalid reference 'bitools'.\",
\"target\":\"/subscriptions/aaaaaaaa-bbbb-cccc-dddd-eeeeeeeeeeee/resourceGroups/rg-bitools/providers/Microsoft.Synapse/workspaces/bitools-tst/notebooks/myNotebook\",
\"details\":null,\"error\":null}, workspace: yp-tst, notebook: myNotebook, ArtifactId: a4581d64-96d3-4041-9ac4-ccc0d7235cc4]"}

Solution
This deployment error often happens when you don't have the same set of Spark pools in each environment of your DTAP. If one of your notebooks is still referencing a Spark Pool that doesn't exists in the target workspace then the deploymenty proces will throw an invalid reference error.

We often have one general Spark Pool doing all the work and that is available in each Synapse workspace, but also have a whole bunch of Spark Pools in development letting multiple developers do some work without getting in each other's way. Nothing is more enoying then waiting for a colleague to release the spark nodes. 

This deployment error can easily be solved by changing the attached Spark Pool in the notebook before you start deploying. This is ofcourse taking a lot of extra time (and patience) each time you forget to select the right Spark Pool that exists in all workspaces.
Attached Spark Pool


You can make it a little less enoying by adding an override to the YAML task Synapse workspace deployment@2 for the notebook property bigDataPool referenceName. You can even do this manually for a couple of notebooks, but the more notebooks you have the more enoying it gets.
###################################
# Validate and Deploy Synapse
###################################
- task: Synapse workspace deployment@2
  displayName: 'Validate and Deploy Synapse'
  inputs:
	operation: validateDeploy
	ArtifactsFolder: '$(Pipeline.Workspace)/SynapseArtifact'
	azureSubscription: ${{ parameters.ServiceConnection }}
	ResourceGroupName: ${{ parameters.Synapse_ResourceGroupName }}
	TargetWorkspaceName: ${{ parameters.Synapse_WorkspaceName }}
	DeleteArtifactsNotInTemplate: true
	DeployManagedPrivateEndpoints: true
	OverrideArmParameters: '
	  -LS_AKV_Secrets_properties_typeProperties_baseUrl				https://${{ parameters.KeyVault_Name }}.vault.azure.net/
	  -LS_ADLS_Datalake_properties_typeProperties_url				https://${{ parameters.Datalake_Name }}.dfs.core.windows.net/
	  -LS_ASQL_Metadata_connectionString							${{ parameters.Metadata_Connectionstring }}
	  -NB_myFirstNotebook_properties_bigDataPool_referenceName		${{ parameters.Synapse_SparkpoolName }}
	  -NB_mySecondNotebook_properties_bigDataPool_referenceName		${{ parameters.Synapse_SparkpoolName }}
	  -NB_myThirdNotebook_properties_bigDataPool_referenceName		${{ parameters.Synapse_SparkpoolName }}
	'

You can make it even easier by generating an override for each notebook in your Synapse workspace. For this we need these three steps:

1) Create variable
First create a YAML variable in your pipeline. For this example we used the name OverrideParams. The value is just an empty string.
jobs:
    - deployment: DeploymentJob${{ parameters.Env }}
      displayName: Deployment Job ${{ parameters.Env }} 
      environment: Deploy-to-${{ parameters.Env }}
      variables: 
      - name: OverrideParams
        value: ""

      strategy:
        runOnce:
          deploy:
            steps:

2) Add PowerShell task
Next is adding a PowerShell task that will be filling the above variable with an override list. The PowerShell loops through all your notebooks in the artifact. It creates one override for each notebook and stores it in a PowerShell string variable. The last step is to use the PowerShell variable to fill the YAML variable.
            ##################################
            # Edit Notebook sparkpool reference
            ##################################
            - powershell: |
                # Determine notebook subfolder in synapse artifact
                $Path = Join-Path -Path "$(Pipeline.Workspace)" -ChildPath "SynapseArtifact\notebook\"

                # Get all notebook files
                $notebooks = Get-ChildItem -Path $Path

				# Create string variable for all overrides
                [string]$overridelist = ""

                # Loop through notebook files
                foreach ($notebook in $notebooks)
                {
				  # Generate an override for each notebook, make sure to end
				  # with a space to separate each override. Don't use a line
				  # feed or carriage return, because the value should be 1 line
                  $overridelist += "-$($notebook.Basename)_properties_bigDataPool_referenceName   mysparkpool "
                }
				# Show list for debug purposes
                Write-Host "overridelist:`r`n$($overridelist)"
				# Fill the YAML variable value with the value of the PowerShell variable
                Write-Host "##vso[task.setvariable variable=OverrideParams;]$overridelist"
              displayName: 'Edit Notebook sparkpool reference'
Note if you are using the template files then you have to create an alternative loop

3) Use YAML variable in Override
Last step is to add the YAML variable in the OverrideArmParameters part. Now run your deployment and see your invalid reference errors disappear!
            ###################################
            # Validate and Deploy Synapse
            ###################################
            - task: Synapse workspace deployment@2
              displayName: 'Validate and Deploy Synapse'
              inputs:
                operation: validateDeploy
                ArtifactsFolder: '$(Pipeline.Workspace)/SynapseArtifact'
                azureSubscription: ${{ parameters.ServiceConnection }}
                ResourceGroupName: ${{ parameters.Synapse_ResourceGroupName }}
                TargetWorkspaceName: ${{ parameters.Synapse_WorkspaceName }}
                DeleteArtifactsNotInTemplate: true
                DeployManagedPrivateEndpoints: true
                OverrideArmParameters: '
				  -LS_AKV_Secrets_properties_typeProperties_baseUrl				https://${{ parameters.KeyVault_Name }}.vault.azure.net/
				  -LS_ADLS_Datalake_properties_typeProperties_url				https://${{ parameters.Datalake_Name }}.dfs.core.windows.net/
				  -LS_ASQL_Metadata_connectionString							${{ parameters.Metadata_Connectionstring }}
                  $(OverrideParams)
                  '
Conclusion
This solution uses a little, fairly simple PowerShell script so solve all your invalid reference errors during deployment. It doesn't change the Spark Pool in the Notebook Activity, but just the default Spark Pool in the notebook itself. So you can still have multiple Spark Pools for various jobs if you set it in the Notebook Activity.

As mentioned before, if you use the template files TemplateForWorkspace.json and TemplateParametersForWorkspace.json for the deployment then you have to retrieve the JSON objects for the notebooks in those files and create a similar loop as in step 2.


Sunday, 22 September 2024

Synapse - Run all notebooks in a foreach loop

Case
I have several notebooks to create/fill Silver and Gold tables which I want to execute. Is their a way to execute several notebooks in a foreach loop? That would help me not having to create and maintain a pipeline with just lots of Notebook activities.

Notebook activity in FOREACH


Solution
The properties of the Notebook activity can be overridden with an expression in the Dynamic Content section. This means you can use a collection of notebook names and execute them within a Foreach activity. 

The smart part of the solution is creating the collection of notebooks so that you can iterate it, but is also always up to date. This solution uses the Synapse rest API to get all notebooks from Synapse and then use a filter to only get a selection of all those notebook.

The hard part is that the rest API will return mulitple pages with notebooks if you have a lot of notebooks. The Entire solutions looks like this. Only the last part is for looping and executing the notebooks. The first few activities are all for retrieving the collection of notebooks. It perhaps looks a bit complex, but looks can be deceiving.
The solution


1) Parameter
This solution uses one string pipeline parameter to provide a folder path that we can use to filter out a selection of notebooks. Name of the parameter is NotebookFolderPath.
String parameter to get a selection of notebooks


2) Variables
The UNTIL loop to retrieve all notebooks uses three variables. The first is a String variable containing the URL of the rest API: SynapseRestAPI. The second and third are Array variables to store the response of the Rest API: Notebooks and Notebooks_Temp.
The pipeline variables to retrieve and store the notebooks


3) Determine Rest API URL
The Rest API will return multiple pages with details of all notebooks if you exceed the max number of notebooks per page. Therefore we will first determine the initial URL for the first page before the UNTIL loop. Lateron the URL of the successive pages is retrieved within the UNTIL loop by reading the response of the Rest API.

For the initial URL we need the name of the Synapse workspace. Since this can be retrieved via an expression, we can make the URL dynamic:
@concat(
    'https://'
    ,pipeline().DataFactory
    ,'.dev.azuresynapse.net/notebooks?api-version=2021-04-01'
    )
For this we will start with a Set Variable activity in front of the UNTIL loop.
Set Variable task to determine Rest API URL


4) Until loop
Within the UNTIL loop we use a WEB activity for the first REST API call. The UNTIL loop uses its output to to check whether it contains a property nextLink. If that property is present in the output then there is a next page and this property will contain the REST API URL for it.

The name of the WEB activity is web_GetNotebooks and therefor the expression of the UNTIL is:
@not(
    contains(
            activity('web_GetNotebooks').output
            ,'nextLink'
            )
    )
UNTIL loop


5) Web activity
The first activity in the UNTIL is the WEB activity. It's easier to add this activity to the UNTIL before writing the expression of the step above.
As mentioned above its name is web_GetNotebooks. The important settings are:
  • URL - @variables('SynapseRestAPI')
  • Method - GET
  • Authenication - System-assigned managed identity
  • Resource - https://dev.azuresynapse.net/
And make sure to select your SHIR in the advanced settings if you use one. Also make sure to give the Synapse workspace at least the Reader role to itself otherwise it can't use its own Rest API.
WEB activity for REST API


6) Union output to temp
Next we need two Set Variable activities in the UNTIL. With the first Set Variable activity we union the output of the Rest API with the value of the Notebooks array variable and store it in the Notebooks_Temp array variable. This has to be a two step task, hence the temp variable. The expression looks like:
@union(
    activity('WEB_GetNotebooks').output.value
    ,variables('Notebooks')
    )

The first iteration the Notebooks variable will still be empty, but for all next iterations it will be filled by the next activity.
Union output to temp array variable


7) Use temp to fill variable
In the previous activity we filled the Notebooks_Temp variable. In this next step we store the value of Notebooks_Temp in the main array variable Notebooks. Then we can use this value to union it in the next iteration.
Store temp value in main variable


8) Determine URL of next Rest API call
The last activity in the UNTIL is to check whether there a next page. If there is we will fill the string variable SynapseRestAPI with the URL and if not we will fill it with an empty string that will break the UNTIL loop.
@if(
    contains(
            activity('WEB_GetNotebooks').output
            , 'nextLink'
            )
    ,activity('WEB_GetNotebooks').output.nextLink
    ,''
    )
Retrieve URL of next page


9) Filter notebook array
The notebook array is now filled with all published notebooks. If you only want certain notebooks from a specific folder then we need to add a FILTER Activity. The path for filtering is retrieved from the pipeline parameter. The startswith will also retrieve notebooks from all subfolders. Replace with EQUALS if you don't want that:
@if(
    not(
        empty(item().properties.folder)
        )
    , startswith(
        item().properties.folder.name
        , pipeline().parameters.NotebookFolderPath
        )
    , false
    )
Filter notebooks by folder path


10) Foreach notebook
Now you can use the output of the FILTER Activity in the FOREACH loop. You should also tune the FOREACH settings to the available Spark node. If you use a small node then you probably won't run 20 notebooks at a time.
Foreach Notebook


11) Execute Notebook
Last step of the solution is executing all notebooks via the Notebook Activity. The notebook name property should be filled with an expression: @item().name
Execute all notebooks


The loop will ofcourse only work if the parameters and settings for each notebook are all equal. Otherwise you will have a lot of expression work to do making the solution probably to difficult to maintain.

Tip
In the User property tab of the Notebook activity you can add a few properties which you can show in the output making it very handy for debugging. In this case there is a NotebookName property with the expression @{item().name} and a FolderPath property with the expression @{item().properties.folder.name}.
Adding User Properties


Now when debugging your pipeline you can add those properies as columns. Click on the icon in the User Property column to see the available columns. This is useful for loops like UNTIL and FOREACH. Now you can forexample instantly see which notebook fails and which one succeeds without checking the input of each Notebook activity.
Showing user properties in Output window


Conclusion
This solution will make it easy to iterate through a whole bunch of notebooks without adding them one by one to a pipeline. You will have to use folders for your notebooks (or a certain notebook naming convention) if you don't want them all to be executed. In development this only works if you first publish the notebooks, because the Rest API only returns published/live notebooks. Don't forget to use the User Properties tip to make debugging a lot easier.


Saturday, 21 September 2024

Synapse - ReferenceError: Response is not defined

Case
My Synapse CICD deployment pipeline is failing with some kind of error pointing to a javascript file main.js: ReferenceError: Response is not defined
ReferenceError: Response is not defined


When using the Synapse Workspace Deployment addon for Azure Devops, it gives me an error (and it did work before) when trying to deploy a Synapase Analytics Workspace:
ReferenceError: Response is not defined
    at Module../node_modules/@trident/data-access-artifact/src/lib/models/http.js (D:\a\1\s\downloads\main.js:360446:40)
    at __webpack_require__ (D:\a\1\s\downloads\main.js:668203:42)
    at Module../node_modules/@trident/data-access-artifact/src/lib/models/index.js (D:\a\1\s\downloads\main.js:360536:63)
    at __webpack_require__ (D:\a\1\s\downloads\main.js:668203:42)
    at Module../node_modules/@trident/data-access-artifact/src/lib/clients/artifact-client.js (D:\a\1\s\downloads\main.js:359333:65)
    at __webpack_require__ (D:\a\1\s\downloads\main.js:668203:42)
    at Module../node_modules/@trident/data-access-artifact/src/lib/clients/index.js (D:\a\1\s\downloads\main.js:359814:74)
    at __webpack_require__ (D:\a\1\s\downloads\main.js:668203:42)
    at Module../node_modules/@trident/data-access-artifact/src/index.js (D:\a\1\s\downloads\main.js:359310:70)
    at __webpack_require__ (D:\a\1\s\downloads\main.js:668203:42)

Entire error


Solution
This Synapse addon for DevOps requires node.js on your Azure DevOps agent. If you installed an older(/wrong) version of node.js then you will get this error. If you installed node.js in your YAML pipeline then you just need to raise the version. At the moment version 18 is the minimum version that works, but 22 also works. However it shifted a lot the past years. I think it started with version 10.

###################################
# Installs Node.js on agent
###################################
- task: NodeTool@0
  displayName: 'Install Node.js'
  inputs:
    versionSpec: '22.x'
    checkLatest: true  

Conclusion
Just make sure to regularly check available node.js versions and then try if they already work with your Synapse release proces. In the past the most recent version didn't always worked for me.


Monday, 1 January 2024

Toggle Azure Synapse Triggers during deployment

Case
To turn of the Synapse triggers before deployment and turning them back of after deployment, we used a PowerShell script for ADF that we rewritten for Synapse. However now there is a new activity available that avoids the use of scripting, but it is a bit hidden if you mainly use YAML for pipelines.
Azure Synapse Toggle Triggers Dev (Preview)


Solution
If you go the release pipelines (not YAML, but the visual variant) and under add task search for Synapse then you will find the Synapse workspace deployment activity, but also the Azure Synapse Toggle Triggers Dev. It's already out there for a couple months but still preview (probably to busy with Fabric at the moment). For these tasks you need to add the Synapse addon to Azure DevOps, but if you are already using the deployment task then you already have it. The postfix of the taskname is Dev, so it is to be expected that they will remove it once it is General Available.
Synapse Tasks


Since we have a preference for YAML we need to know what the task name is and which properties are available. There is no YAML documentation available, but it you fill in the form in the release pipeline then you can view the YAML code. And by clicking on the circled i icon you will get some more info about the properties.
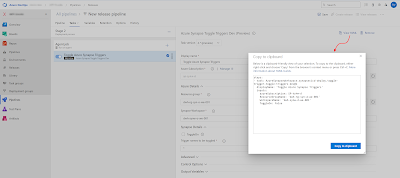
View YAML code


First the YAML code for toggling off all triggers which you need to do before deploying a new version of Synapse. With and without parameters.
steps:
- task: AzureSynapseWorkspace.synapsecicd-deploy.toggle-trigger.toggle-triggers-dev@2
  displayName: 'Toggle Azure Synapse Triggers'
  inputs:
    azureSubscription: SP-synw-d
    ResourceGroupName: 'dwh-synw-d-we-001'
    WorkspaceName: 'dwh-synw-d-we-001'
    ToggleOn: false
    Triggers: '*'
    
    
- task: AzureSynapseWorkspace.synapsecicd-deploy.toggle-trigger.toggle-triggers-dev@2
  displayName: 'Toggle Azure Synapse Triggers'
  inputs:
    azureSubscription: ${{ parameters.SerCon }}
    ResourceGroupName: ${{ parameters.Synapse_ResourceGroupName }}
    WorkspaceName: ${{ parameters.Synapse_WorkspaceName }}
    ToggleOn: false
    Triggers: '*'
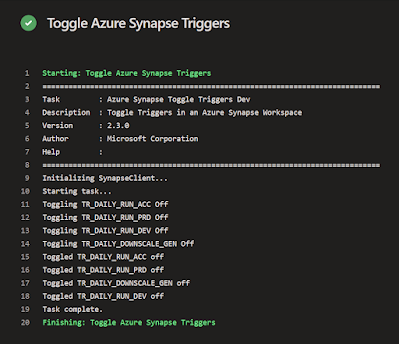
Toggle all trigger OFF


Then the same code but now for enabling certain triggers. Again with and without parameters.
steps:
- task: toggle-triggers-dev@2
  displayName: 'Toggle Azure Synapse Triggers'
  inputs:
    azureSubscription: SP-synw-d
    ResourceGroupName: 'dwh-synw-d-we-001'
    WorkspaceName: 'dwh-synw-d-we-001'
    ToggleOn: true
    Triggers: 'TR_DAILY_RUN_DEV,TR_DAILY_DOWNSCALE_GEN'


- task: toggle-triggers-dev@2
  displayName: 'Toggle Azure Synapse Triggers'
  inputs:
    azureSubscription: ${{ parameters.SerCon }}
    ResourceGroupName: ${{ parameters.Synapse_ResourceGroupName }}
    WorkspaceName: ${{ parameters.Synapse_WorkspaceName }}
    ToggleOn: true
    Triggers: '${{ parameters.Synapse_EnableTriggers }}'
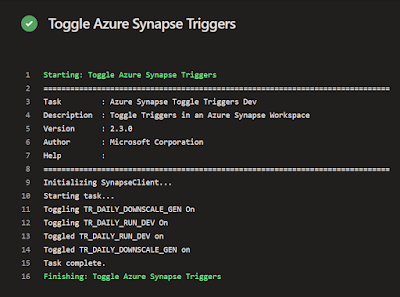
Toggle specific triggers ON


You can remove the long prefix in the task name and just keep toggle-triggers-dev@2. Property ToggleOn set to 'false' means stop the triggers and 'true' means start the mentioned triggers. The triggers property shoud contain a '*' to stop/start everything, but you probably only want to enable certain triggers on each environment. In that case you can use 'trigger1,trigger2,trigger3'  to do that, but without spaces around each comma. With extra spaces you will get an error that the trigger is not found. In the error message you can see the extra space in front of the trigger name.
##[error]Refer to above logs for more details:
The Trigger TR_DAILY_DOWNSCALE_GEN was not found


An other issue is that the Triggers property must be filled. If you have one environment where you don't want to start any of the triggers then you will get an error saying that the property is required. I would rather see a warning instead or an other user friendly solution that works with some of the YAML shortcomings.
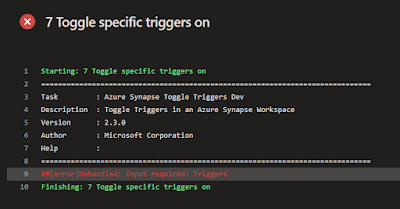
##[error]Unhandled: Input required: Triggers


You can solve this by adding a YAML condition to the task where you check whether the list of triggers is empty. If it is, the task will be skipped. Unfortunately you cannot use a parameter in a condition. The workaround is to read directly from a variable group:
- task: toggle-triggers-dev@2
  displayName: 'Toggle Azure Synapse Triggers'
  condition: ne(replace(variables.Synapse_EnableTriggers, ' ', ''), '')
  inputs:
    azureSubscription: ${{ parameters.SerCon }}
    ResourceGroupName: ${{ parameters.Synapse_ResourceGroupName }}
    WorkspaceName: ${{ parameters.Synapse_WorkspaceName }}
    ToggleOn: true
    Triggers: '${{ parameters.Synapse_EnableTriggers }}'

Alternatives
If you don't like that workaround there are two alternatives until Microsoft fixes the issue. You could use the OverrideParameters option to override the endTime property of a trigger during the Synapse deployment as showed here for Data Factory or use a PowerShell activity to enable the triggers just like for ADF. For this PowerShell option you need to create a PowerShell file in the repository under \CICD\PowerShell with the name SetTriggers.ps1 and the following code (Synapse version):

param
(
    [parameter(Mandatory = $true)] [String] $WorkspaceName,
    [parameter(Mandatory = $true)] [String] $ResourceGroupName,
    [parameter(Mandatory = $true)] [string] $EnableTriggers,
    [parameter(Mandatory = $false)] [Bool] $DisableAllTriggers = $true
)

Write-Host "Checking existance Resource Group [$($ResourceGroupName)]..."
Get-AzResourceGroup -Name $ResourceGroupName > $null
Write-Host "- Resource Group [$($ResourceGroupName)] found."

Write-Host "Checking existance Synapse Workspace [$($WorkspaceName)]..."
Get-AzSynapseWorkspace -ResourceGroupName $ResourceGroupName `
              -Name $WorkspaceName > $null
Write-Host "- Synapse Workspace [$($WorkspaceName)] found."

#Getting triggers
Write-Host "Looking for triggers..."
$Triggers = Get-AzSynapseTrigger -WorkspaceName $WorkspaceName
Write-Host "Found [$($Triggers.Count)] trigger(s)"

# Checking provided triggernames, first split into array
$EnabledTriggersArray = $EnableTriggers.Split(",")
Write-Host "Checking existance of ($($EnabledTriggersArray.Count)) provided triggernames."
# Loop through all provided triggernames
foreach ($EnabledTrigger in $EnabledTriggersArray)
{ 
    # Get Trigger by name
    $CheckTrigger = Get-AzSynapseTrigger    -WorkspaceName $WorkspaceName `
                                            -Name $EnabledTrigger `
                                            -ErrorAction Ignore # To be able to provide more detailed error

    # Check if trigger was found
    if (!$CheckTrigger)
    {
        throw "Trigger $($EnabledTrigger) not found in Synapse Workspace $($WorkspaceName) within resource group $($ResourceGroupName)"
    }
}
Write-Host "- All ($($EnabledTriggersArray.Count)) provided triggernames found."

##############################################
# Disable triggers
##############################################
# Check if all trigger should be disabled
if ($DisableAllTriggers)
{
   # Get all enabled triggers and stop them (unless they should be enabled)
   Write-Host "Getting all enabled triggers that should be disabled."
   $CurrentTriggers = Get-AzSynapseTrigger    -WorkspaceName $WorkspaceName `
                      | Where-Object {$_.RuntimeState -ne 'Stopped'} `
                      | Where-Object {$EnabledTriggersArray.Contains($_.Name) -eq $false}

   # Loop through all found triggers
   Write-Host "- Number of triggers to disable: $($CurrentTriggers.Count)."
   foreach ($CurrentTrigger in $CurrentTriggers)
   {
        # Stop trigger
        Write-Host "- Stopping trigger [$($CurrentTrigger.Name)]."
        try {
            Stop-AzSynapseTrigger -WorkspaceName $WorkspaceName -Name $CurrentTrigger.Name > $null
        } catch {
            Write-Host "error code 1, but disabling trigger that already is disabled"
        }
   }
}

##############################################
# Enable triggers
##############################################
# Loop through provided triggernames and enable them
Write-Host "Enable all ($($EnabledTriggersArray.Count)) provided triggers."

foreach ($EnabledTrigger in $EnabledTriggersArray)
{                   
    # Get trigger details
    $CheckTrigger = Get-AzSynapseTrigger     -WorkspaceName $WorkspaceName `
                                               -Name $EnabledTrigger

    # Check status of trigger
    if ($CheckTrigger.RuntimeState -ne "Started")
    {
        try {
            Write-Host "- Trigger [$($EnabledTrigger)] starting. This will take only a few seconds..."
            Start-AzSynapseTrigger      -WorkspaceName $WorkspaceName `
                                        -Name $EnabledTrigger
        } catch {
            Throw "Error enabling trigger '$EnabledTrigger': $Error[0].Message"
            exit 1
        }
    }
    else
    {
        Write-Host "- Trigger [$($EnabledTrigger)] already started"
    }
}
Then the YAML Code for after the deployment step:
- task: AzurePowerShell@5
  displayName: 'Enabling triggers per environment'
  inputs:
    azureSubscription: ${{ parameters.SerCon }}
    scriptType: filePath
    scriptPath: $(Pipeline.Workspace)\s\CICD\PowerShell\Set_Triggers.ps1
    scriptArguments:
      -WorkspaceName ${{ parameters.Synapse_WorkspaceName }} `
      -ResourceGroupName ${{ parameters.Synapse_ResourceGroupName }} `
      -EnableTriggers "${{ parameters.Synapse_EnableTriggers }}"
    azurePowerShellVersion: latestVersion
    pwsh: true
Conclusion
Microsoft is introducing a very promising new DevOps task for Synapse that will make you CICD task much easier. Hopefully it will be G.A. soon and the small bugs will be solved. In the mean while you could use one of the alternatives if you don't want to use a preview version of the task.

An other solution for Microsoft could be to just add these options in the current deployment task since you always need to stop all triggers first and than start some of the triggers once the new version has been deployed. Is there a good reason to have these as two separate tasks in DevOps? Let it know in the comments below.


ADDITION
The new task toggle-triggers-dev@2 does not yet work with the new type of Azure Service Connection with Workload Identity federation. This will result in the following error: {"code":"U002","message":"The service connection authScheme WorkloadIdentityFederation is not supported by this task"}.
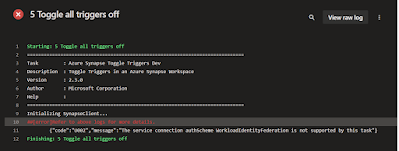
The service connection authScheme
WorkloadIdentityFederation is not supported by this task