Thursday, 20 February 2020

Use Azure Key Vault for Azure Databricks

Case
I need to use some passwords and keys in my Databricks notebook, but for security reasons I don't want to store them in the notebook. How do I prevent storing sensitive data in Databricks?
Using Azure Key Vault for Azure Databricks


Solution
Let's say you want to connect to an Azure SQL Database with SQL Authentication or an Azure Blob Storage container with an Access key in Databricks. Instead of storing the password or key in the notebook in plain text, we will store it in an Azure Key Vault as a secret. With an extra line of code we will retrieve the secret and use its value for the connection.

The example below will show all individual steps in detail including creating an Azure Key Vault, but assumes you already have an Azure Databricks notebook and a cluster to run its code. The steps to give Databricks access to the Key Vault slightly deviate from Azure Data Factory or Azure Automation Runbook, because the access policy is set from within Databricks itself.

1) Create Key Vault
First step is creating a key vault. If you already have one then you can skip this step.
  • Go to the Azure portal and create a new resource
  • Search for key vault
  • Select Key Vault and click on Create
  • Select your Subscription and Resource Group 
  • Choose a useful name for the Key Vault
  • Select your Region (the same as your other resources)
  • And choose the Pricing tier. We will use Standard for this demo
Creating a new Key Vault


2) Add Secret
Now that we have a Key Vault we can add the password from the SQL Server user or the key from the Azure Storage account. The Key Vault stores three types of items: Secrets, Keys and Certificates. For passwords, account keys or connectionstrings you need the Secret.
  • Go to the newly created Azure Key Vault
  • Go to Secrets in the left menu
  • Click on the Generate/Import button to create a new secret
  • Choose Manual in the upload options
  • Enter a recognizable and descriptive name. You will later on use this name in Databricks
  • Next step is to add the secret value which we will retrieve in Databricks
  • Keep Content type Empty and don't use the activation or expiration date for this example
  • Make sure the secret is enabled and then click on the Create button
Adding a new secret to Azure Key Vault


3) Create Secret Scope
Instead of adding Databricks via the Access policies in the Key Vault we will use a special page in the Databricks workspace editor which will create an Application in the Azure Active Directory and give that application access within the Key Vault. At the moment of writing this feature is still a Public Preview feature and therefore layout could still change and it will probably become a menu item when in GA.
  • Go to your Azure Databricks overview page in the Azure portal
  • Click on the Launch workspace button in the middle (a new tab will opened)
  • Change the URL of the new tab by adding '#secrets/createScope' after the URL
    Example
    https://westeurope.azuredatabricks.net/?o=1234567890123456
    Becomes
    https://westeurope.azuredatabricks.net/?o=1234567890123456#secrets/createScope
Find 'Create Secret Scope' form


Next step is to fill in the 'Create Secret Scope' form. This will connect Databricks to the Key Vault.
  • Fill in the name of your secret scope. It should be unique within the workspace and will be used in code to retrieve the secret from Key Vault.
  • The Manage Principal for the premium tier can either be Creator (secret scope only for you) or All Users (secret scope for all users within the workspace). For the standard tier you can only choose All Users.
  • The DNS name is the URL of your Key Vault which can be found on the Overview page of your Azure Key Vault which looks like: https://bitools.vault.azure.net/
  • The Resource ID is a path that points to your Azure Key Vault. Within the following path replace the three parts within the brackets:
    /subscriptions/[1.your-subscription]/resourcegroups/[2.resourcegroup_of_keyvault]/providers/ Microsoft.KeyVault/vaults/[3.name_of_keyvault]
    1. The guid of your subscription
    2. The name of the resource group that hosts your Key Vault
    3. The name of your Key Vault
      Tip: if you go to your Key Vault in the Azure portal then this path is part of the URL which you could copy
  • Click on the Create button and when creation has finished click on the Ok button
Create Secret Scope


4) Verify Access policies
Next you want to verify the rights of Databricks in the Key Vault and probably restrict some options because by default it gets a lot of permissions.
  1. Go to your Key Vault in the Azure Portal
  2. Go to Access policies in the left menu
  3. Locate the application with Databricks in its name
  4. Check which permissions you need. When using secrets only, the Get and List for secrets is probably enough.
Verify permissions of Databricks in Azure Key Vault


5) Scala code
Now it is time to retrieve the secrets from the Key Vault in your notebook with Scala code (Python code in next step). First code is for when you forgot the name of your secret scope or want to know which ones are available in your workspace.
1
2
3
4
5
6
// Scala code
 
// Get list of all scopes
val mysecrets = dbutils.secrets.listScopes()
// Loop through list
mysecrets.foreach { println }
Scala code to get secret scopes


If you want to get the value of one secret you can execute the following code. Note that the value will not be shown in your notebook execution result
1
2
3
// Scala code
 
dbutils.secrets.get(scope = "bitools_secrets", key = "blobkey")
Scale code to retrieve secret from the Azure Key Vault


And if you want to use that code to retrieve the key from your blob storage account and get a list of files you can combine it in the following code. The name of the storage account is 'bitools2'
1
2
3
4
5
6
// Scala code
 
dbutils.fs.mount(
  mountPoint = "/mnt/bitools2",
  extraConfigs = Map("fs.azure.account.key.bitools2.blob.core.windows.net" -> dbutils.secrets.get(scope = "bitools_secrets", key = "blobkey")))

Scale code to mount Storage and get list of files


6) Python code
Now it is time to retrieve the secrets from the Key Vault in your notebook with Python code. First code is for when you forgot the name of your secret scope or want to know which ones are available in your workspace.
1
2
3
4
5
6
7
# Python code
 
# Get list of all scopes
mysecrets = dbutils.secrets.listScopes()
# Loop through list
for secret in mysecrets:
  print(secret.name)
Python code to get secret scopes


If you want to get the value of one secret you can execute the following code. Note that the value will not be shown in your notebook execution result
1
2
3
# Python code
 
dbutils.secrets.get(scope = "bitools_secrets", key = "blobkey")
Python code to retrieve secret from the Azure Key Vault


And if you want to use that code to retrieve the key from your blob storage account and get a list of files you can combine it in the following code. The name of the storage account is 'bitools2'
1
2
3
4
5
6
# Python code
 
dbutils.fs.mount(
  mount_point = "/mnt/bitools2a",
  extra_configs = {"fs.azure.account.key.bitools2.blob.core.windows.net":dbutils.secrets.get(scope = "bitools_secrets", key = "blobkey")})

Python code to mount Storage and get list of files


Conclusion
In this post you learned how to store sensitive data for your data preparation in databricks the right way by creating a Key Vault and use it in your notebook. The feature is still in public preview which will probably mean the layout will slightly change before going to GA, but the features will most likely stay the same. Another point of attention is that you don't have any influence on the name of the Databricks application in de AAD and the default permissions in the Key Vault.

In previous posts we also showed you how to use the same Key Vault in an Azure Data Factory and an Azure Automation Runbook to avoid hardcoded passwords and keys. In a future post we will show you how to use it in other tools like Azure Functions.

Sunday, 16 February 2020

Use Azure Key Vault for Azure Data Factory

Case
I need to use some passwords and keys in my Azure Data Factory (ADF) pipelines, but for security reasons I don't want to store them in ADF. How do I prevent storing sensitive data in Azure Data Factory?
Using Azure Key Vault for Azure Data Factory


Solution
Let's say you want to connect to a database in ADF with SQL Authentication. Instead of saving the password in a Linked Services connection of ADF, you can store that password in an Azure Key Vault as a secret. Then you give ADF read rights (GET Secret) to that Key Vault to retrieve the password stored in the secret. In the Linked Services connection you configure which Key Vault to use and the name of your secret.

The example below will show all individual steps in detail including creating an Azure Key Vault, but assumes you already have an Azure Data Factory with pipelines.

1) Create Key Vault
First step is creating a key vault. If you already have one then you can skip this step.
  • Go to the Azure portal and create a new resource
  • Search for key vault
  • Select Key Vault and click on Create
  • Select your Subscription and Resource Group 
  • Choose a useful name for the Key Vault
  • Select your Region (the same as your other resources)
  • And choose the Pricing tier. We will use Standard for this demo
Creating a new Key Vault


2) Add Secret
Now that we have a Key Vault we can add the password from the SQL Server user. The Key Vault stores three types of items: Secrets, Keys and Certificates. For passwords, account keys or connectionstrings you need the Secret.
  • Go to the newly created Azure Key Vault
  • Go to Secrets in the left menu
  • Click on the Generate/Import button to create a new secret
  • Choose Manual in the upload options
  • Enter a recognizable and descriptive name. You will later on use this name in ADF
  • Next step is to add the secret value which we will retrieve in ADF
  • Keep Content type Empty and don't use the activation or expiration date for this example
  • Make sure the secret is enabled and then click on the Create button
Adding a new secret to Azure Key Vault


3) Access policies
Now we have to give ADF access to the Key Vault to read its content. You can now find ADF by its name so you don't have to search for its managed identity guid, but using that guid is also still possible.
  1. Go to Access policies in the left menu
  2. Click on the blue + Add Access Policy link
  3. Leave Configure from template empty
  4. Leave Key permissions unselected (we will only use a Secret for this example)
  5. Select Get for Secret permissions
  6. Leave Certificate permissions unselected (we will only use a Secret for this example)
  7. Click on the field of Select principal to find the name of your Azure Data Factory
  8. Leave Authorized application unchanged
  9. Click on Add and a new Application will appear in the list of Current Access Policies
Add Access policy


If you want to use the Managed Identity GUID then first go to ADF and click on Properties in the left menu. There you will find the Managed Identity Object ID that you can use to search for principals under the access policies.
The Managed Identity of ADF


4) Create Linked Service connection to Azure Key Vault
Now we need to let ADF know about your new Azure Key Vault by adding an extra Linked Service connection to your Key Vault.
  1. Go to ADF and open the Author & Monitor editor
  2. Within the new tab go to the Author section (Pencil icon) and click on connections to see all Linked Services
  3. Add a new Linked Service by clicking the + New button
  4. Search for (Azure) Key Vault and click on continue to enter all connection details
  5. First enter a descriptive name and optionally a description
  6. Select your subscription
  7. Select your newly created Key Vault
  8. Test the connection and if successful click on Create
Add Key Vault Linked Service


5) Create Linked Service connection
Last step is creating the SQL Server Linked Service connection in ADF. In this example we used a SQL Server connection, but the same principal works for all connections in ADF. Note: that you can also retrieve the entire connection string from the Key Vault, but for this example we only retrieve the password secret.

Before you start make sure the Linked Service connection to the Key Vault has been  published. Otherwise you get an error message when hitting the create button
  1. Add a new Linked Service by clicking the + New button
  2. Search for (Azure) SQL Database and click on continue to enter all connection details
  3. First enter a descriptive name and a description
  4. Then use Connection string (not Azure Key Vault) to select your server and database
  5. After that use Azure Key Vault (not Password) to retrieve the password
  6. Select the Key Vault from the previous step
  7. Enter the name of the secret (that you created in step 2)
  8. Test the connection and if successful hit the create button
  9. Now you can use this Linked Services connection in your pipelines
Create connection and retrieve password via Key Vault


Conclusion
In this post you learned how to store sensitive data for your ETL the right way by creating a Key Vault and use it in Azure Data Factory. An important step is to give ADF rights to retrieve secrets from the Key Vault. Either via its name of the Managed Identity.

In a previous post we also showed you how to use the same Key Vault in an Azure Automation Runbook to avoid passwords and keys in the PowerShell code. In a future post we will show you how to use it in other tools like Azure Databricks or Azure Functions.

It is also possible to use Key Vault secrets in the pipelines instead of in the Linked Services, but this is explained in a separate post.


Sunday, 2 February 2020

Schedule Up/Downscale Azure SQL Database (API)

Case
I want to up- and downscale my Azure SQL Database within my ADF pipeline. You recently showed how do this with Powershell code in an Automation Runbook, but that is too much coding for me. You also showed how to do this with some simple TSQL code, but that requires a lot of database permissions for the ETL user. Is there a codeless solution in Azure Data Factory which doesn't require permissions within my Azure SQL Database?
Change the Tier of your SQL Azure DB


Solution
Yes: Rest API! And don't worry there is no coding required. For this example we will use the Web activity to call the Rest API of SQL Server. This doesn't require any coding or permissions within the database itself. However you need ofcourse some permissions to change the database Pricing Tier. For this we will be using managed identities for Azure resources: we will give the Azure Data Factory permissions to the Azure SQL Server.

For this example we assume you already have an ADF with a pipeline for your ETL which we will extend with an upscale and a downscale.
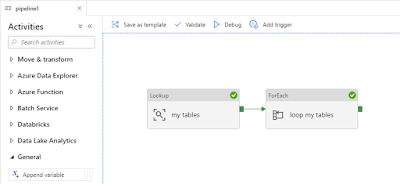
Stage multiple tables in a foreach loop


1) Assign permissions to ADF
The permissions will be granted to the Azure SQL Server and not to a specific database. To change the database Pricing Tier with ADF, we need a role that can only change the database settings, but nothing security related: Contributer, SQL DB Contributer or SQL Server Contributer.
  • Go to the Azure SQL Server of the database that you want to up- or downscale with ADF
  • In the left menu click on Access control (IAM)
  • Click on Add, Add role assignment
  • In the 'Role' drop down select 'SQL DB Contributer'
  • In the 'Assign access to' drop down select Data Factory
  • Search for your Data Factory, select it and click on Save
Note: if you forget this step you will get an error while executing the pipeline in ADF
Not enough permissions


1
2
3
4
5
6
7
{
    "errorCode": "2108",
    "message": "{\"error\":{\"code\":\"AuthorizationFailed\",\"message\":\"The client 'xxxxxx-xxxx-xxxx-xxxx-xxxxxxxxxxxx' with object id 'xxxxxx-xxxx-xxxx-xxxx-xxxxxxxxxxxx' does not have authorization to perform action 'Microsoft.Sql/servers/databases/write' over scope '/subscriptions/xxxxxx-xxxx-xxxx-xxxx-xxxxxxxxxxxx/resourceGroups/Joost_van_Rossum/providers/Microsoft.Sql/servers/bitools2/databases/Stage' or the scope is invalid. If access was recently granted, please refresh your credentials.\"}}",
    "failureType": "UserError",
    "target": "Upscale Stage DB",
    "details": []
}

2) Get URL Rest API
Now it is almost time to edit your ADF pipeline. The first step will be adding a Web activity to call the Rest API, but before we can do that we need to determine the URL of this API which you can find here. Check the api version because it changes regularly.

https://management.azure.com/subscriptions/{subscriptionId}/resourceGroups/{resourceGroupName}/providers/Microsoft.Sql/servers/{serverName}/databases/{databaseName}?api-version=2021-02-01-preview

Within this URL you need to replace all parts that start and end with a curly bracket: {subscriptionId}, {resourceGroupName}, {serverName} and {databaseName} (including the brackets themselves). Don't use a URL (bitools2.database.windows.net) for the database server name, but use only the name:

https://management.azure.com/subscriptions/xxxxxx-xxxx-xxxx-xxxx-xxxxxxxxxxxx/resourceGroups/Joost_van_Rossum/providers/Microsoft.Sql/servers/bitools2/databases/Stage?api-version=2021-02-01-preview

3) JSON message for Rest API
The Rest API expects a JSON message with the pricing tier for which you can find the details here under SKU. For some reason the location is required in these messages. Here are two example which you need to adjust for your requirements:
1
{"sku":{"name":"S1","tier":"Standard"}, "location": "West Europe"}
or
1
{"sku":{"name":"Basic","tier":"Basic"}, "location": "West Europe"}

3) Upscale DB
Go to your existing ADF pipeline to add an upscale (and downscale) activity
  • Add a Web activity in front of the existing Lookup activity
  • Give it a descriptive name: Upscale Stage DB
  • Go to the Settings tab of the Web activity
  • For URL enter the URL you created in step 2
  • For Method choose PUT
  • Add a new Header called 'Content-Type' with the value 'application/json'
  • Copy the JSON message that you create in step 3 to the Body
  • Collapse Advanced at the bottum
  • Choose MSI (old name for Managed Instance) as authentication
  • Enter 'https://management.azure.com/' in the Resource field. This is the URL for Managed Identity
Add Web activity to call Rest API


4) Downscale DB
Repeat the previous step, but now add the downscale activity at the end
  • Add a second Web activity, but now after your ETL activity (foreach in this example)
  • Give it a descriptive name: Downscale Stage DB
  • Go to the Settings tab of the Web activity
  • For URL enter the URL you created in step 2
  • For Method choose PUT
  • Add a new Header called 'Content-Type' with the value 'application/json'
  • Copy the JSON message that you create in step 3 to the Body
  • Collapse Advanced at the bottum
  • Choose MSI (old name for Managed Instance) as authentication
  • Enter 'https://management.azure.com/' in the Resource field
Adding an upscale and downscale via Rest API


Conclusion
In this post you learned how to give a resource (ADF) access to an other resource (SQL Server) via Managed Identities. Then we showed you how to call a Rest API in an ADF pipline Web activity for which we didn't have to write any code at all. From all the different options we showed you to Up- and Downscale an Azure SQL Database this is probably the easiest and safest method especially when you want to incorporate in your ETL process. An other positive thing is that the Rest API call is synchronous which means it doesn't start the ETL before the database has been upscaled. So no extra wait activities required.

Saturday, 1 February 2020

Schedule Up/Downscale Azure SQL Database (TSQL)

Case
You recently showed how to up- or downscale my Azure SQL Database with Powershell code in an Automation Runbook, but is there a way to do this without Powershell?
Change the Tier of your SQL Azure DB


Solution
Changing the database Pricing Tier can also be done with some TSQL script. First we will show you how to do this in Sql Server Mangement Studio (SSMS) and then how you could also do this in Azure Data Factory (ADF).

A) SSMS
To change the Pricing Tier in SSMS you first need to connect SSMS to your Azure SQL Database and make sure to select the right database (not master) in your query window.

A1) Retrieve pricing tier
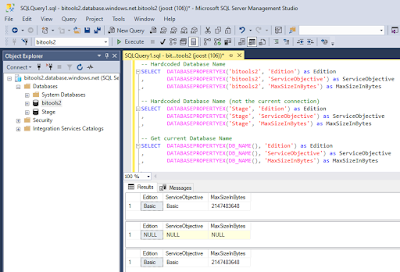
First a query to retrieve the Pricing Tier (Edition, Server Objective and Max Size). This can be done with a hardcode name or by using DB_NAME() within the DATABASEPROPERTYEX() command. However since you cannot retrieve the data from database X when connected to database Y (it will return NULL) the second options is the easiest.
1
2
3
4
5
6
7
8
9
-- Hardcoded Database Name
SELECT DATABASEPROPERTYEX('bitools2', 'Edition') as Edition
,  DATABASEPROPERTYEX('bitools2', 'ServiceObjective') as ServiceObjective
,  DATABASEPROPERTYEX('bitools2', 'MaxSizeInBytes') as MaxSizeInBytes
 
-- Get current Database Name
SELECT DATABASEPROPERTYEX(DB_NAME(), 'Edition') as Edition
,  DATABASEPROPERTYEX(DB_NAME(), 'ServiceObjective') as ServiceObjective
,  DATABASEPROPERTYEX(DB_NAME(), 'MaxSizeInBytes') as MaxSizeInBytes
Retrieve Database Pricing Tier


A2) Change pricing tier
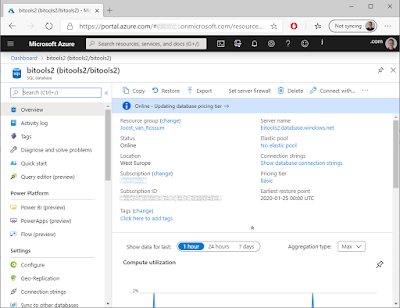
The next step is to change the Pricing Tier with an ALTER DATABASE command in SSMS. If you go to the portal right after executing the ALTER statement you will see a message Updating database pricing tier. When executing the command in SSMS it immediately shows that it is completed, however it takes a few moments to actually finish the command.
1
2
3
4
5
6
7
8
9
10
11
-- Change Princing Tier to Basic (only when size < 2GB)
ALTER DATABASE [bitools2] MODIFY (EDITION ='Basic');
 
-- Change Pricing Tier to Standard S1 with size set to 250GB
ALTER DATABASE [bitools2] MODIFY (EDITION ='Standard', SERVICE_OBJECTIVE = 'S1', MAXSIZE = 250 GB);
 
-- Change Pricing Tier to Standard S1 (withoud mentioning edition and size)
ALTER DATABASE [bitools2] MODIFY (SERVICE_OBJECTIVE = 'S1');
 
-- Change Pricing Tier to lowest Standard (S0)
ALTER DATABASE [bitools2] MODIFY (EDITION ='Standard');

Pricing Tier changes after execution the alter script


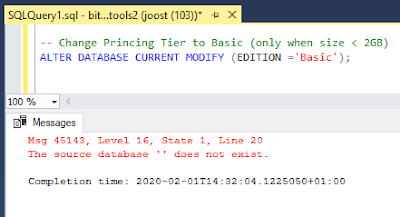
Note: According to the documentation you could also use CURRENT (instead of the database name) to alter the current database. However that failed on my laptop (SSMS 18.4). Please write your suggestions in the comments.
The source database '' does not exist.


B) Azure Data Factory
You could also execute this script in ADF to upscale your Azure SQL Database before the ETL (or ELT) starts and then downscale it afterwards. For this example we will add these ADF activities in our existing stage pipeline from a previous blog post to upscale the sink database (our stage database).
Stage multiple tables in a foreach loop


B1) Upscale DB
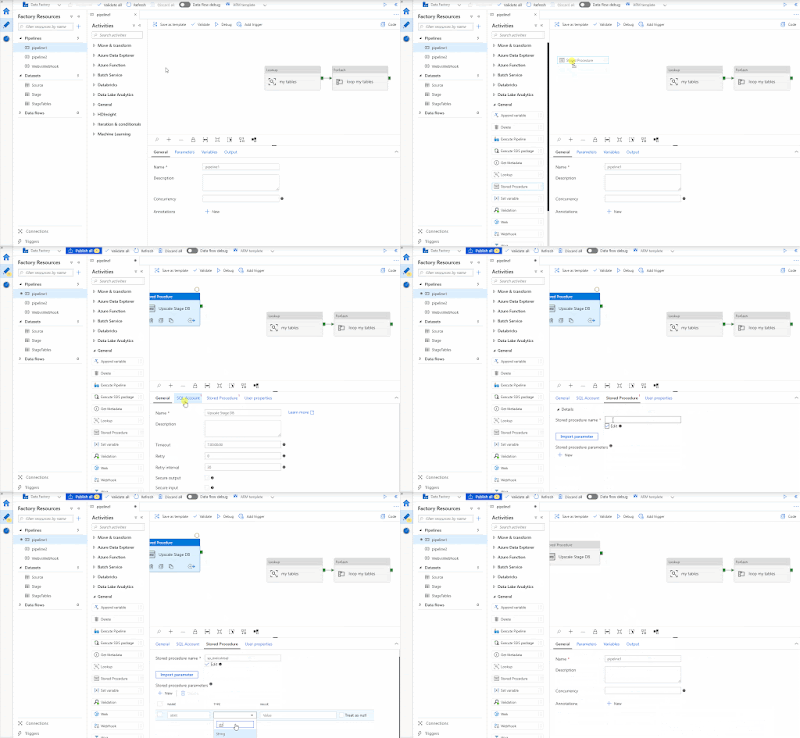
First we will add a Stored Procedure activity which executes the ALTER script from above to upscale the stage database.
  • Add the stored procedure activity in front of the existing Lookup activity
  • Give it a descriptive name: Upscale Stage DB
  • Make sure to use the same Linked service connection as your sink (Stage database)
  • Use 'sp_execute' for the Stored Procedure name
  • Add a new string parameter named 'stmt' and add the ALTER query as value (change DB name)
1
2
-- Change Pricing Tier to Standard S1 with size set to 250GB
ALTER DATABASE [Stage] MODIFY (EDITION ='Standard', SERVICE_OBJECTIVE = 'S1', MAXSIZE = 250 GB);

Upscale DB in ADF


B2) Wait for upscale to be finished
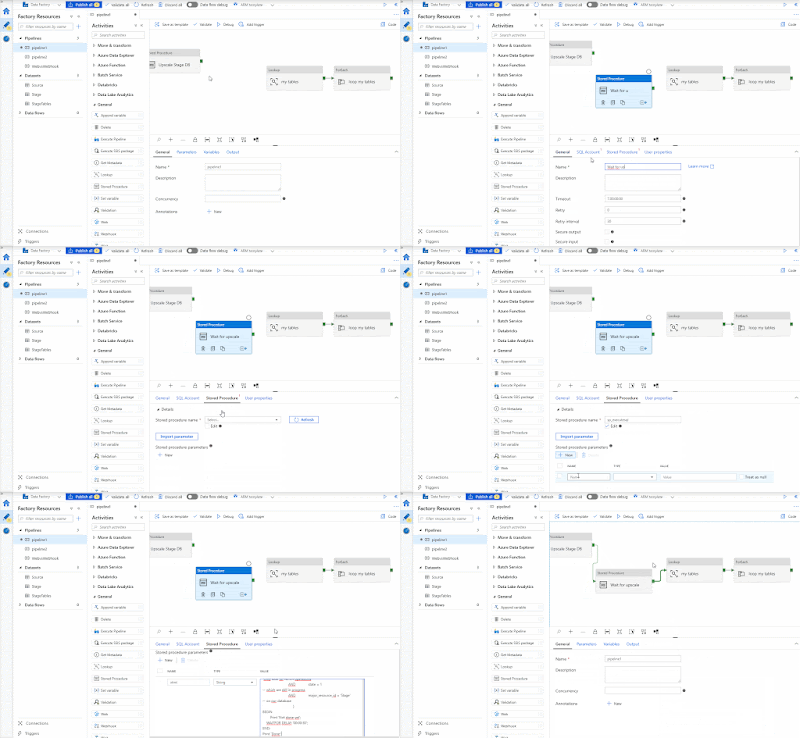
Now you want to wait until the database has been upscaled before you start the ETL because during the upscale some queries will be cancelled. For this we will execute a query on the MASTER database (because queries will be cancelled on the Stage DB). This query will check whether the view sys.dm_operation_status still has an active ALTER query on our Stage DB.
  • Add a Stored Procedure Activity between the Upscale and the Lookup
  • Give it a descriptive name: Wait for upscale
  • Use a connection to the master database as Linked Service
  • Use 'sp_execute' for the Stored Procedure name
  • Add a new string parameter named 'stmt' and add the query below as value (change DB name)
  • Connect all activities in the pipeline: Upscale => Wait => Lookup
1
2
3
4
5
6
7
8
9
10
11
-- Wait until pricing tier has changed (retry ever 30 second)
WHILE EXISTS (
    SELECT  *
    FROM    sys.dm_operation_status
    WHERE   operation = 'ALTER DATABASE' -- Only look for ALTER operations
    AND     state = 1                    -- which are still in progress
    AND     major_resource_id = 'Stage'  -- on our database
    )
BEGIN
    WAITFOR DELAY '00:00:30';
END;
Bijschrift toevoegen


B3) Downscale DB
After the foreach loop is done we can add an other Stored Procedure activity to downscale the Stage database.
  • Add the stored procedure activity after the existing ForEach activity
  • Give it a descriptive name: Downscale Stage DB
  • Make sure to use the same Linked service connection as your sink (Stage database)
  • Use 'sp_execute' for the Stored Procedure name
  • Add a new string parameter named 'stmt' and add the ALTER query as value (change DB name)
  • Connect the ForEach activity to the Downscale Acticity
1
2
-- Change Princing Tier to Basic (only when size < 2GB)
ALTER DATABASE [Stage] MODIFY (EDITION ='Basic');
Upscale, Wait, ETL and Downscale


Note: A big downside of using this method in Azure Data Factory is that you need a lot of permissions on your database. Which in most cases you don't want do give to your ETL account. In a next blog post we will show you an other alternative: Rest API.

Conclusion

In this post you learned how to change the database Pricing Tier with some simple TSQL script instead of a Powershell. Probably most suitable during development to temporarily upscale your DB to make the queries faster. But it could also be very useful to integrate the scaling in your ETL (or ELT) proces to minimize the time for a more expensive/faster database. In a next blog post we will introduce you to the Rest API which is very suitable for ADF.