Case
U-SQL has cognitive capabilities to analyse a text on sentiment. How does that work? Do I need Azure Cognitive-services?
 |
| U-SQL Cognitive Capabilities |
Solution
Good news is that you only need
Azure Data Lake (Analytics and Store) with a U-SQL job. Downside is that U-SQL does not yet have the full functionality of
Azure Cognitive Services, but all the basics are available. This blog post describes the text sentiment analysis,
but there is a second text analysis capability for Key phrases extraction which will be handled in an future post.
Please: see our blog post about Image Tagging with U-SQL in Data Lake if you have not yet installed the Cognitive Functions for U-SQL that we will be using for this post.
The starting point of this blog post is an Azure Data Lake Analytics (ADLA) that is connected to an Azure Data Lake Store (ADLS) with some texts to analyse. For this example we used a
transscript of Obama's Victory speech from 2008, but you could for example also use a
transcript of Trump's Davos speech from a few weeks ago. The text file will be stored in an ADLS folder called TextSentiment.
Text sentiment
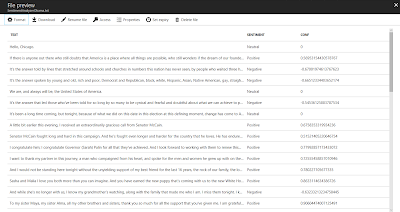
The text sentiment analysis will return two columns for each row with text. The first column is the sentiment classification: Positive, Negative or Neutral. The second column is a score between negative 1 and positive 1. Where a negative number close to -1 means it is very sure that the text is negative and vice versa where a positive number close to 1 means that it is very sure that the text is positive. This also allows you to take an average on the entire text file to get an overall score.
1) Create new job
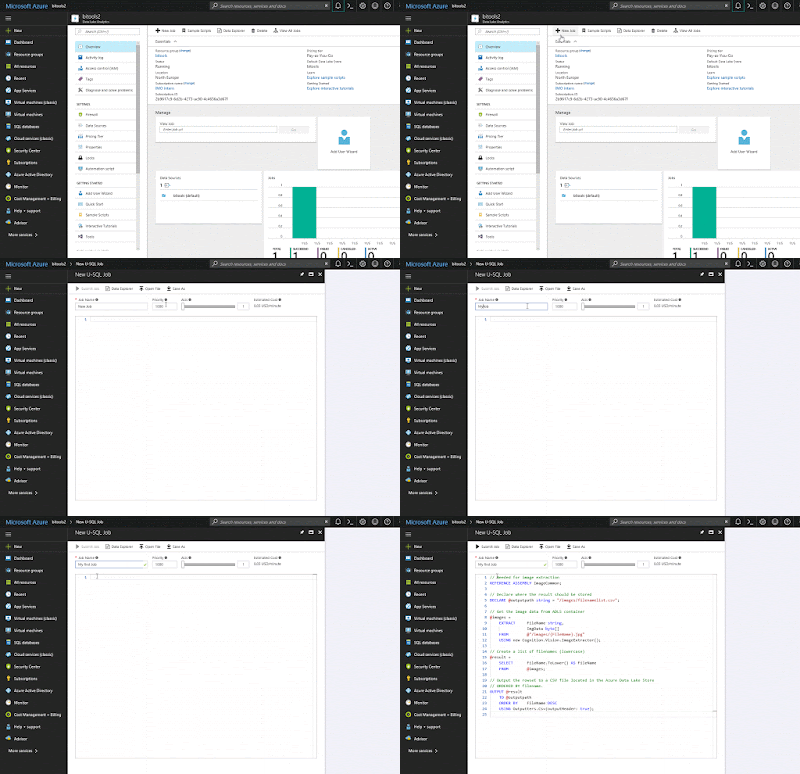
On the ADLA overview page click on
+New Job and then give it a suitable name before we start coding. A descriptive name allows you to find your script/job in the overview of all jobs.
 |
| Create new U-SQL job |
2) Referencing assemblies
The cognitive scripts in U-SQL always start with adding references. For text sentiment we need to add a reference to the assembly "TextSentiment".
// Needed for text sentiment
REFERENCE ASSEMBLY TextSentiment;
3) Extract text file
Next step is to extract the text file with the transcript from the ADLS container and store them in a rowset variable called @speech. Each row in the transcript text file contains one paragraph of text. Therefor the we will use Extractors.Text() and only one string column. We replaced the default delimiter with something that doesn't occur in the text (|-pipeline) and if it does the
silent option will ignore it and continue without throwing errors.
The extraction script looks a bit like a T-SQL SELECT statement, but because we are getting unstructured data it starts with EXTRACT instead of SELECT and we need to specify the data type for each column we extract (Schema on Read). The FROM does not get the data from a table, but from a file in the ADLS container called "TextSentiment".
// Get the transcript file from the ADLS container
@speech =
    EXTRACT Text string
    FROM @"/TextSentiment/ObamasVictorySpeechTranscript.txt"
    USING Extractors.Text(silent: true, delimiter: '|');
4) Transform data
The method that analyses the text for sentiment takes one readonly input column and three output columns: the original text, classification and confidence. The confidence column can be turned off/on with the Boolean parameter (see code). The name (or datatype) of the output columns cannot be changed.
//Analyse the text and return classification and confidence
@sentiment =
    PROCESS @speech
    PRODUCE Text,
            Sentiment string,
            Conf double
    READONLY Text
    USING new Cognition.Text.SentimentAnalyzer(true); // True adds the confidence column
5) Output data
Now we can output the data to a file in an ADLS container. In the first output we will see a score per line and in a second output we will aggregate the confidence column to get an overal score.
// Output sentiment per line
OUTPUT @sentiment
TO "/TextSentiment/SentimentAnalyzerObama.txt"
USING Outputters.Csv(outputHeader: true);

// Aggregate the Confidence to get an overall score
// Note: it doesn't take into account the length of
// each row. You can find the length with Text.Length
@average =
    SELECT AVG(Conf) AS OverallSentimentScore
    FROM @sentiment;

// Output overall score sentiment
OUTPUT @average
TO "/TextSentiment/SentimentAnalyzerObamaOverall.txt"
USING Outputters.Csv(outputHeader: true);
Download the complete script
here.
The result
Now the script is ready to run. Click on the submit button and wait for the job to finish. This could take a few moments! Then browse to the ADLS folder and preview the file to see the result.
 |
| The result with the sentiment and score per paragraph |
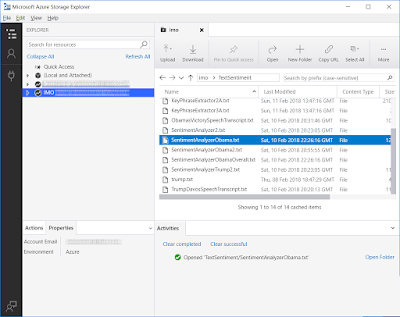
An other new options to view the result with the
Azure Storage Explorer. This new Microsoft tool allows you to browse to your storage accounts and data lake stores to download the result of your U-SQL query.
 |
| Azure Storage Explorer |
Summary
In this post you saw how to analyse texts for sentiment. Analyzing media like Twitter or Facebook or emails to/from your helpdesk is probably more interesting then speeches from presidents of the United States. Some might say that the overall score with the AVG is perhaps a bit arbitrary because it shows the confidence, but combine it with the text length and it will give some good insights on the entire text.
As said before the text sentiment in Azure Cognitive Services -
Text Analytics API has some additional options like support of multiple languages and language detection, but we will show that in a future post.


