Case
With PowerApps, Microsoft brought a new element to the existing world of reporting and dashboarding inside the Microsoft BI stack. For example, you can connect and customize your data using PowerApps. How does this work and how can you use PowerApps inside Power BI?
 |
| Power BI Marketplace - PowerApps custom visual |
Solution
Important to know is that
Microsoft PowerApps is part of Office 365. In case your organization does not have an Office 365 licence, PowerApps will cost 7 or 40 dollar per user per month. With a license, you can start building your own apps. There are more features available for an additional cost. More details about pricing
here.
In this post we want to show you how you can connect to your data and store new data in an Azure SQL Database using PowerApps. For this example, you can give as Sales Employee approval (or not) on the report. This all happens in a Power BI dashboard using PowerApps.
1) Create new PowerApp
We will build the PowerApp using the Power BI Desktop and service. First, you have to create a new report in Power BI Desktop and add the PowerApps custom visual to the report. Choose
PowerApps from the marketplace. Notice that this visual is still in Preview.
 |
| Power BI Desktop - Add PowerApps custom visual |
For our example, we will use data from
WideWorldImportersDW (Azure SQL Database) and import the "Employee" dimension and "Sales" fact table. We have implemented a number of transformations to keep only sales employees and created a 'Employee Full Name' column with values like 'Schuurman, Ricardo'. We choose the columns 'Employee Full Name' and 'Profit' in the PowerApps custom visual.
After you have published your report and opened it in the Power BI service, you will see the option
Create new. You will be redirected to the development portal of PowerApps.
 |
| Power BI Service - Create new PowerApp using custom visual |
Note:
When you create a new PowerApp using the Power BI service, a new dataset for the Power BI data will automatically be created with the name "
'PowerBIIntegration'.Data".
2) Build PowerApp
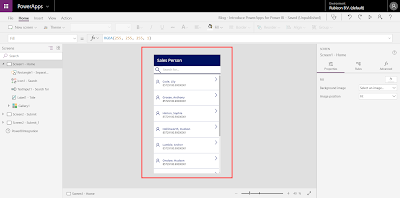
Once you are in the development portal, you can start building your app. In a next post we will fine tune the app and explain and show you several elements of the PowerApp.
 |
| PowerApps Studio - Developing the PowerApp |
Important to know is that we have created a new table in WideWorldImportersDW, called "SalesApproval".
USE [WideWorldImportersDW]

CREATE TABLE [PowerBI].[SalesApproval](
 [SalesApprovalKey] [int] IDENTITY(1,1) NOT NULL,
 [EmployeeFullName] [nvarchar](100) NULL,
 [Profit] [numeric](20, 8) NULL,
 [Approved] [nvarchar](50) NULL,
 [Comment] [nvarchar](max) NULL,
 CONSTRAINT [PK_Dimension_Employee] PRIMARY KEY CLUSTERED
(
 [SalesApprovalKey] ASC
)WITH (STATISTICS_NORECOMPUTE = OFF, IGNORE_DUP_KEY = OFF) ON [PRIMARY]
) ON [PRIMARY] TEXTIMAGE_ON [PRIMARY]
GO
In this table we will store the data we have filled with the PowerApp. Later on we will show you how to do this and which data will be stored.
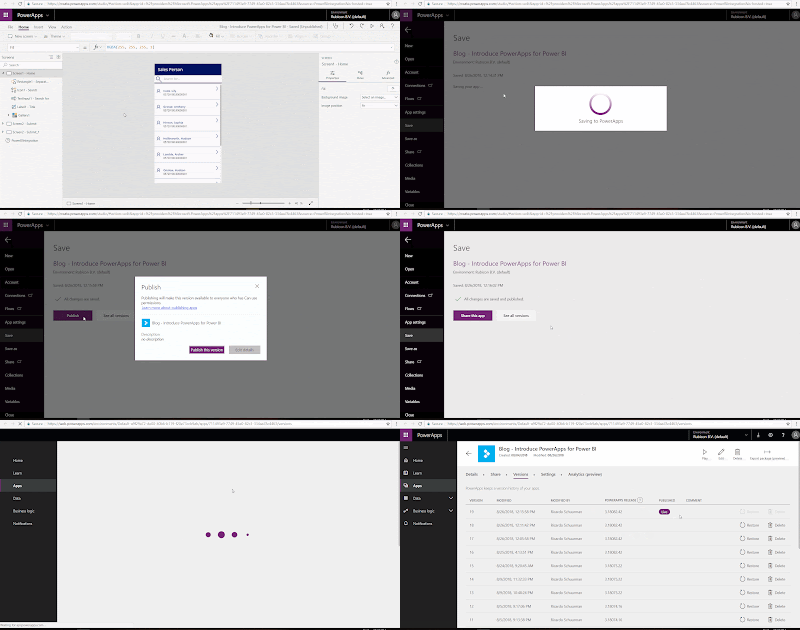
When you are done developing, you have to save and publish the PowerApp. After this, the app is live and available in several applications, such as Power BI and
Microsoft Teams.
 |
| PowerApps Studio - Publishing the PowerApp |
Note:
After saving and publishing your PowerApp it can happen that the
PowerApp is missing the Power BI data the next time you open it. To fix this, go to the Power BI service and add a new Power Apps custom visual in the report. Select the right columns (in PowerApps Data) and click on
Choose app. Add your existing app and go to the PowerApps Studio. Now your PowerApp is working again, including the Power BI data.
3) Result
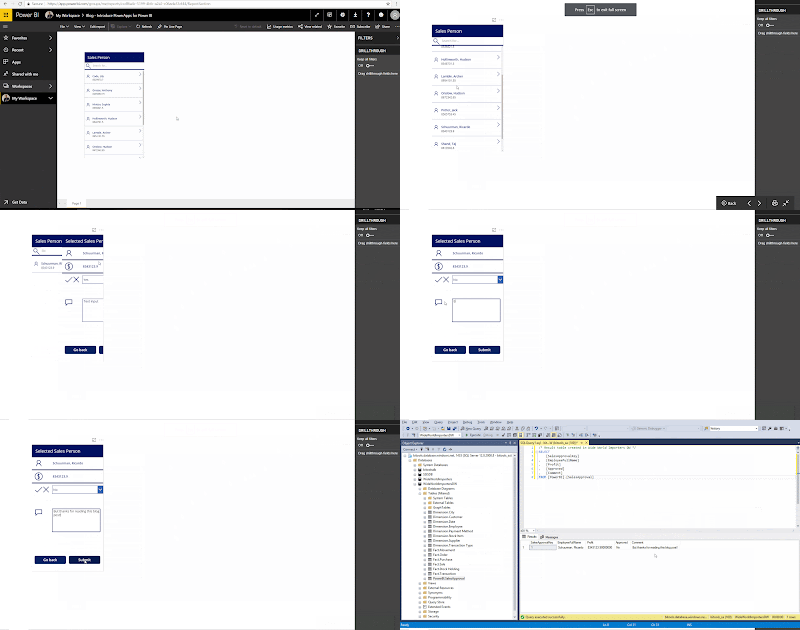
Let's see if we can use this PowerApp in Power BI and store the result in the table "SalesApproval" we created earlier. Go to the Power BI service and open the report. Search for the right sales person (this is you as sales person if this dashboard is live) and fill in the form:
Yes or
No for approval and associated comment (
Text input). Press
Submit when you are done.
Now if we look at the table in SQL Server Management, we see a new record containing the data we have filled in. Cool!
 |
| Power BI Service - Submit data in PowerApp (custom visual) and result |
You can download the Power BI report
here and the first version of the corresponding PowerApp we used for this post
here. Use the
Export (preview) and Import (preview) feature to add the app in your environment.
Note:
The Export and Import feature is still in preview. After preview, you must have PowerApps Plan 2 trial or PowerApps Plan 2 paid license for this feature.
Summary
In this post you saw how to use the PowerApps custom visual in Power BI. For this example we used PowerApps to approve (or not) a sales report and store this data in an Azure SQL Database.
In a next post we will describe and explain how this PowerApp is build. We will also customize the app to make it more user friendly.


