U-SQL has cognitive capabilities to analyse images. How do they work? Do I need Azure Cognitive-services?
 |
| U-SQL Cognitive Capabilities |
Solution
Good news is that you only need Azure Data Lake (Analytics and Store) with a U-SQL job. Downside is that U-SQL does not yet have the full functionality of Azure Cognitive Services, but all the basics are available. This blog post starts with a very simple image extraction script to explain the basics of the U-SQL cognitive functions. In the second example we will tag images to add descriptive labels to them.
In a second post we will also show how to detect faces on images and extract emotion, gender and age from them. The base of these scripts are all very similar.
Starting point
The starting point of this blog post is an Azure Data Lake Store (ADLS) with a collection of 'random' images. We have a folder called 'objects' that contains random object images which we wil use for these first two scripts.
 |
| The content of ADLS container with random google image pictures |
Create ADLA environment
To start we need to create a new Azure Data Lake Analytics (ADLA) environment and connect it to the existing ADLS with the image collection. Go to the Azure portal and click on New in the top left corner of the dashboard and locate ADLA under "Data + Analytics". Supply the basic stuff like name, subscription, resource group and location. One of the last steps is selecting the ADLS (or create a new one). Unless you have a good reason to deviate, it is wise to use the same location for ADLS and ADLA to prevent unnecessary data trafic around the world which could make your queries slower and therefore costing you extra money.
 |
| Creating new ADLA and connect it to ADLS |
Install U-SQL Extensions
To make use of the cognitive functions in U-SQL, we first need to install the extensions. Go to Sample Scripts in the menu of ADLA and then click on Install U-SQL Extensions in the header. This assembly installation takes a few minutes, but you only have to do this once per ADLA.
 |
| Install U-SQL extensions |
You can check the internal database in the Data Explorer to see which assemblies are installed. The Data Explorer button can be found on the ADLA overview page in the header.
 |
| Check which assemblies are installed |
A) Basic script
Let's start with a very basic example: Extracting image files from an ADLS container and create a CSV file with all filenames in it.
1) Create new job
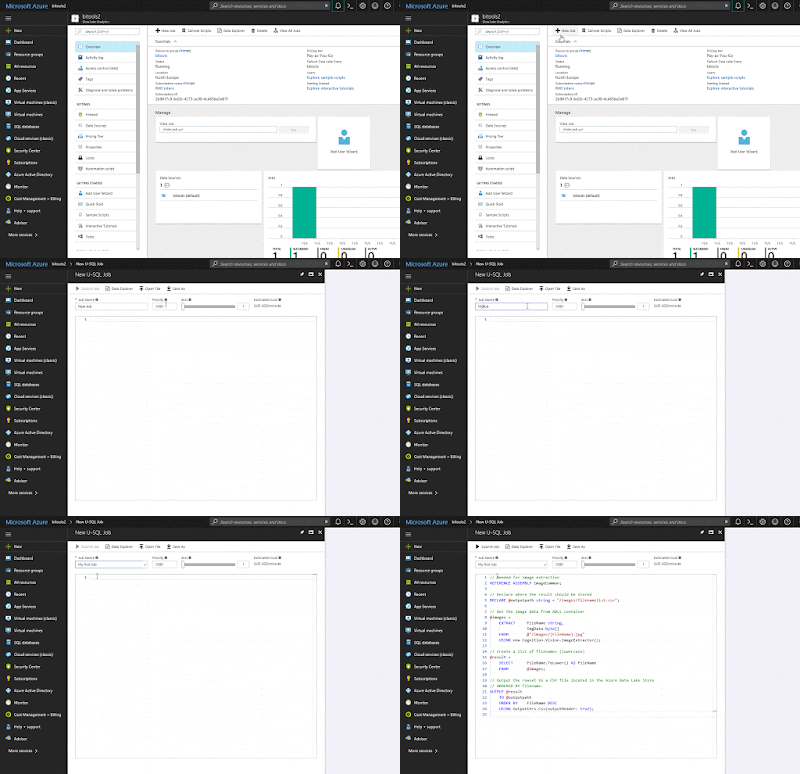
On the ADLA overview page click on +New Job and then give it a suitable name before we start coding.
 |
| Create new U-SQL job |
2) Referencing assemblies
The cognitive image scripts in U-SQL always start with adding references. For image extraction we need to add a reference to "ImageCommon".
// Needed for image extraction
REFERENCE ASSEMBLY ImageCommon;
3) Extract image files
Next step is to extract the actual files from the ADLS container and store them in a rowset variable called @images. The ImageExtractor method can only get the filename and the actual bytes of the file. The order and datatype of these columns are fixed, but you can use different column names.
It looks a bit like a T-SQL SELECT statement, but because we are getting unstructured data it starts with EXTRACT instead of SELECT and we need to specify the data type. The FROM does not get the data from a table, but from the ADLS container called "objects" and the construction with {FileName}.jpg is a wildcard to only get JPG images from that container.
// Get the image data from ADLS container
@images =
    EXTRACT     FileName string,
                ImageData byte[]
    FROM        @"/objects/{FileName}.jpg"
    USING new Cognition.Vision.ImageExtractor();
4) Transform data
For our CSV with filenames we only want to extract the filename column from the rowset variable called @images. This is done with a very simple SELECT query on the rowset variable from the previous step to extract the required data.
// Create a list of filenames
@result =
    SELECT      FileName
    FROM        @images;
You can add an ORDER BY clause, but it requires to add FETCH to specify the number of rows that you want to select and sort. By default the ORDER BY is case sensitive (just like C#). You can overcome this by adding .ToLower() after the column name.
// Create a orderd list of filenames
// Note 1: ORDER BY requires the FETCH option to supply the nummer of rows
// Note 2: ORDER BY is case sensitive. Workaround: add .ToLower()
// Note 3: ORDER BY can be moved to OUTPUT section (below TO)
@result =
    SELECT      FileName
    FROM        @images
    ORDER BY    FileName.ToLower()
    FETCH       10 ROWS;
5) Output data
Last step is to save the data in a CSV file in an ADLS container. In this example we are outputting the rowset variable @result that was created in the previous step. The outputter.csv has many options to format your CSV file, but they are all optional.
// Output the rowset to a CSV file located in the Azure Data Lake Store
OUTPUT @result
    TO "/objects/filenamelist.csv"
    USING Outputters.Csv(outputHeader: true, quoting: false);
Instead of a hardcoded path in the OUTPUT section you could also use a variable to move the hardcoded part to the top of your script.
// Declare where the result should be stored
DECLARE @outputpath string = "/objects/filenamelist.csv";

// Output the rowset to a CSV file located in the Azure Data Lake Store with variable
OUTPUT @result
    TO @outputpath
    USING Outputters.Csv();
There is an alternative place for the ORDER BY. You can also add it in the OUTPUT section right below the TO clause. It does not allow the FETCH option, which is a good thing, but it also does not allow the .ToLower() workaround (causing a case sensitive ordering). You could solve that by lowering it in the @result rowset instead.
// Create a list of filenames (lowercase)
@result =
    SELECT      FileName.ToLower() AS FileName
    FROM        @images;

// Output the rowset to a CSV file located in the Azure Data Lake Store
// ORDERED BY filename descending.
OUTPUT @result
    TO "/objects/filenamelist.csv"
    ORDER BY    FileName DESC
    USING Outputters.Csv(outputHeader: true);
Download the complete script here.6) Run Job
Now the script is ready to run. To improve the performance we increase the AUs a little bit, but this increases the costs. In a later post the optimal settings will be explained. Then click on the submit button and wait for the job to finish. This could take a few moments!
 |
| Running the job (not the actual speed) |
7) The result
When the job has finished you can preview the result file in ADLS. Use the Data Explorer to browse to the folder and then preview the generated CSV file.
 |
| Preview result in Data Explorer |
B) Tagging script
Image tagging means that it will scan the images and add descriptive words to it including a probability rate to show you how certain it is about that particular word. If you have a picture of someone cycling in the mountains then it will add words like bicycle, mountain, outdoor, person, sky.
 |
| Example |
Referencing assemblies
For image tagging we need one extra reference called "ImageTagging".
// Needed for image extraction and tagging
REFERENCE ASSEMBLY ImageCommon;
REFERENCE ASSEMBLY ImageTagging;
Extract image files
This is the same code as in the previous example to extract image files from an ADLS container.
// Get the image data from ADLS container
@images =
    EXTRACT     FileName string,
                ImgData byte[]
    FROM        @"/objects/{FileName}.jpg"
    USING new Cognition.Vision.ImageExtractor();
Transform data
Tagging the images is a two step action where it first adds (zero, one or) multiple tags and the probability in value pairs. The second step is to convert all those value pairs to a string which we can export. It also shows the number of tags added.
// Process the images and add multiple tag pairs (tag and probability rate)
// NumObjects contains the number of tag pairs added to the image
@tags =
    PROCESS  @images
    PRODUCE  FileName,
             NumObjects int,
             Tags SQL.MAP<string, float?>
    READONLY FileName
    USING new Cognition.Vision.ImageTagger();

// We need to convert the tagpairs to a string which we can export
// The string will look like: bicycle:0.9998484;outdoor:0.9164549;transport:0.7914466
@tags_serialized =
    SELECT  FileName.ToLower() AS FileName,
    NumObjects AS TagsCount,
    String.Join(",", Tags.Select(x => String.Format("{0}:{1}", x.Key, x.Value))) AS TagsString
    FROM  @tags;
Output data
This is the same code as in the previous example to output the filename and tags to a file in an ADLS container. Only the variablename and filename did change.
// Output the rowset to a CSV file located in the Azure Data Lake Store
OUTPUT @tags_serialized
    TO "/objects/tagging.csv"
    ORDER BY    FileName
    USING Outputters.Csv(outputHeader: true);
Download the complete script here.The result
Now the script is ready to run. Click on the submit button and wait for the job to finish. Again, this could take a few moments! Then browse to the ADLS folder and preview the file to see the result.
 |
| The result with in red the cyclist from above |
Note:
The tagging in Azure Cognitive Services - Computer vision API has some additional options, but we will show that in a future post.
Summary
In this post you saw how to extract images from ADLS and process them with U-SQL in ADLA. We also showed how tagging of images works and in the next post we will handle the scanning of faces for emotions, gender and age. If you want to try these scripts your self, then you can only do that in the Azure portal. The U-SQL projects for Visual Studio do not yet support these extensions.