Recently Microsoft introduced a new feature for Azure Data Factory (ADF) called Mapping Data Flows. This allows you to do data transformations without writing and maintaining code. Similar to SSIS, but then in the Cloud. How can we use Mapping Data Flows to build an incremental load?
First, it is good to know that Mapping Data Flows is not the only feature that is part of "Data Flows". Microsoft announced also Wrangling Data Flows. The main difference between these two features is that Mapping Data Flows is more traditional "ETL" with a known source and destination, while Wrangling Data Flows is suited for preparing data and store this dataset in Azure Data Lake for example. From here, it can be used as input for Machine Learning or doing transformations later on. Currently it is in Limited Private Preview. In a future post we will explain more about Wrangling Data Flows and show you how it actually works.
In this post we are going to set up an incremental load for a Data Warehouse (DWH) scenario using Mapping Data Flows. We want to load our Staging layer incremental. We use a so-called Watermark for this. An example of a watermark is a column that contains the last modified time or id. We already configured an Azure Data Factory and we are using an Azure SQL Database with sample data from WideWorldImporters. We use the "Orders" table.
Note:
Here you will find an tutorial of an incremental load using an ADF pipeline with several activities.
1) Create table for watermark(s)
First we create a table that stores the watermark values of all the tables that are suited for an incremental load. The table contains the following columns:
--Create Watermark table
CREATE TABLE [dbo].[WatermarkTable](
 [WatermarkTableName] [nvarchar](255) NULL
, [WatermarkColumn] [nvarchar](255) NULL
, [WatermarkValue] [nvarchar](255) NULL
) ON [PRIMARY]
GO
2) Fill watermark table
Add the appropriate table, column and value to the watermark table. The value must be the last loaded date or id. This is a one-time insert, because after this the watermark value will be updated after each load. In our case the table contains the following record:
 |
| Azure SQL Database - Watermark value for Orders |
3) Create Linked Service
Before we can start building the Data Flow, we first have to make a connection with our database. Go to Connections and click on 'New'. Select Azure SQL Database and give it a suitable name. Select your Azure subscription and then select the correct server, database and fill in the credentials.
 |
| Azure Data Factory - Create Linked Service |
4) Create Data Flow
Now lets build the Data Flow itself. Click on Add Data Flow and give it a suitable name. Important to know is that you can test your Data Flow components by turning on the Data Flow Debug mode. Be aware of the costs, because it will spin up a Databricks cluster and that is hourly billed. More information about the debug mode here.
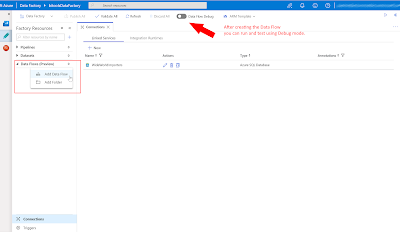 |
| Azure Data Factory - Create Data Flow |
Note:
After creating the Data Flow, we can only save it by adding at least one source and one sink.
The goal of this Data Flow is to include only data from the source table / query that is greater then the watermark value that is stored from the previous load. Below we will explain each component of this flow individually.
Source 1: source table / query
In this Data Flow the first source is the source table / query. Click on "Add Source", give it a suitable name and click on new "Source dataset". Select "Azure SQL Database" and select the Linked Service we created earlier. Now go back to the source and click on "Source Options". Select "Query" and write the query. Click on "Import Schema" and at last we can preview our data. We have turned on the Debug mode to import the schema and preview the data.
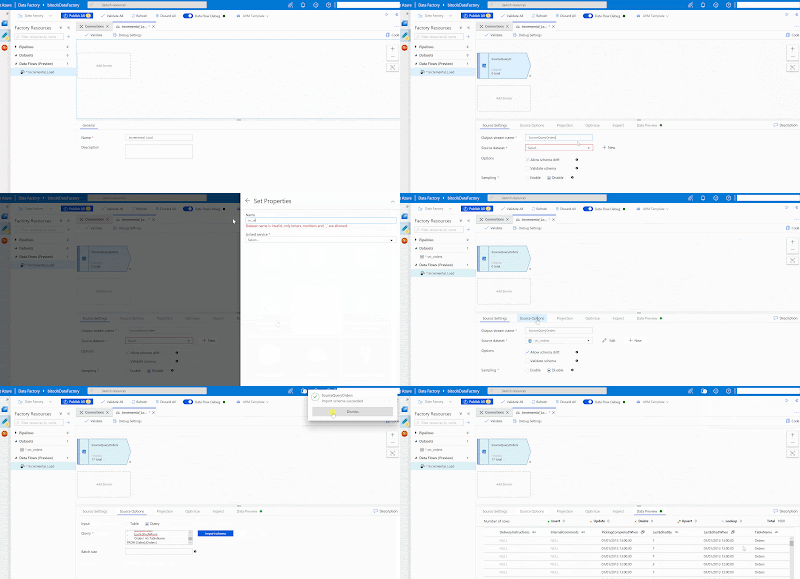 |
| Azure Data Factory - Add Source in Data Flows |
We used the following query. As you can see, we added a column that contains the table name from which we want to retrieve the watermark value.
--Create source query
SELECT
 [OrderID]
, [CustomerID]
, [SalespersonPersonID]
, [PickedByPersonID]
, [ContactPersonID]
, [BackorderOrderID]
, [OrderDate]
, [ExpectedDeliveryDate]
, [CustomerPurchaseOrderNumber]
, [IsUndersupplyBackordered]
, [Comments]
, [DeliveryInstructions]
, [InternalComments]
, [PickingCompletedWhen]
, [LastEditedBy]
, [LastEditedWhen]
, 'Orders' AS TableName
FROM [Sales].[Orders]
Source 2: watermark table
This source contains a simple query of the watermark table. The setup is the same as source 1, only with a different query. Later on we will make sure we only select the watermark value from the correct table in the watermark table (with a Join).
--Create watermark table query
SELECT
 [WatermarkTableName]
, [WatermarkColumn]
, [WatermarkValue]
FROM [dbo].[WatermarkTable]
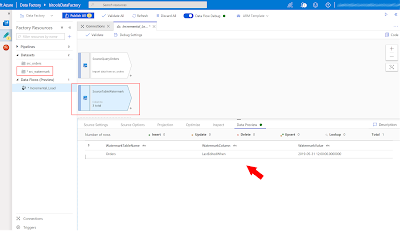 |
| Azure Data Factory - Source WatermarkTable |
Derived Column
It can occur that the watermark values has different datatypes. That is why we use the 'nvarchar' datatype to store the values. In this case the watermark is a 'datetime' and we have to convert this to make a successful join to the watermark table. We use the expression language of Mapping Data Flow for this, more information here.
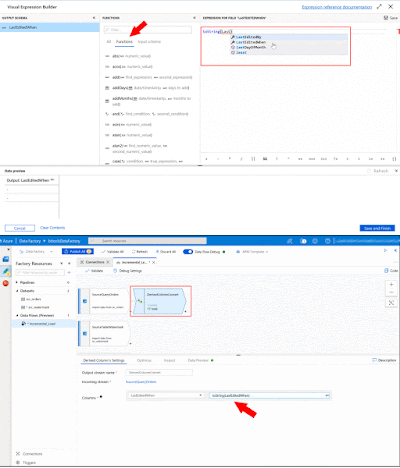 |
| Azure Data Factory - Use Mapping Data Flow expression language |
Join
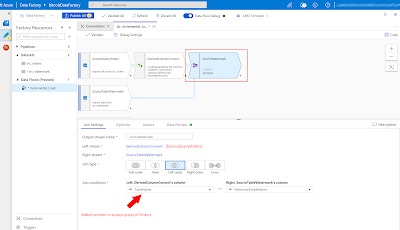
We use a join to combine data from different sources. We can choose between 'Full outer', 'Inner', 'Left outer', 'Right outer' or a 'Cross' join. Here we want to make sure that the watermark value of the specific table is used for the incremental load. We use a 'Left outer', but you can also use a 'Inner' here because all the records contain the same table. A join on watermark table is more future proof, because a join on the watermark column is not going to work when you have multiple watermark tables with the same watermark column name.
 |
| Azure Data Factory - Use Join component |
Filter
Because you can only use the "Join" component with two columns that are equal to each other, we use "Filter" to include only the records where the watermark value from the source table / query is greater then the latest watermark value.
 |
| Azure Data Factory - Filter out old records |
Select
In SSIS you can map the columns from source to destination in the destination. If you do not want to load a column, you do not map it. Here we have to use the "Select" component to select the relevant columns. Thank you Ronny Albouts for mention this.
 |
| Azure Data Factory - Map or unmap columns |
Derived Column 2
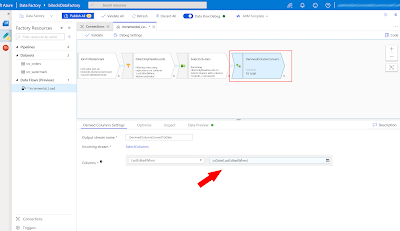
Before we choose the destination, we will convert the column"LastEditedWhen" back to a date using a new "Derived Column" component. Otherwise we cannot map this column with the 'Orders_Incremental' table, because we use the original table definition of 'Orders' and here the datatype is a date (time).
 |
| Azure Data Factory - Convert back to date before Sink |
Sink
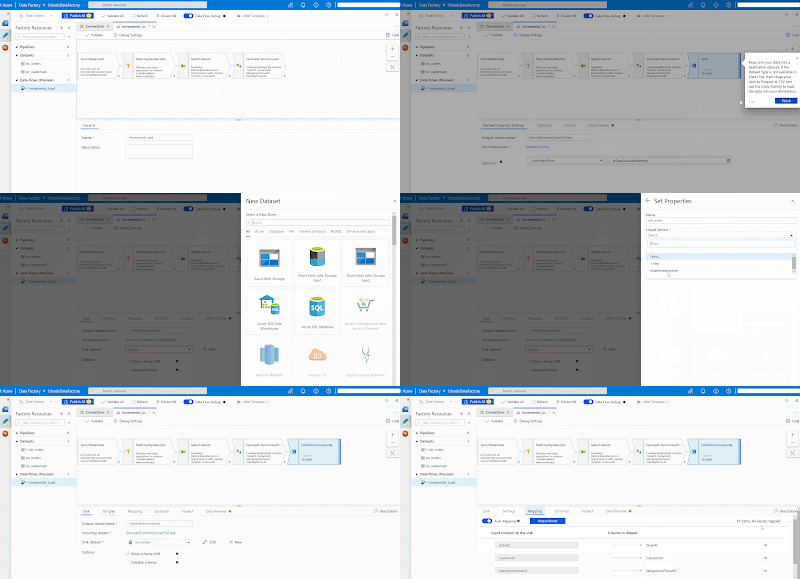
In ADF a destination is called "Sink". Here we will select our destination table called "Orders_Incremental". The table definition is the same as "Orders". Create the Sink dataset and automatically the columns will map. You can turn off 'Auto Mapping' to make manual changes.
 |
| Azure Data Factory - Add Sink in Data Flows |
Note:
If the destination type is not available, you can store the data into CSV format or Blob Storage and use a Copy Activity to load the data in your preferred destination.
Result
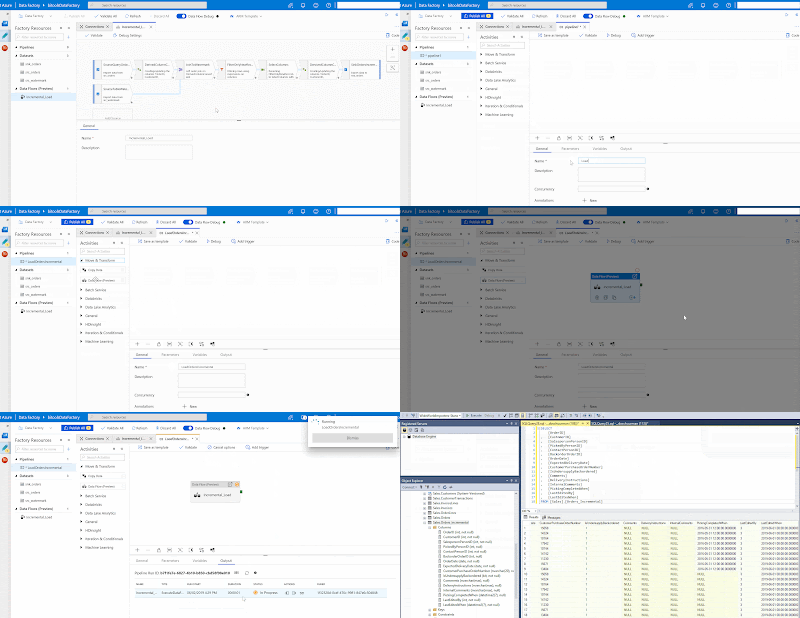
After the Data Flow is ready, go back to "Pipelines" and create a new one. In here we will select the Data Flow activity and select the Data Flow we have created earlier. Now run the pipeline and let's take a look at the result, it is working!
 |
| SQL Server Management Studio - Result of Incremental Load |
To make it as generic as possible, it is prefered to use the "Derived Column" component to add a new column (similar to SSIS). In this way you will keep the source query 'clean'. Unfortunately this is not working at the moment and Microsoft is investigating this issue.
Update Watermark
At last we have to update the watermark value to the last known value, in this case the date of "LastEditedWhen". Therefore we will use the following simple Stored Procedure.
/* Create Stored Procedure */
CREATE PROCEDURE [dbo].[usp_UpdateWatermark]
 @tableName nvarchar(255)

AS

BEGIN

 DECLARE
 /* ============= Variables ============= */
  @watermarkValue  nvarchar(255)

 /* Determine latest Watermark value from input table */
 SELECT
  @watermarkValue = MAX([LastEditedWhen])
 FROM [Sales].[Orders_Incremental] AS T

 /* Update Watermark table */
 UPDATE [dbo].[WatermarkTable]
 SET  [WatermarkValue]  = @watermarkValue
 WHERE [WatermarkTableName] = @tableName

END
GO
Add the Stored Procedure activity at the end of the pipeline. The result should look like this.
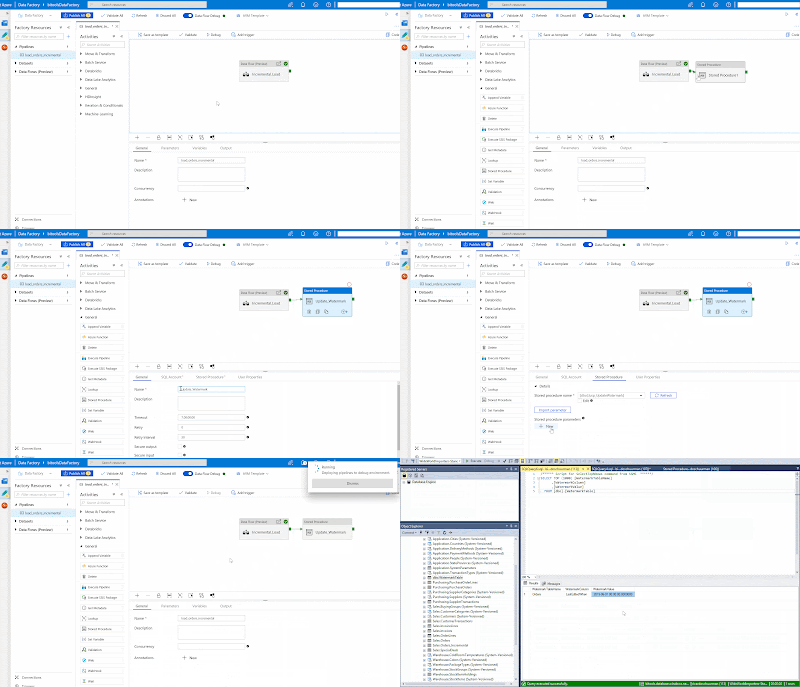 |
| Azure Data Factory - Update Watermark using SP |
As you can see the T-SQL is hard coded. In a next post we will show you how to setup a dynamic pipeline so that you can reuse the Stored Procedure activity for every table in an Incremental Load batch.
Conclusion
In this post we showed you how to create an incremental load scenario for your Data Warehouse using Mapping Data Flows inside Azure Data Factory. With Mapping Data Flows, you can transform and clean up your data like a traditional ETL tool (SSIS).
This is just the beginning of Mapping Data Flows, we will expect more and more functions to make this grow into the new "SSIS in the cloud".
