How do you write and execute PowerShell code in Azure?
 |
| Azure Automation PowerShell Runbook |
Solution
There are several options to execute PowerShell code in Azure. For example in an Azure Function or in an Azure DevOps pipeline. This post shows you how to write and execute PowerShell code in an Azure Automation Runbook. Other blog posts with PowerShell solutions for DWH projects will link to this blogpost (to don't repeat ourselves). You can find them here.
Note: the screenshots and animated gifs could be slightly outdated on the next layout change of the Azure portal, but we will try to occasionally update those.
1) Create Azure Automation Account
1) Create Azure Automation Account
To create a PowerShell runbook we first we need to create an Automation Account. If you already have one with the Run As Account enabled then you can skip this step. The Run As Account allows you to login and easily interact with other Azure Services.
- Go to the Azure portal and create a new resource
- Search for automation
- Select Automation Account
- Choose a useful name for the Automation Account (it will probably host multiple runbooks)
- Select your Subscription, Resource Group and the Region
- Most examples will use the Azure Run As account. So make sure to enable it and then click on the Create button.
 |
| Create Azure Automation Account |
2) Add Modules
Before you start writing code you often first need to add some PowerShell modules to your Azure Automation Account. For this example we will add a PowerShell module called Az.Sql which for example is used to up- and downscale Azure SQL databases. Note that modules often depend on other modules like this one depends on Az.Accounts. Make sure to add those modules first, but you will be notified if an other module is required. Try to avoid the outdated AzureRm modules and use the Az modules instead (you cannot mix them).If you forget this step you will get error messages while running your code that state that some of your commands are not recognized:
Get-AzSqlDatabase : The term 'Get-AzSqlDatabase' is not recognized as the name of a cmdlet, function, script
file, or operable program. Check the spelling of the name, or if a path was included, verify that the path is correct
and try again.
- Go to the newly created Azure Automation Account
- Go to Modules in the left menu
- Click on the Browse Gallery button
- Search for Az.Accounts
- Click on Az.Accounts in the result and import this module
- Also search for Az.Sql (but wait until Az.Accounts is actually imported)
- Click on Az.Sql in the result and import this module
 |
| Adding a new module to your Automation Account |
Note: if you are using an existing Automation Account then you probably already added Az.Accounts, but you might need to update it to a newer version.
2b) Update Modules
Sometimes you need to update one or more modules within your automation account. Not sure why, but unfortunately the removed this option from the Azure Automation gui! More information here. The new way is to import PowerShell code to a new runbook and then run that runbook to update all your modules (or manually delete all the modules one by one and then add them again).
- Go to github and click on the little triangle on the Code button to download the zip file
- Unzip the downloaded file
- Go to runbooks and click on Import a runbook
- Import the local file Update-AutomationAzureModulesForAccount.ps1
- Give the runbook a description (Name and Runbook type are automatically populated)
- Edit the runbook and hit the testpanel
- Enter values for the parameters, besides ResourceGroupName and AutomationAccountName fill in the AzureModuleClass with Az (default value is AzureRm)
- Hit the start button and check
 |
| Update all modules |
3) Create Runbook
Now we are ready to create a PowerShell runbook in the newly created Azure Automation Account and start writing some PowerShell code.- Go back to the overview page of your newly created Azure Automation Account
- Click on Runbooks in the left menu
- Click on the + Create a runbook button to create a new Runbook
- Enter a descriptive name for the Runbook like UpDownScaleDb
- Select PowerShell as Runbook type
- Add a short description to explain the purpose your code and click on the Create button
 |
| Create PowerShell Runbook |
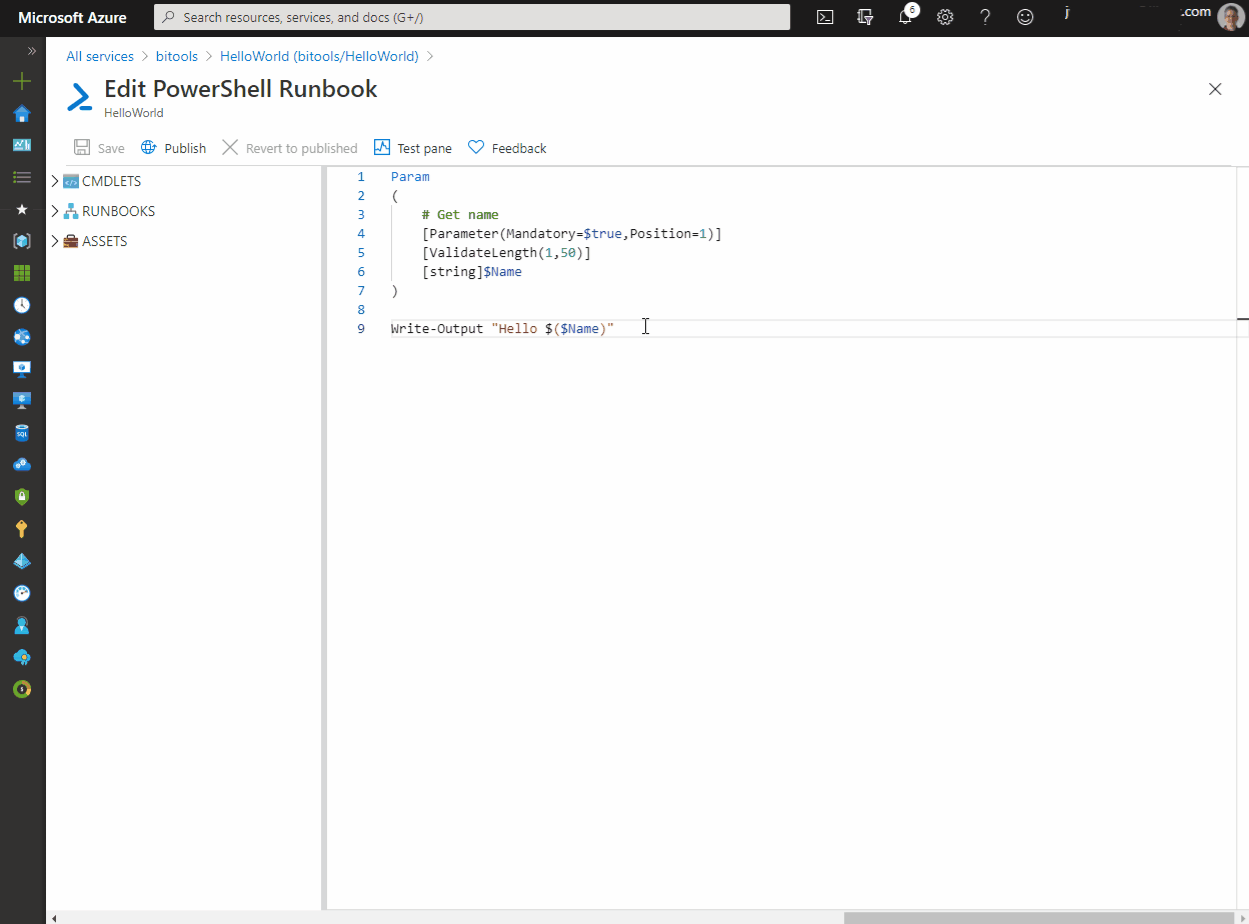
4) Edit Runbook code
Next edit the new Runbook if it wasn't already opened by the previous step and start writing (or pasting) code in the editor. It often exists of three parts: Parameters, Login and the actual code. Make sure not to store secrets in you code, but use Azure Key Vault instead. Want to send a notification from within your runbook, then use SendGrid.# PowerShell example code for testing
Param
(
# Get your name
[Parameter(Mandatory=$true,Position=1)]
[ValidateLength(1,50)]
[string]$Name
)
Write-Output "Hello $($Name)"
5) Testing
It is often easier to write and test the main code first in PowerShell ISE or Visual Studio Code on your local machine which is much faster and easier to debug. But to test the complete code including parameters and the login you can test your code within the runbook editor. Note that it can take over a minute before the code executes since it will first enter an execution queue.- Click on the Test pane button above your script.
- Then optionally fill in the parameter values on the left side
- And then hit the Start button to execute the script.
 |
| Testing your runbook |
6) Scheduling Runbook
If you want to schedule the execution of your runbook in Azure Automation you first need to publish it via the Runbook editor. After it has been published you can add a schedule to this runbook.- Edit the script in the runbook editor
- Click on publish (the editor will close and you will be redirected to the overview page)
- In the overview page click on Link to schedule
- In the Schedule menu you can select an existing schedule or create a new one
- In the Parameter menu you can provide the value for the parameters
 |
| Add schedule to runbook |
7) Add Webhook
If you don't want to schedule your Runbook, but call it from an other service like Azure Data Factory, you have to create a Webhook for ADF.
Make sure to choose a correct expire date. By default it is only valid for one year. Also make sure to copy the URL, because you can only see and copy it once. You need this URL in ADF for the Web(hook) activity. Don't share the URL because it is a URL and Password in one.
 |
| Adding a Webhook to a Runbook |
Summary
In this post a general explanation on how to create and use an Azure Automation PowerShell Runbook. The real solutions are available here and from now on those posts about Azure Automation will link to this post for the general steps.
No comments:
Post a Comment
All comments will be verified first to avoid URL spammers. यूआरएल स्पैमर से बचने के लिए सभी टिप्पणियों को पहले सत्यापित किया जाएगा।