Showing posts with label SQLSERVER. Show all posts

Saturday, 12 November 2022

Deploy Azure SQL Databases via a DevOps pipeline

Case
A while ago we did a post about deploying an Azure SQL Database via Azure DevOps using the deployment pipelines. Since that post we mostley used YAML pipelines. So in this post an update on how to accomplish the same with a YAML pipeline.
Deploy Azure SQL DB with DevOps


Solution
The starting point of this post is that you have a Visual Studio database project connected to the DevOps repository.

1) Variable Groups
First we start with some variable groups to parameterize the YAML code. For this example we have one General variable group with variables like the (visual studio) projectname, databasename and service connection (if each environment uses the same service connection). Then there are also variable groups per environment (Development, Test, Acceptance, Production) with variables like the SQL Server name and service connection (if each environment uses a different service connection).
Pipelines > Library > Variable Groups


Whether you need a variable group for DEV depends on how you do your SQL development. Some teams do the development in the central development database and use the compare option in Visual Studio to update the SQL project. In that case you don't want to deploy the project to the DEV database.
Example of variables in variable groups


2) Environments
Second preparation step is the creation of enviroments. This allows you to add approvals and checks for specific environments. You probably want some approvals before you update your production environment. You can reuse these environments for other deployments like ADF, Synapse or Power BI.

Pipelines > Environments


Same note about the DEV environment as in the previous step. If you don't deploy to DEV then you don't need the 'Devploy to DEV' environment.

3) Repos folder structure
Our folder structure in the repos is as follows (if you use a different structure you need to adjust the YAML to it). We have a SQL folder with a subfolder for our Visual Studio database project. The name of the project/folder is stored in the variable group (see step 1). We also have a CICD folder in the root where we store everything that is deployment related. For SQL deployment we only have a subfolder called YAML for the pipelines, but for other deployments we also have a subfolder for PowerShell scripts.
Folder structure of repos


In the YAML folder we have a BuildSQL.yml and this is the main pipeline file that you will be using to add a new pipeline. It calls DeploySQL.yml once for each environment.

4) Build pipeline
Lets explain the YAML of the build pipeline. It first starts by adding the general variable group to the pipeline so that you are able to use those variables from step 1.

Next is the trigger that shows you when the pipeline will be started. In this example it listens to changes in multiple branches, but only when those changes happen in the SQL folder. This part will be different per branche strategy.

Then we have the stages. The first stage is de build stage where the artifact is created and published for later use. In the Job part we have two noteworthy items: workspace clean will first clean your agent before starting. This is handy if you have a self-hosted agent instead of a Microsoft hosted agent. The agent pool that will be used is the second important part. Name is voor self-hosted agents and vmImage is for Microsoft hosted agents.

Then the steps withing the first stage.
  1. Checkout will retrieve the repository content to your agent. We need the visual studio project on the agent to build it.
  2. The treeview step is an optional debug step to show you where the files are on your agent after the checkout. It makes it easier to specify the paths in the next steps. You can remove it or comment it out when your are ready with your pipeline.
  3. The MSBuild step will build your SQL project and create a dacpac file which you need for deployment. This is equals to building your project within Visual Studio. If you have a self-hosted agent you will need to either install Visual Studio or msbuild on your VM.
  4. The Copy step copies the generated dacpac file to a stage folder, but also copies the publish file with settings for publishing your project.
  5. The last step is to publish the copied files as an artifact
The last stages of this YAML file are copies of each other and then slitly changed for the enviroment specific settings. You can add or remove stages if you have more or less environments.

In these stages you first see that the environment specific variable group is added to the pipeline and it shows which agent will be used for the deployment. If your Azure SQL server only uses private endpoints then the self-hosted agent is required because the Microsoft hosted agents won't be able to connect to your server.

The condition part in this example is optional and depends on the branch strategy. Remove that line if you don't use multiple branches for deployment. The last part of these stages is calling the second YAML file and passing values from the specifi variable group as parameters to the second YAML file.

###################################
# General Variables
###################################
variables:
  - group: SQLParamsGen


###################################
# When to create a pipeline run
###################################
trigger:
  branches:
    include:
    - Development
    - Acceptance
    - main
  paths:
    include:
    - SQL/*

stages:
###################################
# Create DacPac Artifcat
###################################
- stage: CreateSQLArtifact
  displayName: Create SQL Artifact (dacpac)

  jobs:
  - job: Job
    displayName: 'Build DacPac'
    workspace:
      clean: all
    pool:
      name: DataPlatform
      # vmImage: 'windows-latest' 
    steps:

    ###################################
    # 1 Retrieve Repository
    ###################################
    - checkout: self
      displayName: '1 Retrieve Repository'
      clean: true

    ###################################
    # 2 Show treeview of agent
    ###################################
    - powershell: |
        Write-Output "Dit is de tree omgeving"
        tree "$(Pipeline.Workspace)" /F
      displayName: '3 Treeview Workspace and ArmTemplateOutput content '

    ###################################
    # 3 Build Visual Studio project
    ###################################
    - task: MSBuild@1
      displayName: '3. Creating Artifact'
      inputs:
        solution: '$(System.DefaultWorkingDirectory)/SQL/$(SqlProjectName)/$(SqlProjectName).sqlproj'
        msbuildArchitecture: x86
        msbuildVersion: latest

    ###################################
    # 4 Stage dacpac and publish
    ###################################
    - task: CopyFiles@2
      displayName: '4. Copy Artifact'
      inputs:
        contents: |
          **\*.dacpac
          **\*.publish.xml
        TargetFolder: '$(build.artifactstagingdirectory)'

    ###################################
    # 5 Publish dacpac and xml artifact
    ###################################
    - task: PublishPipelineArtifact@1
      displayName: '5. Publish Artifact'
      inputs:
        targetPath: '$(Build.ArtifactStagingDirectory)'
        artifact: 'SQL_Dacpac'
        publishLocation: 'pipeline'


###################################
# Deploy Dev environment
###################################
- stage: DeployDev
  displayName: Deploy DEV
  variables:
    - group: SQLParamsDev
  pool:
    name: DataPlatform
    # vmImage: 'windows-latest'
  condition: eq(variables['Build.SourceBranchName'], 'Development')
  jobs:
    - template: DeploySQL.yml
      parameters:
        env: DEV
        ServiceConnection: $(ServiceConnection)
        SqlServerName: $(SqlServerName)
        SqlDatabaseName: $(SqlDatabaseName)
        SqlProjectName: $(SqlProjectName)


###################################
# Deploy Acc environment
###################################
- stage: DeployAcc
  displayName: Deploy ACC
  variables:
    - group: SQLParamsAcc
  pool:
    name: DataPlatform
    # vmImage: 'windows-latest'
  condition: eq(variables['Build.SourceBranchName'], 'Acceptance')
  jobs:
    - template: DeploySQL.yml
      parameters:
        env: ACC
        ServiceConnection: $(ServiceConnection)
        SqlServerName: $(SqlServerName)
        SqlDatabaseName: $(SqlDatabaseName)
        SqlProjectName: $(SqlProjectName)


###################################
# Deploy Prd environment
###################################
- stage: DeployPrd
  displayName: Deploy PRD
  variables:
    - group: SQLParamsPrd
  pool:
    name: DataPlatform
    # vmImage: 'windows-latest'
  condition: eq(variables['Build.SourceBranchName'], 'Main')
  jobs:
    - template: DeploySQL.yml
      parameters:
        env: PRD
        ServiceConnection: $(ServiceConnection)
        SqlServerName: $(SqlServerName)
        SqlDatabaseName: $(SqlDatabaseName)
        SqlProjectName: $(SqlProjectName)
5) Deploy pipeline
The second YAML file does the deployment of the dacpac to your Azure SQL Database. It starts with the YAML parameters. You can specify allowed values or default values for your parameters.

The job part specifies which enviroment you want to use (see step 2) and then the steps of the deployment:
  1. The checkout retrieves to files from the repos to the agent. For this example it is not necessary, but if you perform some extra steps like executing a PowerShell then you need this to get the PowerShell file to your agent.
  2. The treeview step is an optional debug step to show you where the artifact files are on your agent. You can remove it or comment it out when you don't need it anymore.
  3. The SqlAzureDacpacDeployment@1 is the actual deployment step for the dacpac and it also adds the publish profile file. If you don't use a publish profile then remove that line. Note that if you are using a self-hosted agent then you need to install SqlPackage.exe on that VM for this step.
###################################
# Parameters
###################################
parameters:
  - name: env
    displayName: Enviroment
    type: string
    values: 
    - DEV
    - ACC
    - PRD
  - name: ServiceConnection
    displayName: Service Connection
    type: string
  - name: SqlServerName
    displayName: Sql Server Name
    type: string
  - name: SqlDatabaseName
    displayName: Sql Server Name
    type: string
  - name: SqlProjectName
    displayName: Sql Project Name
    type: string


jobs:
  - deployment: deploymentjob${{ parameters.env }}
    displayName: Deployment Job ${{ parameters.env }} 
    environment: Deploy to ${{ parameters.env }}
    strategy:
      runOnce:
        deploy:
          steps:
          ###################################
          # 1 Check out repository to agent
          ###################################
          - checkout: self
            displayName: '1 Retrieve Repository'
            clean: true 
 
          ###################################
          # 2 Show environment and treeview
          ###################################
          - powershell: |
              Write-Output "Deploying ${{ parameters.SqlProjectName }} to DB ${{ parameters.SqlDatabaseName }} and server ${{ parameters.SqlServerName }} in the ${{ parameters.env }} environment"
              tree "$(Pipeline.Workspace)" /F
            displayName: '2 Show environment and treeview Pipeline_Workspace'

          ###################################
          # 3 Deploy DacPac
          ###################################             
          - task: SqlAzureDacpacDeployment@1
            displayName: '3 Deploy DacPac' 
            inputs:
              azureSubscription: '${{ parameters.ServiceConnection }}'
              AuthenticationType: 'servicePrincipal'
              ServerName: '${{ parameters.SqlServerName }}.database.windows.net'
              DatabaseName: '${{ parameters.SqlDatabaseName }}' 
              deployType: 'DacpacTask'
              DeploymentAction: 'Publish'
              DacpacFile: '$(Pipeline.Workspace)/SQL_Dacpac/SQL/${{ parameters.SqlProjectName }}/bin/debug/${{ parameters.SqlProjectName }}.dacpac'
              PublishProfile: '$(Pipeline.Workspace)/SQL_Dacpac/SQL/${{ parameters.SqlProjectName }}/${{ parameters.SqlProjectName }}.publish.xml'
              IpDetectionMethod: 'AutoDetect'


6) Azure DevOps Service Connection
Make sure you have a DevOps Service Connection (type Azure Resource Manager) and also make sure that your Azure SQL Server uses Azure Active Directory authentication (see your server in the Azure Portal and then go to Azure Active Directory in the left menu to check it).
Azure DevOps Project Service Connection


The Service Principal behind this Service Connection should be either a member of the Azure Active Directory group that is specified under Azure Active Directory admin on that page or...
Azure Active Directory authentication with AAD group


... or you can add the Service Principal as an user with a TSQL command
-- Add your Azure AD Service Principal as external to SQL DB
CREATE USER [YourServicePrincipal] FROM EXTERNAL PROVIDER;

-- Add db_owner role to your Service Principal
ALTER ROLE [db_owner] ADD MEMBER [YourServicePrincipal]
If you don't have a Service Principal then it is also possible to use a SQL database user. Please see the documentation of the Azure SQL Database deployment v1 task for that.

7) Testing
Now go to pipelines and add a new YAML pipeline based on an existing YAML file in your repository and select the BuildSQL.yml file. Then either run it manually or change something in your database project in the repos to trigger pipeline.
Run your new SQL Deployment pipeline


Conclusion
In this post you learned how to deploy your Azure SQL Databases with a YAML pipeline in Azure DevOps. Note that if you don't have public endpoints on your Azure SQL Server that you will need a self-hosted agent in your Azure subscription (a Virtual Machine with Devops software) because the Microsoft hosted agents will use public endpoints. This will be described a next post.

Update when you get a Get-SpnAccessToken is obsolete warning during deployment then check this solution.

Monday, 20 April 2020

Databases in DevOps - Publishing profile

Case
I can’t release my database project due an error “data loss could occur”
error code


Updating database (Failed)
*** Could not deploy package.
Warning SQL72015: The column [dbo].[Table1].[ColumnToRemove] is being dropped, data loss could occur. 

This happens due the fact that my source table changed/removed a column that’s still available in the target table.


Solution
When deploying a database project, you can add an publish file with this deployment. In this file (it’s a xml file) you can set/adjust certain settings
First, we setup visual studio and secondly, we adjust je build pipeline

1) Visual Studio
Here we are going to create the publish file
  • Right click on the solution and click “Publish”
  • Then a new window pop-up, go to “Advanced”
  • Uncheck - 'Block incremental deployment if data loss might occur’ checkbox.
Publish settings - general


  • Go to the second tab and check - 'DROP objects in target but not in project' and click “ok”
Publish settings - drop


  • Then select “Create profile” and a new a ‘***.publish.xml’ will be added to the solution

Add publish file


  • The next step is, is to add the publish file to source control “add ignored file to source control”
Add to source control


2) DevOps 
First, we edit the build pipeline
  • Go to Azure DevOps -> Pipelines -> Pipelines
  • Then edit your pipeline (please see the blog of Joost for creating a pipeline)
  • Go to the task “Copy files” and add to ‘contents’ “**\*.publish.xml” 
Build pipeline


Last step, is to add the xml file to the release pipeline
  • Go to pipelines -> release
  • Then edit your pipeline and add the publish file
Release pipeline


Summary
In this post you learned how to add a Publish Profile file. In this file you can change the publish settings. In this example we did want to make it possible to truncate tables when a column has been removed.
But it can also be used to disable the deployment of security-related objects to our database, like:
  • ExcludeUsers
  • ExcludeLogins
  • ExcludeDatabaseRoles


Thursday, 31 October 2019

Databases in DevOps - Build Pipeline

Case
Before we can deploy our database project through the DTAP environment we need to build it to check whether the merged code of all developers still works. The result of the build is a dacpac file which can be used for the deployment. But what is a dacpac file and how do we create it in Azure DevOps?
Build Pipeline


Solution
First, Dacpac stands for Data Application Component Package. It is a single file containing a database model that is equal to the database project in Visual Studio. It contains all the information to create a database. You can rename it from .dacpac to .zip to see the content of the file.


1) Create empty build pipeline
There are several pipeline templates that you can use, but for this example we will start with an empty build pipeline.
  • Go to Pipelines (Builds) in the left menu
  • Click on New to create a New Build Pipeline
  • Use the classic editor link on the bottom
  • Select Azure Repos Git as the source
  • Then select the Team project, Repository and the default branch
  • Next choose an Empty job
Create empty Build Pipeline


Now give the new Build pipeline a useful name. Next is choosing the Agent pool. For this example we will use the default Microsoft hosted pool: Azure Pipelines. The agent for this pipeline will be 'vs2017-win2016'.

2) Add trigger
To 'Enable continuous integration' for the database project we will need to add a trigger. For this example we will use a Branch filter on 'Master' and a Path filter on the path of this database project in GIT. This trigger will automatically start the build of the database project when someone changes code in the master branch for this particularly project (if done right via a pull request from a feature branch to the master branch).
  • Go to the Triggers tab
  • Enable continuous integration by checking the checkbox
  • First set the branch filter to: Include and master (or the branch you want to use)
  • Click on + Add below Path filters
  • Set the path filter to: include and the path of your project in Git: DB/HST/HST_BB/*
Add trigger


3) Builds tasks: Build solution
Now we need to add tasks to the Agent job generated in step 1. The first task is MSBuild which will build the Visual Studio database project. Once succeeded, this will generate a dacpac file which will be used by the next tasks
  • Click on Agent job 1 and optionally change its name
  • Click on the + icon to add a task the Agent job
  • Search for msbuild in the seachbox
  • Select MSBuild (Build with MSBuild) and click Add
  • The only property you need to set is the filepath of the sqlproj file in GIT: DB/HST/HST_BB/HST_BB.sqlproj
Add MSBuild task


4) Builds tasks: Copy dacpac and publish files
With this task we will copy the result of the build task (a dacpac file) to the Artifact Staging Directory. We need to specify which file we want to copy and to which folder. For the target folder we will use a predefined variable pointing to the right folder. For the files we will use a wildcard filter. Note that we not only publish the dacpac file, but also the Publish profile xml file.

  • Click on Agent job 1 (or the new name you provided in the previous step)
  • Click on the + icon to add a second task the Agent job
  • Search for 'copy files' in the seachbox
  • Select Copy files (Copy files from .... folder paths) and click Add
  • In the contents field add two rows:
    • **\*.dacpac
    • **\*.publish.xml
  • As target folder add: $(Build.ArtifactStagingDirectory)
Copy dacpac to Artifact Staging folder


5) Builds tasks: Publish build artifact
The last step of the build pipeline is to publish all files in the Artifact Staging Directory and give them an Artifact Name. This Artifact Name will be used in the Release pipeline which we will explain in a subsequent post.
  • Click on Agent job 1 (or the new name)
  • Click on the + icon to add a second task the Agent job
  • Search for 'Publish build artifact' in the searchbox
  • Select Publish build artifact (Publish build .... file share) and click Add
  • Give the artifact a new name (instead of drop)
Publish the artifacts


Note: in this case the artifact is a dacpac file, but it could also be ispac for SSIS or a assembly for C#.

6) Test the pipeline
Now it's time to test your build pipeline by committing some changes to your master branch via Visual Studio (or to create a pull request to pull changes to your master branch). This will trigger an automatic build. If you don't want to make any changes at this moment, you could just click on (Save &) Queue in devops to do a build manually.
Dry run your build pipeline


Summary
In this post you saw how to build your database project automatically when someone changes something in the master branch (like a pull request). You don't have to check the result manually if you setup notifications in DevOps. Then you will receive an email when something succeeds of fails.


Bisides master branches you could also build other branches like feature or personal branches by using different filters. Or you could schedule your build to build each night. After setting up this basic example explorer and try out all the other options from the build pipeline. In a followup post we will show you how to deploy this built artifact through your DTAP environment using Continuous Deployment.

Thursday, 12 September 2019

Databases in DevOps - Pre-Deployment scripts

Case
I'm using database projects combined with Azure DevOps CI CD and I want to deploy data through my DTAP enviroment for some reference tables. Another reason could be that you want to do some data preparations before deploying all database changes. How do I do that in Visual Studio Database projects?
Adding Pre- and Post-Deployment scripts


Solution
This is where Pre-Deployment and Post-Deployment scripts could help you out. It's all in the name, but a Pre-Deployment script will be execute before deploying the database project and a Post-Deployment script will be executed after that deployment. These are all just regular .sql files containing T-SQL code.

For example a Pre-Deployment script can be used to secure data in a temporary table before a table change. A Post-Deployment script can be used to copy the data back to the appropriate tables and then clean up the temporary table afterwards.

Deploying data through the DTAP environments is nothing more then creating a delete statement and some subsequent insert queries. If the reference table already exits you could use a Pre-Deployment script or else you should use a Post-Deployment script.

1) Creating a deployment script
To keep our database project clean we will first create a folder called 'Scripts' to store the Pre-Deployment and Post-Deployment scripts. If you have a lot of scripts you could also create two separate folders.

To add scripts to your project, right click new folder in your the project and choose: Add, New Item..., User Scripts and then Pre-Deployment Script or Post-Deployment Script. Then give the file a suitable name.
Adding Pre- or Post-Deployment scripts


Note: see the file property of the deployment file that is called Build Action. This is where you determine the purpose and execution moment of a regular '.sql' file. However you can have only one Pre-Deployment and one Post-Deployment file in a project. There is a workaround below if you need multiple files.

2) Adding code
Now you can add your T-SQL code, but make sure it is repeatable (in case of a crash or when deploying multiple times). So if you want create a temporary table, make sure it doesn't already exits by adding a drop if-exists construction before the create statement.

Below a script that pushes data through the DTAP environment for a reference table.
/*
Post-Deployment Script Template       
--------------------------------------------------------------------------------------
 This file contains SQL statements that will be appended to the build script.  
 Use SQLCMD syntax to include a file in the post-deployment script.   
 Example:      :r .\myfile.sql        
 Use SQLCMD syntax to reference a variable in the post-deployment script.  
 Example:      :setvar TableName MyTable       
               SELECT * FROM [$(TableName)]     
--------------------------------------------------------------------------------------
*/

DELETE FROM [ref].[myTable]
GO
INSERT [ref].[myTable] ([Column1], [Column2], [Column3]) VALUES ('bla 1', 'bla 2', 'bla 3')
GO
INSERT [ref].[myTable] ([Column1], [Column2], [Column3]) VALUES ('bla a', 'bla b', 'bla c')
GO

If you have a big deployment script and you want to divide the code over multiple files then you have to create one 'master' script to call the other 'child' scripts because you can only have one Pre-Deployment and one Post-Deployment script in a database project. For this example we added multiple child scripts in the same folder as the parent script and called those by adding ":r .\" in front of the file names.
/*
Post-Deployment Script Template       
--------------------------------------------------------------------------------------
 This file contains SQL statements that will be appended to the build script.  
 Use SQLCMD syntax to include a file in the post-deployment script.   
 Example:      :r .\myfile.sql        
 Use SQLCMD syntax to reference a variable in the post-deployment script.  
 Example:      :setvar TableName MyTable       
               SELECT * FROM [$(TableName)] 
      
There can be only one post-deployment script per database! (One script to rule them all...)
--------------------------------------------------------------------------------------
*/

:r .\PostDeploymentFile1.sql
:r .\PostDeploymentFile2.sql
:r .\PostDeploymentFile3.sql

Conslusion
In this post you learned how to add some scripts before and after the general deployment of the database project. A good way to either add some reference data or to do some cleanup before you deploy your changes. Next take look at the publishing profile file for you SQL DB project.


Saturday, 31 August 2019

Databases in DevOps - Introduction

Case
I want my Data Warehouse databases in Azure DevOps just like my ETL projects and use Contunious Integration (CI) and Continuous Deliver (CD) for multiple environments. How do you do that?
SQL Database in DevOps


Solution
If you read a couple of forums and blogs about this subject then you will probably notice that 'all roads lead to Rome'. In this blog series we will explain our approach, but feel free to deviate.

Just for the record. With Continuous Integration (CI) we mean merging the code of all developers and building the project to check whether everything still works. Continuous Deliver will orchestrate the  deployment of the package created by CI through out the DTAP environment in an automated manner to reduce costs, but speed up the release proces.

For this example we work with four environments each with its own Azure SQL database: Development, Test, Acceptance and Production. The Development database is a shared database where all developers do there coding.

The database changes since the last compare will be pushed to a Visual Studio Database project. Which on its turn will be committed to Git. After that the project will be build in DevOps and then deployed through all environments.
DTAP environments


Note: This approach with a single shared development database only works for smaller teams or when the database work can be separated to avoid conflicts. The alternative is to give each developer their own local development database. This will take a little more syncing and merging effort though.

1) Visual Studio Database project
First, you either need Visual Studio 2017 or 2019. You have three options:
  1. SSDT standalone installer. This is Visual Studio 2017 with only the BI and DB project templates.
  2. Visual Studio 2017 (Community Edition is free). During installation locate Data storage and processing and select SQL Server Data Tools. Finding a download without an MSDN license is a bit tricky since 2019 is the current version
  3. Visual Studio 2019 (Community Edition is free). During installation locate Data storage and processing and select SQL Server Data Tools.

Data Storage and processing - SQL Server Data Tools


After installing you will find the SQL Server Database Project under SQL Server when you create a new project.
Create new Database Project


2) Import or Schema compare
Now that we have an empty database project we need to add the database items from our development database to this new project. You can either do an import of the database or do a Schema Compare between the database and the project.

When importing a new database you only have couple of options like not importing referenced logins or the folder structure. I would suggest not to import any logins because the are probably different on all environments. As folder structure I recommend Schema\Object Type because I think this is the clearest structure. Note that you can do an import only once.
Import Database


The second option is to do a schema compare which gives you much more options for tuning the synchronization. The best feature is that you can repeat this any time you like to update the Visual Studio Project.

Right click the project and choose Schema Compare... Then make sure the source database is on the left side and the Visual Studio project on the right side. Click on the options/settings icon to tune the comparison. In this case we will ignore users and role memberships.

Now press the compare button and review all changes especially when you work in a team. Then you probably only want your changes. Uncheck changes that are not yours or not ready to go to the next environment. By clicking on a change you can see the actual differences. Last step is to press the Update button and move all selected changes to the Visual Studio project. Before committing any changes to Git you should built your project to check if everything works.
Sql Schema Compare


Note: When working with multiple developers in a single development database you will probably encounter a couple of database changes which where not made by you. This is the point where you have to be selective on which changes you want to push to the database project.

Tip: When you have a lot of 'garbage' in your development database you could do a clean up by switching the source and target in the Sql Schema Compare and then push the update button. This will throw everything away that is not in your database project. It is probably a good idea to first create a backup.

3) Add Schema Compare to project
A great feature of the Sql Schema Compare file is that you can save it to your PC and then add it to your database project. The next time you only have to open it and click on the compare button.
Add Compare file to db project


4) Dacpac to create or update
If you built the database project in Visual Studio or DevOps it will generate a .dacpac file which can be used to create or update the next database in our DTAP environment. By default it can only update tables when they get bigger (extra columns or larger datatypes). This is to prevent loss of data. In a next post we will explain how to overcome this with Publish profiles or Pre-Deployment script.

Conclusion
In this introduction post you learned how to create a database project in Visual Studio and how to synchronize a database and a database project. In the next posts we will create a Build pipeline in DevOps to validate your committed database changes and after that we will create a Release pipeline to release your committed database changes through the DTAP environment.

A downside of database projects in Visual Studio is that it can become very slow if you have like thousands and thousands of database objects. For those very large databases (not in size, but in structure) you could also take a look at commercial database tools like those of redgate or SentryOne. However the majority of Data Warehouse databases will probably easily fit in Visual Studio Database projects.


Friday, 28 April 2017

Azure Snack - AAS and On-Premise Data

Case
You are building a Tabular model in combination with Azure Analysis Server (AAS) and you want to use an on-premise SQL database as source, but you are getting the following error:

Visual Studio - Error while importing the data


Error message:
Failed to save modifications to the server. Error returned: 'On-Premise Gateway is required to access the data source and the gateway is not installed for the server bitools.

How do you fix this error?

Solution
As the error message indicates, we need a gateway to use data from an on-premise data source. This On-Premise Gateway can be downloaded here. In this case we install the gateway for our AAS server. Important to know is that you are installing a gateway for a specific AAS server. For example, if you have an Azure subscription with two servers that connect to on-premises data sources, the gateway must be installed on two separate computers in your (organization) network.

Run the setup, choose a installation folder/path and install the gateway. After installation, you must configure the gateway for your AAS server. Sign in to Azure and fill in your server name. Now you are ready to go!

Azure - Install on-premises data gateway


Note:
Perhaps you saw that I had to update my gateway, this is because I have installed earlier a gateway for Power BI. These gateways are the same, but for AAS it is configured differently. More information about this gateway here.

Result
Go back to your Tabular model and try to import the data again. It works!

Visual Studio - Importing the data succedeed


Note:
If it doesn't work the first time, restart Visual Studio and open your solution again. The connection to the AAS server may be lost after inactivity.

Common Errors
A common installation error of the gateway is the following:

The server you have provided does not exist or you are not an administrator of the server. 

{"code":"NotFound","subCode":0,"message":"Server 'ssastest' is not found.","timeStamp":"2017-05-15T10:07:28.1324395Z","httpStatusCode":404,"details":[{"code":"RootActivityId","message":"b49c33e2-7e45-4e67-98f0-ab86faf21c12"},{"code":"Param1","message":"ssastest"}]} 

Or the following error:

The server you have provided does not exist or you are not an administrator of the server. 

{"code":"Unauthorized","subCode":0,"message":"Either server 'asazure://westeurope.asazure.windows.net/ssastest' does not exist or user is not the administrator of 'asazure://westeurope.asazure.windows.net/ssastest'","timeStamp":"2017-05-15T09:57:48.7294661Z","httpStatusCode":400,"details":[{"code":"RootActivityId","message":"a029ee64-56b7-4f85-96da-bb2f78c8eba6"},{"code":"Param1","message":"asazure://westeurope.asazure.windows.net/ssastest"}]} 

Based on this, we have two types of errors: the AAS server is not found or you have no access to the server. See the screenshots below for more information (possible fixes).

On-premise gateway - AAS server not found


On-premise gateway - No access to AAS server

Thursday, 23 March 2017

Loading tables by using BIML and meta architecture

Case

How can we simplify the process of loading database tables and reduce the time needed to create SSIS packages.

Solution

There are several steps that need to be taken prior to creating such a solution.
These steps are:
  1. Create the databases 'Repository' and 'Staging' and required schema's
  2. Create a Meta table called 'Layer' and a table called 'TableList' in the repository database
  3. Create the Sales tables in the Sales database
  4. Fill the Meta tables with the required meta data
  5. Create a BIML script that will create the Extract and Load SSIS package
  6. Generate the package using BIML Express in Visual Studio 2015 to create the SSIS package
For this solution the following prerequisites need to be met;
  • SQL Server will be used as source and destination platform
  • The Adventure Works 2014 database will be used as source
  • The selected tables from the Adventure Works database are present in the destination database and all required schema’s and specific datatypes, if applicable (we will be using a few tables from the Person schema that do not use custom datatypes)
  • Visual Studio 2015 is installed (Community/Professional/Enterprise)
  • BIML Express is installed

1) - Create the databases and schema's

In this step the databases 'Repository' and Staging are created and the required schema's.
--Create the databases Repository and Staging and required schema's
CREATE DATABASE [Repository] CONTAINMENT = NONE ON  PRIMARY 
( NAME = N'Repository', FILENAME = N'D:\Program Files\Microsoft SQL Server\MSSQL13.MSSQLSERVER\MSSQL\DATA\Repository.mdf' , SIZE = 7168KB , MAXSIZE = UNLIMITED, FILEGROWTH = 1024KB )
 LOG ON 
( NAME = N'Repository_log', FILENAME = N'D:\Program Files\Microsoft SQL Server\MSSQL13.MSSQLSERVER\MSSQL\DATA\Repository_log.ldf' , SIZE = 5184KB , MAXSIZE = 2048GB , FILEGROWTH = 10%)
GO
ALTER DATABASE [Repository] SET RECOVERY SIMPLE;
GO
USE Repository
go
CREATE SCHEMA rep
GO
CREATE DATABASE [Staging] CONTAINMENT = NONE ON  PRIMARY 
( NAME = N'Staging', FILENAME = N'D:\Program Files\Microsoft SQL Server\MSSQL13.MSSQLSERVER\MSSQL\DATA\Staging.mdf' , SIZE = 7168KB , MAXSIZE = UNLIMITED, FILEGROWTH = 1024KB )
 LOG ON 
( NAME = N'Staging_log', FILENAME = N'D:\Program Files\Microsoft SQL Server\MSSQL13.MSSQLSERVER\MSSQL\DATA\Staging_log.ldf' , SIZE = 5184KB , MAXSIZE = 2048GB , FILEGROWTH = 10%)
GO
ALTER DATABASE [Staging] SET RECOVERY SIMPLE;
GO
USE Staging
go
CREATE SCHEMA Sales
GO

2) - Create the Meta tables

During this step we will be creating the meta tables 'Layer' and 'TableList'. The first table will contain the id, name and prefix of the layers present in the Datawarehouse environment. In this blog the only entry present is the Staging area id and name. Normally this table also holds the name of for example the Datawarehouse and Datamart layer or any other layers present in a Business Intelligence environment.
The column 'LayerId' is used in the other table named 'TableList' and is used to make the distinction between the table names present in the respective layer. In this blog there will only be Staging Area tables described.
The table 'TableList' contains the following columns;
  • LayerId - The id of the layer the table belongs to
  • TableName - The name of the table
  • SchemaName - The name of the schema of the table
  • TableType - The type of the table (fe. user table)
  • LoadOrderNr - The order in which the tables are loaded (or created by other processes)
  • WhereClause - Any optional where clause that is used during the load proces (Default this column must be set to '1 = 1')
  • ActiveInd - Indicates if the table is active or inactive during the BIML creation proces
  • InsertDate - The date when the table entry was inserted in the 'TableList' table
Note: Some of the above columns are not or less applicable to the BIML script in this post, but they are used in other generic scripts used to create and load datawarehouse packages (more about this in future posts)
--Create the meta tables
USE [Repository]
GO
IF OBJECT_ID('[rep].[Layer]', 'U') IS NOT NULL
BEGIN
 DROP TABLE [rep].[Layer]
END
GO
CREATE TABLE [rep].[Layer](
 [LayerId] [smallint] NOT NULL,
 [LayerName] [nvarchar](50) NOT NULL,
 [LayerPrefix] [nvarchar](10) NOT NULL,
) ON [PRIMARY]
GO
IF OBJECT_ID('[rep].[TableList]', 'U') IS NOT NULL
BEGIN
 DROP TABLE [rep].[TableList]
END
GO
CREATE TABLE [rep].[TableList](
 [LayerId] [smallint] NULL,
 [TableName] [nvarchar](100) NULL,
 [SchemaName] [nvarchar](100) NULL,
 [ServerNr] [smallint] NULL,
 [TableType] [nvarchar](100) NULL,
 [LoadOrderNr] [int] NULL,
 [WhereClause] [nvarchar](250) NULL,
 [PrimaryKey] [nvarchar](250) NULL,
 [ActiveInd] [nchar](1) NULL,
 [InsertDate] [datetime] NULL
) ON [PRIMARY]
GO

3) - Create the Sales tables

During this step we will be creating the Sales tables in the target database Staging.
--Create the Sales tables
USE Staging
GO
CREATE TABLE [Sales].[ShoppingCartItem](
 [ShoppingCartItemID] [int] IDENTITY(1,1) NOT NULL,
 [ShoppingCartID] [nvarchar](50) NOT NULL,
 [Quantity] [int] NOT NULL,
 [ProductID] [int] NOT NULL,
 [DateCreated] [datetime] NOT NULL,
 [ModifiedDate] [datetime] NOT NULL,
) ON [PRIMARY]
GO
CREATE TABLE [Sales].[SpecialOffer](
 [SpecialOfferID] [int] IDENTITY(1,1) NOT NULL,
 [Description] [nvarchar](255) NOT NULL,
 [DiscountPct] [smallmoney] NOT NULL,
 [Type] [nvarchar](50) NOT NULL,
 [Category] [nvarchar](50) NOT NULL,
 [StartDate] [datetime] NOT NULL,
 [EndDate] [datetime] NOT NULL,
 [MinQty] [int] NOT NULL,
 [MaxQty] [int] NULL,
 [rowguid] [uniqueidentifier] ROWGUIDCOL  NOT NULL,
 [ModifiedDate] [datetime] NOT NULL,
) ON [PRIMARY]
GO
CREATE TABLE [Sales].[SpecialOfferProduct](
 [SpecialOfferID] [int] NOT NULL,
 [ProductID] [int] NOT NULL,
 [rowguid] [uniqueidentifier] ROWGUIDCOL  NOT NULL,
 [ModifiedDate] [datetime] NOT NULL,
) ON [PRIMARY]
GO

4) - Fill the meta tables with the required meta data

After creating the database and metadata tables, they need to be filled with the meta data that will be used by the BIML script in the next step ('BIML Load_STG_Tables_From_Microsoft.biml').
The script provided below inserts the layer information used in this blog and the table meta information of those tables for which the SSIS load proces will be created.

If you want to test the Where Clause functionality you can replace the value '1 = 1' with '1 = 1 AND ShoppingCartItemID = 2' in the column 'WhereClause' in the table 'TableList' for the tablename 'sales.ShoppingCartItem'. This will place a filter on the table.
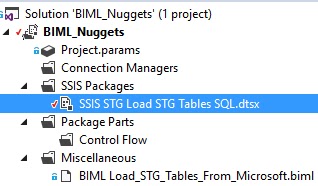
The BIML script will use the meta table information to create one SSIS package with the name 'SSIS STG Load STG Tables SQL.dtsx'

--Insert the meta information in the meta tables
USE [Repository]
GO
TRUNCATE TABLE [rep].[Layer];
TRUNCATE TABLE [rep].[TableList];
INSERT [rep].[Layer] ([LayerId], [LayerName], [LayerPrefix]) VALUES (1, N'staging', N'stg');
INSERT [rep].[TableList] ([LayerId], [TableName], [SchemaName], [TableType], [LoadOrderNr], [WhereClause], [ActiveInd], [InsertDate]) VALUES (1, N'SpecialOffer', N'Sales', N'user_table', 1, N'1 = 1', N'1', CAST(GETDATE() AS DateTime));
INSERT [rep].[TableList] ([LayerId], [TableName], [SchemaName], [TableType], [LoadOrderNr], [WhereClause], [ActiveInd], [InsertDate]) VALUES (1, N'SpecialOfferProduct', N'Sales', N'user_table', 1, N'1 = 1', N'1', CAST(GETDATE() AS DateTime));
INSERT [rep].[TableList] ([LayerId], [TableName], [SchemaName], [TableType], [LoadOrderNr], [WhereClause], [ActiveInd], [InsertDate]) VALUES (1, N'ShoppingCartItem', N'Sales', N'user_table', 1, N'1 = 1', N'1', CAST(GETDATE() AS DateTime));
GO

5) - Create the BIML script

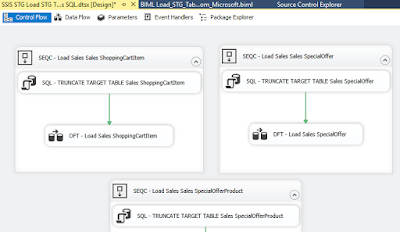
Once the previous steps have been executed it is time to create the BIML script. The BIML script starts with declaring the information needed to create the connection strings to the different database and the server(s) where they recide on. For this example all the databases are SQL Server 2016 databases. It would also be possible to store that information in a meta table but for this post the information is placed inside the BIML script. The BIML script will create one package with the name 'SSIS STG Load STG Tables SQL' and for each table in the 'TableList' table a sequence container will be created with two SSIS components. The first component is a SQL Task component that will use a T-SQL command to truncate the target table. The second component is a Data Flow Task containing a Source and Destination component which will load the data from the target to the source table. Alle the sequence components are executed parallel to each other.

--The BIML code that can be placed inside a BIML file.

    
    <# 
        string pRepServerName    = "localhost"; 
        string pRepDatabaseName  = "Repository";
        string pRepProvider      = "SQLNCLI11.1;Integrated Security=SSPI";
        string pRepSchema        = "rep";
      
        string pSourceServerName = "localhost";
        string pSourceDBName     = "AdventureWorks2014";
        string pSourceProvider   = "SQLNCLI11.1;Integrated Security=SSPI";
        string pSourceSchema     = "Sales";
        
        string pTargetServerName = "localhost";
        string pTargetDBName     = "Staging";
        string pTargetProvider   = "SQLNCLI11.1;Integrated Security=SSPI";
        string pTargetSchema     = "Sales";
    #>
  
    
    <#
        string pLayer            = "Staging";
     #>
    
    <#
    string csRepository = String.Format("Data Source={0};Initial Catalog={1};Provider={2};Auto Translate=False;"
          ,pRepServerName, pRepDatabaseName, pRepProvider);
   
    string csSource = String.Format("Data Source={0};Initial Catalog={1};Provider={2};Auto Translate=False;"
          ,pSourceServerName, pSourceDBName, pSourceProvider);
    
    string csTarget = String.Format("Data Source={0};Initial Catalog={1};Provider={2};Auto Translate=False;"
          ,pTargetServerName, pTargetDBName, pTargetProvider);      
    #>


                <#
                  StringBuilder sMETAGetTableName = new System.Text.StringBuilder();
                  
                  sMETAGetTableName.Append("SELECT ");
                  sMETAGetTableName.Append("    TableName ");
                  sMETAGetTableName.Append("  , SchemaName ");
                  sMETAGetTableName.Append("  , WhereClause ");
                  sMETAGetTableName.Append("FROM ");
                  sMETAGetTableName.Append(pRepSchema);
                  sMETAGetTableName.Append(".TableList AS TAB ");
                  sMETAGetTableName.Append("INNER JOIN ");
                  sMETAGetTableName.Append(pRepSchema);
                  sMETAGetTableName.Append(".Layer AS LYR ");
                  sMETAGetTableName.Append("  ON ( TAB.LayerId = LYR.LayerId) ");
                  sMETAGetTableName.Append("WHERE 1 = 1 ");
                  sMETAGetTableName.Append(" AND TAB.ActiveInd = 1 ");
                  sMETAGetTableName.Append(" AND LYR.LayerName = '");
                  sMETAGetTableName.Append(pLayer);
                  sMETAGetTableName.Append("' ");
                  sMETAGetTableName.Append("ORDER BY ");
                  sMETAGetTableName.Append("   TAB.LoadOrderNr");
                  
                  DataTable tblMETATableNames = ExternalDataAccess.GetDataTable(csRepository, sMETAGetTableName.ToString());
                  foreach (DataRow METATableNameRow in tblMETATableNames.Rows) {
                #>
                 <#=METATableNameRow["TableName"] #>" ConstraintMode="Linear">
                    
                        "
                                    ResultSet="None"
                                    ConnectionName="OLEDB Target">
                            TRUNCATE TABLE <#=pTargetSchema #>.<#=METATableNameRow["TableName"] #> 
                            
                        
                        ">
                            
                                "
                                             ConnectionName="OLEDB Source"
                                             ValidateExternalMetadata="false">
                                    SELECT
        CAST(1 AS INTEGER) AS DUMMY_COLUMN
<#                                          StringBuilder sGETSelectColumn = new System.Text.StringBuilder();
                                            sGETSelectColumn.Append("SELECT " );
                                            sGETSelectColumn.Append("     col.name AS column_name " );
                                            sGETSelectColumn.Append("FROM sys.columns AS col " );
                                            sGETSelectColumn.Append("INNER JOIN sys.objects AS obj " );
                                            sGETSelectColumn.Append("    ON(col.object_id = obj.object_id) " );
                                            sGETSelectColumn.Append("INNER JOIN sys.types AS typ " );
                                            sGETSelectColumn.Append("    ON(col.user_type_id = typ.user_type_id)" );
                                            sGETSelectColumn.Append("WHERE   1 = 1 " );
                                            sGETSelectColumn.Append("   AND obj.name = '"+ METATableNameRow[0].ToString() +"'");
                                            DataTable tblSelectColumn = ExternalDataAccess.GetDataTable(csSource, sGETSelectColumn.ToString());
                                            foreach (DataRow SelectColumn in tblSelectColumn.Rows) {
#>
        , [<#=SelectColumn["COLUMN_NAME"] #>]
<# } #>FROM <#=METATableNameRow["SchemaName"] #>.<#=METATableNameRow["TableName"] #>
WHERE <#=METATableNameRow["WhereClause"] #>


                                " 
                                                  ConnectionName="OLEDB Target">
                                    " />


                <# } #>


<#@ template language="C#" hostspecific="true"#>
<#@ import namespace="System.Data"#>
<#@ import namespace="System.Data.SqlClient"#>
<#@ import namespace="System.Text"#>

6) - Generate the package using BIML Express

Once the BIML file has been created it is time to generate the SSIS package by using BIML Express in Visual Studio 2015.
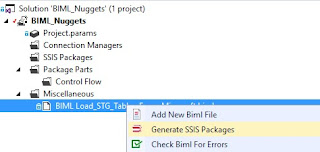
The package can be simply generated by right clicking the BIML package and selecting 'Generate SSIS Packages'.
Using BIML Expres to generate the package

The package has been generated by BIML

Using BIML Expres to generate the package

Summary

In this post we create the following components;
  • Repository database and one schema
  • Staging database and one schema
  • Two meta tables to be used by the BIML script from this post (and possible future posts)
  • Three Staging tables
  • A BIML file called 'BIML Load_STG_Tables_From_Microsoft.biml'
  • A generated SSIS Package named 'SSIS STG Load STG Tables SQL.dtsx'