Showing posts with label BIML. Show all posts

Wednesday, 5 June 2019

Staging with the Azure Data Factory Foreach Loop

Case
When we where using SSIS we could use BIML to generate a whole bunch of staging packages for all tables in a certain database. Is there a similar solution for Data Factory where I don't have to create pipelines for all tables?
ForEach loop in Azure Data Factory


Solution
Azure Data Factory (ADF) has a For Each loop construction that you can use to loop through a set of tables. This is similar to BIML where you often create a For Each loop in C# to loop through a set of tables or files.

To keep things very simple for this example, we have two databases called Source and Stage. We already generated three tables in the Stage database that have the same structure and datatypes as in the Source database. We will empty the stage tables before filling them.

1) Create view in Stage
First we need a list of tables that we can use to loop through. For this example we used a view in the Stage database that retrieves all tables from the information schema. You can finetune this view with for example a where clause or use a filled table instead.
CREATE VIEW [dbo].[StageTables]
AS
  SELECT TABLE_SCHEMA
  ,      TABLE_NAME
  FROM   INFORMATION_SCHEMA.TABLES
  WHERE  TABLE_TYPE = 'BASE TABLE'
GO

Note: Use QUOTENAME to make deviating tablenames monkeyproof. It will add brackets around schema and table names.

2) Create Dataset for view
Now go to ADF (Author & Monitor dashboard) and create a new Dataset for the view above.
ADF - Add Dataset


Select the right Data Store (Azure SQL Server in our example) and give your dataset a suitable name like 'StageTables'. Next add a new (or select an existing) Linked service. Then select the newly created view.
ADF - New Dataset


3) Create Dataset for Source tables
Next we will create a Dataset for the tables in the Source database, but instead of pointing to a particular table we will use a Parameter called 'SourceTable'. First go to the Parameters tab and create the variable. Then return to the Connection tab where the tablename can now be filled with Dynamic Content: @dataset().SourceTable
ADF - Create Dataset with parameter


4) Create Dataset for Stage tables
Now repeat the exact same steps to create a Dataset for the Stage tables and call the Dataset 'Stage' and the Parameter 'StageTable'. The tablename can then be filled with Dynamic Content: @dataset().StageTable

5) Create Pipeline
At this point we have three Datasets (StageTables, Source and Stage) and two Linked Services (to the Source and Stage database). Now it's time to create the pipeline that exists of a Lookup (under General) and a ForEach (under Iteration & Conditionals).
ADF - Pipeline with Lookup and Foreach


6) Add Lookup
In the newly created pipeline we first need to add a Lookup activity that points to the Dataset called StageTables which points to the view. You can hit the Preview data button to check the tables.
ADF - Add Lookup


7) Add Foreach
Next step is adding a Foreach activity that loops through the result of the lookup. On the Settings tab you can provide the items you want to loop though. In our case the output of the preceding Lookup activity from the previous step: @activity('my tables').output.value
On the Activities tab we can add a new activity that we want to execute for all our staging tables. For this example only a Copy Data activity which we will configure in the next step.
ADF - Configure ForEach


Note: on the Settings tab you will also see the setting 'Batch count', this is the maximum number of parallel executions of the Copy Data Activity. If you have a lot of tables then you should probably max it with this setting!


8) Copy Data Activity
The last step is to configure the Copy Data Activity to copy the data from the Source to the Stage database. First give it a suitable name like: stage my table. Then go to the Source tab and select  'Source' (from step 3) as the Source dataset.
Because we added a parameter to this dataset, a new field called 'sourcetable' will appear. With an expression we will add the schema name and a table name from the ForEach loop construction: @concat(item().TABLE_SCHEMA,'.',item().TABLE_NAME)
Next we will repeat this for the Sink tab where we will use the Sink dataset called 'Stage'. The expression for the table name is the same as above: @concat(item().TABLE_SCHEMA,'.',item().TABLE_NAME)
ADF - Copy Data in ForEach


9) Truncate Stage
To empty the Stage tables, you could of course add a Stored Procedure Activity before the Copy Data Activity to execute a Truncate or Delete statement. However the Copy Data Activity has a Pre-copy script option on the Sink tab that you can use to execute this same statement (thx colleague David van der Velden for the idea). Add the following expression:
@concat('TRUNCATE TABLE ', item().TABLE_SCHEMA,'.',item().TABLE_NAME)
ADF - Copy Data Pre-copy script


Summary
In this post you have seen a BIML-SSIS alternative in Azure Data Factory to stage tables with the ForEach construction. If you want to stage an other table you can just add the empty table to the stage database and the ForEach will fill it automatically.


Monday, 24 April 2017

Use BIML to create SSIS packages from csv files

Case
The Case is about importing flat files (CSV’s) without the necessity of metadata.  Because BIML always check’s if the tables are accessible before creating the packages. The first step is to create the tables with BIML and the Second step is creating the SSIS packages to transport the data.

1. Creating tables in the database
2. Packages to fill this database

Because of the size of the solution I’ve created two solution, one for creating the tables and secondly creating the SSSI packages. you can click on the link to go to the other solution (later this month I’will deploy to second script).
In this solution, we create a BIML that is going to create the tables and all the columns are defined as strings

Solution - Creating SSIS packages
we have created the tables in the database, now we can start creating the SSIS package that extract the data from the CSV and transport them into the database.
Our SSIS packages contain a table truncation and a dataflow task with a simple transport from source to destination. We also create a masterpackage which execute the SSIS packages.
The CSV file we are going to use for this solution looks like this

CSV file


1) Determine the colums
Normally (if we look to the example above) we can use this code to determine the columns:

</Columns>
                <Column Name="AgeId" Delimiter=","></Column>
                <Column Name="AgeFrom" Delimiter=","></Column>
                <Column Name="AgeTo" Delimiter=","></Column>
                <Column Name="AgeCategoryEmployee" Delimiter=","></Column>
                <Column Name="AgeCategoryClient" Delimiter="CRLF"></Column>
 <Colums>
 
Note that the last colums uses the CRLF delimiter (CR = Carriage Return and LF = Line Feed)
Now we want BIML to do this for us, so we add a loop that loops through the first row of the textfile  and when the loop is at the end of the row, it uses the CRLF delimiter
The code should look like this:
<Columns>
            <# { # >
                
                StreamReader myFile = new StreamReader(filePath);
                myColumns = myFile.ReadLine().Split(',');
                 myFile.Close();
                
                // to determine the colum delimeter 
                int columnCount = 0;
                string columnDelimiter = ",";

                foreach (string myColumn in myColumns) 
                {
                    columnCount++;
                    if (columnCount == myColumns.Length)
                    {
                        columnDelimiter = "CRLF";
                    }
                    {
                        columnDelimiter = ",";
                    }
                #>
                <Column Name="&lt#=myColumn#>" Delimiter="&lt#=columnDelimiter#>">&lt/Column>
                 } #>
</Columns>


2) Creating the ssis package
The SSIS package we are going to create looks like this:
SISS package


The complete BIML code for creating this packages is:

<Biml xmlns="http://schemas.varigence.com/biml.xsd">
    <#
    string Applicatie = "Manual";
    string Prefix = "Man";
    
    string fileName;
    string path = @"D:\Drop\Man";
    string[] myFiles = Directory.GetFiles(path, "*.csv");
    
    string[] myColumns;
    #>
    <FileFormats>
    <#
    foreach (string filePath in myFiles)
    {

    #>
    <FlatFileFormat Name="FlatFileFormat<#=Path.GetFileNameWithoutExtension(filePath)#>" RowDelimiter="CRLF" ColumnNamesInFirstDataRow="true" IsUnicode="false">
        <Columns>
            <# 
                
                StreamReader myFile = new StreamReader(filePath);
                myColumns = myFile.ReadLine().Split(',');
                 myFile.Close();
                
                // to determine the column delimeter 
                int columnCount = 0;
                string columnDelimiter = ",";

                 foreach (string myColumn in myColumns) 
                {
                    columnCount++;
                    if (columnCount == myColumns.Length)
                    {
                        columnDelimiter = "CRLF";
                    }
                    {
                        columnDelimiter = ",";
                    }
                #>
                <Column Name="<#=myColumn#>" Delimiter="<#=columnDelimiter#>"></Column>
                <# } #>
            </Columns>
        </FlatFileFormat>
            <#}#>
    </FileFormats>
    <Connections>
            <#
            foreach (string filePath in myFiles)
            {
            
            #>
            <FlatFileConnection Name="FF_CSV - <#=Path.GetFileNameWithoutExtension(filePath)#>" FilePath="<#=filePath#>" FileFormat="FlatFileFormat<#=Path.GetFileNameWithoutExtension(filePath)#>">
                
            </FlatFileConnection>
            <# } #>
            <OleDbConnection 
                Name="STG_<#=Applicatie#>" 
                ConnectionString="Data Source=APPL43;Initial Catalog=dummy_STG;Provider=SQLNCLI11.1;Integrated Security=SSPI;Auto Translate=False;">
            </OleDbConnection>
    </Connections> 
        <Packages>

    <#       // Loop trough the files
            int TableCount = 0;
            foreach (string filePath in myFiles)
            { 
                TableCount++;
                fileName = Path.GetFileNameWithoutExtension(filePath);
                #>
                <Package Name="stg_<#=Prefix#>_<#=TableCount.ToString()#>_<#=fileName#>" ConstraintMode="Linear" AutoCreateConfigurationsType="None" ProtectionLevel="DontSaveSensitive">
                    <Variables>
                        <Variable Name="CountStage" DataType="Int32" Namespace="User">0</Variable>
                    </Variables>               
                    <Tasks>
                        <ExecuteSQL ConnectionName="STG_<#=Applicatie#>" Name="SQL - Truncate <#=fileName#>">
                            <DirectInput>TRUNCATE TABLE dbo.<#=Prefix#>_<#=fileName#></DirectInput>
                        </ExecuteSQL>
                        
                        <Dataflow Name="DFT - Transport CSV_<#=fileName#>">
                            <Transformations>
                                <FlatFileSource Name="SRC_FF - <#=fileName#> " ConnectionName="FF_CSV - <#=Path.GetFileNameWithoutExtension(filePath)#>">
                                </FlatFileSource>
                                
                                <OleDbDestination ConnectionName="STG_<#=Applicatie#>" Name="OLE_DST - <#=fileName#>" >
                                <ExternalTableOutput Table="dbo.<#=Prefix#>_<#=fileName#>"/>
                                </OleDbDestination>
                            </Transformations>
                        </Dataflow>
                    </Tasks>
                </Package>
    <#    }    #>

                <!-- Create Master Package -->
                <Package Name="stg_<#=Prefix#>_0_Master" ConstraintMode="Parallel" AutoCreateConfigurationsType="None" ProtectionLevel="DontSaveSensitive">
                    <Tasks>
                    <#  int TableCount2 = 0;
                        foreach (string filePath in myFiles)
                        { 
                                TableCount2++;
                                fileName = Path.GetFileNameWithoutExtension(filePath); #>
                
                            <ExecutePackage Name="stg_<#=Prefix#>_<#=TableCount2.ToString()#>_<#=fileName#>">
                                <ExternalProjectPackage  Package="stg_<#=Prefix#>_<#=TableCount2.ToString()#>_<#=fileName#>.dtsx" />
                            </ExecutePackage>
                        <#
                        }
                        #>    
                    </Tasks>
                </Package>

    </Packages>
</Biml>

<!--Includes/Imports for C#-->
<#@ template language="C#" hostspecific="true"#>
<#@ import namespace="System.Data"#>
<#@ import namespace="System.IO"#>


We call this “3_Generate_Man_SSIS.bml”
If we run this BIML script this will be the end result

End result


Summary
In the first blogspot, we explained how to create the tables, we need these tables which transport the actual data.
It’s important to first create the tables in the database and then create the SSIS packages.
Of course, this is a simple example for filling the staging area, feel free to add more component, like a row count transformation etc.

This whole solution is built with BIML Express.


Thursday, 23 March 2017

Loading tables by using BIML and meta architecture

Case

How can we simplify the process of loading database tables and reduce the time needed to create SSIS packages.

Solution

There are several steps that need to be taken prior to creating such a solution.
These steps are:
  1. Create the databases 'Repository' and 'Staging' and required schema's
  2. Create a Meta table called 'Layer' and a table called 'TableList' in the repository database
  3. Create the Sales tables in the Sales database
  4. Fill the Meta tables with the required meta data
  5. Create a BIML script that will create the Extract and Load SSIS package
  6. Generate the package using BIML Express in Visual Studio 2015 to create the SSIS package
For this solution the following prerequisites need to be met;
  • SQL Server will be used as source and destination platform
  • The Adventure Works 2014 database will be used as source
  • The selected tables from the Adventure Works database are present in the destination database and all required schema’s and specific datatypes, if applicable (we will be using a few tables from the Person schema that do not use custom datatypes)
  • Visual Studio 2015 is installed (Community/Professional/Enterprise)
  • BIML Express is installed

1) - Create the databases and schema's

In this step the databases 'Repository' and Staging are created and the required schema's.
--Create the databases Repository and Staging and required schema's
CREATE DATABASE [Repository] CONTAINMENT = NONE ON  PRIMARY 
( NAME = N'Repository', FILENAME = N'D:\Program Files\Microsoft SQL Server\MSSQL13.MSSQLSERVER\MSSQL\DATA\Repository.mdf' , SIZE = 7168KB , MAXSIZE = UNLIMITED, FILEGROWTH = 1024KB )
 LOG ON 
( NAME = N'Repository_log', FILENAME = N'D:\Program Files\Microsoft SQL Server\MSSQL13.MSSQLSERVER\MSSQL\DATA\Repository_log.ldf' , SIZE = 5184KB , MAXSIZE = 2048GB , FILEGROWTH = 10%)
GO
ALTER DATABASE [Repository] SET RECOVERY SIMPLE;
GO
USE Repository
go
CREATE SCHEMA rep
GO
CREATE DATABASE [Staging] CONTAINMENT = NONE ON  PRIMARY 
( NAME = N'Staging', FILENAME = N'D:\Program Files\Microsoft SQL Server\MSSQL13.MSSQLSERVER\MSSQL\DATA\Staging.mdf' , SIZE = 7168KB , MAXSIZE = UNLIMITED, FILEGROWTH = 1024KB )
 LOG ON 
( NAME = N'Staging_log', FILENAME = N'D:\Program Files\Microsoft SQL Server\MSSQL13.MSSQLSERVER\MSSQL\DATA\Staging_log.ldf' , SIZE = 5184KB , MAXSIZE = 2048GB , FILEGROWTH = 10%)
GO
ALTER DATABASE [Staging] SET RECOVERY SIMPLE;
GO
USE Staging
go
CREATE SCHEMA Sales
GO

2) - Create the Meta tables

During this step we will be creating the meta tables 'Layer' and 'TableList'. The first table will contain the id, name and prefix of the layers present in the Datawarehouse environment. In this blog the only entry present is the Staging area id and name. Normally this table also holds the name of for example the Datawarehouse and Datamart layer or any other layers present in a Business Intelligence environment.
The column 'LayerId' is used in the other table named 'TableList' and is used to make the distinction between the table names present in the respective layer. In this blog there will only be Staging Area tables described.
The table 'TableList' contains the following columns;
  • LayerId - The id of the layer the table belongs to
  • TableName - The name of the table
  • SchemaName - The name of the schema of the table
  • TableType - The type of the table (fe. user table)
  • LoadOrderNr - The order in which the tables are loaded (or created by other processes)
  • WhereClause - Any optional where clause that is used during the load proces (Default this column must be set to '1 = 1')
  • ActiveInd - Indicates if the table is active or inactive during the BIML creation proces
  • InsertDate - The date when the table entry was inserted in the 'TableList' table
Note: Some of the above columns are not or less applicable to the BIML script in this post, but they are used in other generic scripts used to create and load datawarehouse packages (more about this in future posts)
--Create the meta tables
USE [Repository]
GO
IF OBJECT_ID('[rep].[Layer]', 'U') IS NOT NULL
BEGIN
 DROP TABLE [rep].[Layer]
END
GO
CREATE TABLE [rep].[Layer](
 [LayerId] [smallint] NOT NULL,
 [LayerName] [nvarchar](50) NOT NULL,
 [LayerPrefix] [nvarchar](10) NOT NULL,
) ON [PRIMARY]
GO
IF OBJECT_ID('[rep].[TableList]', 'U') IS NOT NULL
BEGIN
 DROP TABLE [rep].[TableList]
END
GO
CREATE TABLE [rep].[TableList](
 [LayerId] [smallint] NULL,
 [TableName] [nvarchar](100) NULL,
 [SchemaName] [nvarchar](100) NULL,
 [ServerNr] [smallint] NULL,
 [TableType] [nvarchar](100) NULL,
 [LoadOrderNr] [int] NULL,
 [WhereClause] [nvarchar](250) NULL,
 [PrimaryKey] [nvarchar](250) NULL,
 [ActiveInd] [nchar](1) NULL,
 [InsertDate] [datetime] NULL
) ON [PRIMARY]
GO

3) - Create the Sales tables

During this step we will be creating the Sales tables in the target database Staging.
--Create the Sales tables
USE Staging
GO
CREATE TABLE [Sales].[ShoppingCartItem](
 [ShoppingCartItemID] [int] IDENTITY(1,1) NOT NULL,
 [ShoppingCartID] [nvarchar](50) NOT NULL,
 [Quantity] [int] NOT NULL,
 [ProductID] [int] NOT NULL,
 [DateCreated] [datetime] NOT NULL,
 [ModifiedDate] [datetime] NOT NULL,
) ON [PRIMARY]
GO
CREATE TABLE [Sales].[SpecialOffer](
 [SpecialOfferID] [int] IDENTITY(1,1) NOT NULL,
 [Description] [nvarchar](255) NOT NULL,
 [DiscountPct] [smallmoney] NOT NULL,
 [Type] [nvarchar](50) NOT NULL,
 [Category] [nvarchar](50) NOT NULL,
 [StartDate] [datetime] NOT NULL,
 [EndDate] [datetime] NOT NULL,
 [MinQty] [int] NOT NULL,
 [MaxQty] [int] NULL,
 [rowguid] [uniqueidentifier] ROWGUIDCOL  NOT NULL,
 [ModifiedDate] [datetime] NOT NULL,
) ON [PRIMARY]
GO
CREATE TABLE [Sales].[SpecialOfferProduct](
 [SpecialOfferID] [int] NOT NULL,
 [ProductID] [int] NOT NULL,
 [rowguid] [uniqueidentifier] ROWGUIDCOL  NOT NULL,
 [ModifiedDate] [datetime] NOT NULL,
) ON [PRIMARY]
GO

4) - Fill the meta tables with the required meta data

After creating the database and metadata tables, they need to be filled with the meta data that will be used by the BIML script in the next step ('BIML Load_STG_Tables_From_Microsoft.biml').
The script provided below inserts the layer information used in this blog and the table meta information of those tables for which the SSIS load proces will be created.

If you want to test the Where Clause functionality you can replace the value '1 = 1' with '1 = 1 AND ShoppingCartItemID = 2' in the column 'WhereClause' in the table 'TableList' for the tablename 'sales.ShoppingCartItem'. This will place a filter on the table.
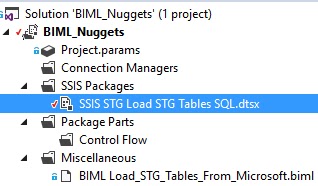
The BIML script will use the meta table information to create one SSIS package with the name 'SSIS STG Load STG Tables SQL.dtsx'

--Insert the meta information in the meta tables
USE [Repository]
GO
TRUNCATE TABLE [rep].[Layer];
TRUNCATE TABLE [rep].[TableList];
INSERT [rep].[Layer] ([LayerId], [LayerName], [LayerPrefix]) VALUES (1, N'staging', N'stg');
INSERT [rep].[TableList] ([LayerId], [TableName], [SchemaName], [TableType], [LoadOrderNr], [WhereClause], [ActiveInd], [InsertDate]) VALUES (1, N'SpecialOffer', N'Sales', N'user_table', 1, N'1 = 1', N'1', CAST(GETDATE() AS DateTime));
INSERT [rep].[TableList] ([LayerId], [TableName], [SchemaName], [TableType], [LoadOrderNr], [WhereClause], [ActiveInd], [InsertDate]) VALUES (1, N'SpecialOfferProduct', N'Sales', N'user_table', 1, N'1 = 1', N'1', CAST(GETDATE() AS DateTime));
INSERT [rep].[TableList] ([LayerId], [TableName], [SchemaName], [TableType], [LoadOrderNr], [WhereClause], [ActiveInd], [InsertDate]) VALUES (1, N'ShoppingCartItem', N'Sales', N'user_table', 1, N'1 = 1', N'1', CAST(GETDATE() AS DateTime));
GO

5) - Create the BIML script

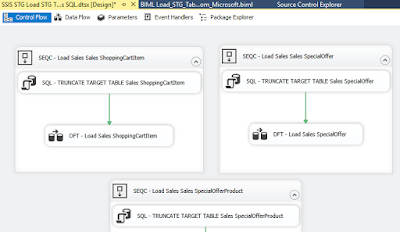
Once the previous steps have been executed it is time to create the BIML script. The BIML script starts with declaring the information needed to create the connection strings to the different database and the server(s) where they recide on. For this example all the databases are SQL Server 2016 databases. It would also be possible to store that information in a meta table but for this post the information is placed inside the BIML script. The BIML script will create one package with the name 'SSIS STG Load STG Tables SQL' and for each table in the 'TableList' table a sequence container will be created with two SSIS components. The first component is a SQL Task component that will use a T-SQL command to truncate the target table. The second component is a Data Flow Task containing a Source and Destination component which will load the data from the target to the source table. Alle the sequence components are executed parallel to each other.

--The BIML code that can be placed inside a BIML file.

    
    <# 
        string pRepServerName    = "localhost"; 
        string pRepDatabaseName  = "Repository";
        string pRepProvider      = "SQLNCLI11.1;Integrated Security=SSPI";
        string pRepSchema        = "rep";
      
        string pSourceServerName = "localhost";
        string pSourceDBName     = "AdventureWorks2014";
        string pSourceProvider   = "SQLNCLI11.1;Integrated Security=SSPI";
        string pSourceSchema     = "Sales";
        
        string pTargetServerName = "localhost";
        string pTargetDBName     = "Staging";
        string pTargetProvider   = "SQLNCLI11.1;Integrated Security=SSPI";
        string pTargetSchema     = "Sales";
    #>
  
    
    <#
        string pLayer            = "Staging";
     #>
    
    <#
    string csRepository = String.Format("Data Source={0};Initial Catalog={1};Provider={2};Auto Translate=False;"
          ,pRepServerName, pRepDatabaseName, pRepProvider);
   
    string csSource = String.Format("Data Source={0};Initial Catalog={1};Provider={2};Auto Translate=False;"
          ,pSourceServerName, pSourceDBName, pSourceProvider);
    
    string csTarget = String.Format("Data Source={0};Initial Catalog={1};Provider={2};Auto Translate=False;"
          ,pTargetServerName, pTargetDBName, pTargetProvider);      
    #>


                <#
                  StringBuilder sMETAGetTableName = new System.Text.StringBuilder();
                  
                  sMETAGetTableName.Append("SELECT ");
                  sMETAGetTableName.Append("    TableName ");
                  sMETAGetTableName.Append("  , SchemaName ");
                  sMETAGetTableName.Append("  , WhereClause ");
                  sMETAGetTableName.Append("FROM ");
                  sMETAGetTableName.Append(pRepSchema);
                  sMETAGetTableName.Append(".TableList AS TAB ");
                  sMETAGetTableName.Append("INNER JOIN ");
                  sMETAGetTableName.Append(pRepSchema);
                  sMETAGetTableName.Append(".Layer AS LYR ");
                  sMETAGetTableName.Append("  ON ( TAB.LayerId = LYR.LayerId) ");
                  sMETAGetTableName.Append("WHERE 1 = 1 ");
                  sMETAGetTableName.Append(" AND TAB.ActiveInd = 1 ");
                  sMETAGetTableName.Append(" AND LYR.LayerName = '");
                  sMETAGetTableName.Append(pLayer);
                  sMETAGetTableName.Append("' ");
                  sMETAGetTableName.Append("ORDER BY ");
                  sMETAGetTableName.Append("   TAB.LoadOrderNr");
                  
                  DataTable tblMETATableNames = ExternalDataAccess.GetDataTable(csRepository, sMETAGetTableName.ToString());
                  foreach (DataRow METATableNameRow in tblMETATableNames.Rows) {
                #>
                 <#=METATableNameRow["TableName"] #>" ConstraintMode="Linear">
                    
                        "
                                    ResultSet="None"
                                    ConnectionName="OLEDB Target">
                            TRUNCATE TABLE <#=pTargetSchema #>.<#=METATableNameRow["TableName"] #> 
                            
                        
                        ">
                            
                                "
                                             ConnectionName="OLEDB Source"
                                             ValidateExternalMetadata="false">
                                    SELECT
        CAST(1 AS INTEGER) AS DUMMY_COLUMN
<#                                          StringBuilder sGETSelectColumn = new System.Text.StringBuilder();
                                            sGETSelectColumn.Append("SELECT " );
                                            sGETSelectColumn.Append("     col.name AS column_name " );
                                            sGETSelectColumn.Append("FROM sys.columns AS col " );
                                            sGETSelectColumn.Append("INNER JOIN sys.objects AS obj " );
                                            sGETSelectColumn.Append("    ON(col.object_id = obj.object_id) " );
                                            sGETSelectColumn.Append("INNER JOIN sys.types AS typ " );
                                            sGETSelectColumn.Append("    ON(col.user_type_id = typ.user_type_id)" );
                                            sGETSelectColumn.Append("WHERE   1 = 1 " );
                                            sGETSelectColumn.Append("   AND obj.name = '"+ METATableNameRow[0].ToString() +"'");
                                            DataTable tblSelectColumn = ExternalDataAccess.GetDataTable(csSource, sGETSelectColumn.ToString());
                                            foreach (DataRow SelectColumn in tblSelectColumn.Rows) {
#>
        , [<#=SelectColumn["COLUMN_NAME"] #>]
<# } #>FROM <#=METATableNameRow["SchemaName"] #>.<#=METATableNameRow["TableName"] #>
WHERE <#=METATableNameRow["WhereClause"] #>


                                " 
                                                  ConnectionName="OLEDB Target">
                                    " />


                <# } #>


<#@ template language="C#" hostspecific="true"#>
<#@ import namespace="System.Data"#>
<#@ import namespace="System.Data.SqlClient"#>
<#@ import namespace="System.Text"#>

6) - Generate the package using BIML Express

Once the BIML file has been created it is time to generate the SSIS package by using BIML Express in Visual Studio 2015.
The package can be simply generated by right clicking the BIML package and selecting 'Generate SSIS Packages'.
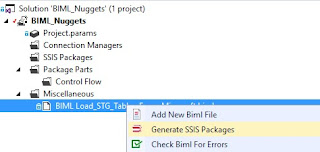
Using BIML Expres to generate the package

The package has been generated by BIML

Using BIML Expres to generate the package

Summary

In this post we create the following components;
  • Repository database and one schema
  • Staging database and one schema
  • Two meta tables to be used by the BIML script from this post (and possible future posts)
  • Three Staging tables
  • A BIML file called 'BIML Load_STG_Tables_From_Microsoft.biml'
  • A generated SSIS Package named 'SSIS STG Load STG Tables SQL.dtsx'

Tuesday, 21 February 2017

Use BIML and csv files to create tables

Case
The case is about importing flat files (CSV’s) without the necessity of metadata. Because BIML always checks if the tables are accessible before creating the packages, the first step is to create the tables with BIML and the second step is to create the SSIS packages for transporting the data.

  1. Creating tables in the database 
  2. Packages to fill this database

Because of the size of the solution I’ve created two separate solutions, one for creating the tables and a second for creating the SSSI packages. You can click on the link to go to the other solution (which I will deploy later this month).


Solution - Creating tables with BIML
In this solution, we create a BIML that is going to create the tables and all the columns are defined as strings.
We have to create two BIML scripts, the first script for defining the table definition and the second for creating the actual package.

1) CSV files
For this example we are using two CSV files (age and sickleave) which are comma separated and have columnnames on the first row. These columnnames will be used in the create table statement

the drop map


content csv file


2) Tabledefinitions
The first biml is called “1_TableDefinitions.biml”
In this biml we define the path were the CSV files are located, an array with the names of the csv files and also some string which we going to use further in the code.
We use two “foreach loops”, the first one loops trough the array with files and the second one loops trough the actual file (to extract the column names).

Normally (without the loop) the code should look like this:

< tables>
 <columns>
   <column datatype="Int32" identityincrement="1" identityseed="1" name="AgeID">
   <column datatype="Int32" name="AgeFrom">
   <column name="AgeTo">
   <column datatype="String" length="255" name="AgeCategoryEmployee">
  </columns>
 </columns>
</tables>

Default BIML uses INT as an default datatype, in this case we use a string.
Now we add the loop in place and the complete code looks like this
<Biml xmlns="http://schemas.varigence.com/biml.xsd">

<#  
    string Prefix="Man";
    
    // the locatie of the csv's'
    string path = @"D:\Drop\Man";
    // Put all the filenames with the extension csv in a string array
    string[] myFiles = Directory.GetFiles(path, "*.csv");
    // string that will be filled with the filename
    string filename;
    // string array for columnnames extracted from CSV
    string[] myColumns;
#>
        <Connections>
            <OleDbConnection 
            Name="OLEDB_STG_<#=Prefix#>" 
            ConnectionString="Data Source=APPL43;Initial Catalog=dummy_STG;Provider=SQLNCLI11.1;Integrated Security=SSPI;Auto Translate=False;">
            </OleDbConnection>
        </Connections>
        <Databases>
             <Database ConnectionName="OLEDB_STG_<#=Prefix#>" Name="dummy_STG"/>
        </Databases>
       <Schemas>
              <Schema Name="dbo" DatabaseName="dummy_STG" Owner="dbo"/>
       </Schemas>
       <Tables>
            <!-- loop trough the array of files-->
            <#  foreach(string filePath in myFiles) 
                {
               // extract the filename from the path to use as tablename     
               fileName = Path.GetFileNameWithoutExtension(filePath);
            
            #>
            <Table Name="<#=Prefix#>_<#=fileName#>" SchemaName="dummy_STG.dbo">
                <Columns>
                   <!-- loop trough the file looking for the columnnames-->
                    <#
                    // read first row of csv to extract to columnnames
                    // and split on comma to create an array
                    StreamReader myFile = new StreamReader(filePath);

                    myColumns = myFile.ReadLine().Split(',');
                    // close file after reading first line
                    myFile.Close();

                    // Loop through column array
                    foreach(string myColumn in myColumns) 
                    {  
                    #>
                      <Column Name="<#=myColumn#>" DataType="String" Length="255"></Column>
                 <#  }   #>
                </Columns>    
            </Table>
            <# }#>
       </Tables>
</Biml>
 
<#@ template language="C#" hostspecific="true"#>
<#@ import namespace="System.IO"#>


3) CreateTable
Secondly we are going to create the biml, called 2_CreateTables.biml. which creates the actual package that contains the create statements to generate the tables.
BIML has an method to create SQL tables “RootNode.Tables.First().GetTableSql();”
We use this method to create ‘SQL create statement’ the of table

The code looks like this

<Biml xmlns="http://schemas.varigence.com/biml.xsd">
    <Packages>
        <Package Name="CreateTables" AutoCreateConfigurationsType="None" ConstraintMode="Linear">
            <Tasks>
                <# 
                // Loop trough the table definition os the first biml
                foreach(var table in RootNode.Tables) {#>
                <ExecuteSQL Name="SQL - Drop_Create <#=table.Name#>" ConnectionName="<#=table.Connection.Name#>">
                    <DirectInput>
                        <#=table.GetTableSql()#>    
                    </DirectInput>
                </ExecuteSQL>
                <# } #>
            </Tasks>
        </Package>
    </Packages>
</Biml>

<!--Includes/Imports for C#-->
<#@ template language="C#" hostspecific="true"#>
<#@ import namespace="System.Data"#>
<#@ import namespace="System.Data.SqlClient"#>


We’ve created 2 bimls, 1_TableDefinitions.biml and 2_CreateTables.biml. Now comes the important part (I’m using Biml Express) for generating the package. First we click on 1_TableDefinitions and secondly on and 2_CreateTables, if you have selected the 2 biml scripts  you click with your right mouse on 1_TableDefinitions.biml and generate SSIS packages. If you do this otherwise, you will get an empty SSIS package. .

Generate SSIS package


Below you can see the result of your BIML scripts: a package with an execute SQL Task for each table you need to create.
Visual studio


The actual create statement looks like this

SET ANSI_NULLS ON
SET QUOTED_IDENTIFIER ON
GO
-------------------------------------------------------------------
IF EXISTS (SELECT * from sys.objects WHERE object_id = OBJECT_ID(N'[dbo].[Man_Age]') AND type IN (N'U'))
DROP TABLE [dbo].[Man_Age]
GO

CREATE TABLE [dbo].[Man_Age]
(
-- Columns Definition
 [AgeID] nvarchar(255) NOT NULL 
, [AgeFrom] nvarchar(255) NOT NULL 
, [AgeTo] nvarchar(255) NOT NULL 
, [AgeCategoryEmployee] nvarchar(255) NOT NULL 
, [AgeCategoryClient] nvarchar(255) NOT NULL 

-- Constraints

)
ON "default"
WITH (DATA_COMPRESSION = NONE)
GO
-------------------------------------------------------------------


Summary
We created two biml scripts one for creating to table definition and one which creates the actuale packages.The result in Management Studio looks like this.

Management studio result


In the next blog I’m going to explain how to create SSIS packages that transport the data from the csv files