Showing posts with label AAS. Show all posts

Saturday, 13 February 2021

Scaling Azure Analysis Services with ADF only

Case
I want to upscale and downscale my Azure Analysis Services (AAS) from within Azure Data Factory, but I don't want write any code or use other Azure services like Azure Automation or Azure Logic Apps to do this. Is there an Azure Data Factory-only solution where we only use the standard pipeline activities from ADF?
Save some money on your Azure Bill by pausing AAS


Solution
Yes you can use the Web Activity to call the Rest API of Azure Analysis Services (AAS), but that requires you to give ADF permissions in AAS via its Managed Service Identity (MSI). If you already used our Process Model example, then this is slightly different (and easier).


1) Add ADF as contributer to AAS
Different than for processing one of the AAS models we don't need SSMS to add ADF as an Server Administrator. Instead we will use Access control (IAM) on the Azure portal to make our ADF a contributor for the AAS that we want to pause or resume.
  • Go to your AAS the Azure portal
  • In the left menu click on Access control (IAM)
  • Click on + Add and choose Add role assignment
  • In the new Add role assignment pane select Contributor as Role
  • In the Assign access to dropdown select Data Factory
  • Select the right Subscription
  • Now Select your Data Factory and click on the Save button
Add ADF as Contributor to AAS


2) Add Web Activity
In your ADF pipeline you need to add a Web Activity to call the Rest API of Analysis Services. First step is to determine the Rest API URL. Replace in the string below, the <xxx> values with the subscription id, resource group and servername of your Analysis Services. The Rest API method we will be using is 'update':
https://management.azure.com/subscriptions/<xxx>/resourceGroups/<xxx>/providers/Microsoft.AnalysisServices/servers/<xxx>/?api-version=2017-08-01

Example:
https://management.azure.com/subscriptions/a74a173e-4d8a-48d9-9ab7-a0b85abb98fb/resourceGroups/bitools/providers/Microsoft.AnalysisServices/servers/bitools2/?api-version=2017-08-01

Second step is to create a JSON message for the Rest API. The tier in this message is either: Developer, Basic or Standard. Within those tiers you have the (instance) name like B1, B2, S1, S2 until S9. Note that you can upscale from Developer to Basic to Standard, but you cannot downscale from Standard to Basic to Developer. Since Developer has only one instance you will probably never use that within this JSON message.
{
   "sku":{
      "capacity":1,
      "name":"S1",
      "tier":"Standard"
   }
}
or
{
   "sku":{
      "capacity":1,
      "name":"B2",
      "tier":"Basic"
   }
}
  • Add the Web activity to your pipeline
  • Give it a descriptive name like Upscale AAS (or Downscale AAS)
  • Go to the Settings tab
  • Use the Rest API URL from above in the URL property
  • Choose PATCH as Method
  • Add the JSON message from above in the Body property
  • Under advanced choose MSI as Authentication method
  • Add 'https://management.azure.com/ in the Resource property (different than process example)
Web Activity calling the AAS Rest API

Then Debug the Pipeline to check the scaling action


3) Retrieve info
By changing the method type from PATCH to GET (body property will disappear), you can retrieve information about the AAS like pricing tier (or status). You could for example use that to first check the current pricing tier before changing it.
Retrieve service info via GET


Summary
In this post you learned how change the pricing tier from your Analysis Services to save some money on your Azure bill. The big advantage of this method is that you don't need other Azure services which makes maintenance a little easier. In a previous post we already showed you how to pause or resume your AAS with the Rest API.

Saturday, 14 November 2020

Process Analysis Service with Firewall in ADF only

Case
How do I process my Azure Analysis Services (AAS) within Azure Data Factory (ADF) when the firewall of AAS is turned on? I 'm getting the following error:

Cannot connect to server 'bitools'. Client with IP Address '40.74.24.250' is not allowed to access the server. To enable access, use the Firewall settings in Azure Management Portal. It may take up to 5 minutes for this change to take effect. More information on configuring firewall and setting IP address ranges can be found here: https://go.microsoft.com/fwlink/?linkid=2099963
Azure Anaylis Services with firewall turned on


Solution
Within ADF you have two options. The first option is to add the IP addresses of ALL data factories within your region to the firewall of AAS. You can download a list and add those IP addresses to the firewall. You could even schedule a powershell script to do that for you to keep your firewall up-to-date in case the list changes. A downside could be that now a lot of data factories can access your AAS.

The second option is to retrieve the public IP address of your current ADF during runtime and then add it temporarily to the firewall of AAS. Note that this is a first attempt which still needs some improvement and testing to make it future proof. First a picture of the solution and then detailed steps of each activity.
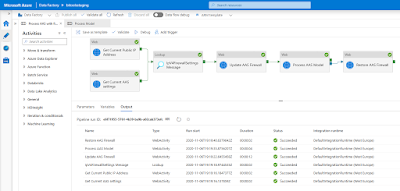
The solution


1) Add ADF as contributer to AAS
Since we will chance the service settings of AAS from within ADF, we will need to use Access control (IAM) to make our ADF a contributor for the AAS where we want to change the firewall. Note that this step will not give ADF access to the models, but only to the service.
  • Go to your AAS in the Azure portal
  • In the left menu click on Access control (IAM)
  • Click on + Add and choose Add role assignment
  • In the new Add role assignment pane select Contributor as Role
  • In the Assign access to dropdown select Data Factory
  • Select the right Subscription
  • And then Select your Data Factory and click on the Save button
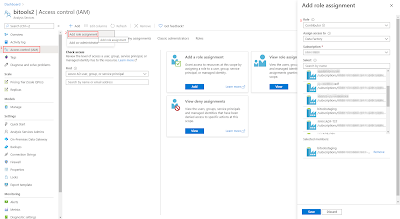
Add ADF as Contributor to AAS


2) Get Current Public IP Address of ADF
Now back to ADF. You can execute a webrequest to one of the many public services to retrieve the public IP address of the ADF server that runs your pipeline:
  • https://icanhazip.com
  • https://ident.me
  • https://ifconfig.me/ip
  • https://ipinfo.io/ip
  • http://smart-ip.net/myip
Now the steps to take:
  • Create a new pipeline in ADF and add a Web activity
  • Give the activity a descriptive name because we need it in a subsequent activity
  • Add one of the above web addresses as URL on the Settings tab
  • The last step is to select GET as method
In a subsequent activity that is connected to this Web activity we use the follow expression to retrieve the IP Address: @activity('Get Current Public IP Address').output.Response
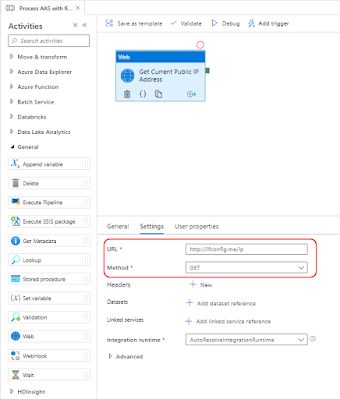
Get Public IP address of ADF


3) Get Current AAS settings
The Rest API that sets the firewall settings of AAS can unfortunately not add a single firewall rule. Instead it will delete all rules and then add news ones. To avoid other services or persons losing access to the AAS server we first need to retrieve the current settings. This is done via a Rest API. Therefore the first step is to determine the Rest API URL. Replace in the string below, the <xxx> values with the subscription id, resourcegroup name and servername of your Analysis Services. The Rest API method we will be using is 'Get Details':
https://management.azure.com/subscriptions/<xxx>/resourceGroups/<xxx>/providers/Microsoft.AnalysisServices/servers/<xxx>?api-version=2017-08-01
Example:
https://management.azure.com/subscriptions/aaaa-bbbb-123456-cccc/resourceGroups/RG_production/providers/Microsoft.AnalysisServices/servers/bitoolsserver?api-version=2017-08-01

Add a second Web activity to the pipeline
  • Give the activity a descriptive name because we need it in a subsequent activity
  • Add the above web address as URL on the Settings tab
  • Next select GET as method
  • Under Advanced set Authentication to MSI
  • Set Resource to https://management.azure.com/
The Rest API will return a JSON message with ALL the settings of the service, including the firewall rules. In a next step we can retrieve these settings with the following expression:
@STRING(activity('Get Current AAS settings').output)
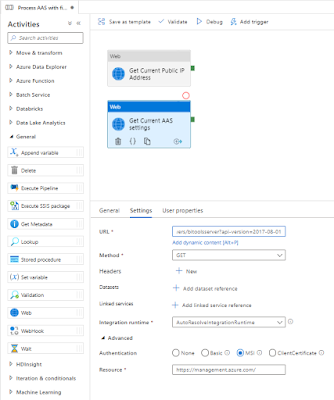
Retrieve AAS Service settings


4) Merge current firewall settings with new ip address
In this step we will merge the current firewall settings (from step 3) with the runtime ip address of ADF (from step 2). Unfortunately the expression language of ADF is not that extensive (yet). For example the indexof expression does not have a search starting position. Therefore for now we have chosen to merge those two with a little Stored Procedure. But please share your suggestion for alternatives in the comments.

First add the following Stored Procedure to one of your Azure SQL databases. It will return both the current firewall setting part of the entire JSON and the new adjusted firewall part. That first one can be used to restore the settings as final step.
T-SQL Stored Procedure
CREATE PROCEDURE [dbo].[UpdateIpV4FirewallSettings]
(
	@jsonmessage nvarchar(max)
,	@firewallRuleName nvarchar(50)
,	@ipAddress nvarchar(20) 
)
AS
BEGIN
	-- =============================================
	-- Recieves the current AAS settings as a JSON
	-- message and extracts the firewall settings
	-- from it. Then the firerullname and the ip
	-- address are added.
	--
	-- The select query returns the new and old
	-- firewall settings to update and restore
	-- afterwards.
	-- =============================================

	SELECT	CAST(
				SUBSTRING(@jsonmessage, 1, 15) + -- properties
				SUBSTRING(@jsonmessage, CHARINDEX('"ipV4FirewallSettings":',@jsonmessage , 1), CHARINDEX(']',@jsonmessage , CHARINDEX('"ipV4FirewallSettings":',@jsonmessage , 1)) - CHARINDEX('"ipV4FirewallSettings":',@jsonmessage , 1)) + -- oldfirewallrules
				iif(CHARINDEX('"firewallRuleName":"' + @firewallRuleName, @jsonmessage , 1) > 0 OR CHARINDEX(@ipAddress, @jsonmessage , 1) > 0,'',',{"firewallRuleName":"' + @firewallRuleName +'","rangeStart":"' + @ipAddress + '","rangeEnd":"' + @ipAddress + '"}') + -- newfirewallrules
				SUBSTRING(@jsonmessage,CHARINDEX('],"enablePowerBIService":',@jsonmessage , 1), CHARINDEX('}',@jsonmessage , CHARINDEX('],"enablePowerBIService":',@jsonmessage , 1)) - CHARINDEX('],"enablePowerBIService":',@jsonmessage , 1) + 1) + -- powerbirules
				'}}' -- end
			as nvarchar(4000))
			as NewFirewallSettings
	,		CAST(
				SUBSTRING(@jsonmessage, 1, 15) + -- properties
				SUBSTRING(@jsonmessage, CHARINDEX('"ipV4FirewallSettings":',@jsonmessage , 1), CHARINDEX(']',@jsonmessage , CHARINDEX('"ipV4FirewallSettings":',@jsonmessage , 1)) - CHARINDEX('"ipV4FirewallSettings":',@jsonmessage , 1)) + -- oldfirewallrules
				SUBSTRING(@jsonmessage,CHARINDEX('],"enablePowerBIService":',@jsonmessage , 1), CHARINDEX('}',@jsonmessage , CHARINDEX('],"enablePowerBIService":',@jsonmessage , 1)) - CHARINDEX('],"enablePowerBIService":',@jsonmessage , 1) + 1) + -- powerbirules
				'}}' -- end
			as nvarchar(4000))
			as oldFirewallSettings
END

Now back to the pipeline to merge the json message and the ip address. We will solve this by calling the above Stored Procedure within a Lookup activity.
  • Add the Look up activity and give it a descriptive name (we need it in the next step)
  • Connect both previous activities to this new activity (in parallel, see screenshot)
  • Go to the settings tab and select the (/ create a) Source dataset that connects to the Azure SQL Database that contains the above Stored Procedure
  • Select Stored Procedure under Use query
  • Select the new Stored Procedure under Name
  • Hit the Import parameter button to add three string parameters
  • Enter the following expressions
    • firewallRuleName - @concat('ADF-',pipeline().DataFactory)
    • ipAddress - @activity('Get Current Public IP Address').output.Response
    • jsonmessage - @STRING(activity('Get Current AAS settings').output)
The output of this activity will be use in the next activity:
@activity('IpV4FirewallSettings Message').output.firstRow.NewFirewallSettings
@activity('IpV4FirewallSettings Message').output.firstRow.OldFirewallSettings
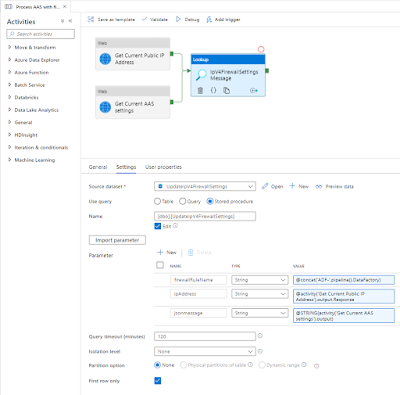
Lookup Activity calling Stored Procedure


5) Update AAS Firewall
In this step we will update the firewall settings of AAS to allow ADF to process the tabular model. This is done via a Rest API call of the Update method within a Web activity. This is exactly the same URL as step 3. Copy it

Add an other Web activity to the pipeline and connect it to the last activity (see screenshot).
  • Give the activity a descriptive name
  • Add the web address from step 3 as URL on the Settings tab
  • Next select PATCH as method (instead of GET like in step 3)
  • Click on + New after Headers to add a new header
    • Use Content-type as Name
    • Use application/json as Value
  • As body we will use the NewFirewallSettings from the previous step:
    @activity('IpV4FirewallSettings Message').output.firstRow.NewFirewallSettings
  • Under Advanced set Authentication to MSI
  • Set Resource to https://management.azure.com/
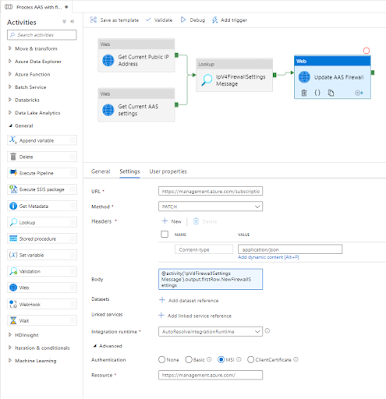
Update AAS Firewall


6) Process AAS model
Finally we can do the actual processing of the tabular model. Since we all ready described this in detail in a previous post you have to take a little trip to that post. Make sure to connect the new Web activity to the last activity in the pipeline (see screenshot).
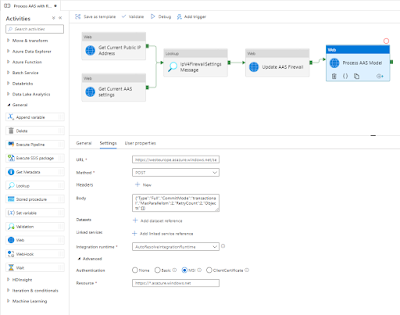
Process AAS tabular model


7) Update AAS Firewall
The last step is to restore the firewall settings so this ADF server will no longer have access to your AAS. The steps are almost identical to step 5 with two differences. Copy and paste that Web activity and connect it to the process activity, but then change the green Success line to a blue completion line. Then it will always restore the firewall settings even if the process fails.
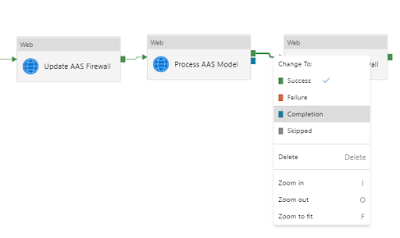
Change the dependency condition between the activities


Next change  is the Body property on the Settings pane. Change it to retrieve the OLD firewall settings:
@activity('IpV4FirewallSettings Message').output.firstRow.OldFirewallSettings
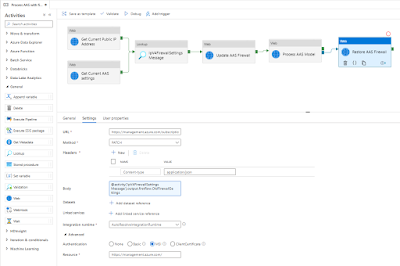
Restore AAS firewall


Summary
In this post you saw a (experimental) solution to handle the firewall problem: adding the IP address of a shared service/server to your AAS firewall. This is especially necessary when your service doesn't support VNET (like AAS).

There is still a lot of room for improvements. In particular the merge part in step 4. An other concern is that the activities of one pipeline could be executed by multiple ADF servers (each having there own ip address). 

Feel free to experiment with this solution and leave your suggestions for improvements in the comments below. However don't use it in a production environment... or do it at your own risk.

I a feature post we will download the JSON file with Azure IP Address and at those to the firewall.


Sunday, 14 June 2020

Pause and Resume Analysis Services with ADF only

Case
I want to start and stop my Azure Analysis Services from within Azure Data Factory, but I don't want write code or use other Azure services like Azure Automation or Azure Logic Apps to do this. Is there an Azure Data Factory-only solution where we only use the standard pipeline activities from ADF?
Save some money on your Azure Bill by pausing AAS


Solution
Yes you can use the Web Activity to call the Rest API of Azure Analysis Services (AAS), but that requires you to give ADF permissions in AAS via its Managed Service Identity (MSI). If you already used our Process Model example, then this is slightly different (and easier).


1) Add ADF as contributer to AAS
Different than for processing one of the AAS models we don't need SSMS to add ADF as an Server Administrator. Instead we will use Access control (IAM) on the Azure portal to make our ADF a contributor for the AAS that we want to pause or resume.
  • Go to your AAS the Azure portal
  • In the left menu click on Access control (IAM)
  • Click on + Add and choose Add role assignment
  • In the new Add role assignment pane select Contributor as Role
  • In the Assign access to dropdown select Data Factory
  • Select the right Subscription
  • Now Select your Data Factory and click on the Save button
Add ADF as Contributor to AAS


2) Add Web Activity
In your ADF pipeline you need to add a Web Activity to call the Rest API of Analysis Services. First step is to determine the Rest API URL. Replace in the string below, the <xxx> values with the subscription id, resource group and servername of your Analysis Services. The Rest API method we will be using is 'Suspend' but you can replace that word by 'Resume' to startup the AAS:
https://management.azure.com/subscriptions/<xxx>/resourceGroups/<xxx>/providers/Microsoft.AnalysisServices/servers/<xxx>/Suspend?api-version=2017-08-01

Example:
https://management.azure.com/subscriptions/a74a173e-4d8a-48d9-9ab7-a0b85abb98fb/resourceGroups/bitools/providers/Microsoft.AnalysisServices/servers/bitools2/Suspend?api-version=2017-08-01

Second step is to create a JSON message for the Rest API. Well the Rest API doesn't use it, but it is required in the Web activity when you use POST as method. So you just need to create a dummy json message:
{
    "Dummy": "Dummy"
}
  • Add the Web activity to your pipeline
  • Give it a descriptive name like Pause AAS (or Resume AAS)
  • Go to the Settings tab
  • Use the Rest API URL from above in the URL property
  • Choose POST as Method
  • Add the dummy JSON message from above in the Body property
  • Under advanced choose MSI as Authentication method
  • Add 'https://management.azure.com/ in the Resource property (different than process example)
Web Activity calling the AAS Rest API


Then Debug the Pipeline to check the suspend/resume action


3) Retrieve info
By changing the method type from POST to GET (body property will disappear) and removing the method (suspend or pause) from the URL, you can retrieve information about the AAS. Like status and pricing tier. You could for example use that to first check the status before changing it.
Retrieve service info via GET


Summary
In this post you learned how pause and resume your Analysis Services to save some money on your Azure bill. The big advantage of this method is that you don't need other Azure services which makes maintenance a little easier. In a next post we will also show you how to change the pricing tier via the Rest API.

Saturday, 13 June 2020

Process Analysis Service with Data Factory only

Case
There are several methods to process Azure Analysis Services models like with Logic Apps, Azure Automation Runbooks and even SSIS, but is there an Azure Data Factory-only solution where we only use the pipeline activities from ADF?
Process Azure Analysis Services


Solution
Yes you can use the Web Activity to call the Rest API of Azure Analysis Services (AAS), but that requires you to give ADF permissions in AAS via its Managed Service Identity (MSI).

1) Create ADF service principal
In the next step we need a user which we can add as a Server Administrator of AAS. Since we will not find the managed identity of ADF when we search for a user account, we will have to create one. This 'user' is called a service principal.
  • Go to ADF in the Azure portal (not the Author & Monitor environment)
  • In the left menu click on Properties which you can find under General
  • Copy the 'Managed Identity Application ID' and the 'Managed Identity Tenant' properties to a notepad and construct the following string for the next step:
    app:<Application ID>@<Tentant> (and replace the <xxx> values with the properties)
    app:653ca9f9-855c-45df-bfff-3e7718159295@d903b4cb-ac8c-4e31-964c-e630a3a0c05e

Create app user from ADF for AAS


2) Add user as Server Administrator
Now we need to connect to your Azure Analysis Services via SQL Server Management Studio (SSMS) to add the user from the previous step as a Server Administrator. This cannot be done via the Azure portal.
  • Login to your AAS with SSMS
  • Right click your server and choose Properties
  • Go to the Security pane
  • Click on the Add... button
  • Add the service principal from the previous step via the Manual Entry textbox and click on the Add button
  • Click on Ok the close the property window

Add Server Administrator via Manual Entry


After this step the 'user' will appear on the portal as well, but you can not add it via the portal.
Analysis Services Admins


3) Add Web Activity
In your ADF pipeline you need to add a Web Activity to call the Rest API of Analysis Services. First step is to determine the Rest API URL. Replace in the string below, the <xxx> values with the region, servername and modelname of your Analysis Services. The Rest API method we will be using is 'refreshes':
https://<region>.asazure.windows.net/servers/<servername>/models/<modelname>/refreshes

Example:
https://westeurope.asazure.windows.net/servers/bitoolsserver/models/bitools/refreshes

Second step is to create a JSON message for the Rest API to give the process order to AAS. To full process the entire model you can use this message:
{
    "Type": "Full",
    "CommitMode": "transactional",
    "MaxParallelism": 2,
    "RetryCount": 2,
    "Objects": []
}
Or you can process particular tables within the model with a message like this:
{
    "Type": "Full",
    "CommitMode": "transactional",
    "MaxParallelism": 2,
    "RetryCount": 2,
    "Objects": [
        {
            "table": "DimProduct",
            "partition": "CurrentYear"
        },
        {
            "table": "DimDepartment"
        }
    ]
}
See the documentation for all the parameters that you can use.
  • Add the Web activity to your pipeline
  • Give it a descriptive name like Process Model
  • Go to the Settings tab
  • Use the Rest API URL from above in the URL property
  • Choose POST as Method
  • Add the JSON message from above in the Body property
  • Under advanced choose MSI as Authentication method
  • Add 'https://*.asazure.windows.net' in the Resource property (note this URL is different for suspending and resuming AAS)
Web Activity calling the AAS Rest API


Then Debug the Pipeline to check the process result


4) Retrieve refreshes
By only changing the method type from POST to GET (body property will disappear) you can retrieve information about the processing status and use that information in the next pipeline activities.
Retrieve process status via GET


Summary
In this post you learned how process your Analysis Services models with only Azure Data Factory. No other services are needed which makes maintenance a little easier. In a next post we will also show you how to Pause or Resume your Analysis Services with Rest API. With a few extra steps you can also use this method to refresh a Power BI dataset, but we will show that in a future post.

Update: firewall turned on?


Tuesday, 31 December 2019

Schedule start & stop of Azure Analysis Services (Az)

Case
To save some money on my Azure Bill, I want to pause my Azure Analysis Services (AAS) at night when nobody is using it and then resume it in the morning. How do you arrange that in Azure?
Save some money on your Azure Bill by pausing AAS


Solution
A few years ago we showed you how to do this with some PowerShell code in an Azure Automation Runbook with the AzureRM modules. However these old modules will be be out of support by the end of 2020. So now it is time to change those scripts.

1) Create Automation Account
First we need to create an Automation Account. If you already have one with the Run As Account enabled then you can skip this step.
  • Go to the Azure portal and create a new resource
  • Search for automation
  • Select Automation Account
  • Choose a useful name for the Automation Account
  • Select your Subscription, Resource Group and the Region
  • For this example we will use the Azure Run As account. So make sure to enable it and then click on the Create button.
Create Azure Automation Account


2) Add Module Az.AnalysisServices
Before we start writing some code we need to add a PowerShell module called Az.AnalysisServices. This module contains methods we need in our code to pause and resume Azure Analysis Services. But first we need to add Az.Accounts because Az.AnalysisServices depends on it.

If you forget this step you will get error messages while running your code that state that some of your commands are not recognized:
Get-AzAnalysisServicesServer : The term 'Get-AzAnalysisServicesServer' is not recognized as the name of a cmdlet, function, script 
file, or operable program. Check the spelling of the name, or if a path was included, verify that the path is correct 
and try again.
  • Go to the newly created Azure Automation Account
  • Go to Modules in the left menu
  • Click on the Browse Gallery button
  • Search for Az.Accounts
  • Click on Az.Accounts in the result and import this module
  • Also search for Az.AnalysisServices (but wait until Az.Accounts is actually imported)
  • Click on Az.AnalysisServices in the result and import this module
Adding a new module to your Automation Account


Note: if you are using an existing Automation Account then you probably already added Az.Accounts.

3) Create Runbook
Now we are ready to create a runbook in the Azure Automation Account and start writing some PowerShell code.
  • Go back to the overview page of your newly created Azure Automation Account
  • Click on Runbooks in the left menu
  • Click on the + Create a runbook button to create a new Runbook
  • Enter a descriptive name for the Runbook like StartStopAas
  • Select PowerShell as Runbook type
  • Optionally add a description and click on the Create button
Create a Runbook


4) Edit Runbook code
Next edit the new Runbook if it wasn't already opened by the previous step. Copy the code below and paste it in the editor. Then study the code and its comments to understand the code that can both start and stop your Azure Analysis Services (AAS). It exists of five parts:
  1. Parameters
  2. Log in to Azure
  3. Get current state
  4. Pause or Resume
  5. Logging
Parameters
To pause or resume the script needs three parameters. The first parameter 'AasAction' is a string that indicates whether you want to stop or start the AAS. The second parameter 'ResourceGroupName' indicates the location (resourcegroup) of your AAS and the last parameter 'AnalysisServerName' is the name of your AAS. There are a couple of validations which you could extend to make your script even more monkey proof.
Note: if you want to call this script via Azure Data Factory (ADF), then you need to change the parameter part. You can find all the details to do that in our blog posts about Runbook parameters and ADF and using the Webhook activity in ADF. If this is your first time creating a runbook then first try the standard script and then adjust it to your needs.

Log in to Azure
This is a standard piece of code that you will see in all of our examples. Please read our blog post about the Azure Run as Account for more detailed information.

Get current state
This piece of code tests whether it can find the AAS and gets its current state. It stores the current state and uses it later on for an extra check when pausing or resuming the AAS.

Pause or Resume
This is the actual code for pausing or resuming the AAS. There is an extra check to compare the current state with the new desired state. It now throws an error when you want to pause an AAS that is already paused. You could change that to write an warning instead of an error.
Note: you could also send emails to notify you of any errors

Logging
The last piece of code is for logging purposes. It shows you that it successfully changed the state of the AAS and how long it took to accomplish that.

# PowerShell code

########################################################
# Parameters
########################################################
[CmdletBinding()]
param(
    [Parameter(Mandatory=$True,Position=0)]
    [ValidateSet('Start','Stop')]
    [string]$AasAction,
    
    [Parameter(Mandatory=$True,Position=1)]
    [ValidateLength(1,100)]
    [string]$ResourceGroupName,

    [Parameter(Mandatory=$True,Position=2)]
    [ValidateLength(1,100)]
    [string]$AnalysisServerName
)

# Keep track of time
$StartDate=(GET-DATE)


########################################################
# Log in to Azure with AZ (standard code)
########################################################
Write-Verbose -Message 'Connecting to Azure'
 
# Name of the Azure Run As connection
$ConnectionName = 'AzureRunAsConnection'
try
{
    # Get the connection properties
    $ServicePrincipalConnection = Get-AutomationConnection -Name $ConnectionName       
  
    'Log in to Azure...'
    $null = Connect-AzAccount `
        -ServicePrincipal `
        -TenantId $ServicePrincipalConnection.TenantId `
        -ApplicationId $ServicePrincipalConnection.ApplicationId `
        -CertificateThumbprint $ServicePrincipalConnection.CertificateThumbprint 
}
catch 
{
    if (!$ServicePrincipalConnection)
    {
        # You forgot to turn on 'Create Azure Run As account' 
        $ErrorMessage = "Connection $ConnectionName not found."
        throw $ErrorMessage
    }
    else
    {
        # Something else went wrong
        Write-Error -Message $_.Exception.Message
        throw $_.Exception
    }
}
########################################################


########################################################
# Getting the AAS for testing and logging purposes
########################################################
$myAzureAnalysisServer = Get-AzAnalysisServicesServer -ResourceGroupName $ResourceGroupName -Name $AnalysisServerName
if (!$myAzureAnalysisServer)
{
    Write-Error "$($AnalysisServerName) not found in $($ResourceGroupName)"
    return
}
else
{
    Write-Output "Current status of $($AnalysisServerName): $($myAzureAnalysisServer.State)"
}


########################################################
# Pause or Resume AAS
########################################################
# Check for incompatible actions
if (($AasAction -eq "Start" -And $myAzureAnalysisServer.State -eq "Succeeded") -Or ($AasAction -eq "Stop" -And $myAzureAnalysisServer.State -eq "Paused"))
{
    Write-Error "Cannot $($AasAction) $($AnalysisServerName) while the status is $($myAzureAnalysisServer.State)"
    return
}
# Resume Azure Analysis Services
elseif ($AasAction -eq "Start")
{
    Write-Output "Now starting $($AnalysisServerName)"
    $null = Resume-AzAnalysisServicesServer -ResourceGroupName $ResourceGroupName -Name $AnalysisServerName
}
# Pause Azure Analysis Services
else
{
    Write-Output "Now stopping $($AnalysisServerName)"
    $null = Suspend-AzAnalysisServicesServer -ResourceGroupName $ResourceGroupName -Name $AnalysisServerName
}


########################################################
# Show when finished
########################################################
$Duration = NEW-TIMESPAN –Start $StartDate –End (GET-DATE)
Write-Output "Done in $([int]$Duration.TotalMinutes) minute(s) and $([int]$Duration.Seconds) second(s)"

5) Testing
Testing the functionality of your code can be done in the runbook editor. Click on the Test pane button above your script. After that you need to fill in the parameters and hit the Start button to execute the script.
Testing your script


6) Scheduling Runbook
To schedule your runbook in Azure Automation you first need to publish it via the Runbook editor. After it has been published you can add a schedule to this runbook.
  • Edit the script in the runbook editor
  • Click on publish (the editor will close and you will be redirected to the overview page)
  • In the overview page click on Link to schedule
  • In the Schedule menu you can select an existing schedule or create a new one
  • In the Parameter menu you can provide the value for the parameters
Add schedule to runbook


Note: If you have multiple Azure Analysis Services that you all want to pause/resume on the same time then you have a slight problem because you cannot reuse a schedule for the same runbook multiple times with different parameters (please upvote or add a comment). Workarounds:

  1. create multiple identical schedules (ugly but works)
  2. do everything in one big script (less flexible but works)
Log of runbook executions


Summary
In this blog post you learned how to schedule a stop and start for your Azure Analysis Services to save money in case you don't need it to be live 24*7. Scheduling is done in Azure Automation, but with some minor changes you can also do that via an ADF pipeline.

Friday, 23 February 2018

AAS Snack: process Azure Analysis Services with SSIS

Case
I'm running SSIS and SSAS in Azure. How do I process my tabular model when my ETL has finished? Can I use SSIS to process Azure Analysis Services?
Process Azure Analysis Services


Solution
One option is to process the Azure Analysis Services (AAS) model is with Azure Automation and a PowerShell Runbook. However the good old Analysis Services Processing Task will also work for AAS and lets you process the model right after the ETL has finished. This post explains how to configure it.

1)  Get AAS Server name
First go to your AAS in the Azure portal and copy the server name from the AAS dashboard. It should look like:
asazure://[region].asazure.windows.net/[Name of Analysis Services Server].
You can also find the models available for processing.
Azure Analysis Services


2) Analysis Services Processing Task
Go to your SSIS project in Visual Studio. Open your SSIS package and add the Analysis Services Processing Task to the Control Flow and give it a descriptive name. Then edit it and optionally add a description.
Add Analysis Services Process Task


3) New Connection Manager
Go to the Processing Settings page and click on New to add a new Analysis Services Connection Manager. In the textbox for Server or file name you need to enter/paste the server name from step 1. Then enter the email address and password from the user that can process the model. Select the model you want to process and test your connection. Finally press OK (three times) to return to your task editor.
Add new Connection Manager


4) Object to process
After adding the connection it is time to add one or more objects from your tabular model to process. Press the Add button and select all required objects. For this example the entire model. Then click OK to close the window and change the Process Options, for example to Full Process. Now you are ready to close the Task editor and test it.
Add Object(s) to process


5) Testing
Now it is time to test the package by executing it. If successful, you can finish the package by renaming the connection manager and adding package parameters to supply the URL, e-mail address and password.
Executing


Summary
This post showed you how to process an AAS model with a standard SSIS task. More information about deploying to and executing in ADF can be found here.

Monday, 1 January 2018

Pause everything on your Azure playground - Tags

Case
To prevent unnecessary high bills because I forgot to turn off services, I want to pause everything in my Azure 'playground' subscription. However I want to give my co-workers more control to decide which machines and services they don't want to pause each night. Your current solution works with a centralized exception list that needs to be maintained by someone. Is there an alternative solution?
Pause everything v2


Solution
You should of course make some agreements about being careful with pricey services, but you can support that with a 'simple' technical solution: run a PowerShell script in Azure Automation Runbook that pauses all often used services each night. In this version of the script, exceptions are handled with tags that people can add to their own server or service. Here is how you can add a tag to for example Azure Analysis Services.
Add tags to your service or server


For this example we will pause the following Azure parts:
  • Azure Virtual Machines (not classics)
  • Azure SQL Data Warehouses
  • Azure Analysis Services
This is not a complete list, but once you understand these three, it should be relatively easy to add more services. Still to hard? Add a comment to suggest more services.

1) Automation Account
First we need an Azure Automation Account to run the Runbook with PowerShell code. If you don't have one or want to create a new one, then search for Automation under Monitoring + Management and give it a suitable name like 'maintenance', then select your subscription, resource group and location. For this example I will choose West Europe since I'm from the Netherlands. Keep 'Create Azure Run As account' on Yes. We need it in the code. See step 3 for more details.
Azure Automation Account


2) Credentials
Next step is to create Credentials to run this runbook with. This works very similar to the Credentials in SQL Server Management Studio. Go to the Azure Automation Account and click on Credentials in the menu. Then click on Add New Credentials. You could just use your own Azure credentials, but the best options is to use a service account with a non-expiring password. Otherwise you need to change this regularly.
Create new credentials


3) Connections
This step is for your information only and to understand the code. Under Connections you will find a default connection named 'AzureRunAsConnection' that contains information about the Azure environment, like the tendant id and the subscription id. To prevent hardcoded connection details we will retrieve these fields in the PowerShell code.
Azure Connections


4) Modules
The Azure Analysis Services methods (cmdlets) are in a separate PowerShell module which is not included by default. If you do not add this module you will get errors telling you that the method is not recognized. See below for more details.
The term 'Get-AzureRmAnalysisServicesServer' is not recognized
as the name of a cmdlet, function, script file, or operable program.


Go to the Modules page and check whether you see AzureRM.AnalysisServices in the list. If not then use the 'Browse gallery' button to add it, but first add AzureRM.Profile because the Analysis module will ask for it. Adding the modules could take a few minutes!
Add modules


5) Runbooks
Now it is time to add a new Azure Runbook for the PowerShell code. Click on Runbooks and then add a new runbook (There are also several example runbooks of which AzureAutomationTutorialScript could be useful as an example). Give your new Runbook a suitable name like 'PauseEverything' and choose PowerShell as type.
Add Azure Runbook


6) Edit Script
After clicking Create in the previous step the editor will be opened. When editing an existing Runbook you need to click on the Edit button to edit the code. You can copy and paste the code below to your editor. Study the green comments to understand the code. Notice that this version doesn't use Runbook variables.
Edit the PowerShell code


# PowerShell code
# Connect to a connection to get TenantId and SubscriptionId
$Connection = Get-AutomationConnection -Name "AzureRunAsConnection"
$TenantId = $Connection.TenantId
$SubscriptionId = $Connection.SubscriptionId
  
# Get the service principal credentials connected to the automation account. 
$null = $SPCredential = Get-AutomationPSCredential -Name "Administrator"

# Login to Azure ($null is to prevent output, since Out-Null doesn't work in Azure)
Write-Output "Login to Azure using automation account 'Administrator'."
$null = Login-AzureRmAccount -TenantId $TenantId -SubscriptionId $SubscriptionId -Credential $SPCredential
  
# Select the correct subscription
Write-Output "Selecting subscription '$($SubscriptionId)'."
$null = Select-AzureRmSubscription -SubscriptionID $SubscriptionId


################################
# Pause AnalysisServicesServers
################################
Write-Output "Checking Analysis Services Servers"

# Get list of all AnalysisServicesServers that are turned on (ProvisioningState = Succeeded)
# but skip AnalysisServicesServers that have an Environment tag with the value Production
$AnalysisServicesServers = Get-AzureRmAnalysisServicesServer | 
Where-Object {$_.ProvisioningState -eq "Succeeded" -and $_.Tag['Environment'] -ne "Production"}

# Loop through all AnalysisServicesServers to pause them
foreach ($AnalysisServicesServer in $AnalysisServicesServers)
{
    Write-Output "- Pausing Analysis Services Server $($AnalysisServicesServer.Name)"
    $null = Suspend-AzureRmAnalysisServicesServer -Name $AnalysisServicesServer.Name
}


################################
# Pause Virtual Machines
################################
Write-Output "Checking Virtual Machines"

# Get list of all Azure Virtual Machines that are not deallocated (PowerState <> VM deallocated)
# Filtering on tags is not supported for Azure Virtual Machines
$VirtualMachines = Get-AzureRmVM -Status |
Where-Object {$_.PowerState -ne "VM deallocated"} #-and $_.Tag['Environment'] -ne "Production"}

# Loop through all Virtual Machines to pause them
foreach ($VirtualMachine in $VirtualMachines)
{
    # Get-AzureRmVM does not show tags therefor
    # filtering in Where-Object does not work.
    # Workaround: if statement within loop
    if ($VirtualMachine.Tags['Environment'] -ne "Production")
    {
        Write-Output "- Deallocating Virtual Machine $($VirtualMachine.Name) "
        $null = Stop-AzureRmVM -ResourceGroupName $VirtualMachine.ResourceGroupName -Name $VirtualMachine.Name -Force 
    }
}
# Note: Classic Virtual machines are excluded with this script because they don't support Tags.
 

################################
# Pause SQL Data Warehouses
################################
Write-Output "Checking SQL Data Warehouses"

# Get list of all Azure SQL Servers
$SqlServers = Get-AzureRmSqlServer

# Loop through all SQL Servers to check if they host a DWH
foreach ($SqlServer in $SqlServers)
{
    # Get list of all SQL Data Warehouses (Edition=DataWarehouse) that are turned on (Status = Online)
    # but skip SQL Data Warehouses that have an Environment tag with the value Production
    $SqlDatabases = Get-AzureRmSqlDatabase -ServerName $SqlServer.ServerName -ResourceGroupName $SqlServer.ResourceGroupName |
    Where-Object {$_.Edition -eq 'DataWarehouse' -and $_.Status -eq 'Online' -and $_.Tag['Environment'] -ne "Production"} 

    # Loop through all SQL Data Warehouses to pause them
    foreach ($SqlDatabase in $SqlDatabases)
    {
        Write-Output "- Pausing SQL Data Warehouse $($SqlDatabase.DatabaseName)"
        $null = Suspend-AzureRmSqlDatabase -DatabaseName $SqlDatabase.DatabaseName -ServerName $SqlServer.ServerName -ResourceGroupName $SqlDatabase.ResourceGroupName
    }
}


Write-Output "Done"

Note 1: This is a very basic script. No error handling has been added. Check the AzureAutomationTutorialScript for an example. Finetune it for you own needs.
Note 2: There are often two versions of an method like Get-AzureRmSqlDatabase and Get-AzureSqlDatabase. Always use the one with "Rm" in it (Resource Managed), because that one is for the new Azure portal. Without Rm is for the old/classic Azure portal.
Note 3: Because Azure Automation doesn't support Out-Null I used an other trick with the $null =. However the Write-Outputs are for testing purposes only. Nobody sees them when they are scheduled.
Note 4: The code for Data Warehouses first loops through the SQL Servers and then through all databases on that server filtering on edition 'DataWarehouse'.
Note 5: The method to get Virtual Machines (Get-AzureRmVM) doesn't show tags. Therefor we cannot use the Where-Object filter to filter out certain tags. Workaround: if-statement within foreach loop.

7) Testing
You can use the Test Pane menu option in the editor to test your PowerShell scripts. When clicking on Run it will first Queue the script before Starting it. If nothing needs to be paused the script runs in about a minute, but pausing or deallocating items takes several minutes.
Testing the script in the Test Pane


8) Publish
When your script is ready, it is time to publish it. Above the editor click on the Publish button. Confirm overriding any previously published versions.
Publish the Runbook


9) Schedule
And now that we have a working and published Azure Runbook, we need to schedule it. Click on Schedule to create a new schedule for your runbook. For this pause everything script I created a schedule that runs every day on 2:00AM (02:00). This gives late working colleagues more than enough time to play with all the Azure stuff before there service will be paused.
Add Schedule


Summary
In this post you saw how you can pause all expensive services in an Azure playground environment. If a co-worker don't wants to pause his/her service then he/she can skip that by adding a tag to the specific server or service. As mentioned before: this is not a complete list. Feel free to suggest more services, that can be paused, in the comments.